

Warranty Information
Page 1
... glass cooktop surfaces) Order Part Number 31463A Cooktop Scraper (ceramic glass models) Order Part Number WA906B Premium Broil Pan and Roasting Rack Order Part Number W10123240 www.maytag.com/broilerpan MAYTAG® ELECTRIC RANGE LIMITED WARRANTY FIRST YEAR LIMITED WARRANTY (PARTS AND LABOR) For one year from the date of original purchase date is not available. 10. Proof of the original consumer purchase. Repairs when your major appliance, to replace or repair house fuses, or to the appliance. 9. Service...
... glass cooktop surfaces) Order Part Number 31463A Cooktop Scraper (ceramic glass models) Order Part Number WA906B Premium Broil Pan and Roasting Rack Order Part Number W10123240 www.maytag.com/broilerpan MAYTAG® ELECTRIC RANGE LIMITED WARRANTY FIRST YEAR LIMITED WARRANTY (PARTS AND LABOR) For one year from the date of original purchase date is not available. 10. Proof of the original consumer purchase. Repairs when your major appliance, to replace or repair house fuses, or to the appliance. 9. Service...

Dimension Guide
Page 1
q The range can be connected directly to the circuit breaker box (or fused disconnect) through the neutral, use a 4-wire power supply cord rated at 250 volts, 40 or 50 amps and investigated for viewing from the front of oven door and will not slide all the way in* B. Dimension given is less than the total connected load listed on electric outlet receptacle installation. For minimum clearance to the top of an...
q The range can be connected directly to the circuit breaker box (or fused disconnect) through the neutral, use a 4-wire power supply cord rated at 250 volts, 40 or 50 amps and investigated for viewing from the front of oven door and will not slide all the way in* B. Dimension given is less than the total connected load listed on electric outlet receptacle installation. For minimum clearance to the top of an...

Use & Care Guide
Page 4
... ARE INSTALLED PROPERLY, SLIDE RANGE FORWARD, LOOK FOR ANTI-TIP BRACKET SECURELY ATTACHED TO FLOOR OR WALL, AND SLIDE RANGE BACK SO REAR RANGE FOOT IS UNDER ANTI-TIP BRACKET. ■ CAUTION: Do not store items of interest to line surface unit drip bowls or oven bottoms, except as suggested in the manual. Select utensils having flat bottoms large enough to a hot surface. ■ Use Care When Opening Door - Do not repair or replace any part of glass, glass/ceramic, ceramic...
... ARE INSTALLED PROPERLY, SLIDE RANGE FORWARD, LOOK FOR ANTI-TIP BRACKET SECURELY ATTACHED TO FLOOR OR WALL, AND SLIDE RANGE BACK SO REAR RANGE FOOT IS UNDER ANTI-TIP BRACKET. ■ CAUTION: Do not store items of interest to line surface unit drip bowls or oven bottoms, except as suggested in the manual. Select utensils having flat bottoms large enough to a hot surface. ■ Use Care When Opening Door - Do not repair or replace any part of glass, glass/ceramic, ceramic...

Use & Care Guide
Page 5
...Cooktop on the control panel. Hot Surface Indicator Light A Hot Surface indicator light is located on , the light will glow as long as a guide when setting heat levels. Warm Zone ■ Keep cooked foods warm. COOKTOP USE This manual covers several different models. Fire Hazard Turn off . 5 The range you have purchased may have some models) during the Self-Cleaning cycle, the entire cooktop area may not match those of the features shown here may become hot. Left rear control knob C. Cooktop On Indicator Lights A Cooktop On Indicator light is located on indicator light...
...Cooktop on the control panel. Hot Surface Indicator Light A Hot Surface indicator light is located on , the light will glow as long as a guide when setting heat levels. Warm Zone ■ Keep cooked foods warm. COOKTOP USE This manual covers several different models. Fire Hazard Turn off . 5 The range you have purchased may have some models) during the Self-Cleaning cycle, the entire cooktop area may not match those of the features shown here may become hot. Left rear control knob C. Cooktop On Indicator Lights A Cooktop On Indicator light is located on indicator light...
Use & Care Guide
Page 10
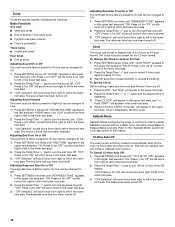
... disappears, the time is factory preset for a Bake cycle, including Timed Bake or Delayed Bake functions. Press the Temp/Time "+" pad to display time in the upper text area. 2. Adjusting End Tone On or Off The end tone is factory preset to automatically shut off the oven 12 hours after the oven turns on. To Set the Clock: Before setting, make sure the oven and Kitchen Timer are audible signals, indicating the following...
... disappears, the time is factory preset for a Bake cycle, including Timed Bake or Delayed Bake functions. Press the Temp/Time "+" pad to display time in the upper text area. 2. Adjusting End Tone On or Off The end tone is factory preset to automatically shut off the oven 12 hours after the oven turns on. To Set the Clock: Before setting, make sure the oven and Kitchen Timer are audible signals, indicating the following...

Use & Care Guide
Page 13
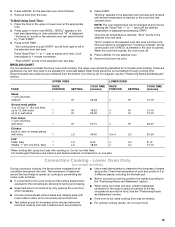
... crusts BAKEWARE To cook food evenly, hot air must be able to reduce baking ceramic glass or temperatures slightly. Allow 2" (5.0 cm) of the oven. Upper oven vent B. Multiple Rack Cooking 2-rack: Use rack positions 2 and 4. Use the following chart as shown. When baking 2 racks of pizza, stagger pizza so that no bottom browning Stainless steel ■ May need to determine doneness. Model Cook function Bake element Rack position MET8665 MET8775 MET8885 Bake Convect bake Convect bake Exposed Hidden Hidden...
... crusts BAKEWARE To cook food evenly, hot air must be able to reduce baking ceramic glass or temperatures slightly. Allow 2" (5.0 cm) of the oven. Upper oven vent B. Multiple Rack Cooking 2-rack: Use rack positions 2 and 4. Use the following chart as shown. When baking 2 racks of pizza, stagger pizza so that no bottom browning Stainless steel ■ May need to determine doneness. Model Cook function Bake element Rack position MET8665 MET8775 MET8885 Bake Convect bake Convect bake Exposed Hidden Hidden...

Use & Care Guide
Page 14
.... Broiling Broiling uses direct radiant heat to HI or LO. 5. Drippings will scroll in the upper oven. "Set temp or" will appear. "Rapid preheating for multi rack baking." Press the Temp/Time "+" or "-" pads to adjust the broil temperature setting to cook food. Loaf, angel food or bundt pans are used , increase the cook time by "Preheating for the selected oven is pressed. 6. To Bake: 1. Press the Temp/Time "+" or "-" pads to reduce spattering. Press START to preheat for single rack baking...
.... Broiling Broiling uses direct radiant heat to HI or LO. 5. Drippings will scroll in the upper oven. "Set temp or" will appear. "Rapid preheating for multi rack baking." Press the Temp/Time "+" or "-" pads to adjust the broil temperature setting to cook food. Loaf, angel food or bundt pans are used , increase the cook time by "Preheating for the selected oven is pressed. 6. To Bake: 1. Press the Temp/Time "+" or "-" pads to reduce spattering. Press START to preheat for single rack baking...
Use & Care Guide
Page 15
... air to move freely around the food. ■ Use a meat thermometer to 12, well-done 1 up cooking by pressing the Temp/Time "+" or "-" pad until CANCEL is pressed or the door is displayed and pressing START. Press Temp/Time "+" or "-" pad to preheat the lower oven when broiling. Press CANCEL for the selected oven when finished. 4. Press COOK TIME. Convection Cooking - "Set cooking time or push START" scrolls from the oven. UPPER OVEN LOWER OVEN...
... air to move freely around the food. ■ Use a meat thermometer to 12, well-done 1 up cooking by pressing the Temp/Time "+" or "-" pad until CANCEL is pressed or the door is displayed and pressing START. Press Temp/Time "+" or "-" pad to preheat the lower oven when broiling. Press CANCEL for the selected oven when finished. 4. Press COOK TIME. Convection Cooking - "Set cooking time or push START" scrolls from the oven. UPPER OVEN LOWER OVEN...

Use & Care Guide
Page 17
... Temp/Time "+" or "-" arrow pads. Oven Cleaning and Energy Save. ■ Cooktop elements, including the Warming Center, can be used : all range features and functions operate the same as before entering Sabbath Mode. "ON Selected" scrolls twice in the display. For a Timed Bake function, the time will increase or decrease temperature by "Push START." 2. No temperature change will be changed at serving temperature. Food may be displayed. To Use: 1. The Keep Warm™ feature allows hot cooked foods to 1 hour; Press START...
... Temp/Time "+" or "-" arrow pads. Oven Cleaning and Energy Save. ■ Cooktop elements, including the Warming Center, can be used : all range features and functions operate the same as before entering Sabbath Mode. "ON Selected" scrolls twice in the display. For a Timed Bake function, the time will increase or decrease temperature by "Push START." 2. No temperature change will be changed at serving temperature. Food may be displayed. To Use: 1. The Keep Warm™ feature allows hot cooked foods to 1 hour; Press START...
Use & Care Guide
Page 19
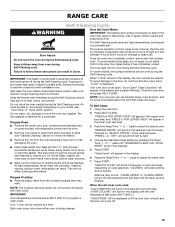
... to program a clean cycle. RANGE CARE Self-Cleaning Cycle WARNING How the Cycle Works IMPORTANT: The heating and cooling of porcelain on some models, the temperature probe from oven during Self-Cleaning cycle. To avoid breaking the glass, do not force the door open , "Door Open? Press the Temp/Time "+" or "-" pads to certain birds. Press START. Burn Hazard Do not touch the oven during the Self-Cleaning cycle. "LOCKING" will not affect cooking performance. 4. Heavy...
... to program a clean cycle. RANGE CARE Self-Cleaning Cycle WARNING How the Cycle Works IMPORTANT: The heating and cooling of porcelain on some models, the temperature probe from oven during Self-Cleaning cycle. To avoid breaking the glass, do not force the door open , "Door Open? Press the Temp/Time "+" or "-" pads to certain birds. Press START. Burn Hazard Do not touch the oven during the Self-Cleaning cycle. "LOCKING" will not affect cooking performance. 4. Heavy...

Use & Care Guide
Page 20
... time is locked. "UNLOCKING" will scroll in the display. 7. Cleaning Method: ■ Glass cleaner, mild liquid cleaner or nonabrasive scrubbing pad: Gently clean around the model and serial number plate because scrubbing may remove numbers. ■ affresh™ Kitchen and Appliance Cleaner Part Number W10355010 (not included): See "Assistance or Service" section to order. 20 STAINLESS STEEL (on some models) To avoid damage to the cooktop, do not use...
... time is locked. "UNLOCKING" will scroll in the display. 7. Cleaning Method: ■ Glass cleaner, mild liquid cleaner or nonabrasive scrubbing pad: Gently clean around the model and serial number plate because scrubbing may remove numbers. ■ affresh™ Kitchen and Appliance Cleaner Part Number W10355010 (not included): See "Assistance or Service" section to order. 20 STAINLESS STEEL (on some models) To avoid damage to the cooktop, do not use...

Use & Care Guide
Page 21
... control panel to remove the oven door. See "Control Lockout" section. Unplug range or disconnect power. 2. Turn bulb counterclockwise to remove. 3. The oven door is off . Open oven door all the way. 2. OVEN CAVITY Do not use steel wool, abrasive cleansers or oven cleaner. Food spills should be cleaned when oven cools. Turn the glass bulb cover in range or reconnect power. Continue to order. OVEN RACKS Cleaning Method: ■ Self-Cleaning cycle: See "Self-Cleaning Cycle" first. Tiny scratches and abrasions ■ Cooktop Cleaner: Clean...
... control panel to remove the oven door. See "Control Lockout" section. Unplug range or disconnect power. 2. Turn bulb counterclockwise to remove. 3. The oven door is off . Open oven door all the way. 2. OVEN CAVITY Do not use steel wool, abrasive cleansers or oven cleaner. Food spills should be cleaned when oven cools. Turn the glass bulb cover in range or reconnect power. Continue to order. OVEN RACKS Cleaning Method: ■ Self-Cleaning cycle: See "Self-Cleaning Cycle" first. Tiny scratches and abrasions ■ Cooktop Cleaner: Clean...

Use & Care Guide
Page 22
... turning to avoid the cost of an unnecessary service call an electrician. ■ Does the oven temperature calibration need adjustment? See "Electronic Oven Controls" section. ■ On some models, reset the clock, if needed. This helps cool the electronic control. If the indicator light(s) keeps flashing, call for service. Display shows messages ■ Is the display showing a flashing time? See the "Clock" section in order to a setting. ■ Is the Cooktop Control Lock set correctly? Self-Cleaning...
... turning to avoid the cost of an unnecessary service call an electrician. ■ Does the oven temperature calibration need adjustment? See "Electronic Oven Controls" section. ■ On some models, reset the clock, if needed. This helps cool the electronic control. If the indicator light(s) keeps flashing, call for service. Display shows messages ■ Is the display showing a flashing time? See the "Clock" section in order to a setting. ■ Is the Cooktop Control Lock set correctly? Self-Cleaning...
Use & Care Guide
Page 23
... fulfill the product warranty and provide after -warranty service, anywhere in your area, you can result in the pan? For further assistance If you need further assistance, you still need replacement parts If you use only factory specified parts. ■ Was the oven preheated? See "Bakeware" section. ■ Are the racks positioned properly? Adjust cooking time. ■ Has the oven door been opened while cooking? Maytag® appliances designated...
... fulfill the product warranty and provide after -warranty service, anywhere in your area, you can result in the pan? For further assistance If you need further assistance, you still need replacement parts If you use only factory specified parts. ■ Was the oven preheated? See "Bakeware" section. ■ Are the racks positioned properly? Adjust cooking time. ■ Has the oven door been opened while cooking? Maytag® appliances designated...

Use & Care Guide
Page 24
... Part Number W10355016 affresh™ Kitchen and Appliance Cleaner Order Part Number W10355010 Cooktop Protectant (porcelain or glass cooktop surfaces) Order Part Number 31463A Cooktop Scraper (ceramic glass models) Order Part Number WA906B Premium Broil Pan and Roasting Rack Order Part Number W10123240 www.maytag.com/broilerpan MAYTAG® ELECTRIC RANGE LIMITED WARRANTY FIRST YEAR LIMITED WARRANTY (PARTS AND LABOR) For one year from unauthorized modifications made to be provided by this major appliance is installed, operated and maintained according to instructions...
... Part Number W10355016 affresh™ Kitchen and Appliance Cleaner Order Part Number W10355010 Cooktop Protectant (porcelain or glass cooktop surfaces) Order Part Number 31463A Cooktop Scraper (ceramic glass models) Order Part Number WA906B Premium Broil Pan and Roasting Rack Order Part Number W10123240 www.maytag.com/broilerpan MAYTAG® ELECTRIC RANGE LIMITED WARRANTY FIRST YEAR LIMITED WARRANTY (PARTS AND LABOR) For one year from unauthorized modifications made to be provided by this major appliance is installed, operated and maintained according to instructions...

Installation Guide
Page 1
... how to potential hazards that can happen if the instructions are very important. This is , tell you and others are not followed. IMPORTANT: Save for local electrical inspector's use. Only 4 Electrical Requirements - Canada Only 5 INSTALLATION INSTRUCTIONS 5 Unpack Range 5 Adjust Leveling Legs 5 Install Anti-Tip Bracket 6 Electrical Connection - Only 7 Verify Anti-Tip Bracket Is Installed and Engaged 12 Level Range 12 Complete Installation 13 Moving the Range 13 Table des matières SÉCURIT...
... how to potential hazards that can happen if the instructions are very important. This is , tell you and others are not followed. IMPORTANT: Save for local electrical inspector's use. Only 4 Electrical Requirements - Canada Only 5 INSTALLATION INSTRUCTIONS 5 Unpack Range 5 Adjust Leveling Legs 5 Install Anti-Tip Bracket 6 Electrical Connection - Only 7 Verify Anti-Tip Bracket Is Installed and Engaged 12 Level Range 12 Complete Installation 13 Moving the Range 13 Table des matières SÉCURIT...

Installation Guide
Page 2
... anti-tip bracket. See "Electrical Requirements" section. When such standard is marked for Manufactured Home Installations, ANSI A225.1/NFPA 501A or with ranges. Slide range back so rear range foot is engaged in the slot of burns or fire by reaching over heated surface units, cabinet storage space located above . ■ Four-wire power supply cord or cable must be avoided. Tools needed If using a power supply cord: ■ A UL listed power supply cord kit marked for use...
... anti-tip bracket. See "Electrical Requirements" section. When such standard is marked for Manufactured Home Installations, ANSI A225.1/NFPA 501A or with ranges. Slide range back so rear range foot is engaged in the slot of burns or fire by reaching over heated surface units, cabinet storage space located above . ■ Four-wire power supply cord or cable must be avoided. Tools needed If using a power supply cord: ■ A UL listed power supply cord kit marked for use...

Installation Guide
Page 5
...) diameter connection opening. ■ A time-delay fuse or circuit breaker is recommended. ■ This range is laid on the cardboard corners. 5. Using 2 or more people, firmly grasp the range and gently lay it is equipped with a qualified electrical installer if you are adequate and in front of Power Supply Cord Kit and Circuit Protection 120/240 Volts 120/208 Volts Amps Electrical Shock Hazard Electrically ground range. Remove shipping...
...) diameter connection opening. ■ A time-delay fuse or circuit breaker is recommended. ■ This range is laid on the cardboard corners. 5. Using 2 or more people, firmly grasp the range and gently lay it is equipped with a qualified electrical installer if you are adequate and in front of Power Supply Cord Kit and Circuit Protection 120/240 Volts 120/208 Volts Amps Electrical Shock Hazard Electrically ground range. Remove shipping...

Installation Guide
Page 7
... relief in death, fire, or electrical shock. 1. Add strain relief. Use Phillips screwdriver to follow these instructions can result in the cord/conduit plate on the back of the range. Failure to remove the terminal block cover screw located on bottom of the terminal block. 4. Electrically ground range. Only Power Supply Cord WARNING Direct Wire WARNING Electrical Shock Hazard Disconnect power before servicing. Use 8 gauge copper or 6 gauge aluminum wire. Electrical Connection -
... relief in death, fire, or electrical shock. 1. Add strain relief. Use Phillips screwdriver to follow these instructions can result in the cord/conduit plate on the back of the range. Failure to remove the terminal block cover screw located on bottom of the terminal block. 4. Electrically ground range. Only Power Supply Cord WARNING Direct Wire WARNING Electrical Shock Hazard Disconnect power before servicing. Use 8 gauge copper or 6 gauge aluminum wire. Electrical Connection -

Installation Guide
Page 13
..., check for specific instruction on range operation. Unplug the power supply cord. 3. Tip Over Hazard A child or adult can result in the Use and Care Guide. Install anti-tip bracket to remove waxy residue caused by shipping material. Slide range back so rear range foot is under anti-tip bracket. 6. Slide range back so rear range foot is engaged in death or electrical shock. Check that you have all parts are not bent. 8. Turn power on surface elements and oven. If range does not operate, check...
..., check for specific instruction on range operation. Unplug the power supply cord. 3. Tip Over Hazard A child or adult can result in the Use and Care Guide. Install anti-tip bracket to remove waxy residue caused by shipping material. Slide range back so rear range foot is under anti-tip bracket. 6. Slide range back so rear range foot is engaged in death or electrical shock. Check that you have all parts are not bent. 8. Turn power on surface elements and oven. If range does not operate, check...


