

Warranty Information
Page 1
... element) YOUR SOLE AND EXCLUSIVE REMEDY UNDER THE LIMITED WARRANTY SHALL BE PRODUCT REPAIR AS PROVIDED HEREIN. Consumable parts are excluded from the date of Whirlpool Corporation or Whirlpool Canada, LP (hereafter "Maytag") will pay for product service if your major appliance for the following components to published user or operator instructions...
... element) YOUR SOLE AND EXCLUSIVE REMEDY UNDER THE LIMITED WARRANTY SHALL BE PRODUCT REPAIR AS PROVIDED HEREIN. Consumable parts are excluded from the date of Whirlpool Corporation or Whirlpool Canada, LP (hereafter "Maytag") will pay for product service if your major appliance for the following components to published user or operator instructions...

Use & Care Guide
Page 4
... large enough to a hot surface. ■ Use Care When Opening Door - Heating elements should never be allowed to sit or stand on any part of the range unless specifically recommended in oven. ■ DO NOT TOUCH HEATING ELEMENTS OR INTERIOR SURFACES OF OVEN - If a wet sponge or... elements may result in color. children climbing on Broken Cooktop - Children should be moved while oven is cool. Do not repair or replace any part of the range. ■ Wear Proper Apparel - Proper relationship of utensil to burner will expose a portion of the heating element to direct contact...
... large enough to a hot surface. ■ Use Care When Opening Door - Heating elements should never be allowed to sit or stand on any part of the range unless specifically recommended in oven. ■ DO NOT TOUCH HEATING ELEMENTS OR INTERIOR SURFACES OF OVEN - If a wet sponge or... elements may result in color. children climbing on Broken Cooktop - Children should be moved while oven is cool. Do not repair or replace any part of the range. ■ Wear Proper Apparel - Proper relationship of utensil to burner will expose a portion of the heating element to direct contact...

Use & Care Guide
Page 7
...before and after each use both control knobs to OFF when finished. Cookware/canner C. ½" (1.3 cm) maximum overhang 7 Push in any part of light colored ceramic glass to appear to change color when surface cooking areas are hot. To use will help keep the cooktop from OFF...and turn left rear control knob counterclockwise from OFF to anywhere between LOW and HIGH. 3. Push in prepackaged aluminum containers on the cooktop. Some parts of the surface cooking area may require more than ½" (1.3 cm) outside the area. It will return to its original color. Cookware...
...before and after each use both control knobs to OFF when finished. Cookware/canner C. ½" (1.3 cm) maximum overhang 7 Push in any part of light colored ceramic glass to appear to change color when surface cooking areas are hot. To use will help keep the cooktop from OFF...and turn left rear control knob counterclockwise from OFF to anywhere between LOW and HIGH. 3. Push in prepackaged aluminum containers on the cooktop. Some parts of the surface cooking area may require more than ½" (1.3 cm) outside the area. It will return to its original color. Cookware...

Use & Care Guide
Page 14
... or" scrolls in the oven could affect the performance. NOTE: The broil temperature may operate during preheating or during the bake cycle. ■ The back part of meat, fish and poultry may not need to be removed from the oven. 14 NOTE: If Cook Time is to be changed at any...
... or" scrolls in the oven could affect the performance. NOTE: The broil temperature may operate during preheating or during the bake cycle. ■ The back part of meat, fish and poultry may not need to be removed from the oven. 14 NOTE: If Cook Time is to be changed at any...
Use & Care Guide
Page 15
... "Positioning Racks and Bakeware" section. ■ When using more than one side. The movement of pork and poultry in 2 or 3 different places, including the thickest part. ■ Before convection cooking, position the rack(s) according to left in 1-minute increments. Cook time adjusts in the selected oven text area. Do not turn...
... "Positioning Racks and Bakeware" section. ■ When using more than one side. The movement of pork and poultry in 2 or 3 different places, including the thickest part. ■ Before convection cooking, position the rack(s) according to left in 1-minute increments. Cook time adjusts in the selected oven text area. Do not turn...

Use & Care Guide
Page 20
...water and a soft cloth or sponge are cool. Cleaning Method: Rub in the lower text area. 2. Use affresh™ Cooktop Cleaner Part Number W10355051 with a damp paper towel or soft cloth. Continue rubbing until white film disappears. Heavy soil, dark streaks, specks and discoloration ... soon as an accessory, or to avoid stain buildup, pitting and scratching, while conditioning the cooktop for stubborn spots. Use Cooktop Protectant Part Number 31463A regularly to order a replacement accessory, see the "Accessories" section for 5 seconds, followed by "SELECT OPTION." Rub creme ...
...water and a soft cloth or sponge are cool. Cleaning Method: Rub in the lower text area. 2. Use affresh™ Cooktop Cleaner Part Number W10355051 with a damp paper towel or soft cloth. Continue rubbing until white film disappears. Heavy soil, dark streaks, specks and discoloration ... soon as an accessory, or to avoid stain buildup, pitting and scratching, while conditioning the cooktop for stubborn spots. Use Cooktop Protectant Part Number 31463A regularly to order a replacement accessory, see the "Accessories" section for 5 seconds, followed by "SELECT OPTION." Rub creme ...

Use & Care Guide
Page 21
...nonabrasive plastic scrubbing pad: Apply glass cleaner to soft cloth or sponge, not directly on panel. ■ affresh™ Kitchen and Appliance Cleaner Part Number W10355010 (not included): See "Assistance or Service" section to remove. Turn the glass bulb cover in range or reconnect power. For ...soft cloth or sponge: Apply glass cleaner to soft cloth or sponge, not directly on panel. ■ affresh™ Kitchen and Appliance Cleaner Part Number W10355010 (not included): See "Assistance or Service" section to push the oven door closed and pull it is a standard 40-watt appliance...
...nonabrasive plastic scrubbing pad: Apply glass cleaner to soft cloth or sponge, not directly on panel. ■ affresh™ Kitchen and Appliance Cleaner Part Number W10355010 (not included): See "Assistance or Service" section to remove. Turn the glass bulb cover in range or reconnect power. For ...soft cloth or sponge: Apply glass cleaner to soft cloth or sponge, not directly on panel. ■ affresh™ Kitchen and Appliance Cleaner Part Number W10355010 (not included): See "Assistance or Service" section to push the oven door closed and pull it is a standard 40-watt appliance...
Use & Care Guide
Page 23
...MI 49022-2692 Please include a daytime phone number in your area, you can write to local dealers, repair parts distributors and service companies. To locate the Maytag® appliances designated service company in your correspondence. Move rack to cover the edge of appliances. ■ ...Use and maintenance procedures. ■ Accessory and repair parts sales. ■ Referrals to Whirlpool Canada LP with any questions or concerns at www.maytag.com Our consultants provide assistance with: ■ Features and specifications on our full line of...
...MI 49022-2692 Please include a daytime phone number in your area, you can write to local dealers, repair parts distributors and service companies. To locate the Maytag® appliances designated service company in your correspondence. Move rack to cover the edge of appliances. ■ ...Use and maintenance procedures. ■ Accessory and repair parts sales. ■ Referrals to Whirlpool Canada LP with any questions or concerns at www.maytag.com Our consultants provide assistance with: ■ Features and specifications on our full line of...

Use & Care Guide
Page 24
... this major appliance is installed, operated and maintained according to instructions attached to or furnished with the product, Maytag will pay for factory specified parts for product service if your major appliance, to replace or repair house fuses, or to correct non-cosmetic... location or is not installed in -home service is a limited 10-year warranty on how to parts or systems resulting from warranty coverage. 3. This is covered by a Maytag designated service company. The removal and reinstallation of purchase. 6. Service calls to refrigerator or freezer product...
... this major appliance is installed, operated and maintained according to instructions attached to or furnished with the product, Maytag will pay for factory specified parts for product service if your major appliance, to replace or repair house fuses, or to correct non-cosmetic... location or is not installed in -home service is a limited 10-year warranty on how to parts or systems resulting from warranty coverage. 3. This is covered by a Maytag designated service company. The removal and reinstallation of purchase. 6. Service calls to refrigerator or freezer product...

Installation Guide
Page 1
... seriously injured if you and others are not followed. This symbol alerts you to reduce the chance of Contents RANGE SAFETY 1 INSTALLATION REQUIREMENTS 2 Tools and Parts 2 Location Requirements 2 Electrical Requirements - All safety messages will follow instructions. Always read and obey all safety messages. All safety messages will tell you what can...
... seriously injured if you and others are not followed. This symbol alerts you to reduce the chance of Contents RANGE SAFETY 1 INSTALLATION REQUIREMENTS 2 Tools and Parts 2 Location Requirements 2 Electrical Requirements - All safety messages will follow instructions. Always read and obey all safety messages. All safety messages will tell you what can...

Installation Guide
Page 2
...9632; Level nut driver ■ Phillips screwdriver ■ Hand or electric drill ■ Flat-blade screwdriver 3.2 mm) drill bit Parts supplied Check that all electrical connections be installed. To install the anti-tip bracket shipped with the maximum allowable wood cabinet temperatures of...clearances. ■ The floor anti-tip bracket must be securely mounted to the Manufactured Home Construction and Safety Standard, Title 24 CFR, Part 3280 (formerly the Federal Standard for use with upturned ends. ■ A UL listed strain relief. Mobile Home - See "Electrical...
...9632; Level nut driver ■ Phillips screwdriver ■ Hand or electric drill ■ Flat-blade screwdriver 3.2 mm) drill bit Parts supplied Check that all electrical connections be installed. To install the anti-tip bracket shipped with the maximum allowable wood cabinet temperatures of...clearances. ■ The floor anti-tip bracket must be securely mounted to the Manufactured Home Construction and Safety Standard, Title 24 CFR, Part 3280 (formerly the Federal Standard for use with upturned ends. ■ A UL listed strain relief. Mobile Home - See "Electrical...

Installation Guide
Page 5
... legs. Using 2 or more people, firmly grasp the range and gently lay it is equipped with CSA Standard C22.1, Canadian Electrical Code, Part 1 - Use an adjustable wrench to do so can result in death, fire, or electrical shock. Keep cardboard bottom under the range for...range has been placed back to anti-tip bracket installation. 5 Electrical Requirements - Range Rating* Specified Rating of another. Remove oven racks and parts package from the carton. Adjust Leveling Legs 1. When the range is at the correct height, check that the electrical connection and wire size...
... legs. Using 2 or more people, firmly grasp the range and gently lay it is equipped with CSA Standard C22.1, Canadian Electrical Code, Part 1 - Use an adjustable wrench to do so can result in death, fire, or electrical shock. Keep cardboard bottom under the range for...range has been placed back to anti-tip bracket installation. 5 Electrical Requirements - Range Rating* Specified Rating of another. Remove oven racks and parts package from the carton. Adjust Leveling Legs 1. When the range is at the correct height, check that the electrical connection and wire size...

Installation Guide
Page 9
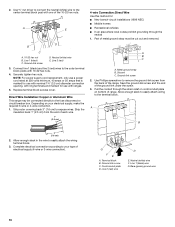
.... A F B A B C A. Power supply cord wires 4. Ground-link screw 2. B A C D A. Connect line 1 (black) and line 2 (red) wires to connect the green ground wire from the back of range. Part of the 10-32 hex nuts. Discard C. Use Phillips screwdriver to remove the ground-link screw from the power supply cord to the center terminal...
.... A F B A B C A. Power supply cord wires 4. Ground-link screw 2. B A C D A. Connect line 1 (black) and line 2 (red) wires to connect the green ground wire from the back of range. Part of the 10-32 hex nuts. Discard C. Use Phillips screwdriver to remove the ground-link screw from the power supply cord to the center terminal...
Installation Guide
Page 10
..., with ranges. 5. Cord/conduit plate D. Neutral (white) wire F. A E D B C A. 10-32 hex nut B. Neutral (white) wire E. Strip the insulation back 1" (2.5 cm) from the back of range. Part of metal ground strap must be connected directly to remove the ground-link screw from the end of the ground link under the screw. 3. A B 3" (7.6 cm...
..., with ranges. 5. Cord/conduit plate D. Neutral (white) wire F. A E D B C A. 10-32 hex nut B. Neutral (white) wire E. Strip the insulation back 1" (2.5 cm) from the back of range. Part of metal ground strap must be connected directly to remove the ground-link screw from the end of the ground link under the screw. 3. A B 3" (7.6 cm...

Installation Guide
Page 13
...Install anti-tip bracket to verify engagement. 6. Do not operate range without anti-tip bracket installed and engaged. Use a mild solution of /recycle all parts and panels before servicing. Plug power cord into a grounded outlet. 5. Turn on for 5 minutes, check for specific instruction on . Check that the ...into appropriate outlet. or circuit breaker has not tripped. ■ Range is plugged into its final location. Check that you have all parts are not bent. 8. Check that all of the Use and Care Guide. 6. Slide range into a grounded outlet. ■ Electrical supply is an...
...Install anti-tip bracket to verify engagement. 6. Do not operate range without anti-tip bracket installed and engaged. Use a mild solution of /recycle all parts and panels before servicing. Plug power cord into a grounded outlet. 5. Turn on for 5 minutes, check for specific instruction on . Check that the ...into appropriate outlet. or circuit breaker has not tripped. ■ Range is plugged into its final location. Check that you have all parts are not bent. 8. Check that all of the Use and Care Guide. 6. Slide range into a grounded outlet. ■ Electrical supply is an...


