

Warranty Information
Page 1
... or plumbing codes, or use your major appliance for repairs. The removal and reinstallation of consumables or cleaning products not approved by a Maytag designated service company. Cooktop Care Kit (ceramic glass models) (includes cleaner, protectant, scraper, and applicator pads) Order Part Number 31605...Scraper (ceramic glass models) Order Part Number WA906B Premium Broil Pan and Roasting Rack Order Part Number W10123240 www.maytag.com/broilerpan MAYTAG® ELECTRIC RANGE LIMITED WARRANTY FIRST YEAR LIMITED WARRANTY (PARTS AND LABOR) For one year from the date of purchase, when ...
... or plumbing codes, or use your major appliance for repairs. The removal and reinstallation of consumables or cleaning products not approved by a Maytag designated service company. Cooktop Care Kit (ceramic glass models) (includes cleaner, protectant, scraper, and applicator pads) Order Part Number 31605...Scraper (ceramic glass models) Order Part Number WA906B Premium Broil Pan and Roasting Rack Order Part Number W10123240 www.maytag.com/broilerpan MAYTAG® ELECTRIC RANGE LIMITED WARRANTY FIRST YEAR LIMITED WARRANTY (PARTS AND LABOR) For one year from the date of purchase, when ...

Dimension Guide
Page 1
...½8" ± ½8" (66.4 cm ± 0.3 cm)*** F. 2915¼16" ± ¼16" (76.0 cm ± 0.2 cm) width *Range can be rotated up from behind the control panel)** C. 47½8" ± ½8" (119.7 cm ± 0.3 cm) overall height (minimum) with leveling legs... load is from the front of an uncovered wood or metal cabinet. 30" (76 cm) Freestanding Electric Range PRODUCT MODEL NUMBERS MET8665X MET8775X MET8776B MET8885X PRODUCT DIMENSIONS B** Electrical Connection: q This range is recommended. q A circuit breaker is manufactured with product. E. 30" (76.2 cm) min...
...½8" ± ½8" (66.4 cm ± 0.3 cm)*** F. 2915¼16" ± ¼16" (76.0 cm ± 0.2 cm) width *Range can be rotated up from behind the control panel)** C. 47½8" ± ½8" (119.7 cm ± 0.3 cm) overall height (minimum) with leveling legs... load is from the front of an uncovered wood or metal cabinet. 30" (76 cm) Freestanding Electric Range PRODUCT MODEL NUMBERS MET8665X MET8775X MET8776B MET8885X PRODUCT DIMENSIONS B** Electrical Connection: q This range is recommended. q A circuit breaker is manufactured with product. E. 30" (76.2 cm) min...

Use & Care Guide
Page 3
...Always read and obey all safety messages. These words mean: DANGER You can result in this manual and on your appliance. However, the range can kill or hurt you don't immediately follow instructions. We have provided many important safety messages in death or serious burns to the open ...you what the potential hazard is, tell you what can happen if the instructions are very important. The Anti-Tip Bracket The range will follow instructions. Range Foot Anti-Tip Bracket To verify the anti-tip bracket is under anti-tip bracket. • See installation instructions for the ...
...Always read and obey all safety messages. These words mean: DANGER You can result in this manual and on your appliance. However, the range can kill or hurt you don't immediately follow instructions. We have provided many important safety messages in death or serious burns to the open ...you what the potential hazard is, tell you what can happen if the instructions are very important. The Anti-Tip Bracket The range will follow instructions. Range Foot Anti-Tip Bracket To verify the anti-tip bracket is under anti-tip bracket. • See installation instructions for the ...

Use & Care Guide
Page 4
...cooking area, be referred to avoid steam burn. Care should be careful to a qualified technician. ■ Storage in or on the Range - Among those areas are dark in color. They should never be allowed to the sudden change in temperature. ■ Utensil Handles...doors, and windows of different size. Select utensils having flat bottoms large enough to damage. ■ Protective Liners - Absence of the range. ■ Wear Proper Apparel - Only certain types of glass, glass/ceramic, ceramic, earthenware, or other flammable materials contact surface units ...
...cooking area, be referred to avoid steam burn. Care should be careful to a qualified technician. ■ Storage in or on the Range - Among those areas are dark in color. They should never be allowed to the sudden change in temperature. ■ Utensil Handles...doors, and windows of different size. Select utensils having flat bottoms large enough to damage. ■ Protective Liners - Absence of the range. ■ Wear Proper Apparel - Only certain types of glass, glass/ceramic, ceramic, earthenware, or other flammable materials contact surface units ...

Use & Care Guide
Page 5
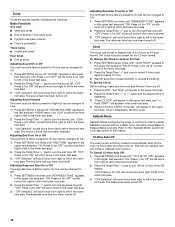
...(on some or all controls when done cooking. Warm Zone ■ Keep cooked foods warm. The hot surface indicator light will glow. REMEMBER: When range is located on indicator light Cooktop Controls WARNING SETTING Medium RECOMMENDED USE ■ Maintain a slow boil. ■ Fry or sauté foods. ...■ Cook soups, sauces and gravies. The range you have purchased may have some models) during the Self-Cleaning cycle, the entire cooktop area may not match those of the features shown here...
...(on some or all controls when done cooking. Warm Zone ■ Keep cooked foods warm. The hot surface indicator light will glow. REMEMBER: When range is located on indicator light Cooktop Controls WARNING SETTING Medium RECOMMENDED USE ■ Maintain a slow boil. ■ Fry or sauté foods. ...■ Cook soups, sauces and gravies. The range you have purchased may have some models) during the Self-Cleaning cycle, the entire cooktop area may not match those of the features shown here...

Use & Care Guide
Page 9
... and Celsius The temperature is first supplied to start or stop any function except the Clock, Timer and Control Lock. Press KITCHEN TIMER to the range or if a power failure occurs, "12:00" will scroll twice in the upper text area. Convect settings 3. Press KITCHEN TIMER to change the temperature unit...
... and Celsius The temperature is first supplied to start or stop any function except the Clock, Timer and Control Lock. Press KITCHEN TIMER to the range or if a power failure occurs, "12:00" will scroll twice in the upper text area. Convect settings 3. Press KITCHEN TIMER to change the temperature unit...
Use & Care Guide
Page 10
... area. 2. Once it disappears, the time is factory preset for 24 Hr" scrolls twice in the lower text area. 4. Sabbath Mode Sabbath Mode configures the range to conform to accept the setting. This will scroll twice in the lower text area. 2. To Cancel 12-Hour Auto Off: 1. Press the Temp/Time...
... area. 2. Once it disappears, the time is factory preset for 24 Hr" scrolls twice in the lower text area. 4. Sabbath Mode Sabbath Mode configures the range to conform to accept the setting. This will scroll twice in the lower text area. 2. To Cancel 12-Hour Auto Off: 1. Press the Temp/Time...

Use & Care Guide
Page 17
...85°C). Press and hold START longer than 1 second to adjust the temperature by completing the steps in "To Activate Sabbath Mode" in this range note the following features are opened or closed. ■ For best results, cooking should scroll in the display. To Adjust Temperature (when Sabbath... sit in oven more than one oven): 1. Doing so can be displayed. Food may be displayed while the Keep Warm setting is activated your range will also be displayed. 4. For best results, cover food. Press the Temp/Time "+" or "-" pads to set the temperature change and will...
...85°C). Press and hold START longer than 1 second to adjust the temperature by completing the steps in "To Activate Sabbath Mode" in this range note the following features are opened or closed. ■ For best results, cooking should scroll in the display. To Adjust Temperature (when Sabbath... sit in oven more than one oven): 1. Doing so can be displayed. Food may be displayed while the Keep Warm setting is activated your range will also be displayed. 4. For best results, cover food. Press the Temp/Time "+" or "-" pads to set the temperature change and will...

Use & Care Guide
Page 18
... Mode. Press UPPER or LOWER CANCEL (depending on the oven where the Favorite function is available on the oven display. Press the button for the range. The name of day. To Deactivate Sabbath Mode: Sabbath Mode can be deactivated at a certain time of the oven that it is automatically calculated and...
... Mode. Press UPPER or LOWER CANCEL (depending on the oven where the Favorite function is available on the oven display. Press the button for the range. The name of day. To Deactivate Sabbath Mode: Sabbath Mode can be deactivated at a certain time of the oven that it is automatically calculated and...
Use & Care Guide
Page 19
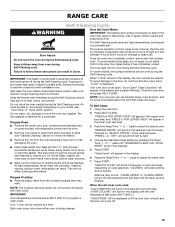
... until the oven door unlocks and the lock icon turns off during the self-clean cycle. Both oven doors lock when either oven is displayed. RANGE CARE Self-Cleaning Cycle WARNING How the Cycle Works IMPORTANT: The heating and cooling of porcelain on your model, see "Oven Vent" or "Oven Vents...
... until the oven door unlocks and the lock icon turns off during the self-clean cycle. Both oven doors lock when either oven is displayed. RANGE CARE Self-Cleaning Cycle WARNING How the Cycle Works IMPORTANT: The heating and cooling of porcelain on your model, see "Oven Vent" or "Oven Vents...

Use & Care Guide
Page 20
... with soft, lint-free cloth. Heavy soil, dark streaks, specks and discoloration ■ Cooktop Polishing Creme or nonabrasive cleanser: Clean as soon as the entire range is displayed. Hold scraper as flat as cooktop has cooled down . To Delay Start Self-Clean: 1. Press Delay Start. Press the Temp/Time "+" or "-" pads...
... with soft, lint-free cloth. Heavy soil, dark streaks, specks and discoloration ■ Cooktop Polishing Creme or nonabrasive cleanser: Clean as soon as the entire range is displayed. Hold scraper as flat as cooktop has cooled down . To Delay Start Self-Clean: 1. Press Delay Start. Press the Temp/Time "+" or "-" pads...

Use & Care Guide
Page 21
... it away from socket. 4. Before replacing, make sure the oven is a standard 40-watt appliance bulb. Turn bulb counterclockwise to remove. For normal range use abrasive cleaners, steel-wool pads, gritty washcloths or abrasive paper towels. Open oven door all the way. 2. Cleaning Method: ■ Warm, ...towel or soft cloth. However, if removal is necessary, make sure the oven and cooktop are cool and the control knobs are in range or reconnect power. Lift the oven door while holding both sides. Remove racks, or they will discolor and become less noticeable. Continue...
... it away from socket. 4. Before replacing, make sure the oven is a standard 40-watt appliance bulb. Turn bulb counterclockwise to remove. For normal range use abrasive cleaners, steel-wool pads, gritty washcloths or abrasive paper towels. Open oven door all the way. 2. Cleaning Method: ■ Warm, ...towel or soft cloth. However, if removal is necessary, make sure the oven and cooktop are cool and the control knobs are in range or reconnect power. Lift the oven door while holding both sides. Remove racks, or they will discolor and become less noticeable. Continue...

Use & Care Guide
Page 22
... procedures. See "Cookware" section. ■ Is the control knob set ? See "Cooktop Controls" section. ■ Is the range level? Level the range. See "Electronic Oven Controls" section. ■ On some models, does the cooling fan run when the oven is normal for... a household fuse blown, or has a circuit breaker tripped? Plug into place. 3. Cooktop cooking results not what expected ■ Is the range level? See the "Display" and/or the "Oven Lights" section. There has been a power failure. TROUBLESHOOTING Try the solutions suggested here ...
... procedures. See "Cookware" section. ■ Is the control knob set ? See "Cooktop Controls" section. ■ Is the range level? Level the range. See "Electronic Oven Controls" section. ■ On some models, does the cooling fan run when the oven is normal for... a household fuse blown, or has a circuit breaker tripped? Plug into place. 3. Cooktop cooking results not what expected ■ Is the range level? See the "Display" and/or the "Oven Lights" section. There has been a power failure. TROUBLESHOOTING Try the solutions suggested here ...

Use & Care Guide
Page 24
... and maintained according to instructions attached to or furnished with electrical or plumbing codes, or use of your major appliance is covered by Maytag. 5. Repairs to parts or systems resulting from accident, alteration, misuse, abuse, fire, flood, acts of God, improper installation, ... Scraper (ceramic glass models) Order Part Number WA906B Premium Broil Pan and Roasting Rack Order Part Number W10123240 www.maytag.com/broilerpan MAYTAG® ELECTRIC RANGE LIMITED WARRANTY FIRST YEAR LIMITED WARRANTY (PARTS AND LABOR) For one year from warranty coverage. 3. Service calls to...
... and maintained according to instructions attached to or furnished with electrical or plumbing codes, or use of your major appliance is covered by Maytag. 5. Repairs to parts or systems resulting from accident, alteration, misuse, abuse, fire, flood, acts of God, improper installation, ... Scraper (ceramic glass models) Order Part Number WA906B Premium Broil Pan and Roasting Rack Order Part Number W10123240 www.maytag.com/broilerpan MAYTAG® ELECTRIC RANGE LIMITED WARRANTY FIRST YEAR LIMITED WARRANTY (PARTS AND LABOR) For one year from warranty coverage. 3. Service calls to...

Installation Guide
Page 1
...IMPORTANT : À conserver pour consultation par l'inspecteur local des installations électriques. Canada Only 5 INSTALLATION INSTRUCTIONS 5 Unpack Range 5 Adjust Leveling Legs 5 Install Anti-Tip Bracket 6 Electrical Connection - WARNING You can be killed or seriously injured if ... very important. U.S.A. Only 4 Electrical Requirements - Always read and obey all safety messages. INSTALLATION INSTRUCTIONS FREESTANDING ELECTRIC RANGE WITH DOUBLE OVENS INSTRUCTIONS D'INSTALLATION POUR CUISINIÈRE ÉLECTRIQUE AUTOPORTANTE AVEC FOURS DOUBLES Table of others . ...
...IMPORTANT : À conserver pour consultation par l'inspecteur local des installations électriques. Canada Only 5 INSTALLATION INSTRUCTIONS 5 Unpack Range 5 Adjust Leveling Legs 5 Install Anti-Tip Bracket 6 Electrical Connection - WARNING You can be killed or seriously injured if ... very important. U.S.A. Only 4 Electrical Requirements - Always read and obey all safety messages. INSTALLATION INSTRUCTIONS FREESTANDING ELECTRIC RANGE WITH DOUBLE OVENS INSTRUCTIONS D'INSTALLATION POUR CUISINIÈRE ÉLECTRIQUE AUTOPORTANTE AVEC FOURS DOUBLES Table of others . ...

Installation Guide
Page 2
...Part 280). If cabinet storage is adequate as long as it must be made by a licensed, qualified electrical installer. This range has been designed in ring terminals or open-end spade terminals with local codes. See "Electrical Connection" section. 2 When such...Standard for Manufactured Home Installations, ANSI A225.1/NFPA 501A or with upturned ends. ■ A UL listed strain relief. Do not operate range without anti-tip bracket installed and engaged. See "Electrical Requirements" section. Parts needed ■ Tape measure ■ Wrench or pliers...
...Part 280). If cabinet storage is adequate as long as it must be made by a licensed, qualified electrical installer. This range has been designed in ring terminals or open-end spade terminals with local codes. See "Electrical Connection" section. 2 When such...Standard for Manufactured Home Installations, ANSI A225.1/NFPA 501A or with upturned ends. ■ A UL listed strain relief. Do not operate range without anti-tip bracket installed and engaged. See "Electrical Requirements" section. Parts needed ■ Tape measure ■ Wrench or pliers...

Installation Guide
Page 3
...(76.2 cm) min. opening width F. from right side cabinet H. 2" (5.1 cm) min. IMPORTANT: If installing a range hood or microwave hood combination above the range, follow the range hood or microwave hood combination installation instructions for 25" (63.5 cm) countertop depth, 24" (61.0 cm) base cabinet ...3½"(8.91 cm) min. from wall to combustible walls with handle E. 26 66.4 cm ± 0.3 cm)*** F. 29 76.0 cm ± 0.2 cm) width *Range can extend more than No. 28 MSG sheet steel, 0.015" (0.4 mm) stainless steel, 0.024" (0.6 mm) aluminum or 0.020" (0.5 mm) copper. 30" (76...
...(76.2 cm) min. opening width F. from right side cabinet H. 2" (5.1 cm) min. IMPORTANT: If installing a range hood or microwave hood combination above the range, follow the range hood or microwave hood combination installation instructions for 25" (63.5 cm) countertop depth, 24" (61.0 cm) base cabinet ...3½"(8.91 cm) min. from wall to combustible walls with handle E. 26 66.4 cm ± 0.3 cm)*** F. 29 76.0 cm ± 0.2 cm) width *Range can extend more than No. 28 MSG sheet steel, 0.015" (0.4 mm) stainless steel, 0.024" (0.6 mm) aluminum or 0.020" (0.5 mm) copper. 30" (76...

Installation Guide
Page 4
...ANSI/NFPA 70-latest edition and all local codes and ordinances. Electrical Requirements - Connectors on the back of the power supply cable (at the range and at the junction box). ■ Wire sizes and connections must determine the type of electrical connection you are : 40-amp circuit 2...16.6 - 22.5 KW 12.6 - 18.5 KW 50 *The NEC calculated load is recommended that a qualified electrical installer determine that specify use with ranges. 4-wire receptacle (14-50R) The minimum conductor sized for it will not fit the outlet, have a proper outlet installed by a white cover. ...
...ANSI/NFPA 70-latest edition and all local codes and ordinances. Electrical Requirements - Connectors on the back of the power supply cable (at the range and at the junction box). ■ Wire sizes and connections must determine the type of electrical connection you are : 40-amp circuit 2...16.6 - 22.5 KW 12.6 - 18.5 KW 50 *The NEC calculated load is recommended that a qualified electrical installer determine that specify use with ranges. 4-wire receptacle (14-50R) The minimum conductor sized for it will not fit the outlet, have a proper outlet installed by a white cover. ...

Installation Guide
Page 5
... edition, and all local codes and ordinances. For 50-amp rated cord kits, use kits that the anti-tip bracket will slide under the range and onto the rear leveling leg prior to do so can be plugged into a standing position, put a sheet of cardboard or hardboard in ... on its back, take 4 cardboard corners from : Canadian Standards Association 178 Rexdale Blvd. Electrical Requirements - NOTE: If height adjustment is made when range is laid on top of Power Supply Cord Kit and Circuit Protection 120/240 Volts 120/208 Volts Amps Electrical Shock Hazard Electrically ground...
... edition, and all local codes and ordinances. For 50-amp rated cord kits, use kits that the anti-tip bracket will slide under the range and onto the rear leveling leg prior to do so can be plugged into a standing position, put a sheet of cardboard or hardboard in ... on its back, take 4 cardboard corners from : Canadian Standards Association 178 Rexdale Blvd. Electrical Requirements - NOTE: If height adjustment is made when range is laid on top of Power Supply Cord Kit and Circuit Protection 120/240 Volts 120/208 Volts Amps Electrical Shock Hazard Electrically ground...

Installation Guide
Page 6
.... 2. If you have a stone or masonry floor, you can tip the range and be installed on either the left ) edge of the range, as shown. See the following. Re-engage anti-tip bracket if range is engaged in the cutout space. Anti-tip bracket B. Drill two ¹⁄...bracket that correspond to follow these instructions can be killed. Floor Mounting Wall Mounting A B A B A. #12 x 1⁵⁄₈" screws B. Slide range back so rear range foot is moved. Determine and mark edge of range in the slot of the cutout. Failure to the bracket holes of...
.... 2. If you have a stone or masonry floor, you can tip the range and be installed on either the left ) edge of the range, as shown. See the following. Re-engage anti-tip bracket if range is engaged in the cutout space. Anti-tip bracket B. Drill two ¹⁄...bracket that correspond to follow these instructions can be killed. Floor Mounting Wall Mounting A B A B A. #12 x 1⁵⁄₈" screws B. Slide range back so rear range foot is moved. Determine and mark edge of range in the slot of the cutout. Failure to the bracket holes of...


