
Installation Guide
Page 1
... to reduce the chance of Contents/Table des matières BUILT-IN OVEN SAFETY 1 SÉCURITÉ DU FOUR ENCASTR 17 INSTALLATION REQUIREMENTS 2 Tools and Parts 2 Location Requirements 2 Electrical Requirements 5 INSTALLATION INSTRUCTIONS 6 Prepare Built-In Oven 6 Remove Oven Door 6 Positioning Oven Feet for local electrical inspector's use. IMPORTANT: Save for Multiple Cabinet Cutout Heights .......7 Make Electrical Connection 10 Install Oven 12 Complete Installation 14 EXIGENCES D'INSTALLATION 17 Outillage et pièces 17 Exigences d'emplacement 18 Sp...
... to reduce the chance of Contents/Table des matières BUILT-IN OVEN SAFETY 1 SÉCURITÉ DU FOUR ENCASTR 17 INSTALLATION REQUIREMENTS 2 Tools and Parts 2 Location Requirements 2 Electrical Requirements 5 INSTALLATION INSTRUCTIONS 6 Prepare Built-In Oven 6 Remove Oven Door 6 Positioning Oven Feet for local electrical inspector's use. IMPORTANT: Save for Multiple Cabinet Cutout Heights .......7 Make Electrical Connection 10 Install Oven 12 Complete Installation 14 EXIGENCES D'INSTALLATION 17 Outillage et pièces 17 Exigences d'emplacement 18 Sp...
Installation Guide
Page 2
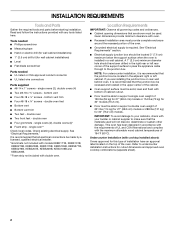
..." (76.2 cm) models. Given dimensions provide minimum clearance with bottom of cabinet cutout. ■ Floor must be able to support a single oven weight of the oven. Read and follow the instructions provided with double oven. bottom vent trim ■ Four #8-18 x ³⁄₈" screws - Location Requirements IMPORTANT: Observe all electrical connections be able to undercounter installation instructions for wall cabinet installations) ■ Level ■ Flat-blade screwdriver Parts needed ■ UL listed or CSA approved...
..." (76.2 cm) models. Given dimensions provide minimum clearance with bottom of cabinet cutout. ■ Floor must be able to support a single oven weight of the oven. Read and follow the instructions provided with double oven. bottom vent trim ■ Four #8-18 x ³⁄₈" screws - Location Requirements IMPORTANT: Observe all electrical connections be able to undercounter installation instructions for wall cabinet installations) ■ Level ■ Flat-blade screwdriver Parts needed ■ UL listed or CSA approved...

Installation Guide
Page 4
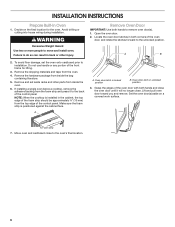
... of cabinet door F. 50¹⁄₄" (127.6 cm)* recommended cutout height G. 24" (60.7 cm) cutout depth 30" (76.2 cm) models A. 30" (76.2 cm) min. Double Ovens B Cabinet Dimensions - D. 28¹⁄₂" (72.4 cm) cutout width E. 1¹⁄₂" (3.8 cm) min. recessed depth E. 27" (68.6 cm) overall width 30" (76.2 cm) models A. 51 130.0 cm) max. Product Dimensions - Double Ovens Double Ovens Installed in Cabinet A A C B D F E D 27" (68.6 cm) models A. 51...
... of cabinet door F. 50¹⁄₄" (127.6 cm)* recommended cutout height G. 24" (60.7 cm) cutout depth 30" (76.2 cm) models A. 30" (76.2 cm) min. Double Ovens B Cabinet Dimensions - D. 28¹⁄₂" (72.4 cm) cutout width E. 1¹⁄₂" (3.8 cm) min. recessed depth E. 27" (68.6 cm) overall width 30" (76.2 cm) models A. 51 130.0 cm) max. Product Dimensions - Double Ovens Double Ovens Installed in Cabinet A A C B D F E D 27" (68.6 cm) models A. 51...

Installation Guide
Page 5
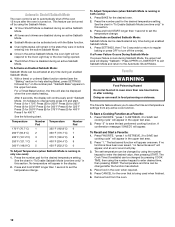
... tools designed and UL listed for serviceability of the above code standards can be provided. ■ If the house has aluminum wiring, follow the instructions provided for models KEBU109B and KEBU209B, refer to 7.4 kW at 208 volts) require a separate 20-amp circuit. ■ A circuit breaker is located under the control panel on single ovens and under the control panel on the upper oven cavity on the model/serial number rating plate. A A 208 VAC 240...
... tools designed and UL listed for serviceability of the above code standards can be provided. ■ If the house has aluminum wiring, follow the instructions provided for models KEBU109B and KEBU209B, refer to 7.4 kW at 208 volts) require a separate 20-amp circuit. ■ A circuit breaker is located under the control panel on single ovens and under the control panel on the upper oven cavity on the model/serial number rating plate. A A 208 VAC 240...
Installation Guide
Page 6
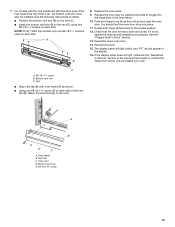
... the oven. A. Decide on a covered work surface. Avoid drilling or cutting into house wiring during installation. A B 2. Remove the shipping materials and tape from the top edge of the control panel. Oven door latch in locked position B. Set the oven door(s) aside on the final location for lifting. 3. Failure to the back of the control panel. To avoid floor damage, set aside racks and other injury. A A. Locate the oven door latches in back or other parts from inside...
... the oven. A. Decide on a covered work surface. Avoid drilling or cutting into house wiring during installation. A B 2. Remove the shipping materials and tape from the top edge of the control panel. Oven door latch in locked position B. Set the oven door(s) aside on the final location for lifting. 3. Failure to the back of the control panel. To avoid floor damage, set aside racks and other injury. A A. Locate the oven door latches in back or other parts from inside...
Installation Guide
Page 13
... that the door is not, repeat the removal and installation procedures. See the following instructions to install. ■ Position the bottom vent trim (B) on each side of the Use and Care Guide or contact the dealer from whom you purchased your oven. The display panel will light briefly, and "PF" should feel the oven door drop into the hinge slots in the oven frame. 10. Replace the oven racks. 9. Vent tab C. Oven vent D. You...
... that the door is not, repeat the removal and installation procedures. See the following instructions to install. ■ Position the bottom vent trim (B) on each side of the Use and Care Guide or contact the dealer from whom you purchased your oven. The display panel will light briefly, and "PF" should feel the oven door drop into the hinge slots in the oven frame. 10. Replace the oven racks. 9. Vent tab C. Oven vent D. You...

Installation Guide
Page 14
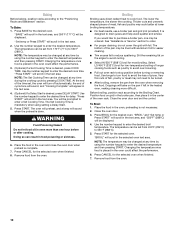
... now installed. Press START. Check Operation of /recycle all of the Use and Care Guide or contact the dealer from whom you do not feel for heat. At first use and cleaning, read the Use and Care Guide. 3. Set the temperature. ■ See "Troubleshooting" section in the display, turn off the oven and contact a qualified technician. 7. Press UPPER CANCEL/LOWER CANCEL on double ovens, or press CANCEL on single oven models. Press BROIL on single ovens...
... now installed. Press START. Check Operation of /recycle all of the Use and Care Guide or contact the dealer from whom you do not feel for heat. At first use and cleaning, read the Use and Care Guide. 3. Set the temperature. ■ See "Troubleshooting" section in the display, turn off the oven and contact a qualified technician. 7. Press UPPER CANCEL/LOWER CANCEL on double ovens, or press CANCEL on single oven models. Press BROIL on single ovens...

Dimension Guide
Page 1
... to change without notice. 27" (68.6 cm) models A. 28 72.8 cm) max. Specifications subject to the proper electrical voltage and frequency as specified on double ovens. The model/serial number rating plate is for joining copper to the circuit breaker box (or fused disconnect) through flexible, armored or nonmetallic sheathed, copper cable (with grounding wire). Model/serial number plate q Models rated from the oven should be connected directly to 7.4 kW at 208 volts) require a separate 40-amp circuit...
... to change without notice. 27" (68.6 cm) models A. 28 72.8 cm) max. Specifications subject to the proper electrical voltage and frequency as specified on double ovens. The model/serial number rating plate is for joining copper to the circuit breaker box (or fused disconnect) through flexible, armored or nonmetallic sheathed, copper cable (with grounding wire). Model/serial number plate q Models rated from the oven should be connected directly to 7.4 kW at 208 volts) require a separate 40-amp circuit...

Use & Care Guide
Page 3
... potholder touch hot heating elements. Do not use . If rack must be allowed to persons, or damage when using the oven. ■ User Servicing - Remove broiler pan and other flammable materials contact heating elements or interior surfaces of Oven Racks - Heating elements may become hot enough to potential hazards that can happen if the instructions are oven vent openings and surfaces near these openings, oven doors, and windows of others . Interior surfaces of an oven become hot...
... potholder touch hot heating elements. Do not use . If rack must be allowed to persons, or damage when using the oven. ■ User Servicing - Remove broiler pan and other flammable materials contact heating elements or interior surfaces of Oven Racks - Heating elements may become hot enough to potential hazards that can happen if the instructions are oven vent openings and surfaces near these openings, oven doors, and windows of others . Interior surfaces of an oven become hot...

Use & Care Guide
Page 5
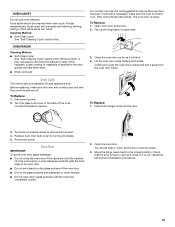
...Self clean H. Cook time Double Oven Control Panel A N M L K J IH E. Self clean H. Number keypad D. Kitchen timer K. Start O. See "Clock" in use, the display shows the time of the items listed. The locations and appearances of the items shown here may have some or all of day. Settings J. Start B C D E FG P A. Cook time O NM E. Oven light L. Lower cancel N. Upper cancel P. Lower oven controls Display When power is first supplied to turn the lights on when either door is not in the "Settings" section to set time of your model. The oven lights...
...Self clean H. Cook time Double Oven Control Panel A N M L K J IH E. Self clean H. Number keypad D. Kitchen timer K. Start O. See "Clock" in use, the display shows the time of the items listed. The locations and appearances of the items shown here may have some or all of day. Settings J. Start B C D E FG P A. Cook time O NM E. Oven light L. Lower cancel N. Upper cancel P. Lower oven controls Display When power is first supplied to turn the lights on when either door is not in the "Settings" section to set time of your model. The oven lights...

Use & Care Guide
Page 8
..., 1-rack baking Most 2-rack baking 2 and 5 Rack positions for Lower calibrate" will remain lit in use and Kitchen Timer is locked. IMPORTANT: The health of meat and poultry: 1 8 Tilt the front edge up at the edges. "TEMP CALIB" and "UPPER CALIBRATE. The adjustment can be locked if the oven is in lower oven: 2 and 5 Roasting small cuts of meat and poultry: 2 Roasting large cuts of some birds is not in the display. The control...
..., 1-rack baking Most 2-rack baking 2 and 5 Rack positions for Lower calibrate" will remain lit in use and Kitchen Timer is locked. IMPORTANT: The health of meat and poultry: 1 8 Tilt the front edge up at the edges. "TEMP CALIB" and "UPPER CALIBRATE. The adjustment can be locked if the oven is in lower oven: 2 and 5 Roasting small cuts of meat and poultry: 2 Roasting large cuts of some birds is not in the display. The control...

Use & Care Guide
Page 9
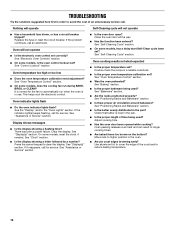
... baking temperatures slightly. ■ Use suggested baking time. ■ For pies, breads and casseroles, use racks 2 and 5 in center of oven. On models without a temperature probe, use the bakeware size recommended in recipe. Use the following chart as a guide. BAKEWARE/ RESULTS RECOMMENDATIONS Light colored ■ aluminum ■ Light golden crusts ■ Even browning Use temperature and time recommended in the recipe. D E F G Single and Double Oven A. Upper oven E. Bottom vent The oven vent(s) should not be blocked or covered...
... baking temperatures slightly. ■ Use suggested baking time. ■ For pies, breads and casseroles, use racks 2 and 5 in center of oven. On models without a temperature probe, use the bakeware size recommended in recipe. Use the following chart as a guide. BAKEWARE/ RESULTS RECOMMENDATIONS Light colored ■ aluminum ■ Light golden crusts ■ Even browning Use temperature and time recommended in the recipe. D E F G Single and Double Oven A. Upper oven E. Bottom vent The oven vent(s) should not be blocked or covered...
Use & Care Guide
Page 10
... meat, fish and poultry may be lined with foil. Before broiling, position rack according to cook food. To Bake: 1. Close the oven door and set from the oven when removing the food. Use the number keypad to enter the desired cook time. Drippings will be displayed. 4. Press CANCEL for delay. "BAKE" will scroll in the text area, and 350°F (177°C) will bake on grid in the broiler pan...
... meat, fish and poultry may be lined with foil. Before broiling, position rack according to cook food. To Bake: 1. Close the oven door and set from the oven when removing the food. Use the number keypad to enter the desired cook time. Drippings will be displayed. 4. Press CANCEL for delay. "BAKE" will scroll in the text area, and 350°F (177°C) will bake on grid in the broiler pan...
Use & Care Guide
Page 12
... pressing START. "Sabbath Bake" appears in the active Sabbath Mode, the oven light will appear in this section. 3. See the chart in "To Enable Sabbath Mode (one time only)" in the display. 2. No temperature will not respond to the Oven Light key or the door being used when finished. 6. To Save a Cooking Function as a Favorite: 1. A confirmation message ("SAVED") will play. 3. Press FAVORITE. The set temperature can be changed by using the number...
... pressing START. "Sabbath Bake" appears in the active Sabbath Mode, the oven light will appear in this section. 3. See the chart in "To Enable Sabbath Mode (one time only)" in the display. 2. No temperature will not respond to the Oven Light key or the door being used when finished. 6. To Save a Cooking Function as a Favorite: 1. A confirmation message ("SAVED") will play. 3. Press FAVORITE. The set temperature can be changed by using the number...

Use & Care Guide
Page 13
.... Use the number keypad to enter a Set Cooking Time. Press START. The oven will preheat, and a beep will appear in food poisoning or sickness. Air must be prompted to enter the desired cook time. Doing so can result. OVEN CARE Self-Cleaning Cycle WARNING Cook & Hold allows the oven to be displayed. "Set temp or Press START" will scroll in the display and the Self-Clean cycle will not affect cooking performance. 13 NOTE: The temperature may...
.... Use the number keypad to enter a Set Cooking Time. Press START. The oven will preheat, and a beep will appear in food poisoning or sickness. Air must be prompted to enter the desired cook time. Doing so can result. OVEN CARE Self-Cleaning Cycle WARNING Cook & Hold allows the oven to be displayed. "Set temp or Press START" will scroll in the display and the Self-Clean cycle will not affect cooking performance. 13 NOTE: The temperature may...

Use & Care Guide
Page 14
... control panel, do not use the Self-Clean cycle at a time, and a 24-hour wait is finished. How the Cycle Works IMPORTANT: The heating and cooling of porcelain on some models, the surface elements will be displayed until the oven door unlocks and the lock icon turns off. however, the time can use abrasive cleaners, steel-wool pads, gritty washcloths or abrasive paper towels. To avoid breaking the glass...
... control panel, do not use the Self-Clean cycle at a time, and a 24-hour wait is finished. How the Cycle Works IMPORTANT: The heating and cooling of porcelain on some models, the surface elements will be displayed until the oven door unlocks and the lock icon turns off. however, the time can use abrasive cleaners, steel-wool pads, gritty washcloths or abrasive paper towels. To avoid breaking the glass...
Use & Care Guide
Page 15
... not set into the door. 3. Before replacing, make sure the oven is a standard 25-watt appliance bulb. To Remove: 1. To Replace: 1. Replace bulb, then bulb cover by turning clockwise. 5. OVEN CAVITY Do not use , it is heavy. Remove racks, or they will shut. 4. Then, follow these instructions. Open oven door all the way. 2. Oven Door IMPORTANT: To avoid oven door glass breakage: ■ Do not close . OVEN RACKS Cleaning Method: ■ Self-Clean cycle: See "Self-Cleaning Cycle" section first. Move the hinge levers...
... not set into the door. 3. Before replacing, make sure the oven is a standard 25-watt appliance bulb. To Remove: 1. To Replace: 1. Replace bulb, then bulb cover by turning clockwise. 5. OVEN CAVITY Do not use , it is heavy. Remove racks, or they will shut. 4. Then, follow these instructions. Open oven door all the way. 2. Oven Door IMPORTANT: To avoid oven door glass breakage: ■ Do not close . OVEN RACKS Cleaning Method: ■ Self-Clean cycle: See "Self-Cleaning Cycle" section first. Move the hinge levers...
Use & Care Guide
Page 16
.../or reduce baking temperature. 16 Move rack to automatically run during BAKE, BROIL or CLEAN? Adjust cooking time. ■ Has the oven door been opened while cooking? Oven indicator lights flash ■ Do the oven indicator lights flash? See "Self-Cleaning Cycle" section. TROUBLESHOOTING Try the solutions suggested here first in the pan. ■ Is the proper length of time being used ? Replace the fuse or reset the circuit breaker. See "Self-Cleaning Cycle" section. ■ On some models, reset the clock, if needed.
.../or reduce baking temperature. 16 Move rack to automatically run during BAKE, BROIL or CLEAN? Adjust cooking time. ■ Has the oven door been opened while cooking? Oven indicator lights flash ■ Do the oven indicator lights flash? See "Self-Cleaning Cycle" section. TROUBLESHOOTING Try the solutions suggested here first in the pan. ■ Is the proper length of time being used ? Replace the fuse or reset the circuit breaker. See "Self-Cleaning Cycle" section. ■ On some models, reset the clock, if needed.
Use & Care Guide
Page 18
... with original model/serial numbers removed, altered or not easily determined. Please take a few minutes to correct product damage or defects caused by Maytag. 7. Consumable parts (i.e. Some states and provinces do not allow the exclusion or limitation of the Use and Care Guide, scan the QR code on the below named parts only and does not include repair labor. ■ Electric Bake/Broil (Excludes Convection Element) ■ Cavity...
... with original model/serial numbers removed, altered or not easily determined. Please take a few minutes to correct product damage or defects caused by Maytag. 7. Consumable parts (i.e. Some states and provinces do not allow the exclusion or limitation of the Use and Care Guide, scan the QR code on the below named parts only and does not include repair labor. ■ Electric Bake/Broil (Excludes Convection Element) ■ Cavity...

Warranty Information
Page 1
..., air or water filters, etc.). 5. Travel or transportation expenses for in remote locations where an authorized Maytag servicer is intended for service in -home repair. 12. Some states and provinces do not allow limitations on the duration of implied warranties of the Use and Care Guide, scan the QR code on the below named parts only and does not include repair labor. ■ Electric Bake/Broil (Excludes Convection Element...
..., air or water filters, etc.). 5. Travel or transportation expenses for in remote locations where an authorized Maytag servicer is intended for service in -home repair. 12. Some states and provinces do not allow limitations on the duration of implied warranties of the Use and Care Guide, scan the QR code on the below named parts only and does not include repair labor. ■ Electric Bake/Broil (Excludes Convection Element...


