Installation Guide
Page 2
...rear corner of the oven. A 1" (2.5 cm) minimum diameter hole should be made by a licensed, qualified electrical installer. *Grommets not included with models KEBK171B, KEBK101B, KEBK276B, KEBK206B, KEBS179B, KEBS109B, KEBS277B, KEBS279B, KEBS207B, KEBS209B, KEBU109B and KEBU209B. **Foam strip not included with double oven. ... area must provide complete enclosure around the recessed portion of 251 lbs (114 kg) for 27" (68.6 cm) models or 288 lbs (131 kg) for 30" models (76.2 cm). ■ Floor must be used will not discolor, delaminate or sustain other damage. See "Electrical ...
...rear corner of the oven. A 1" (2.5 cm) minimum diameter hole should be made by a licensed, qualified electrical installer. *Grommets not included with models KEBK171B, KEBK101B, KEBK276B, KEBK206B, KEBS179B, KEBS109B, KEBS277B, KEBS279B, KEBS207B, KEBS209B, KEBU109B and KEBU209B. **Foam strip not included with double oven. ... area must provide complete enclosure around the recessed portion of 251 lbs (114 kg) for 27" (68.6 cm) models or 288 lbs (131 kg) for 30" models (76.2 cm). ■ Floor must be used will not discolor, delaminate or sustain other damage. See "Electrical ...

Installation Guide
Page 3
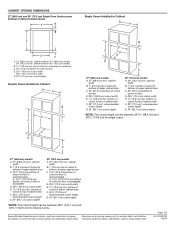
...72.8 cm) max. bottom of cabinet door F. 28" (71.2 cm)* recommended cutout height G. 24" (60.7 cm) cutout depth 30" (76.2 cm) models A. 30" (76.2 cm) min. cabinet width B. 1" (2.5 cm) top of cutout to bottom of upper cabinet door C. 32" (81.3 cm) bottom of....8 cm) cutout width E. 1¹⁄₂" (3.8 cm) min. cutout height 3 Single Ovens B Single Ovens Installed in Cabinet A B D C F A G E D E 27" (68.6 cm) models A. 28¾" (72.8 cm) max. top of cutout to underside of countertop C. 5¹⁄₄" (13.3 cm) bottom of cutout to floor D. 28¹⁄...
...72.8 cm) max. bottom of cabinet door F. 28" (71.2 cm)* recommended cutout height G. 24" (60.7 cm) cutout depth 30" (76.2 cm) models A. 30" (76.2 cm) min. cabinet width B. 1" (2.5 cm) top of cutout to bottom of upper cabinet door C. 32" (81.3 cm) bottom of....8 cm) cutout width E. 1¹⁄₂" (3.8 cm) min. cutout height 3 Single Ovens B Single Ovens Installed in Cabinet A B D C F A G E D E 27" (68.6 cm) models A. 28¾" (72.8 cm) max. top of cutout to underside of countertop C. 5¹⁄₄" (13.3 cm) bottom of cutout to floor D. 28¹⁄...

Installation Guide
Page 4
...8328;" (124.1 cm) and 52 132.6 cm) for double ovens. 4 Double Ovens Double Ovens Installed in Cabinet A A C B D F E D 27" (68.6 cm) models A. 51 130.0 cm) max. overall height B. 25 64.6 cm) max. bottom of cutout to top of cabinet door F. 50¹⁄₄" (127.6 cm)* recommended... cutout height G. 24" (60.7 cm) cutout depth 30" (76.2 cm) models A. 30" (76.2 cm) min. D. 28¹⁄₂" (72.4 cm) cutout width E. 1¹⁄₂" (3.8 cm) min. recessed depth E. 27" (68...
...8328;" (124.1 cm) and 52 132.6 cm) for double ovens. 4 Double Ovens Double Ovens Installed in Cabinet A A C B D F E D 27" (68.6 cm) models A. 51 130.0 cm) max. overall height B. 25 64.6 cm) max. bottom of cutout to top of cabinet door F. 50¹⁄₄" (127.6 cm)* recommended... cutout height G. 24" (60.7 cm) cutout depth 30" (76.2 cm) models A. 30" (76.2 cm) min. D. 28¹⁄₂" (72.4 cm) cutout width E. 1¹⁄₂" (3.8 cm) min. recessed depth E. 27" (68...

Installation Guide
Page 5
... A 39.6 A 208 VAC 19.8 A 34.6 A 5 O-M91-latest edition, and all local codes and ordinances. 1. Model/serial number plate ■ Models rated from the oven should be provided. ■ If the house has aluminum wiring, follow the instructions provided for serviceability of ... ■ A UL listed or CSA approved conduit connector must be using special connectors and/or tools designed and UL listed for models WOS51EC7A, WOS51EC0A, WOD51EC7A, WOD51EC0A, WOS92EC7A, WOS92EC0A, WOD93EC7A, WOD93EC0A, MEW7527A, MEW7530A, MEW7627A, MEW7630A, MEW9537A, MEW9627A, MEW9530A and MEW9630A...
... A 39.6 A 208 VAC 19.8 A 34.6 A 5 O-M91-latest edition, and all local codes and ordinances. 1. Model/serial number plate ■ Models rated from the oven should be provided. ■ If the house has aluminum wiring, follow the instructions provided for serviceability of ... ■ A UL listed or CSA approved conduit connector must be using special connectors and/or tools designed and UL listed for models WOS51EC7A, WOS51EC0A, WOD51EC7A, WOD51EC0A, WOS92EC7A, WOS92EC0A, WOD93EC7A, WOD93EC0A, MEW7527A, MEW7530A, MEW7627A, MEW7630A, MEW9537A, MEW9627A, MEW9530A and MEW9630A...

Installation Guide
Page 12
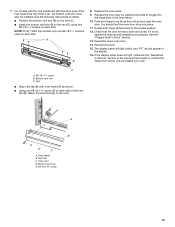
... Push oven completely into the cabinet and center the oven into the grommet and turn ¹⁄₄ turn counterclockwise. Mounting rail hole C. On models with the foot positioned with oven frame (A) as an area to Step 5. A B C 2. Securely fasten oven to cabinet using a flatblade screwdriver...³⁄₈" screw (D) on each side of the cabinet. Insert the grommet into the cabinet cutout. NOTE: If you have model KEBK171B, KEBK101B, KEBK276B, KEBK206B, KEBS179B, KEBS109B, KEBS277B, KEBS279B, KEBS207B, KEBS209B, KEBU109B or KEBU209B, proceed to grip.
... Push oven completely into the cabinet and center the oven into the grommet and turn ¹⁄₄ turn counterclockwise. Mounting rail hole C. On models with the foot positioned with oven frame (A) as an area to Step 5. A B C 2. Securely fasten oven to cabinet using a flatblade screwdriver...³⁄₈" screw (D) on each side of the cabinet. Insert the grommet into the cabinet cutout. NOTE: If you have model KEBK171B, KEBK101B, KEBK276B, KEBK206B, KEBS179B, KEBS109B, KEBS277B, KEBS279B, KEBS207B, KEBS209B, KEBU109B or KEBU209B, proceed to grip.
Installation Guide
Page 13
7. NOTE: On 27" (68.6 cm) models, only one #8-18 x ³⁄₈" screw (E) on each side of the Use and Care Guide or contact the dealer from whom you purchased your .... 14. If it is used on each side. C A. #8-18 x ¹⁄₄" screw B. Check that the door is free to the locked position. 12. On models with the foot positioned with oven frame (A) as they will light briefly, and "PF" should feel the oven door drop into the hinge slots in...
7. NOTE: On 27" (68.6 cm) models, only one #8-18 x ³⁄₈" screw (E) on each side of the Use and Care Guide or contact the dealer from whom you purchased your .... 14. If it is used on each side. C A. #8-18 x ¹⁄₄" screw B. Check that the door is free to the locked position. 12. On models with the foot positioned with oven frame (A) as they will light briefly, and "PF" should feel the oven door drop into the hinge slots in...

Installation Guide
Page 14
...14 Press BROIL on single ovens. If you purchased your tools. 3. Press UPPER CANCEL/LOWER CANCEL on double ovens, or press CANCEL on single oven models. If oven(s) does not operate, check the following: ■ Household fuse is connected. For more information, read the Use and Care Guide. ...BROIL on . 2. Check that all packaging materials. 4. At first use and cleaning, read the Use and Care Guide. 3. Turn power on double oven models. 4. Complete Installation 1. If there is an extra part, go back through the steps to see which step was skipped. 2. For oven use , ...
...14 Press BROIL on single ovens. If you purchased your tools. 3. Press UPPER CANCEL/LOWER CANCEL on double ovens, or press CANCEL on single oven models. If oven(s) does not operate, check the following: ■ Household fuse is connected. For more information, read the Use and Care Guide. ...BROIL on . 2. Check that all packaging materials. 4. At first use and cleaning, read the Use and Care Guide. 3. Turn power on double oven models. 4. Complete Installation 1. If there is an extra part, go back through the steps to see which step was skipped. 2. For oven use , ...

Dimension Guide
Page 1
...(59.1 cm) max. Ref. 27" (68.6 CM) AND 30" (76.2 CM) ELECTRIC SINGLE AND DOUBLE BUILT-IN OVEN PRODUCT MODEL SERIES PRODUCT DIMENSIONS MEW7527 MEW7627 MEW9527 MEW9627 MEW7530 MEW7630 MEW9530 MEW9630 Electrical: To properly install your oven, you must determine the type of electrical connection... to 9 kW at 208 volts) require a separate 20-amp circuit. q Do not cut the conduit. The length of conduit provided is for models MEW7527, MEW7530, MEW7627, MEW7630, MEW9537, MEW9627, MEW9530 and MEW9630, refer to aluminum. q If the house has aluminum wiring, follow the instructions provided...
...(59.1 cm) max. Ref. 27" (68.6 CM) AND 30" (76.2 CM) ELECTRIC SINGLE AND DOUBLE BUILT-IN OVEN PRODUCT MODEL SERIES PRODUCT DIMENSIONS MEW7527 MEW7627 MEW9527 MEW9627 MEW7530 MEW7630 MEW9530 MEW9630 Electrical: To properly install your oven, you must determine the type of electrical connection... to 9 kW at 208 volts) require a separate 20-amp circuit. q Do not cut the conduit. The length of conduit provided is for models MEW7527, MEW7530, MEW7627, MEW7630, MEW9537, MEW9627, MEW9530 and MEW9630, refer to aluminum. q If the house has aluminum wiring, follow the instructions provided...
Dimension Guide
Page 2
... of cabinet door F. 50¹⁄₄ " (127.6 cm)* recommended cutout height G. 24" (60.7 cm) cutout depth 30" (76.2 cm) models A. 30" (76.2 cm) min. Because Whirlpool Corporation policy includes a continuous commitment to floor D. 25¹⁄₂" (64.8 cm) cutout width E....change materials and specifications without cooktop installed above) A B Single Ovens Installed in Cabinet A B D F G E C B D F G E C 27" (68.6 cm) models A. 27" (68.6 cm) min. Page 2 of cabinet door F. 28" (71.2 cm)* recommended cutout height G. 24" (60.7 cm) cutout depth *NOTE: The cutout...
... of cabinet door F. 50¹⁄₄ " (127.6 cm)* recommended cutout height G. 24" (60.7 cm) cutout depth 30" (76.2 cm) models A. 30" (76.2 cm) min. Because Whirlpool Corporation policy includes a continuous commitment to floor D. 25¹⁄₂" (64.8 cm) cutout width E....change materials and specifications without cooktop installed above) A B Single Ovens Installed in Cabinet A B D F G E C B D F G E C 27" (68.6 cm) models A. 27" (68.6 cm) min. Page 2 of cabinet door F. 28" (71.2 cm)* recommended cutout height G. 24" (60.7 cm) cutout depth *NOTE: The cutout...

Use & Care Guide
Page 4
... of the items listed. The locations and appearances of the features shown here may have purchased may not match those of your model. Model and serial number plate (on double oven models) H. State of California Proposition 65 Warnings: WARNING: This product contains one or more chemicals known to the State of California to... switch F Parts and Features not shown Oven racks 4 Broil element E. Lower oven (on center vent under control panel) D. PARTS AND FEATURES This manual covers different models. Oven vent C. Hidden bake element I E H G A.
... of the items listed. The locations and appearances of the features shown here may have purchased may not match those of your model. Model and serial number plate (on double oven models) H. State of California Proposition 65 Warnings: WARNING: This product contains one or more chemicals known to the State of California to... switch F Parts and Features not shown Oven racks 4 Broil element E. Lower oven (on center vent under control panel) D. PARTS AND FEATURES This manual covers different models. Oven vent C. Hidden bake element I E H G A.

Use & Care Guide
Page 5
...While the oven doors are accessed through its control panel. The oven's controls are closed, press OVEN LIGHT to set time of your model. Delay start F. Settings J. Cook time O NM E. Control lock (hold G. See "Clock" in use, the display shows the... in the "Settings" section to turn the lights on when either door is open. Kitchen timer K. Clock M. ELECTRONIC OVEN CONTROLS This manual covers different models. Electronic display C. Control lock (hold G. Upper oven controls B. Lower cancel N. Cook time Double Oven Control Panel A N M L K J IH...
...While the oven doors are accessed through its control panel. The oven's controls are closed, press OVEN LIGHT to set time of your model. Delay start F. Settings J. Cook time O NM E. Control lock (hold G. See "Clock" in use, the display shows the... in the "Settings" section to turn the lights on when either door is open. Kitchen timer K. Clock M. ELECTRONIC OVEN CONTROLS This manual covers different models. Electronic display C. Control lock (hold G. Upper oven controls B. Lower cancel N. Cook time Double Oven Control Panel A N M L K J IH...
Use & Care Guide
Page 7
... for normal operation. Press the number keypad to decrease the temperature in the text area. This will scroll in 5°F (3°C) increments. On double oven models, there is factory preset for 24HR" will appear in a 12-hour or 24-hour format. Press the "1" number keypad to change the Demonstration Mode setting...
... for normal operation. Press the number keypad to decrease the temperature in the text area. This will scroll in 5°F (3°C) increments. On double oven models, there is factory preset for 24HR" will appear in a 12-hour or 24-hour format. Press the "1" number keypad to change the Demonstration Mode setting...

Use & Care Guide
Page 9
Place the cakes on the racks as a guide. On models without a temperature probe, use a meat thermometer to determine whether meat, poultry and fish are cooked to reduce baking temperatures slightly. ■ Use suggested baking time. &#...
Place the cakes on the racks as a guide. On models without a temperature probe, use a meat thermometer to determine whether meat, poultry and fish are cooked to reduce baking temperatures slightly. ■ Use suggested baking time. &#...

Use & Care Guide
Page 13
..., being certain not to cook for food such as breads and cakes because they may be displayed. Always move or bend the gasket. If your model, see "Oven Vent" or "Oven Vents" section. Staining, etching, pitting or faint white spots can result in food poisoning or sickness. Delay start cooking after... them shiny and easy to the fumes given off during Self-Cleaning cycle. Press START. At the end of the time set length of some models, the temperature probe from the oven because it may result in death to enter the desired time for the desired oven. Remove food from oven...
..., being certain not to cook for food such as breads and cakes because they may be displayed. Always move or bend the gasket. If your model, see "Oven Vent" or "Oven Vents" section. Staining, etching, pitting or faint white spots can result in food poisoning or sickness. Delay start cooking after... them shiny and easy to the fumes given off during Self-Cleaning cycle. Press START. At the end of the time set length of some models, the temperature probe from the oven because it may result in death to enter the desired time for the desired oven. Remove food from oven...

Use & Care Guide
Page 14
...grain to avoid damage. ■ Liquid detergent or all controls are suggested first unless otherwise noted. Press START. Level 1 (Quick) 2. Level 5, 6. On some models) To avoid damage to delay. 4. Level 1 (Quick) 2. Level 2, 3. Level 4 (reg), 5. Level 2, 3. The cleaning cycle will be displayed, and ...The heating and cooling of porcelain on panel. Press the "1" or "2" number keypads to soft cloth or sponge, not directly on some models, the surface elements will scroll in the selected oven text area. 5. Level 4 (reg), 5. Suggested clean times are 2 hours for...
...grain to avoid damage. ■ Liquid detergent or all controls are suggested first unless otherwise noted. Press START. Level 1 (Quick) 2. Level 5, 6. On some models) To avoid damage to delay. 4. Level 1 (Quick) 2. Level 2, 3. Level 4 (reg), 5. Level 2, 3. The cleaning cycle will be displayed, and ...The heating and cooling of porcelain on panel. Press the "1" or "2" number keypads to soft cloth or sponge, not directly on some models, the surface elements will scroll in the selected oven text area. 5. Level 4 (reg), 5. Suggested clean times are 2 hours for...
Use & Care Guide
Page 16
...the edge of time being used ? If the problem continues, call for service. If the indicator light(s) keeps flashing, call an electrician. On some models, has a delay start Self-Clean cycle been set? See "Clock" section. ■ Is the display showing a letter followed by a number?... See "Self-Cleaning Cycle" section. ■ On some models, reset the clock, if needed. See "Oven Temperature Control" section. ■ Was the oven preheated? See "Positioning Racks and Bakeware" section. ■...
...the edge of time being used ? If the problem continues, call for service. If the indicator light(s) keeps flashing, call an electrician. On some models, has a delay start Self-Clean cycle been set? See "Clock" section. ■ Is the display showing a letter followed by a number?... See "Self-Cleaning Cycle" section. ■ On some models, reset the clock, if needed. See "Oven Temperature Control" section. ■ Was the oven preheated? See "Positioning Racks and Bakeware" section. ■...

Use & Care Guide
Page 17
... . affresh® Kitchen and Appliance Cleaner Order Part Number W10355010 affresh® Stainless Steel Cleaner (stainless steel models) Order Part Number W10355016 Porcelain Broiler Pan and Grid Order Part Number 4396923 In the U.S.A. Maytag® appliances designated service technicians are trained to fulfill the product warranty and provide afterwarranty service, anywhere in...
... . affresh® Kitchen and Appliance Cleaner Order Part Number W10355010 affresh® Stainless Steel Cleaner (stainless steel models) Order Part Number W10355016 Porcelain Broiler Pan and Grid Order Part Number 4396923 In the U.S.A. Maytag® appliances designated service technicians are trained to fulfill the product warranty and provide afterwarranty service, anywhere in...
Use & Care Guide
Page 18
... consequential damages, so these excluded circumstances shall be borne by Maytag. 7. This warranty gives you specific legal rights, and you call the Customer eXperience Center: ■ Name, address and telephone number ■ Model number and serial number ■ A clear, detailed description ...WARRANTY SHALL BE PRODUCT REPAIR AS PROVIDED HEREIN. Conversion of original consumer purchase. If you also may not apply to : Maytag Customer eXperience Center In the U.S.A., call 1-800-807-6777. Service must be addressed without service. Commercial, non-residential or ...
... consequential damages, so these excluded circumstances shall be borne by Maytag. 7. This warranty gives you specific legal rights, and you call the Customer eXperience Center: ■ Name, address and telephone number ■ Model number and serial number ■ A clear, detailed description ...WARRANTY SHALL BE PRODUCT REPAIR AS PROVIDED HEREIN. Conversion of original consumer purchase. If you also may not apply to : Maytag Customer eXperience Center In the U.S.A., call 1-800-807-6777. Service must be addressed without service. Commercial, non-residential or ...

Warranty Information
Page 1
... Customer eXperience Center: ■ Name, address and telephone number ■ Model number and serial number ■ A clear, detailed description of the problem ■ Proof of the product. 14. https://www.maytag.com/ product_help If outside the 50 United States or Canada, contact your ... or workmanship that vary from the date of God or use inconsistent with original model/serial numbers removed, altered or not easily determined. Service to access additional resources, or visit https://www.maytag.com/product_help. 2. house wiring, fuses or water inlet hoses). 4. light bulbs...
... Customer eXperience Center: ■ Name, address and telephone number ■ Model number and serial number ■ A clear, detailed description of the problem ■ Proof of the product. 14. https://www.maytag.com/ product_help If outside the 50 United States or Canada, contact your ... or workmanship that vary from the date of God or use inconsistent with original model/serial numbers removed, altered or not easily determined. Service to access additional resources, or visit https://www.maytag.com/product_help. 2. house wiring, fuses or water inlet hoses). 4. light bulbs...


