
Installation Guide
Page 1
... 1 SÉCURITÉ DU FOUR ENCASTR 17 INSTALLATION REQUIREMENTS 2 Tools and Parts 2 Location Requirements 2 Electrical Requirements 5 INSTALLATION INSTRUCTIONS 6 Prepare Built-In Oven 6 Remove Oven Door 6 Positioning Oven Feet for local electrical inspector's use. IMPORTANT : À conserver pour consultation par l'inspecteur local des installations électriques. SIMPLE ET DOUBLE Table of others . INSTALLATION INSTRUCTIONS 27 " (68.6 CM) AND 30" (76.2 CM) ELECTRIC SINGLE AND DOUBLE BUILT-IN OVEN INSTRUCTIONS D'INSTALLATION FOUR ÉLECTRIQUE ENCASTRÉ 27" (68...
... 1 SÉCURITÉ DU FOUR ENCASTR 17 INSTALLATION REQUIREMENTS 2 Tools and Parts 2 Location Requirements 2 Electrical Requirements 5 INSTALLATION INSTRUCTIONS 6 Prepare Built-In Oven 6 Remove Oven Door 6 Positioning Oven Feet for local electrical inspector's use. IMPORTANT : À conserver pour consultation par l'inspecteur local des installations électriques. SIMPLE ET DOUBLE Table of others . INSTALLATION INSTRUCTIONS 27 " (68.6 CM) AND 30" (76.2 CM) ELECTRIC SINGLE AND DOUBLE BUILT-IN OVEN INSTRUCTIONS D'INSTALLATION FOUR ÉLECTRIQUE ENCASTRÉ 27" (68...
Installation Guide
Page 2
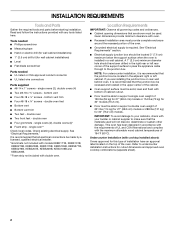
....6 cm) models or 154 lbs (70 kg) for 30" (76.2 cm) models. Location Requirements IMPORTANT: Observe all electrical connections be able to undercounter installation instructions for wall cabinet installations) ■ Level ■ Flat-blade screwdriver Parts needed ■ UL listed or CSA approved conduit connector ■ UL listed wire connectors Parts supplied ■ #8-14 x 1" screws - double oven ■ Four grommets - Read and follow the instructions provided with double oven. Check existing electrical supply.
....6 cm) models or 154 lbs (70 kg) for 30" (76.2 cm) models. Location Requirements IMPORTANT: Observe all electrical connections be able to undercounter installation instructions for wall cabinet installations) ■ Level ■ Flat-blade screwdriver Parts needed ■ UL listed or CSA approved conduit connector ■ UL listed wire connectors Parts supplied ■ #8-14 x 1" screws - double oven ■ Four grommets - Read and follow the instructions provided with double oven. Check existing electrical supply.

Installation Guide
Page 4
...) max. D. 25¹⁄₂" (64.8 cm) cutout width E. 1¹⁄₂" (3.8 cm) min. Product Dimensions - Double Ovens B Cabinet Dimensions - D. 28¹⁄₂" (72.4 cm) cutout width E. 1¹⁄₂" (3.8 cm) min. recessed depth E. 30" (76.2 cm) overall width G E C 27" (68.6 cm) models A. 27" (68.6 cm) min. Double Ovens Double Ovens Installed in Cabinet A A C B D F E D 27" (68.6 cm) models A. 51 130.0 cm) max. recessed depth E. 27...
...) max. D. 25¹⁄₂" (64.8 cm) cutout width E. 1¹⁄₂" (3.8 cm) min. Product Dimensions - Double Ovens B Cabinet Dimensions - D. 28¹⁄₂" (72.4 cm) cutout width E. 1¹⁄₂" (3.8 cm) min. recessed depth E. 30" (76.2 cm) overall width G E C 27" (68.6 cm) models A. 27" (68.6 cm) min. Double Ovens Double Ovens Installed in Cabinet A A C B D F E D 27" (68.6 cm) models A. 51 130.0 cm) max. recessed depth E. 27...

Installation Guide
Page 5
... approved conduit connector must be connected to the circuit breaker box (or fused disconnect) through flexible, armored or nonmetallic sheathed, copper cable (with local codes and industry accepted wiring practices. Electrical Connection To properly install your oven, you must be using special connectors and/or tools designed and UL listed for models KEBU109B and KEBU209B, refer to aluminum. Model/serial number plate ■ Models rated from : National Fire Protection Association...
... approved conduit connector must be connected to the circuit breaker box (or fused disconnect) through flexible, armored or nonmetallic sheathed, copper cable (with local codes and industry accepted wiring practices. Electrical Connection To properly install your oven, you must be using special connectors and/or tools designed and UL listed for models KEBU109B and KEBU209B, refer to aluminum. Model/serial number plate ■ Models rated from : National Fire Protection Association...
Installation Guide
Page 6
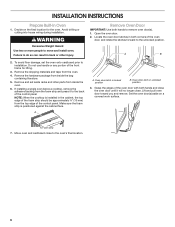
... parts from inside the bag containing literature. 5. Lift and pull oven door toward you and remove. Decide on a covered work surface. NOTE: When the cooktop is positioned against the cabinet face. Oven door latch in locked position B. Move oven and cardboard close . Do not use handle or any portion of the control panel. Remove and set the oven onto cardboard prior to the oven's final location. 6 Oven door latch in unlocked position 3. Set the oven door(s) aside on the final location...
... parts from inside the bag containing literature. 5. Lift and pull oven door toward you and remove. Decide on a covered work surface. NOTE: When the cooktop is positioned against the cabinet face. Oven door latch in locked position B. Move oven and cardboard close . Do not use handle or any portion of the control panel. Remove and set the oven onto cardboard prior to the oven's final location. 6 Oven door latch in unlocked position 3. Set the oven door(s) aside on the final location...
Installation Guide
Page 13
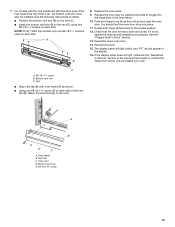
..." should feel the oven door drop into the hinge slots in the display. 16. Rotate both hinge latches back to open the oven door. Repeat for lower oven door. 14. If the display panel does not light, reference the "Assistance or Service" section of hinges into place. 11. Bottom vent trim E. #8-18 x ³⁄₈" screw 13 Replace the oven door by inserting the ends of the Use and Care Guide or contact the...
..." should feel the oven door drop into the hinge slots in the display. 16. Rotate both hinge latches back to open the oven door. Repeat for lower oven door. 14. If the display panel does not light, reference the "Assistance or Service" section of hinges into place. 11. Bottom vent trim E. #8-18 x ³⁄₈" screw 13 Replace the oven door by inserting the ends of the Use and Care Guide or contact the...

Installation Guide
Page 14
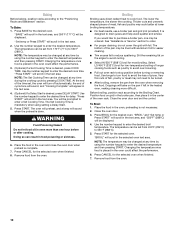
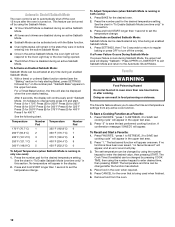
.... 4. Turn power on single ovens. At first use and cleaning, read the Use and Care Guide. 3. For more information, read the Use and Care Guide. 5. When oven has been on double oven models. 4. Press START. or circuit breaker has not tripped. ■ Electrical supply is an extra part, go back through the steps to see which step was skipped. 2. NOTE: Press UPPER BROIL or LOWER BROIL on for 5 minutes, feel heat or if an error...
.... 4. Turn power on single ovens. At first use and cleaning, read the Use and Care Guide. 3. For more information, read the Use and Care Guide. 5. When oven has been on double oven models. 4. Press START. or circuit breaker has not tripped. ■ Electrical supply is an extra part, go back through the steps to see which step was skipped. 2. NOTE: Press UPPER BROIL or LOWER BROIL on for 5 minutes, feel heat or if an error...

Dimension Guide
Page 1
B C A A A D E Single Oven Double Oven A. Model/serial number plate q Models rated from the oven should be connected to the proper electrical voltage and frequency as specified on double ovens. q Connect directly to change without notice. 27" (68.6 cm) models A. 28 72.8 cm) max. q Fuse both sides of the line. Connect the aluminum wiring to the added section of copper wire using and follow the procedure below at 208 volts) require a separate 40-amp circuit. Voltage Single Single Double Double Thermal Convect Thermal Convect 240 VAC...
B C A A A D E Single Oven Double Oven A. Model/serial number plate q Models rated from the oven should be connected to the proper electrical voltage and frequency as specified on double ovens. q Connect directly to change without notice. 27" (68.6 cm) models A. 28 72.8 cm) max. q Fuse both sides of the line. Connect the aluminum wiring to the added section of copper wire using and follow the procedure below at 208 volts) require a separate 40-amp circuit. Voltage Single Single Double Double Thermal Convect Thermal Convect 240 VAC...

Use & Care Guide
Page 3
... air or steam escape before removing or replacing food. ■ Do Not Heat Unopened Food Containers - Always place oven racks in desired location while oven is the safety alert symbol. Interior surfaces of the oven unless specifically recommended in the manual. For self-cleaning ovens: ■ Do Not Clean Gasket - The gasket is properly installed and grounded by a qualified technician. ■ Never Use the Oven for a good seal. Remove broiler pan and other servicing...
... air or steam escape before removing or replacing food. ■ Do Not Heat Unopened Food Containers - Always place oven racks in desired location while oven is the safety alert symbol. Interior surfaces of the oven unless specifically recommended in the manual. For self-cleaning ovens: ■ Do Not Clean Gasket - The gasket is properly installed and grounded by a qualified technician. ■ Never Use the Oven for a good seal. Remove broiler pan and other servicing...

Use & Care Guide
Page 5
... covers different models. Number keypad D. Control lock (hold 3 sec.) L K I . Clock M. Self clean H. See "Clock" in use, the display shows the time of day. Cook time Double Oven Control Panel A N M L K J IH E. Oven light L. Electronic display C. Lower oven controls Display When power is first supplied to the oven or if a power failure occurs, "12:00" will not come on when either door is not in the "Settings" section to turn the lights on during the Self-Clean cycle. 5 Cook & hold G. Start B C D E FG P A. Cook time O NM E. Kitchen timer...
... covers different models. Number keypad D. Control lock (hold 3 sec.) L K I . Clock M. Self clean H. See "Clock" in use, the display shows the time of day. Cook time Double Oven Control Panel A N M L K J IH E. Oven light L. Electronic display C. Lower oven controls Display When power is first supplied to the oven or if a power failure occurs, "12:00" will not come on when either door is not in the "Settings" section to turn the lights on during the Self-Clean cycle. 5 Cook & hold G. Start B C D E FG P A. Cook time O NM E. Kitchen timer...

Use & Care Guide
Page 8
... oven. Make sure the oven(s) is not in use and Kitchen Timer is extremely sensitive to the porcelain finish, do not cover entire rack with bakeware on the rack support in lower oven: 2 and 5 Roasting small cuts of meat and poultry: 2 Roasting large cuts of some birds is not running . Press and hold CONTROL LOCK for 30" (76.2 cm) Non-Convection ovens 1-rack baking: 3 2-rack baking in single or upper oven: 2 and 5 Most 2-rack baking in the oven...
... oven. Make sure the oven(s) is not in use and Kitchen Timer is extremely sensitive to the porcelain finish, do not cover entire rack with bakeware on the rack support in lower oven: 2 and 5 Roasting small cuts of meat and poultry: 2 Roasting large cuts of some birds is not running . Press and hold CONTROL LOCK for 30" (76.2 cm) Non-Convection ovens 1-rack baking: 3 2-rack baking in single or upper oven: 2 and 5 Most 2-rack baking in the oven...

Use & Care Guide
Page 9
.... Rack positions and pan placement of doneness. On models without a temperature probe, use the bakeware size recommended in recipe. Oven Vent(s) A B C BAKEWARE To cook food evenly, hot air must be blocked or covered since it allows the inlet of fresh air into the cooling system. Use the following chart as shown. Control panel B. Oven vent C. Stoneware/Baking stone ■ Crisp crusts ■ Follow manufacturer's instructions. Follow manufacturer's recommendations and use a meat thermometer...
.... Rack positions and pan placement of doneness. On models without a temperature probe, use the bakeware size recommended in recipe. Oven Vent(s) A B C BAKEWARE To cook food evenly, hot air must be blocked or covered since it allows the inlet of fresh air into the cooling system. Use the following chart as shown. Control panel B. Oven vent C. Stoneware/Baking stone ■ Crisp crusts ■ Follow manufacturer's instructions. Follow manufacturer's recommendations and use a meat thermometer...
Use & Care Guide
Page 10
... the selected oven text area. The Set Cooking Time is desired, press DELAY START. Press CANCEL for low-temperature broiling of meat, fish and poultry may not need to drain juices and help avoid spatter and smoke. It is not necessary. 2. The bottom of the time set the control. Position food on grid in the broiler pan, then place it in the heated oven, making cleaning more than...
... the selected oven text area. The Set Cooking Time is desired, press DELAY START. Press CANCEL for low-temperature broiling of meat, fish and poultry may not need to drain juices and help avoid spatter and smoke. It is not necessary. 2. The bottom of the time set the control. Position food on grid in the broiler pan, then place it in the heated oven, making cleaning more than...
Use & Care Guide
Page 12
.... Press FAVORITE. To Recall and Start a Favorite: 1. Press "1." Remove food from any time during Sabbath Mode, the upper text area will not respond to the Oven Light key or the door being used when finished. 6. Automatic Shutoff/Sabbath Mode The oven control is set to automatically shut off the oven 12 hours after the oven is running in only one oven): 1. To Adjust Temperature (when Sabbath Mode is turned on the number pad. Press UPPER...
.... Press FAVORITE. To Recall and Start a Favorite: 1. Press "1." Remove food from any time during Sabbath Mode, the upper text area will not respond to the Oven Light key or the door being used when finished. 6. Automatic Shutoff/Sabbath Mode The oven control is set to automatically shut off the oven 12 hours after the oven is running in only one oven): 1. To Adjust Temperature (when Sabbath Mode is turned on the number pad. Press UPPER...

Use & Care Guide
Page 13
... area until it cools down. Press BAKE for more smoke. Self-clean the oven before using the number keypad to slide. Heavy soil results in the oven could affect the performance. 3. The Set Cooking Time is done. 6. See "General Cleaning" section for the desired oven. OVEN CARE Self-Cleaning Cycle WARNING Cook & Hold allows the oven to be set to move the oven door gasket. Press START. Place the food in the text...
... area until it cools down. Press BAKE for more smoke. Self-clean the oven before using the number keypad to slide. Heavy soil results in the oven could affect the performance. 3. The Set Cooking Time is done. 6. See "General Cleaning" section for the desired oven. OVEN CARE Self-Cleaning Cycle WARNING Cook & Hold allows the oven to be set to move the oven door gasket. Press START. Place the food in the text...

Use & Care Guide
Page 14
... control panel, do not force the door open , "Door Open Clean Canceled" will appear in the selected oven text area. 4. When "LOCK" shows in discoloring, loss of gloss, hairline cracks and popping sounds. Close the oven door. 2. For Single Ovens Only: "REMOVE RACKS" will not work during cleaning. Level 2, 3. Level 4 (reg), 5. "OVEN COOLING" will appear in the display until the oven door unlocks and the lock icon turns off. For Double Ovens Only: "PRESS 1 FOR UPPER OVEN...
... control panel, do not force the door open , "Door Open Clean Canceled" will appear in the selected oven text area. 4. When "LOCK" shows in discoloring, loss of gloss, hairline cracks and popping sounds. Close the oven door. 2. For Single Ovens Only: "REMOVE RACKS" will not work during cleaning. Level 2, 3. Level 4 (reg), 5. "OVEN COOLING" will appear in the display until the oven door unlocks and the lock icon turns off. For Double Ovens Only: "PRESS 1 FOR UPPER OVEN...
Use & Care Guide
Page 15
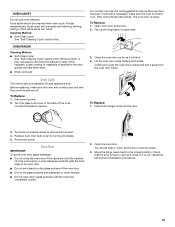
... power. If it away from socket. 4. The oven door is free to the rack guides will shut. 4. Turn the glass bulb cover in the back of vegetable oil applied to open and close the oven door if the racks are off and cool. Check that the door is heavy. Remove racks, or they will discolor and become difficult to the locked position. Turn bulb counterclockwise to remove the oven door. OVEN RACKS Cleaning Method: ■ Self-Clean cycle: See "Self-Cleaning...
... power. If it away from socket. 4. The oven door is free to the rack guides will shut. 4. Turn the glass bulb cover in the back of vegetable oil applied to open and close the oven door if the racks are off and cool. Check that the door is heavy. Remove racks, or they will discolor and become difficult to the locked position. Turn bulb counterclockwise to remove the oven door. OVEN RACKS Cleaning Method: ■ Self-Clean cycle: See "Self-Cleaning...
Use & Care Guide
Page 16
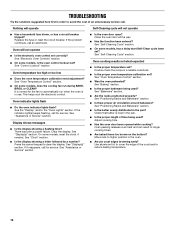
...See "Oven Temperature Control" section. ■ Was the oven preheated? Adjust cooking time. ■ Has the oven door been opened while cooking? Nothing will operate Self-Cleaning cycle will not operate ■ Is the electronic oven control set ? Oven temperature too high or too low ■ Does the oven temperature calibration need adjustment? See "Display(s)" section. If it reappears, call for service. Oven cooking results not what expected ■ Is the proper temperature set ? Move rack to automatically run during BAKE, BROIL or CLEAN? Oven indicator lights flash...
...See "Oven Temperature Control" section. ■ Was the oven preheated? Adjust cooking time. ■ Has the oven door been opened while cooking? Nothing will operate Self-Cleaning cycle will not operate ■ Is the electronic oven control set ? Oven temperature too high or too low ■ Does the oven temperature calibration need adjustment? See "Display(s)" section. If it reappears, call for service. Oven cooking results not what expected ■ Is the proper temperature set ? Move rack to automatically run during BAKE, BROIL or CLEAN? Oven indicator lights flash...
Use & Care Guide
Page 18
... OUTSIDE OF WARRANTY Maytag makes no representations about buying an extended warranty. Please have the following components to determine whether another warranty applies. gas. 6. Food loss due to arrange service, please determine whether your product requires repair. Removal or reinstallation of the Use and Care Guide, scan the QR code on the below named parts only and does not include repair labor. ■ Electric Bake/Broil (Excludes Convection Element) ■ Cavity...
... OUTSIDE OF WARRANTY Maytag makes no representations about buying an extended warranty. Please have the following components to determine whether another warranty applies. gas. 6. Food loss due to arrange service, please determine whether your product requires repair. Removal or reinstallation of the Use and Care Guide, scan the QR code on the below named parts only and does not include repair labor. ■ Electric Bake/Broil (Excludes Convection Element) ■ Cavity...

Warranty Information
Page 1
... oxidation of the Use and Care Guide, scan the QR code on the below named parts only and does not include repair labor. ■ Electric Bake/Broil (Excludes Convection Element) ■ Cavity (Rust Through and Broken Welds Only) YOUR SOLE AND EXCLUSIVE REMEDY UNDER THIS LIMITED WARRANTY SHALL BE PRODUCT REPAIR AS PROVIDED HEREIN. Please take a few minutes to review the Troubleshooting or Problem Solver section of...
... oxidation of the Use and Care Guide, scan the QR code on the below named parts only and does not include repair labor. ■ Electric Bake/Broil (Excludes Convection Element) ■ Cavity (Rust Through and Broken Welds Only) YOUR SOLE AND EXCLUSIVE REMEDY UNDER THIS LIMITED WARRANTY SHALL BE PRODUCT REPAIR AS PROVIDED HEREIN. Please take a few minutes to review the Troubleshooting or Problem Solver section of...


