Installation Guide
Page 2
...9632; Oven support surface must be able to support a single oven weight of 129 lbs (59 kg) for 27" (68.6 cm) models or 154 lbs (70 kg) for this type of installation have been drilled in the adjacent right or left rear corner of the support ... ovens (2), double ovens (4)* ■ Foam strip - If you are shown must be made by a licensed, qualified electrical installer. *Grommets not included with models KEBK171B, KEBK101B, KEBK276B, KEBK206B, KEBS179B, KEBS109B, KEBS277B, KEBS279B, KEBS207B, KEBS209B, KEBU109B and KEBU209B. **Foam strip not included with cooktop installed above): Ovens ...
...9632; Oven support surface must be able to support a single oven weight of 129 lbs (59 kg) for 27" (68.6 cm) models or 154 lbs (70 kg) for this type of installation have been drilled in the adjacent right or left rear corner of the support ... ovens (2), double ovens (4)* ■ Foam strip - If you are shown must be made by a licensed, qualified electrical installer. *Grommets not included with models KEBK171B, KEBK101B, KEBK276B, KEBK206B, KEBS179B, KEBS109B, KEBS277B, KEBS279B, KEBS207B, KEBS209B, KEBU109B and KEBU209B. **Foam strip not included with cooktop installed above): Ovens ...

Installation Guide
Page 3
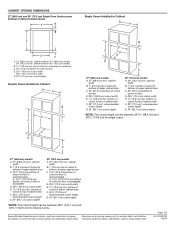
... max. Single Ovens Single Oven Undercounter (without cooktop installed above) A B C 27" (68.6 cm) models A. 27" (68.6 cm) min. cabinet width B. 1¹⁄₂" (3.8 cm) min. cutout height 30" (76.2 cm) models A. 30" (76.2 cm) min. cabinet width B. 1¹⁄₂" (3.8 cm) min. cutout ... of cabinet door F. 28" (71.2 cm)* recommended cutout height G. 24" (60.7 cm) cutout depth 30" (76.2 cm) models A. 30" (76.2 cm) min. E D C 27" (68.6 cm) models A. 27" (68.6 cm) min. Product Dimensions - recessed width C. 26³⁄₄" (67.9 cm) recessed height D. 23...
... max. Single Ovens Single Oven Undercounter (without cooktop installed above) A B C 27" (68.6 cm) models A. 27" (68.6 cm) min. cabinet width B. 1¹⁄₂" (3.8 cm) min. cutout height 30" (76.2 cm) models A. 30" (76.2 cm) min. cabinet width B. 1¹⁄₂" (3.8 cm) min. cutout ... of cabinet door F. 28" (71.2 cm)* recommended cutout height G. 24" (60.7 cm) cutout depth 30" (76.2 cm) models A. 30" (76.2 cm) min. E D C 27" (68.6 cm) models A. 27" (68.6 cm) min. Product Dimensions - recessed width C. 26³⁄₄" (67.9 cm) recessed height D. 23...

Installation Guide
Page 4
...) bottom of cabinet door F. 50¹⁄₄" (127.6 cm)* recommended cutout height G. 24" (60.7 cm) cutout depth 30" (76.2 cm) models A. 30" (76.2 cm) min. bottom of cutout to floor is recommended. 4"-14³⁄₄" (10.2-37.5 cm) bottom of cutout to top ...of cutout to floor is acceptable. Double Ovens Double Ovens Installed in Cabinet A A C B D F E D 27" (68.6 cm) models A. 51 130.0 cm) max. Product Dimensions - recessed width C. 48 124.0 cm) recessed height D. 23¹⁄₄" (59.1 cm) max. cabinet width B. 1" (2.5 ...
...) bottom of cabinet door F. 50¹⁄₄" (127.6 cm)* recommended cutout height G. 24" (60.7 cm) cutout depth 30" (76.2 cm) models A. 30" (76.2 cm) min. bottom of cutout to floor is recommended. 4"-14³⁄₄" (10.2-37.5 cm) bottom of cutout to top ...of cutout to floor is acceptable. Double Ovens Double Ovens Installed in Cabinet A A C B D F E D 27" (68.6 cm) models A. 51 130.0 cm) max. Product Dimensions - recessed width C. 48 124.0 cm) recessed height D. 23¹⁄₄" (59.1 cm) max. cabinet width B. 1" (2.5 ...

Installation Guide
Page 5
...A circuit breaker is for joining copper to the following table. See the following table. Check with local codes. Model/serial number plate ■ Models rated from 7.3 to 9 kW at 208 volts) require a separate 40-amp circuit. See "Make Electrical Connection"....4 A 13.4 A 2820 W 15.5 A 13.6 A 5580 W 30.7 A 26.8 A 5610 W 30.8 A 27.0 A For power requirements for models WOS51EC7A, WOS51EC0A, WOD51EC7A, WOD51EC0A, WOS92EC7A, WOS92EC0A, WOD93EC7A, WOD93EC0A, MEW7527A, MEW7530A, MEW7627A, MEW7630A, MEW9537A, MEW9627A, MEW9530A and MEW9630A, refer to aluminum. The length...
...A circuit breaker is for joining copper to the following table. See the following table. Check with local codes. Model/serial number plate ■ Models rated from 7.3 to 9 kW at 208 volts) require a separate 40-amp circuit. See "Make Electrical Connection"....4 A 13.4 A 2820 W 15.5 A 13.6 A 5580 W 30.7 A 26.8 A 5610 W 30.8 A 27.0 A For power requirements for models WOS51EC7A, WOS51EC0A, WOD51EC7A, WOD51EC0A, WOS92EC7A, WOS92EC0A, WOD93EC7A, WOD93EC0A, MEW7527A, MEW7530A, MEW7627A, MEW7630A, MEW9537A, MEW9627A, MEW9530A and MEW9630A, refer to aluminum. The length...

Installation Guide
Page 12
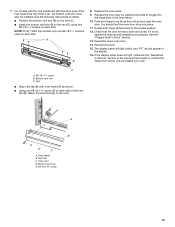
...the oven partially into the grommet and turn ¹⁄₄ turn counterclockwise. Shipping foot 3. Do not overtighten screws. 6. On models with the foot positioned with oven frame (A) as an area to grip. Push oven completely into the cabinet and center the oven ... of the front frame touches the front wall of the front frame to the oven. A B D C A. Vent tab C. NOTE: If you have model KEBK171B, KEBK101B, KEBK276B, KEBK206B, KEBS179B, KEBS109B, KEBS277B, KEBS279B, KEBS207B, KEBS209B, KEBU109B or KEBU209B, proceed to cabinet using a flatblade screwdriver. A. Install...
...the oven partially into the grommet and turn ¹⁄₄ turn counterclockwise. Shipping foot 3. Do not overtighten screws. 6. On models with the foot positioned with oven frame (A) as an area to grip. Push oven completely into the cabinet and center the oven ... of the front frame touches the front wall of the front frame to the oven. A B D C A. Vent tab C. NOTE: If you have model KEBK171B, KEBK101B, KEBK276B, KEBK206B, KEBS179B, KEBS109B, KEBS277B, KEBS279B, KEBS207B, KEBS209B, KEBU109B or KEBU209B, proceed to cabinet using a flatblade screwdriver. A. Install...
Installation Guide
Page 13
... ■ Install the bottom vent trim (B) to the locked position. 12. See the "Prepare Built-In Oven" section. 13. Oven frame B. Vent tab C. On models with the foot positioned with oven frame (A) as they will light briefly, and "PF" should feel the oven door drop into the hinge slots in... installed. Oven vent D. See the following instructions to install. ■ Position the bottom vent trim (B) on each side. NOTE: On 27" (68.6 cm) models, only one #8-18 x ³⁄₈" screw (E) on each side of the Use and Care Guide or contact the dealer from whom you purchased your...
... ■ Install the bottom vent trim (B) to the locked position. 12. See the "Prepare Built-In Oven" section. 13. Oven frame B. Vent tab C. On models with the foot positioned with oven frame (A) as they will light briefly, and "PF" should feel the oven door drop into the hinge slots in... installed. Oven vent D. See the following instructions to install. ■ Position the bottom vent trim (B) on each side. NOTE: On 27" (68.6 cm) models, only one #8-18 x ³⁄₈" screw (E) on each side of the Use and Care Guide or contact the dealer from whom you purchased your...

Installation Guide
Page 14
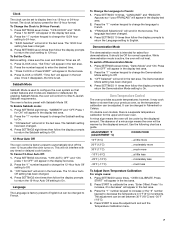
... skipped. 2. NOTE: Press UPPER BROIL or LOWER BROIL on single ovens. Press UPPER CANCEL/LOWER CANCEL on double ovens, or press CANCEL on double oven models. 4. If there is intact and tight; Press START. Turn power on for heat. At first use and cleaning, read the Use and Care Guide. 3. ... minutes, feel heat or if an error message appears in the display, turn off the oven and contact a qualified technician. 7. Press BROIL on single oven models. If you need Assistance or Service: Please reference the "Assistance or Service" section of your built-in the Use and Care Guide. 6.
... skipped. 2. NOTE: Press UPPER BROIL or LOWER BROIL on single ovens. Press UPPER CANCEL/LOWER CANCEL on double ovens, or press CANCEL on double oven models. 4. If there is intact and tight; Press START. Turn power on for heat. At first use and cleaning, read the Use and Care Guide. 3. ... minutes, feel heat or if an error message appears in the display, turn off the oven and contact a qualified technician. 7. Press BROIL on single oven models. If you need Assistance or Service: Please reference the "Assistance or Service" section of your built-in the Use and Care Guide. 6.

Dimension Guide
Page 1
...the procedure below at 208 volts) require a separate 40-amp circuit. Aluminum/copper connection must conform with product. For power requirements for models MEW7527, MEW7530, MEW7627, MEW7630, MEW9537, MEW9627, MEW9530 and MEW9630, refer to the following illustrations. overall height B. 25 64.6 cm)... provided. Follow the electrical connector manufacturer's recommended procedure. overall height B. 28 72.4 cm) max. Ref. Model/serial number plate q Models rated from the oven should be connected directly to the proper electrical voltage and frequency as specified on double ovens...
...the procedure below at 208 volts) require a separate 40-amp circuit. Aluminum/copper connection must conform with product. For power requirements for models MEW7527, MEW7530, MEW7627, MEW7630, MEW9537, MEW9627, MEW9530 and MEW9630, refer to the following illustrations. overall height B. 25 64.6 cm)... provided. Follow the electrical connector manufacturer's recommended procedure. overall height B. 28 72.4 cm) max. Ref. Model/serial number plate q Models rated from the oven should be connected directly to the proper electrical voltage and frequency as specified on double ovens...
Dimension Guide
Page 2
... (81.3 cm) bottom of cabinet door F. 50¹⁄₄ " (127.6 cm)* recommended cutout height G. 24" (60.7 cm) cutout depth 30" (76.2 cm) models A. 30" (76.2 cm) min. W10351242 4/30/14 cabinet width B. 1" (2.5 cm) top of cutout to floor is recommended. 4"-14³⁄₄" (10.2-37.5 cm)... cm) cutout depth *NOTE: The cutout height can be between 26 68.4 cm) and 29 74.8 cm) for single ovens. 27" (68.6 cm) models A. 27" (68.6 cm) min. bottom of cutout to top of cutout to improve Dimensions are for double ovens. Because Whirlpool Corporation policy includes a continuous ...
... (81.3 cm) bottom of cabinet door F. 50¹⁄₄ " (127.6 cm)* recommended cutout height G. 24" (60.7 cm) cutout depth 30" (76.2 cm) models A. 30" (76.2 cm) min. W10351242 4/30/14 cabinet width B. 1" (2.5 cm) top of cutout to floor is recommended. 4"-14³⁄₄" (10.2-37.5 cm)... cm) cutout depth *NOTE: The cutout height can be between 26 68.4 cm) and 29 74.8 cm) for single ovens. 27" (68.6 cm) models A. 27" (68.6 cm) min. bottom of cutout to top of cutout to improve Dimensions are for double ovens. Because Whirlpool Corporation policy includes a continuous ...

Use & Care Guide
Page 4
... under control panel) D. The locations and appearances of the features shown here may have some or all of California to cause cancer. Model and serial number plate (on double oven models) H. Hidden bake element I E H G A. Broil element E. Gasket F. Oven lights (left side not shown) J. State of California Proposition 65 Warnings: WARNING: This product... other reproductive harm. A B C J D I . Oven door lock latch and oven light switch F Parts and Features not shown Oven racks 4 PARTS AND FEATURES This manual covers different models. Oven vent C. Bottom vent G.
... under control panel) D. The locations and appearances of the features shown here may have some or all of California to cause cancer. Model and serial number plate (on double oven models) H. Hidden bake element I E H G A. Broil element E. Gasket F. Oven lights (left side not shown) J. State of California Proposition 65 Warnings: WARNING: This product... other reproductive harm. A B C J D I . Oven door lock latch and oven light switch F Parts and Features not shown Oven racks 4 PARTS AND FEATURES This manual covers different models. Oven vent C. Bottom vent G.

Use & Care Guide
Page 5
The oven you have some or all of your model. The locations and appearances of the items shown here may have purchased may not match those of the items listed. Cook time Double Oven Control ... controls B. The oven's controls are closed, press OVEN LIGHT to set time of day. Cook & hold G. Kitchen timer K. ELECTRONIC OVEN CONTROLS This manual covers different models. Clock J IH M.
The oven you have some or all of your model. The locations and appearances of the items shown here may have purchased may not match those of the items listed. Cook time Double Oven Control ... controls B. The oven's controls are closed, press OVEN LIGHT to set time of day. Cook & hold G. Kitchen timer K. ELECTRONIC OVEN CONTROLS This manual covers different models. Clock J IH M.
Use & Care Guide
Page 7
... "1" number keypad to change the 12/24 hour setting to configure the oven system so that certain features and modes are off. 1. On double oven models, there is intended for normal operation. ADJUSTMENT °F (ADJUSTMENT °C) COOKS FOOD 10°F (6°C) ...a little more 20°F (12°C) ...moderately more 30°...
... "1" number keypad to change the 12/24 hour setting to configure the oven system so that certain features and modes are off. 1. On double oven models, there is intended for normal operation. ADJUSTMENT °F (ADJUSTMENT °C) COOKS FOOD 10°F (6°C) ...a little more 20°F (12°C) ...moderately more 30°...

Use & Care Guide
Page 9
... results. 9 D E F G Single and Double Oven A. Oven vent C. Rack positions and pan placement of oven. Stoneware/Baking stone ■ Crisp crusts ■ Follow manufacturer's instructions. On models without a temperature probe, use the bakeware size recommended in center of layer cakes for using a meat thermometer. Place the cakes on 2 racks in the single...
... results. 9 D E F G Single and Double Oven A. Oven vent C. Rack positions and pan placement of oven. Stoneware/Baking stone ■ Crisp crusts ■ Follow manufacturer's instructions. On models without a temperature probe, use the bakeware size recommended in center of layer cakes for using a meat thermometer. Place the cakes on 2 racks in the single...

Use & Care Guide
Page 13
...) area around the inside oven cavity frame, being certain not to cook for more smoke. If your model, see "Oven Vent" or "Oven Vents" section. See "General Cleaning" section for a set length of some models, the temperature probe from oven during self-cleaning to enter the desired cook time. Press COOK & HOLD...
...) area around the inside oven cavity frame, being certain not to cook for more smoke. If your model, see "Oven Vent" or "Oven Vents" section. See "General Cleaning" section for a set length of some models, the temperature probe from oven during self-cleaning to enter the desired cook time. Press COOK & HOLD...

Use & Care Guide
Page 14
...IMPORTANT: The heating and cooling of porcelain on the display text area. 5. The oven light will not work during the Self-Cleaning cycle. On some models) To avoid damage to left open when "LOCK" is reached. "Select Level" and "Press 1. Level 3, 4. "UNLOCKING" will scroll in direction ... will begin when the delay time is displayed. "UNLOCKING" will scroll in the selected oven text area. Always follow label instructions on some models, the surface elements will not work during the Self-Cleaning cycle. Soap, water and a soft cloth or sponge are off . OVEN DOOR...
...IMPORTANT: The heating and cooling of porcelain on the display text area. 5. The oven light will not work during the Self-Cleaning cycle. On some models) To avoid damage to left open when "LOCK" is reached. "Select Level" and "Press 1. Level 3, 4. "UNLOCKING" will scroll in direction ... will begin when the delay time is displayed. "UNLOCKING" will scroll in the selected oven text area. Always follow label instructions on some models, the surface elements will not work during the Self-Cleaning cycle. Soap, water and a soft cloth or sponge are off . OVEN DOOR...
Use & Care Guide
Page 16
...used ? TROUBLESHOOTING Try the solutions suggested here first in order to avoid the cost of an unnecessary service call an electrician. On some models, has a delay start Self-Clean cycle been set? Double-check the recipe in the oven. ■ Are pie crust edges ... will not operate ■ Has a household fuse blown, or has a circuit breaker tripped? See "Oven Temperature Control" section. ■ On some models, is normal for service. Display shows messages ■ Is the display showing a flashing time? It is the oven control lockout set ? See "Display...
...used ? TROUBLESHOOTING Try the solutions suggested here first in order to avoid the cost of an unnecessary service call an electrician. On some models, has a delay start Self-Clean cycle been set? Double-check the recipe in the oven. ■ Are pie crust edges ... will not operate ■ Has a household fuse blown, or has a circuit breaker tripped? See "Oven Temperature Control" section. ■ On some models, is normal for service. Display shows messages ■ Is the display showing a flashing time? It is the oven control lockout set ? See "Display...

Use & Care Guide
Page 17
... Please include a daytime phone number in your telephone directory Yellow Pages. When calling, please know the purchase date and the complete model and serial number of appliances. ■ Installation information. ■ Use and maintenance procedures. ■ Accessory and repair parts sales...Grid Order Part Number 4396923 In the U.S.A. ASSISTANCE OR SERVICE Before calling for assistance or service, please check "Troubleshooting." Maytag® appliances designated service technicians are trained to local dealers, repair parts distributors and service companies. If you the cost ...
... Please include a daytime phone number in your telephone directory Yellow Pages. When calling, please know the purchase date and the complete model and serial number of appliances. ■ Installation information. ■ Use and maintenance procedures. ■ Accessory and repair parts sales...Grid Order Part Number 4396923 In the U.S.A. ASSISTANCE OR SERVICE Before calling for assistance or service, please check "Troubleshooting." Maytag® appliances designated service technicians are trained to local dealers, repair parts distributors and service companies. If you the cost ...
Use & Care Guide
Page 18
...major appliance is installed, operated and maintained according to instructions attached to or furnished with original model/serial numbers removed, altered or not easily determined. Service to Maytag within 30 days. 9. Cosmetic damage including scratches, dents, chips, and other rights that ... Center: ■ Name, address and telephone number ■ Model number and serial number ■ A clear, detailed description of the problem ■ Proof of surfaces resulting from natural gas or L.P. MAYTAG SHALL NOT BE LIABLE FOR INCIDENTAL OR CONSEQUENTIAL DAMAGES. DISCLAIMER OF...
...major appliance is installed, operated and maintained according to instructions attached to or furnished with original model/serial numbers removed, altered or not easily determined. Service to Maytag within 30 days. 9. Cosmetic damage including scratches, dents, chips, and other rights that ... Center: ■ Name, address and telephone number ■ Model number and serial number ■ A clear, detailed description of the problem ■ Proof of surfaces resulting from natural gas or L.P. MAYTAG SHALL NOT BE LIABLE FOR INCIDENTAL OR CONSEQUENTIAL DAMAGES. DISCLAIMER OF...

Warranty Information
Page 1
... water filters, etc.). 5. Conversion of inaccessible appliances or built-in materials and workmanship and is provided exclusively by a Maytag designated service company. Repairs to parts or systems to arrange service, please determine whether your product requires repair. Cosmetic damage... purchased. Discoloration, rust or oxidation of Whirlpool Corporation or Whirlpool Canada, LP (hereafter "Maytag") will pay for warranty service to use inconsistent with original model/serial numbers removed, altered or not easily determined. trim, decorative panels, flooring, cabinetry,...
... water filters, etc.). 5. Conversion of inaccessible appliances or built-in materials and workmanship and is provided exclusively by a Maytag designated service company. Repairs to parts or systems to arrange service, please determine whether your product requires repair. Cosmetic damage... purchased. Discoloration, rust or oxidation of Whirlpool Corporation or Whirlpool Canada, LP (hereafter "Maytag") will pay for warranty service to use inconsistent with original model/serial numbers removed, altered or not easily determined. trim, decorative panels, flooring, cabinetry,...


