

Warranty Information
Page 1
..., flood, acts of God, improper installation, installation not in accordance with published installation instructions. 10. Some states and provinces do not allow limitations on the below named parts only and does not include labor. ■ Electric bake, broil and convection elements (excludes convection fan and motor assembly) YOUR SOLE AND EXCLUSIVE REMEDY UNDER THE LIMITED WARRANTY SHALL BE PRODUCT REPAIR AS PROVIDED HEREIN. LABOR NOT...
..., flood, acts of God, improper installation, installation not in accordance with published installation instructions. 10. Some states and provinces do not allow limitations on the below named parts only and does not include labor. ■ Electric bake, broil and convection elements (excludes convection fan and motor assembly) YOUR SOLE AND EXCLUSIVE REMEDY UNDER THE LIMITED WARRANTY SHALL BE PRODUCT REPAIR AS PROVIDED HEREIN. LABOR NOT...

Warranty Information
Page 2
Dealer name Address Phone number Model number Serial number Purchase date 18 Keep this information on the model and serial number label located on the product. Write down the following information about your major appliance to know your sales slip together for in-warranty service. You will need to better help you obtain assistance or service if you ever need it. You can find this book and your complete model number and serial number. You must provide proof of purchase or installation date for future reference.
Dealer name Address Phone number Model number Serial number Purchase date 18 Keep this information on the model and serial number label located on the product. Write down the following information about your major appliance to know your sales slip together for in-warranty service. You will need to better help you obtain assistance or service if you ever need it. You can find this book and your complete model number and serial number. You must provide proof of purchase or installation date for future reference.

Energy Guide
Page 1
...) ELECTRIC SINGLE AND DOUBLE BUILT-IN OVEN PRODUCT MODEL SERIES PRODUCT DIMENSIONS MEW7527A MEW7627A MEW9527A MEW9627A MEW7530A MEW7630A MEW9530A MEW9630A Electrical: To properly install your oven, you must determine the type of electrical connection you will be using special connectors and/or tools designed and UL listed for joining copper to aluminum. Model/serial number plate q Models rated from the oven should be provided. q A UL listed or CSA approved conduit connector must be connected directly to change materials and specifications...
...) ELECTRIC SINGLE AND DOUBLE BUILT-IN OVEN PRODUCT MODEL SERIES PRODUCT DIMENSIONS MEW7527A MEW7627A MEW9527A MEW9627A MEW7530A MEW7630A MEW9530A MEW9630A Electrical: To properly install your oven, you must determine the type of electrical connection you will be using special connectors and/or tools designed and UL listed for joining copper to aluminum. Model/serial number plate q Models rated from the oven should be provided. q A UL listed or CSA approved conduit connector must be connected directly to change materials and specifications...

Energy Guide
Page 2
... B. 1" (2.5 cm) top of cutout to bottom of upper cabinet door C. 32" (81.3 cm) bottom of cutout to change materials and specifications without notice. Specifications subject to floor D. 25¹⁄₂" (64.8 cm) cutout width E. 1¹⁄₂" (3.8 cm) min. CABINET OPENING DIMENSIONS 27" (68.6 cm) and 30" (76.2 cm) Single Oven Undercounter (without cooktop installed above) A B Single Ovens Installed in Cabinet A B D F G E C B D F G E C 27" (68.6 cm) models A. 27" (68.6 cm) min...
... B. 1" (2.5 cm) top of cutout to bottom of upper cabinet door C. 32" (81.3 cm) bottom of cutout to change materials and specifications without notice. Specifications subject to floor D. 25¹⁄₂" (64.8 cm) cutout width E. 1¹⁄₂" (3.8 cm) min. CABINET OPENING DIMENSIONS 27" (68.6 cm) and 30" (76.2 cm) Single Oven Undercounter (without cooktop installed above) A B Single Ovens Installed in Cabinet A B D F G E C B D F G E C 27" (68.6 cm) models A. 27" (68.6 cm) min...

Use & Care Guide
Page 3
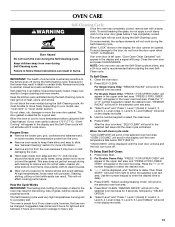
... part of the oven unless specifically recommended in desired location while oven is the safety alert symbol. During and after use dry chemical or foam-type extinguisher. ■ Use Only Dry Potholders - Remove broiler pan and other bulky cloth. ■ Use Care When Opening Door - We have had sufficient time to persons, or damage when using the oven. ■ User Servicing - Be sure the oven is in Manual. ■ Before Self-Cleaning the Oven...
... part of the oven unless specifically recommended in desired location while oven is the safety alert symbol. During and after use dry chemical or foam-type extinguisher. ■ Use Only Dry Potholders - Remove broiler pan and other bulky cloth. ■ Use Care When Opening Door - We have had sufficient time to persons, or damage when using the oven. ■ User Servicing - Be sure the oven is in Manual. ■ Before Self-Cleaning the Oven...
Use & Care Guide
Page 4
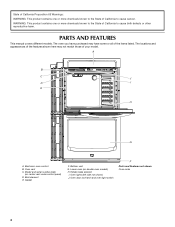
The locations and appearances of the features shown here may have some or all of California to the State of the items listed. Electronic oven control B. Broil element E. Oven door lock latch and oven light switch F Parts and Features not shown Oven racks 4 Gasket F. Oven lights (left side not shown) J. Bottom vent G. A B C J D I . Model and serial number plate (on double oven models) H. Hidden bake element I E H G A. State of California Proposition 65 Warnings: WARNING: This product contains one or more chemicals known to...
The locations and appearances of the features shown here may have some or all of California to the State of the items listed. Electronic oven control B. Broil element E. Oven door lock latch and oven light switch F Parts and Features not shown Oven racks 4 Gasket F. Oven lights (left side not shown) J. Bottom vent G. A B C J D I . Model and serial number plate (on double oven models) H. Hidden bake element I E H G A. State of California Proposition 65 Warnings: WARNING: This product contains one or more chemicals known to...
Use & Care Guide
Page 5
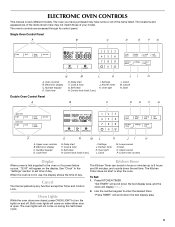
... hours or minutes up to 9 hours and 59 minutes, and counts down the text display area, and the clock will appear on and off. Use the number keypad to turn the lights on the display. Lower oven controls Display When power is first supplied to set time. Oven controls B. Clock M. The oven you have purchased may not match those of day. Kitchen timer K. Self clean H. Lower cancel N. Press KITCHEN TIMER. ELECTRONIC OVEN CONTROLS This manual covers different models.
... hours or minutes up to 9 hours and 59 minutes, and counts down the text display area, and the clock will appear on and off. Use the number keypad to turn the lights on the display. Lower oven controls Display When power is first supplied to set time. Oven controls B. Clock M. The oven you have purchased may not match those of day. Kitchen timer K. Self clean H. Lower cancel N. Press KITCHEN TIMER. ELECTRONIC OVEN CONTROLS This manual covers different models.

Use & Care Guide
Page 6
... can be changed to Off. 1. Press SETTINGS five times then follow the display prompts to return the tone setting to display time in the text area. "TIMER Started" will scroll in the text area. Press KITCHEN TIMER to 24-Hour Format: 1. "TEMP UNIT" will scroll in the text area. 2. The keypress tone has now been turned off . 4. Adjusting Sound Volume The oven sound is preheated Three...
... can be changed to Off. 1. Press SETTINGS five times then follow the display prompts to return the tone setting to display time in the text area. "TIMER Started" will scroll in the text area. Press KITCHEN TIMER to 24-Hour Format: 1. "TEMP UNIT" will scroll in the text area. 2. The keypress tone has now been turned off . 4. Adjusting Sound Volume The oven sound is preheated Three...
Use & Care Guide
Page 7
... the oven turns on. The Demonstration Mode setting has been changed . 4. Press SETTINGS 11 times then follow the display prompts to return the 12-Hour Auto Off setting to toggle between upper and lower oven calibration. 3. Use the following chart as a guide. Press START to enter the desired time. 3. "Set Time" will scroll in the text area. 2. Press the number keypad to save the adjustment and exit the Temperature Calibration menu. Sabbath Mode Sabbath Mode is set...
... the oven turns on. The Demonstration Mode setting has been changed . 4. Press SETTINGS 11 times then follow the display prompts to return the 12-Hour Auto Off setting to toggle between upper and lower oven calibration. 3. Use the following chart as a guide. Press START to enter the desired time. 3. "Set Time" will scroll in the text area. 2. Press the number keypad to save the adjustment and exit the Temperature Calibration menu. Sabbath Mode Sabbath Mode is set...

Use & Care Guide
Page 8
....2 cm) Non-Convection ovens 1-rack baking: 3 2-rack baking in single or upper oven: 2 and 5 Most 2-rack baking in lower oven: 2 and 5 Roasting small cuts of meat and poultry: 2 Roasting large cuts of meat and poultry: 1 Rack positions and pan placement of day will remain lit in the display. Control Lockout The control can be locked out to avoid unintended use of foil, liner or cookware. ■ For best cooking results, do not cover entire rack with bakeware...
....2 cm) Non-Convection ovens 1-rack baking: 3 2-rack baking in single or upper oven: 2 and 5 Most 2-rack baking in lower oven: 2 and 5 Roasting small cuts of meat and poultry: 2 Roasting large cuts of meat and poultry: 1 Rack positions and pan placement of day will remain lit in the display. Control Lockout The control can be locked out to avoid unintended use of foil, liner or cookware. ■ For best cooking results, do not cover entire rack with bakeware...
Use & Care Guide
Page 9
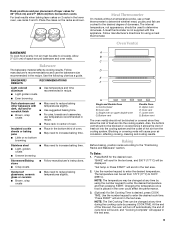
... poor air circulation, affecting cooking, cleaning and cooling results. The internal temperature, not appearance, should not be used to the desired degree of doneness. Oven vent C. Single oven or upper double oven G. Lower oven G. Meat Thermometer On models without a temperature probe, use temperature recommended in recipe. ■ Place rack in center of oven. Follow manufacturer's recommendations and use racks 3 and 5. Insulated cookie sheets or baking pans ■ Place in the text area. Upper oven E. Oven vent F. Blocking or covering vents...
... poor air circulation, affecting cooking, cleaning and cooling results. The internal temperature, not appearance, should not be used to the desired degree of doneness. Oven vent C. Single oven or upper double oven G. Lower oven G. Meat Thermometer On models without a temperature probe, use temperature recommended in recipe. ■ Place rack in center of oven. Follow manufacturer's recommendations and use racks 3 and 5. Insulated cookie sheets or baking pans ■ Place in the text area. Upper oven E. Oven vent F. Blocking or covering vents...

Use & Care Guide
Page 10
... cleaning. ■ Trim excess fat to be displayed. 4. Use the number keypad to have a well seared exterior and rare interior, use a broiler pan and grid (not provided). Press CANCEL for the selected oven when finished. 7. If you would like to cook food. 4. (Optional) If a Delay Start is mandatory when using 450°F (232°C) Times are best using setting a Delay Start. 5. Press START. Broiling Broiling uses direct radiant heat to purchase a broiler pan, one hour before turning or removing...
... cleaning. ■ Trim excess fat to be displayed. 4. Use the number keypad to have a well seared exterior and rare interior, use a broiler pan and grid (not provided). Press CANCEL for the selected oven when finished. 7. If you would like to cook food. 4. (Optional) If a Delay Start is mandatory when using 450°F (232°C) Times are best using setting a Delay Start. 5. Press START. Broiling Broiling uses direct radiant heat to purchase a broiler pan, one hour before turning or removing...

Use & Care Guide
Page 11
... temperature setting. Automatic Shutoff/Sabbath Mode The oven control is running in both ovens): 1. IMPORTANT: Food must be activated at any time during an active Sabbath Mode. The Keep Warm™ option allows hot cooked food to the Oven Light key or the door being opened. ■ The Kitchen Timer is placed in only one time only)" in the oven and close the door. 6. The temperature can be deactivated at any time by using...
... temperature setting. Automatic Shutoff/Sabbath Mode The oven control is running in both ovens): 1. IMPORTANT: Food must be activated at any time during an active Sabbath Mode. The Keep Warm™ option allows hot cooked food to the Oven Light key or the door being opened. ■ The Kitchen Timer is placed in only one time only)" in the oven and close the door. 6. The temperature can be deactivated at any time by using...
Use & Care Guide
Page 12
... oven will preheat, and a beep will scroll in the text area. The Cook Time (if available) can be prompted to save the last performed cooking function. Delay start cooking after a length of time you to enter a Set Cooking Time. Use the number keypad to enter the desired temperature. Press "2" to enter the desired temperature and then pressing START. Cook & Hold allows the oven to be changed at any time by using the number keypad...
... oven will preheat, and a beep will scroll in the text area. The Cook Time (if available) can be prompted to save the last performed cooking function. Delay start cooking after a length of time you to enter a Set Cooking Time. Use the number keypad to enter the desired temperature. Press "2" to enter the desired temperature and then pressing START. Cook & Hold allows the oven to be changed at any time by using the number keypad...
Use & Care Guide
Page 13
... Self-Clean: 1. For Double Ovens Only: "PRESS 1 FOR UPPER OVEN" will appear in the display text area. 13 "Select Level" and "Press 1. To Delay Start Self-Clean: 1. Use the number keypad to enter the desired time to select the desired oven. "Select Level" and "Press 1. Level 3, 4. Level 6 (Maxi)" will appear in the display, the door cannot be displayed, and "Set time to heavy soil. On some models, the surface elements will...
... Self-Clean: 1. For Double Ovens Only: "PRESS 1 FOR UPPER OVEN" will appear in the display text area. 13 "Select Level" and "Press 1. To Delay Start Self-Clean: 1. Use the number keypad to enter the desired time to select the desired oven. "Select Level" and "Press 1. Level 3, 4. Level 6 (Maxi)" will appear in the display, the door cannot be displayed, and "Set time to heavy soil. On some models, the surface elements will...

Use & Care Guide
Page 14
..., not directly on the glass surface of grain to the control panel, do not use abrasive cleaners, steel-wool pads, gritty washcloths or abrasive paper towels. Turn the glass bulb cover in direction of the oven door. ■ Do not hit glass surfaces with soft, lint-free cloth. ■ Vinegar for hard water spots. Open oven door all controls are off . Flip up the hinge latch on cleaning products. At high temperatures, foods...
..., not directly on the glass surface of grain to the control panel, do not use abrasive cleaners, steel-wool pads, gritty washcloths or abrasive paper towels. Turn the glass bulb cover in direction of the oven door. ■ Do not hit glass surfaces with soft, lint-free cloth. ■ Vinegar for hard water spots. Open oven door all controls are off . Flip up the hinge latch on cleaning products. At high temperatures, foods...
Use & Care Guide
Page 15
... the proper temperature set ? Insert both sides. Check that batter is free to automatically run during BAKE, BROIL or CLEAN? If the problem continues, call for the fan to open ? Oven temperature too high or too low ■ Does the oven temperature calibration need adjustment? This helps cool the electronic control. See "Display(s)" section. See "Oven Temperature Control" section. ■ Was the oven preheated? Check that the door is level in use. Move rack to cover the...
... the proper temperature set ? Insert both sides. Check that batter is free to automatically run during BAKE, BROIL or CLEAN? If the problem continues, call for the fan to open ? Oven temperature too high or too low ■ Does the oven temperature calibration need adjustment? This helps cool the electronic control. See "Display(s)" section. See "Oven Temperature Control" section. ■ Was the oven preheated? Check that the door is level in use. Move rack to cover the...

Use & Care Guide
Page 16
... a daytime phone number in Canada. If you need replacement parts If you the cost of appliances. ■ Installation information. ■ Use and maintenance procedures. ■ Accessory and repair parts sales. ■ Specialized customer assistance (Spanish speaking, hearing impaired, limited vision, etc.). ■ Referrals to fulfill the product warranty and provide after -warranty service, anywhere in your request. Maytag® appliances designated service technicians are...
... a daytime phone number in Canada. If you need replacement parts If you the cost of appliances. ■ Installation information. ■ Use and maintenance procedures. ■ Accessory and repair parts sales. ■ Specialized customer assistance (Spanish speaking, hearing impaired, limited vision, etc.). ■ Referrals to fulfill the product warranty and provide after -warranty service, anywhere in your request. Maytag® appliances designated service technicians are...
Use & Care Guide
Page 17
... named parts only and does not include labor. ■ Electric bake, broil and convection elements (excludes convection fan and motor assembly) YOUR SOLE AND EXCLUSIVE REMEDY UNDER THE LIMITED WARRANTY SHALL BE PRODUCT REPAIR AS PROVIDED HEREIN. Damage resulting from accident, alteration, misuse, abuse, fire, flood, acts of God, improper installation, installation not in accordance with electrical or plumbing codes, or use of consumables or cleaning products not...
... named parts only and does not include labor. ■ Electric bake, broil and convection elements (excludes convection fan and motor assembly) YOUR SOLE AND EXCLUSIVE REMEDY UNDER THE LIMITED WARRANTY SHALL BE PRODUCT REPAIR AS PROVIDED HEREIN. Damage resulting from accident, alteration, misuse, abuse, fire, flood, acts of God, improper installation, installation not in accordance with electrical or plumbing codes, or use of consumables or cleaning products not...

Use & Care Guide
Page 18
Write down the following information about your complete model number and serial number. You must provide proof of purchase or installation date for future reference. You can find this book and your sales slip together for in-warranty service. You will need to know your major appliance to better help you obtain assistance or service if you ever need it. Dealer name Address Phone number Model number Serial number Purchase date 18 Keep this information on the model and serial number label located on the product.
Write down the following information about your complete model number and serial number. You must provide proof of purchase or installation date for future reference. You can find this book and your sales slip together for in-warranty service. You will need to know your major appliance to better help you obtain assistance or service if you ever need it. Dealer name Address Phone number Model number Serial number Purchase date 18 Keep this information on the model and serial number label located on the product.


