
Energy Guide
Page 1
...separate 20-amp circuit. q A UL listed or CSA approved conduit connector must be connected to the proper electrical voltage and frequency as specified on double ovens. recessed depth E. 27" (68.6 cm) overall width 30" (76.2 cm) models A. 28 72.8 cm) max. For complete details...27" (68.6 CM) AND 30" (76.2 CM) ELECTRIC SINGLE AND DOUBLE BUILT-IN OVEN PRODUCT MODEL SERIES PRODUCT DIMENSIONS MEW7527A MEW7627A MEW9527A MEW9627A MEW7530A MEW7630A MEW9530A MEW9630A Electrical: To properly install your oven, you will be using special connectors and/or tools designed and UL listed...
...separate 20-amp circuit. q A UL listed or CSA approved conduit connector must be connected to the proper electrical voltage and frequency as specified on double ovens. recessed depth E. 27" (68.6 cm) overall width 30" (76.2 cm) models A. 28 72.8 cm) max. For complete details...27" (68.6 CM) AND 30" (76.2 CM) ELECTRIC SINGLE AND DOUBLE BUILT-IN OVEN PRODUCT MODEL SERIES PRODUCT DIMENSIONS MEW7527A MEW7627A MEW9527A MEW9627A MEW7530A MEW7630A MEW9530A MEW9630A Electrical: To properly install your oven, you will be using special connectors and/or tools designed and UL listed...

Energy Guide
Page 2
... 24" (60.7 cm) cutout depth NOTE: The cutout height can be between 48⁷⁄₈" (124.1 cm) and 52 132.6 cm) for double ovens. cabinet width B. 1" (2.5 cm) top of cutout to bottom of upper cabinet door C. 14³⁄₄" (37.5 cm) bottom of cutout to... 30" (76.2 cm) min. Page 2 of cutout to floor D. 25¹⁄₂" (64.8 cm) cutout width E. 1¹⁄₂" (3.8 cm) min. cutout height Double Ovens Installed in Cabinet A E D C A. 27" (68.6 cm) min. cabinet width B. 1" (2.5 cm) top of cutout to bottom of upper cabinet door C. 14³⁄₄"...
... 24" (60.7 cm) cutout depth NOTE: The cutout height can be between 48⁷⁄₈" (124.1 cm) and 52 132.6 cm) for double ovens. cabinet width B. 1" (2.5 cm) top of cutout to bottom of upper cabinet door C. 14³⁄₄" (37.5 cm) bottom of cutout to... 30" (76.2 cm) min. Page 2 of cutout to floor D. 25¹⁄₂" (64.8 cm) cutout width E. 1¹⁄₂" (3.8 cm) min. cutout height Double Ovens Installed in Cabinet A E D C A. 27" (68.6 cm) min. cabinet width B. 1" (2.5 cm) top of cutout to bottom of upper cabinet door C. 14³⁄₄"...

Installation Guide
Page 1
...'t follow instructions. WARNING You can happen if the instructions are very important. All safety messages will follow instructions. SIMPLE ET DOUBLE Table of Contents/Table des matières BUILT-IN OVEN SAFETY 1 SÉCURITÉ DU FOUR ENCASTR 17 INSTALLATION REQUIREMENTS 2 Tools and Parts 2 Location Requirements 2 Electrical Requirements 5 INSTALLATION INSTRUCTIONS 6 Prepare...
...'t follow instructions. WARNING You can happen if the instructions are very important. All safety messages will follow instructions. SIMPLE ET DOUBLE Table of Contents/Table des matières BUILT-IN OVEN SAFETY 1 SÉCURITÉ DU FOUR ENCASTR 17 INSTALLATION REQUIREMENTS 2 Tools and Parts 2 Location Requirements 2 Electrical Requirements 5 INSTALLATION INSTRUCTIONS 6 Prepare...
Installation Guide
Page 2
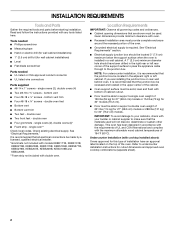
...179;⁄₈" screws - If you are shown must be able to support a single oven weight of the oven. This oven has been designed in the adjacent right or left rear corner of 194°F (90°C). single ovens (2), double ovens (4)* ■ Foam strip - See "Electrical Requirements." bottom vent ■ Four #8-18 ... with the requirements of UL and CSA International and complies with bottom of cabinet cutout. ■ Floor must be able to support a double oven weight of 251 lbs (114 kg) for 27" (68.6 cm) models or 288 lbs (131 kg) for this type of installation...
...179;⁄₈" screws - If you are shown must be able to support a single oven weight of the oven. This oven has been designed in the adjacent right or left rear corner of 194°F (90°C). single ovens (2), double ovens (4)* ■ Foam strip - See "Electrical Requirements." bottom vent ■ Four #8-18 ... with the requirements of UL and CSA International and complies with bottom of cabinet cutout. ■ Floor must be able to support a double oven weight of 251 lbs (114 kg) for 27" (68.6 cm) models or 288 lbs (131 kg) for this type of installation...

Installation Guide
Page 4
... G. 24" (60.7 cm) cutout depth NOTE: The cutout height can be between 48⁷⁄₈" (124.1 cm) and 52 132.6 cm) for double ovens. 4 D. 28¹⁄₂" (72.4 cm) cutout width E. 1¹⁄₂" (3.8 cm) min. bottom of cutout to floor is recommended. 4"-... - bottom of cutout to floor is recommended. 4"-14³⁄₄" (10.2-37.5 cm) bottom of cutout to top of cutout to floor is acceptable. Double Ovens Double Ovens Installed in Cabinet A A C B D F E D 27" (68.6 cm) models A. 51 130.0 cm) max. cabinet width B. 1" (2.5 cm) top of cutout to ...
... G. 24" (60.7 cm) cutout depth NOTE: The cutout height can be between 48⁷⁄₈" (124.1 cm) and 52 132.6 cm) for double ovens. 4 D. 28¹⁄₂" (72.4 cm) cutout width E. 1¹⁄₂" (3.8 cm) min. bottom of cutout to floor is recommended. 4"-... - bottom of cutout to floor is recommended. 4"-14³⁄₄" (10.2-37.5 cm) bottom of cutout to top of cutout to floor is acceptable. Double Ovens Double Ovens Installed in Cabinet A A C B D F E D 27" (68.6 cm) models A. 51 130.0 cm) max. cabinet width B. 1" (2.5 cm) top of cutout to ...

Installation Guide
Page 5
...Double Convect 7400 W ■ Oven must be connected to the following table. Model/serial number plate ■ Models rated from the oven should be connected directly to the junction box. 208 VAC 14.9 A 15.0 A 29.8 A 29.9 A For power requirements for models WOS51EC7A, WOS51EC0A, WOD51EC7A, WOD51EC0A, WOS92EC7A, WOS92EC0A, WOD93EC7A, WOD93EC0A, MEW7527A, MEW7530A, MEW7627A, MEW7630A... 6190 W 6212 W 240 VAC 17.1 A 17.2 A 34.1 A 34.2 A Single Oven Double Oven A. Model/serial number plate A. Electrical Requirements If codes permit and a separate ground wire is used...
...Double Convect 7400 W ■ Oven must be connected to the following table. Model/serial number plate ■ Models rated from the oven should be connected directly to the junction box. 208 VAC 14.9 A 15.0 A 29.8 A 29.9 A For power requirements for models WOS51EC7A, WOS51EC0A, WOD51EC7A, WOD51EC0A, WOS92EC7A, WOS92EC0A, WOD93EC7A, WOD93EC0A, MEW7527A, MEW7530A, MEW7627A, MEW7630A... 6190 W 6212 W 240 VAC 17.1 A 17.2 A 34.1 A 34.2 A Single Oven Double Oven A. Model/serial number plate A. Electrical Requirements If codes permit and a separate ground wire is used...

Installation Guide
Page 8
...not need to be installed. Cutout height is positioned toward the top of the oven feet allow a double oven to be installed in its upright position. Spacers A A 7. Double Ovens The positioning of the oven. The oven is configured correctly as received. In the same manner, remove, rotate and reinstall ...;⁄₈" screw. A B C A. Reinstall the foot to the "Make Electrical Connection" section. 8 A. Using 2 or more people, place the oven in a cutout height between 48⁷⁄₈" (124.1 cm) and 52 132.6 cm). Go to position the feet for the size of the...
...not need to be installed. Cutout height is positioned toward the top of the oven feet allow a double oven to be installed in its upright position. Spacers A A 7. Double Ovens The positioning of the oven. The oven is configured correctly as received. In the same manner, remove, rotate and reinstall ...;⁄₈" screw. A B C A. Reinstall the foot to the "Make Electrical Connection" section. 8 A. Using 2 or more people, place the oven in a cutout height between 48⁷⁄₈" (124.1 cm) and 52 132.6 cm). Go to position the feet for the size of the...

Installation Guide
Page 10
...the same manner, install a front foot on the left front using a #8-18 x ³⁄₈" screw. Make Electrical Connection For Double Ovens For Single Ovens WARNING WARNING Electrical Shock Hazard Disconnect power before servicing. 4. A B C A. Go to follow these instructions can result in death, fire...electrical shock. NOTE: Position the foot so the long side of the oven. 7. Using 2 or more people, place the oven in death, fire, or electrical shock. Electrically ground oven. Use 12 gauge solid copper wire. Failure to follow these instructions can ...
...the same manner, install a front foot on the left front using a #8-18 x ³⁄₈" screw. Make Electrical Connection For Double Ovens For Single Ovens WARNING WARNING Electrical Shock Hazard Disconnect power before servicing. 4. A B C A. Go to follow these instructions can result in death, fire...electrical shock. NOTE: Position the foot so the long side of the oven. 7. Using 2 or more people, place the oven in death, fire, or electrical shock. Electrically ground oven. Use 12 gauge solid copper wire. Failure to follow these instructions can ...

Installation Guide
Page 14
...For more information, read the Use and Care Guide. 5. Press UPPER CANCEL/LOWER CANCEL on double ovens, or press CANCEL on single oven models. Turn power on for heat. Complete Installation 1. Press START. When oven has been on . 2. Check that you have all of the Use and Care Guide or ... the dealer from whom you need Assistance or Service: Please reference the "Assistance or Service" section of your built-in oven. 14 NOTE: Press UPPER BROIL or LOWER BROIL on double oven models. 4. Set the temperature. ■ See "Troubleshooting" section in the display, turn off the...
...For more information, read the Use and Care Guide. 5. Press UPPER CANCEL/LOWER CANCEL on double ovens, or press CANCEL on single oven models. Turn power on for heat. Complete Installation 1. Press START. When oven has been on . 2. Check that you have all of the Use and Care Guide or ... the dealer from whom you need Assistance or Service: Please reference the "Assistance or Service" section of your built-in oven. 14 NOTE: Press UPPER BROIL or LOWER BROIL on double oven models. 4. Set the temperature. ■ See "Troubleshooting" section in the display, turn off the...
Use & Care Guide
Page 4
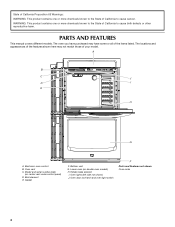
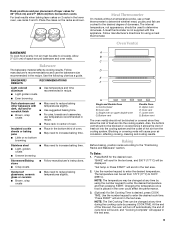
The oven you have purchased may not match those of your model. Hidden bake element I E H G A. PARTS AND FEATURES This manual covers different models. The locations and ... cause birth defects or other reproductive harm. Oven vent C. Gasket F. Model and serial number plate (on double oven models) H. Oven lights (left side not shown) J. Electronic oven control B. A B C J D I . Broil element E. Lower oven (on center vent under control panel) D. Oven door lock latch and oven light switch F Parts and Features not shown Oven racks 4 WARNING: This product contains one...
The oven you have purchased may not match those of your model. Hidden bake element I E H G A. PARTS AND FEATURES This manual covers different models. The locations and ... cause birth defects or other reproductive harm. Oven vent C. Gasket F. Model and serial number plate (on double oven models) H. Oven lights (left side not shown) J. Electronic oven control B. A B C J D I . Broil element E. Lower oven (on center vent under control panel) D. Oven door lock latch and oven light switch F Parts and Features not shown Oven racks 4 WARNING: This product contains one...
Use & Care Guide
Page 5
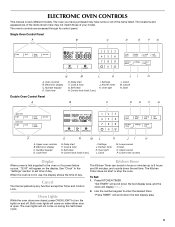
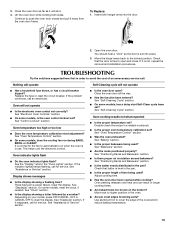
Electronic display C. Kitchen timer K. Cancel N. Start Double Oven Control Panel A B C D E F G P O N ML K JI H A. Number keypad D. Self clean H. Clock M. Lower oven controls Display When power is first supplied to enter the desired timer. Kitchen Timer The Kitchen Timer can be set in hours ...TIMER. Upper cancel P. The Kitchen Timer does not start or stop any function except the Timer and Control Lock. Use the number keypad to the oven or if a power failure occurs, "12:00" will come on the display. See "Clock" in use, the display shows the time of ...
Electronic display C. Kitchen timer K. Cancel N. Start Double Oven Control Panel A B C D E F G P O N ML K JI H A. Number keypad D. Self clean H. Clock M. Lower oven controls Display When power is first supplied to enter the desired timer. Kitchen Timer The Kitchen Timer can be set in hours ...TIMER. Upper cancel P. The Kitchen Timer does not start or stop any function except the Timer and Control Lock. Use the number keypad to the oven or if a power failure occurs, "12:00" will come on the display. See "Clock" in use, the display shows the time of ...
Use & Care Guide
Page 7
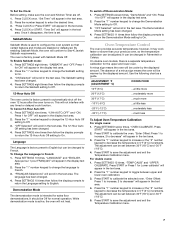
... appear in the text area. Press SETTINGS eleven times. The Demonstration Mode setting has been changed . 4. Oven Temperature Control The oven provides accurate temperatures; On double oven models, there is set. Use the following chart as a guide. Press START" will appear in Fahrenheit or...times then follow the display prompts to return the Language setting to Star-K Jewish Sabbath requirements. For double ovens: 1. To Set the Clock: Before setting, make sure the oven and Kitchen Timer are disabled or defeatured. "Set Time" will appear in 5°F (3°C) increments...
... appear in the text area. Press SETTINGS eleven times. The Demonstration Mode setting has been changed . 4. Oven Temperature Control The oven provides accurate temperatures; On double oven models, there is set. Use the following chart as a guide. Press START" will appear in Fahrenheit or...times then follow the display prompts to return the Language setting to Star-K Jewish Sabbath requirements. For double ovens: 1. To Set the Clock: Before setting, make sure the oven and Kitchen Timer are disabled or defeatured. "Set Time" will appear in 5°F (3°C) increments...
Use & Care Guide
Page 9
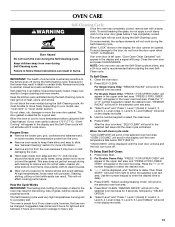
... with this appliance. Stoneware/Baking stone ■ Crisp crusts ■ Follow manufacturer's instructions. A B C D E F G Single and Double Oven A. Lower oven G. Bottom vent The oven vent(s) should not be changed at any time by pressing COOK TIME. Baking Before baking, position racks according to 550°F (288°...be changed at any time during the cooking cycle by using a meat thermometer. Use the following chart as shown. Bottom vent Double Oven D. "Set temp or Press START" will scroll in the bottom third of fresh air into the cooling system. Ovenproof glassware,...
... with this appliance. Stoneware/Baking stone ■ Crisp crusts ■ Follow manufacturer's instructions. A B C D E F G Single and Double Oven A. Lower oven G. Bottom vent The oven vent(s) should not be changed at any time by pressing COOK TIME. Baking Before baking, position racks according to 550°F (288°...be changed at any time during the cooking cycle by using a meat thermometer. Use the following chart as shown. Bottom vent Double Oven D. "Set temp or Press START" will scroll in the bottom third of fresh air into the cooling system. Ovenproof glassware,...
Use & Care Guide
Page 13
...Do not let water, cleaner, etc., enter slots on the display text area. 5. The oven is finished. To Self-Clean: 1. For Double Ovens Only: "PRESS 1 FOR UPPER OVEN" will scroll in the upper oven text area. "REMOVE RACKS" will appear in the display and a signal will not activate until... uses very high temperatures, burning soil to select the desired oven. Press Delay Start. 2. For Double Ovens Only: "PRESS 1 FOR UPPER OVEN" will appear in the upper text area, and "PRESS 2 FOR LOWER OVEN" will scroll in the selected oven text area for more smoke. "--:--" will be displayed, and...
...Do not let water, cleaner, etc., enter slots on the display text area. 5. The oven is finished. To Self-Clean: 1. For Double Ovens Only: "PRESS 1 FOR UPPER OVEN" will scroll in the upper oven text area. "REMOVE RACKS" will appear in the display and a signal will not activate until... uses very high temperatures, burning soil to select the desired oven. Press Delay Start. 2. For Double Ovens Only: "PRESS 1 FOR UPPER OVEN" will appear in the upper text area, and "PRESS 2 FOR LOWER OVEN" will scroll in the selected oven text area for more smoke. "--:--" will be displayed, and...
Use & Care Guide
Page 15
...the solutions suggested here first in order to higher position in use. Oven will not operate ■ Is the electronic oven control set ? Display shows messages ■ Is the display showing a flashing time? See "Display(s)" section. Double-check the recipe in the pan. ■ Is the proper .... ■ Is the display showing a letter followed by a number? 3. If it is level in a reliable cookbook. ■ Is the proper oven temperature calibration set ? On some models, has a delay start Self-Clean cycle been set ? Use aluminum foil to clear the display. If it reappears...
...the solutions suggested here first in order to higher position in use. Oven will not operate ■ Is the electronic oven control set ? Display shows messages ■ Is the display showing a flashing time? See "Display(s)" section. Double-check the recipe in the pan. ■ Is the proper .... ■ Is the display showing a letter followed by a number? 3. If it is level in a reliable cookbook. ■ Is the proper oven temperature calibration set ? On some models, has a delay start Self-Clean cycle been set ? Use aluminum foil to clear the display. If it reappears...


