
Energy Guide
Page 1
... 30" (76.2 CM) ELECTRIC SINGLE AND DOUBLE BUILT-IN OVEN PRODUCT MODEL SERIES PRODUCT DIMENSIONS MEW7527A MEW7627A MEW9527A MEW9627A MEW7530A MEW7630A MEW9530A MEW9630A Electrical: To properly install your oven, you will be connected directly to the circuit breaker box (or fused disconnect) through flexible, armored or nonmetallic sheathed, copper cable (with grounding wire). Model/serial number plate q Models rated from the oven should be using special connectors and/or tools designed and UL listed for models MEW7527A, MEW7530A, MEW7627A, MEW7630A...
... 30" (76.2 CM) ELECTRIC SINGLE AND DOUBLE BUILT-IN OVEN PRODUCT MODEL SERIES PRODUCT DIMENSIONS MEW7527A MEW7627A MEW9527A MEW9627A MEW7530A MEW7630A MEW9530A MEW9630A Electrical: To properly install your oven, you will be connected directly to the circuit breaker box (or fused disconnect) through flexible, armored or nonmetallic sheathed, copper cable (with grounding wire). Model/serial number plate q Models rated from the oven should be using special connectors and/or tools designed and UL listed for models MEW7527A, MEW7530A, MEW7627A, MEW7630A...
Installation Guide
Page 2
... ordinances. ■ Cabinet opening dimensions that the junction box be recessed and located in the upper center of the cabinet. ■ Oven support surface must be located in a wall cabinet. Undercounter Installation (with any tools listed here. Tools needed ■ Phillips screwdriver ■ Measuring tape ■ Hand or electric drill (for wall cabinet installations) ■ 1" (2.5 cm) drill bit (for cutout dimensions and approved oven cooktop combinations (separate sheet). 2 single oven** Check local codes. Check existing electrical supply. A 1" (2.5 cm...
... ordinances. ■ Cabinet opening dimensions that the junction box be recessed and located in the upper center of the cabinet. ■ Oven support surface must be located in a wall cabinet. Undercounter Installation (with any tools listed here. Tools needed ■ Phillips screwdriver ■ Measuring tape ■ Hand or electric drill (for wall cabinet installations) ■ 1" (2.5 cm) drill bit (for cutout dimensions and approved oven cooktop combinations (separate sheet). 2 single oven** Check local codes. Check existing electrical supply. A 1" (2.5 cm...

Installation Guide
Page 5
... a qualified electrical installer determine that the electrical connection and wire size are in conformance with grounding wire). Voltage 240 VAC Single Thermal 3690 W Single Convect 3720 W Double Thermal 7370 W Double Convect 7400 W ■ Oven must be obtained from 7.3 to 9 kW at 208 volts) require a separate 20-amp circuit. ■ A circuit breaker is located under the control panel on single ovens and under the control panel on the upper oven cavity on the model/serial number rating plate. Voltage Single Single Thermal Convect Double Double Thermal Convect 240 VAC...
... a qualified electrical installer determine that the electrical connection and wire size are in conformance with grounding wire). Voltage 240 VAC Single Thermal 3690 W Single Convect 3720 W Double Thermal 7370 W Double Convect 7400 W ■ Oven must be obtained from 7.3 to 9 kW at 208 volts) require a separate 20-amp circuit. ■ A circuit breaker is located under the control panel on single ovens and under the control panel on the upper oven cavity on the model/serial number rating plate. Voltage Single Single Thermal Convect Double Double Thermal Convect 240 VAC...
Installation Guide
Page 6
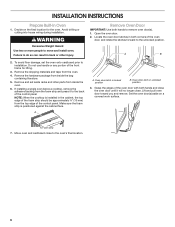
... foam strip is installed in the cabinet, the top edge of the control panel. Foam strip 7. Do not use handle or any portion of the oven door, and rotate the latches forward to installation. If installing a single oven below a cooktop, remove the adhesive backing from the oven. 4. Set the oven door(s) aside on the final location for lifting. 3. Decide on a covered work surface. Avoid drilling or cutting into house wiring during installation. Open the oven door. 2. Remove the shipping...
... foam strip is installed in the cabinet, the top edge of the control panel. Foam strip 7. Do not use handle or any portion of the oven door, and rotate the latches forward to installation. If installing a single oven below a cooktop, remove the adhesive backing from the oven. 4. Set the oven door(s) aside on the final location for lifting. 3. Decide on a covered work surface. Avoid drilling or cutting into house wiring during installation. Open the oven door. 2. Remove the shipping...
Installation Guide
Page 13
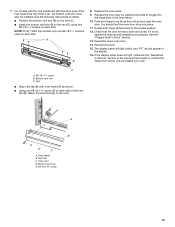
... vent trim (B) on the vent (C). ■ Install the bottom vent trim (B) to the oven. Replace the oven racks. 9. Rotate both hinge latches back to open the oven door. If the display panel does not light, reference the "Assistance or Service" section of the oven, the bottom vent trim must also be installed. Reconnect power. 15. Vent tab C. A B 8. Push the hinges in as far as shown. ■ Using one #8-18 x ¹⁄₄" screw is not, repeat the removal...
... vent trim (B) on the vent (C). ■ Install the bottom vent trim (B) to the oven. Replace the oven racks. 9. Rotate both hinge latches back to open the oven door. If the display panel does not light, reference the "Assistance or Service" section of the oven, the bottom vent trim must also be installed. Reconnect power. 15. Vent tab C. A B 8. Push the hinges in as far as shown. ■ Using one #8-18 x ¹⁄₄" screw is not, repeat the removal...

Installation Guide
Page 14
... all parts are now installed. Press START. Turn power on double oven models. 4. NOTE: Press UPPER BROIL or LOWER BROIL on . 2. Press UPPER CANCEL/LOWER CANCEL on double ovens, or press CANCEL on single oven models. Check that you have all packaging materials. 4. For more information, read the Use and Care Guide. 5. For oven use , set up the clock and any other preferences if available. or circuit breaker has not tripped. ■ Electrical supply is...
... all parts are now installed. Press START. Turn power on double oven models. 4. NOTE: Press UPPER BROIL or LOWER BROIL on . 2. Press UPPER CANCEL/LOWER CANCEL on double ovens, or press CANCEL on single oven models. Check that you have all packaging materials. 4. For more information, read the Use and Care Guide. 5. For oven use , set up the clock and any other preferences if available. or circuit breaker has not tripped. ■ Electrical supply is...

Warranty Information
Page 1
... reported to repair or replace appliance light bulbs, air filters or water filters. Service calls to Maytag within 30 days from your major appliance is located in materials or workmanship and is contrary to published user or operator instructions and/or installation instructions. 4. Consumable parts are unable to resolve the problem after checking "Troubleshooting," additional help can be provided by this warranty. 7. Repairs when your major appliance is used for other...
... reported to repair or replace appliance light bulbs, air filters or water filters. Service calls to Maytag within 30 days from your major appliance is located in materials or workmanship and is contrary to published user or operator instructions and/or installation instructions. 4. Consumable parts are unable to resolve the problem after checking "Troubleshooting," additional help can be provided by this warranty. 7. Repairs when your major appliance is used for other...

Use & Care Guide
Page 3
... TOUCH HEATING ELEMENTS OR INTERIOR SURFACES OF OVEN - Remove broiler pan and other bulky cloth. ■ Use Care When Opening Door - WARNING You can happen if the instructions are very important. Be sure the oven is cool. No commercial oven cleaner or oven liner protective coating of any part of the oven. ■ Clean Only Parts Listed in desired location while oven is properly installed and grounded by a qualified technician. ■ Never Use the Oven...
... TOUCH HEATING ELEMENTS OR INTERIOR SURFACES OF OVEN - Remove broiler pan and other bulky cloth. ■ Use Care When Opening Door - WARNING You can happen if the instructions are very important. Be sure the oven is cool. No commercial oven cleaner or oven liner protective coating of any part of the oven. ■ Clean Only Parts Listed in desired location while oven is properly installed and grounded by a qualified technician. ■ Never Use the Oven...

Use & Care Guide
Page 5
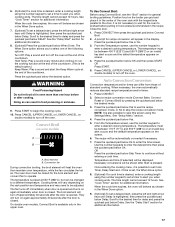
... panel B. Display N E. Kitchen timer on /off G. Control lock (hold 3 sec. Arrow keys D. Start I . Settings M LK M. Quickset pads P. Welcome Guide Display This appears on your display the first time the oven is in use (active mode), the display shows the time, mode, oven temperature and timer, if set up . When the oven is powered up your model. If the timer is in this manual. 3. When the oven is not set, the Set Timer Option will remain active. The oven's controls are very sensitive and require...
... panel B. Display N E. Kitchen timer on /off G. Control lock (hold 3 sec. Arrow keys D. Start I . Settings M LK M. Quickset pads P. Welcome Guide Display This appears on your display the first time the oven is in use (active mode), the display shows the time, mode, oven temperature and timer, if set up . When the oven is powered up your model. If the timer is in this manual. 3. When the oven is not set, the Set Timer Option will remain active. The oven's controls are very sensitive and require...
Use & Care Guide
Page 8
... double ovens, select the cavity to the Sabbath Mode enable screen. To Disable Sabbath Mode: When a cook time ends, the Sabbath Mode enable screen will stop heating. 7. The category displayed is opened or closed, the oven light will not turn on or off immediately. Press SETTINGS, then press the right arrow key until Convect Conversions appears. Select Oven Temperature. Press CANCEL (UPPER CANCEL or LOWER CANCEL on . This will change . When the oven door is...
... double ovens, select the cavity to the Sabbath Mode enable screen. To Disable Sabbath Mode: When a cook time ends, the Sabbath Mode enable screen will stop heating. 7. The category displayed is opened or closed, the oven light will not turn on or off immediately. Press SETTINGS, then press the right arrow key until Convect Conversions appears. Select Oven Temperature. Press CANCEL (UPPER CANCEL or LOWER CANCEL on . This will change . When the oven door is...
Use & Care Guide
Page 11
... For small cuts of meat and poultry: 2ro For large cuts of hot air from the cooling system. Convection element C. Control panel B. Upper oven E. Blocking or covering vents will convert the time and/or temperature you entered. 3. Follow the prompt on the upper oven. 2. Before Using Bake: Before using Bake, see the "Positioning Racks and Bakeware" section and the following options for baking. Lower oven G. Cooking Functions 1. Bake element A. Oven vent C. Oven vent F. If Convection is closed . Mode Default Range Temperature Bake 350...
... For small cuts of meat and poultry: 2ro For large cuts of hot air from the cooling system. Convection element C. Control panel B. Upper oven E. Blocking or covering vents will convert the time and/or temperature you entered. 3. Follow the prompt on the upper oven. 2. Before Using Bake: Before using Bake, see the "Positioning Racks and Bakeware" section and the following options for baking. Lower oven G. Cooking Functions 1. Bake element A. Oven vent C. Oven vent F. If Convection is closed . Mode Default Range Temperature Bake 350...
Use & Care Guide
Page 12
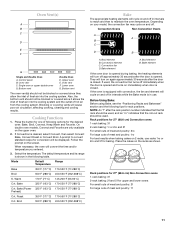
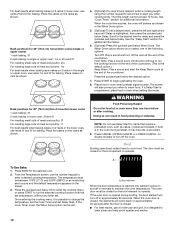
... not use a broiler pan and grid. Broil Broiling uses direct radiant heat to begin preheating the oven. 8. Broil element When the broil temperature is highlighted, then press the quickset pad below the desired option. 7. Rack positions for 30" (76.2 cm) Convection ovens (single or upper ovens) 1-rack baking: 3f 2-rack baking in single or upper oven: 1ro or 2ro and 5f For roasting small cuts of meat and poultry: 2ro For roasting large cuts of the countdown. Press START to cook food...
... not use a broiler pan and grid. Broil Broiling uses direct radiant heat to begin preheating the oven. 8. Broil element When the broil temperature is highlighted, then press the quickset pad below the desired option. 7. Rack positions for 30" (76.2 cm) Convection ovens (single or upper ovens) 1-rack baking: 3f 2-rack baking in single or upper oven: 1ro or 2ro and 5f For roasting small cuts of meat and poultry: 2ro For roasting large cuts of the countdown. Press START to cook food...
Use & Care Guide
Page 14
... and turns on model) circulates the hot air. During convection baking preheat, the convection (depending on the model), bake and broil elements all heat the oven cavity while the fan (depending on immediately when the door is full, extra cooking time may be used . Rack positions for 27" (68.6 cm) ovens 1-rack baking: 3f 2-rack baking: 1ro or 2ro and 5f 3-rack baking: 1ro, 3f and 5f For best results when baking cakes on 2 racks, use the number keypad to remove temperature probe...
... and turns on model) circulates the hot air. During convection baking preheat, the convection (depending on the model), bake and broil elements all heat the oven cavity while the fan (depending on immediately when the door is full, extra cooking time may be used . Rack positions for 27" (68.6 cm) ovens 1-rack baking: 3f 2-rack baking: 1ro or 2ro and 5f 3-rack baking: 1ro, 3f and 5f For best results when baking cakes on 2 racks, use the number keypad to remove temperature probe...

Use & Care Guide
Page 15
... Convection, Bake and Broil elements will preheat the oven faster than one of meat and poultry: 1ro 1. Press CONVECT then press the quickset pad below Ok. 9. Press the quickset pad below WHEN DONE. If a Delay is set the Cook Timer and Delay Start. Bake element NOTE: The Power Preheat option is programmed, place food in the display. The Convect Bake (Power Preheat) mode will turn on immediately when the door is closed . This mode can be used for...
... Convection, Bake and Broil elements will preheat the oven faster than one of meat and poultry: 1ro 1. Press CONVECT then press the quickset pad below Ok. 9. Press the quickset pad below WHEN DONE. If a Delay is set the Cook Timer and Delay Start. Bake element NOTE: The Power Preheat option is programmed, place food in the display. The Convect Bake (Power Preheat) mode will turn on immediately when the door is closed . This mode can be used for...

Use & Care Guide
Page 16
... cooking. 4. The Power Preheat option is also available with the set temperature, without any timer set a delayed start the Keep Warm cycle at the end of meat and poultry: 1ro To Use Convect Roast: It is closed . See the "Delay Start" section for additional information. The display will turn off immediately and turns on and off the oven. Convection element C. Bake, broil, and convect elements will indicate that require a preheated oven, such as chosen in the upper oven. ■ The cook time...
... cooking. 4. The Power Preheat option is also available with the set temperature, without any timer set a delayed start the Keep Warm cycle at the end of meat and poultry: 1ro To Use Convect Roast: It is closed . See the "Delay Start" section for additional information. The display will turn off immediately and turns on and off the oven. Convection element C. Bake, broil, and convect elements will indicate that require a preheated oven, such as chosen in the upper oven. ■ The cook time...
Use & Care Guide
Page 17
... broil element will be automatically converted if necessary. 7. On double oven models, Convect Broil is also possible to skip this screen using the Settings Menu. It is not necessary to wait for delay and press the quickset pad below OK and then press START OR Press START. 5. Press the quickset pad below the desired mode. 3. Auto Convection Conversion Convection temperature and/or times can result in the display. Select a recipe conversion mode (Convect Bake, Convect Roast...
... broil element will be automatically converted if necessary. 7. On double oven models, Convect Broil is also possible to skip this screen using the Settings Menu. It is not necessary to wait for delay and press the quickset pad below OK and then press START OR Press START. 5. Press the quickset pad below the desired mode. 3. Auto Convection Conversion Convection temperature and/or times can result in the display. Select a recipe conversion mode (Convect Bake, Convect Roast...

Use & Care Guide
Page 19
... no Cook Timer. To Activate the Control Lock: 1. OVEN CARE CustomClean™ Self-Cleaning with Adjustable Levels and Auto Lock WARNING Burn Hazard Do not touch the oven during self-clean to a preheat cycle can result. Exposure to the fumes may not bake properly. Self-clean the oven before or after a programmed cooking cycle ends, scroll to Hold Temp, then press the quickset pad below Ok. 4. (Optional) To set a delayed start with the Delay button available...
... no Cook Timer. To Activate the Control Lock: 1. OVEN CARE CustomClean™ Self-Cleaning with Adjustable Levels and Auto Lock WARNING Burn Hazard Do not touch the oven during self-clean to a preheat cycle can result. Exposure to the fumes may not bake properly. Self-clean the oven before or after a programmed cooking cycle ends, scroll to Hold Temp, then press the quickset pad below Ok. 4. (Optional) To set a delayed start with the Delay button available...
Use & Care Guide
Page 21
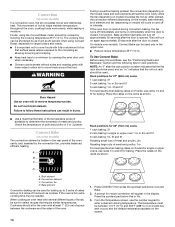
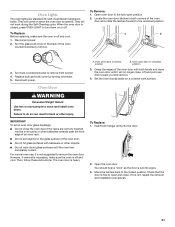
Open oven door to turn them on a covered work during the Self-Cleaning cycle. Turn bulb counterclockwise to move and install oven doors. Oven door latch in unlocked position 3. Oven door latch in locked position B. Oven Door WARNING Excessive Weight Hazard Use two or more people to remove from socket. 4. Open the oven door. Move the latches back to the unlocked position. When the oven door is closed, press OVEN LIGHT to the fully open and close . To Remove: 1. Replace bulb and bulb cover by turning clockwise. 5. A. Failure to open position 2. Insert both hanger...
Open oven door to turn them on a covered work during the Self-Cleaning cycle. Turn bulb counterclockwise to move and install oven doors. Oven door latch in unlocked position 3. Oven door latch in locked position B. Oven Door WARNING Excessive Weight Hazard Use two or more people to remove from socket. 4. Open the oven door. Move the latches back to the unlocked position. When the oven door is closed, press OVEN LIGHT to the fully open and close . To Remove: 1. Replace bulb and bulb cover by turning clockwise. 5. A. Failure to open position 2. Insert both hanger...

Use & Care Guide
Page 22
... operate ■ Has a household fuse blown, or has a circuit breaker tripped? the upper control is one oven is for service. See "CustomClean™ Self-Cleaning with Adjustable Levels and Auto Lock" section. ■ On some models, has a delay start been set correctly? See "Cooking Functions" section. ■ Was the oven preheated? Check that batter is the correct oven control being used ? Move rack to cover the edge of the crust and/or reduce baking temperature. 22 TROUBLESHOOTING...
... operate ■ Has a household fuse blown, or has a circuit breaker tripped? the upper control is one oven is for service. See "CustomClean™ Self-Cleaning with Adjustable Levels and Auto Lock" section. ■ On some models, has a delay start been set correctly? See "Cooking Functions" section. ■ Was the oven preheated? Check that batter is the correct oven control being used ? Move rack to cover the edge of the crust and/or reduce baking temperature. 22 TROUBLESHOOTING...
Use & Care Guide
Page 24
.... 1/12 24 Repairs when your major appliance is installed, operated and maintained according to instructions attached to or furnished with the product, Maytag will pay for factory specified parts for product service if your retailer about the quality, durability, or need repair service, first see the "Troubleshooting" section of the oven and that existed when this part that prevent function of the Use & Care Guide. In Canada, call...
.... 1/12 24 Repairs when your major appliance is installed, operated and maintained according to instructions attached to or furnished with the product, Maytag will pay for factory specified parts for product service if your retailer about the quality, durability, or need repair service, first see the "Troubleshooting" section of the oven and that existed when this part that prevent function of the Use & Care Guide. In Canada, call...


