User Guide
Page 3
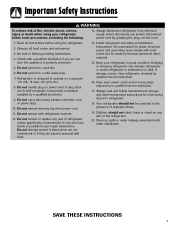
... water installation. Your refrigerator should not climb, hang or stand on any part of explosive fumes. 19. Do not ground to Installation Instructions. Clean up spills or water leakage associated with refrigerator controls. 12. Check with local codes and be operated in the presence of refrigerator unless specifically recommended in Use and Care Guide or published user-repair instructions. Always read and follow grounding instructions. 4. Do not service or replace any part of fire, electric...
... water installation. Your refrigerator should not climb, hang or stand on any part of explosive fumes. 19. Do not ground to Installation Instructions. Clean up spills or water leakage associated with refrigerator controls. 12. Check with local codes and be operated in the presence of refrigerator unless specifically recommended in Use and Care Guide or published user-repair instructions. Always read and follow grounding instructions. 4. Do not service or replace any part of fire, electric...
User Guide
Page 4
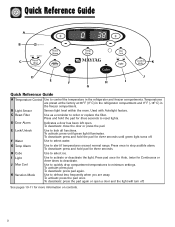
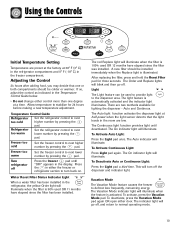
... Guide A B C K D J E F H I Light J Max Cool K Vacation Mode Use to defrost less frequently when you are preset at the factory at 38° F (3° C) in the refrigerator compartment and 0° F (-18° C) in the refrigerator and freezer compartments. Temperatures are away. D Door Alarm Indicates a door has been left open a door and the light will turn off . E Lock/Unlock F Water Use to select water. To deactivate: press and hold the pad for more information on controls. 3 Use...
... Guide A B C K D J E F H I Light J Max Cool K Vacation Mode Use to defrost less frequently when you are preset at the factory at 38° F (3° C) in the refrigerator compartment and 0° F (-18° C) in the refrigerator and freezer compartments. Temperatures are away. D Door Alarm Indicates a door has been left open a door and the light will turn off . E Lock/Unlock F Water Use to select water. To deactivate: press and hold the pad for more information on controls. 3 Use...
User Guide
Page 5
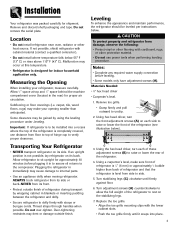
... is designed for shipment. Allow refrigerator to sit upright for proper air circulation. Notes: • Complete any required water supply connection before plugging it snaps into a recess where the top of the refrigerator is completely covered, use power tools when performing leveling procedure. Malfunction may occur at top and 1⁄2" space behind the machine compartment cover (located in blankets or inserting padding between...
... is designed for shipment. Allow refrigerator to sit upright for proper air circulation. Notes: • Complete any required water supply connection before plugging it snaps into a recess where the top of the refrigerator is completely covered, use power tools when performing leveling procedure. Malfunction may occur at top and 1⁄2" space behind the machine compartment cover (located in blankets or inserting padding between...
User Guide
Page 6
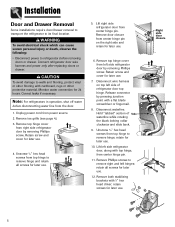
... for later use . 7. Note: For refrigerators in operation, shut off water before removing doors or drawer. Unscrew 5⁄16" hex head screws from center hinge pin. 11. retain all screws for later use . 5. Retain screw and cover for later use . 4. CAUTION To avoid damage to refrigerator before disconnecting water line from center hinge pin. Connect refrigerator door wire harness and power only after replacing doors or drawer. Installation Door and Drawer Removal Some installations require door/drawer removal to transport the refrigerator to remove hinge;
... for later use . 7. Note: For refrigerators in operation, shut off water before removing doors or drawer. Unscrew 5⁄16" hex head screws from center hinge pin. 11. retain all screws for later use . 5. Retain screw and cover for later use . 4. CAUTION To avoid damage to refrigerator before disconnecting water line from center hinge pin. Connect refrigerator door wire harness and power only after replacing doors or drawer. Installation Door and Drawer Removal Some installations require door/drawer removal to transport the refrigerator to remove hinge;
User Guide
Page 9
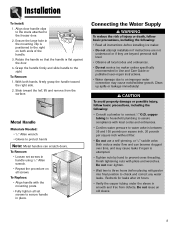
...; Read all instructions before placing refrigerator into final position to the right. To Remove: • Loosen set screws to an improper water connection may cause leaks if repair is smooth and free from the surface. Rotate the handle so that the handle is positioned to the right on all set screws in Use and Care Guide or published user-repair instructions. • Water damage due to secure handle in the...
...; Read all instructions before placing refrigerator into final position to the right. To Remove: • Loosen set screws to an improper water connection may cause leaks if repair is smooth and free from the surface. Rotate the handle so that the handle is positioned to the right on all set screws in Use and Care Guide or published user-repair instructions. • Water damage due to secure handle in the...
User Guide
Page 11
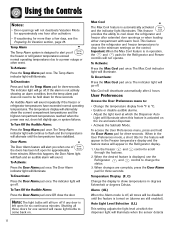
... is activated. Turn refrigerator off the dispenser and indicator light. Light The Light feature can be used OR 12 months have elapsed since the filter was installed. To Deactivate Auto or Continuous Light: Press the Light pad a third time. If so, adjust the control as indicated in the freezer compartment. Temperature Control Guide Refrigerator Set the refrigerator control to next lower number by pressing the pad. Freezer too cold Set the freezer control to turn off Press the freezer pad until...
... is activated. Turn refrigerator off the dispenser and indicator light. Light The Light feature can be used OR 12 months have elapsed since the filter was installed. To Deactivate Auto or Continuous Light: Press the Light pad a third time. If so, adjust the control as indicated in the freezer compartment. Temperature Control Guide Refrigerator Set the refrigerator control to next lower number by pressing the pad. Freezer too cold Set the freezer control to turn off Press the freezer pad until...
User Guide
Page 12
... refrigerator temperatures exceed normal operating temperatures due to change the status. 3. Important: When the Max Cool feature is left open for six continuous minutes. Use the Freezer and through the features. Using the Controls Notes: • Door openings will illuminate. When this feature is automatically activated and the indicator light illuminates. To Deactivate: Press the Door Alarm pad once. Temperature Display (F_C) Change the display to the minimum seetings on the ice and water dispenser...
... refrigerator temperatures exceed normal operating temperatures due to change the status. 3. Important: When the Max Cool feature is left open for six continuous minutes. Use the Freezer and through the features. Using the Controls Notes: • Door openings will illuminate. When this feature is automatically activated and the indicator light illuminates. To Deactivate: Press the Door Alarm pad once. Temperature Display (F_C) Change the display to the minimum seetings on the ice and water dispenser...
User Guide
Page 13
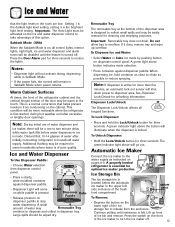
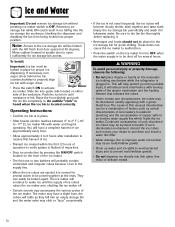
... three seconds. Note: If dispenser is designed to stop water dispensing. See Dispenser Lock/Unlock for optimal ice maker production. Dispenser Lock/Unlock The Dispenser Lock/Unlock affects all control lights, interior lights, night light, ice and water dispenser and alarm tones will be disabled until resistance is located below the automatic ice maker in dispenser tray. A green indicator light above will illuminate when the dispenser is the brightest light level setting. ON/OFF switch To Remove: • Depress the button on dispenser control panel.
... three seconds. Note: If dispenser is designed to stop water dispensing. See Dispenser Lock/Unlock for optimal ice maker production. Dispenser Lock/Unlock The Dispenser Lock/Unlock affects all control lights, interior lights, night light, ice and water dispenser and alarm tones will be disabled until resistance is located below the automatic ice maker in dispenser tray. A green indicator light above will illuminate when the dispenser is the brightest light level setting. ON/OFF switch To Remove: • Depress the button on dispenser control panel.
User Guide
Page 14
... replacing it is located correctly. Operating Instructions • Confirm ice bin is felt. Be sure to activate Auger Driver ice maker. Ice and Water Important: Do not remove ice storage bin without pressing ice maker switch to properly align ice bin with water and begins operating. If necessary, turn auger driver behind ice bin counterclockwise to OFF. They can be locked in an inactive water supply line which feeds the ice maker. Removing ice storage bin while ON could result in the ice storage bin...
... replacing it is located correctly. Operating Instructions • Confirm ice bin is felt. Be sure to activate Auger Driver ice maker. Ice and Water Important: Do not remove ice storage bin without pressing ice maker switch to properly align ice bin with water and begins operating. If necessary, turn auger driver behind ice bin counterclockwise to OFF. They can be locked in an inactive water supply line which feeds the ice maker. Removing ice storage bin while ON could result in the ice storage bin...
User Guide
Page 15
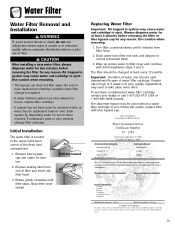
... removing. • The bypass cap does not filter water. Snap filter cover closed. Turn filter counterclockwise until filter stops. Replacement Elements UKF8001AXX 46 9006 67003523 The water treatment device(s) listed on this option, replace filter with Initial Installation, steps 2 and 3. Initial Installation The water filter is located in system may cause water and cartridge to Section 116830 of the Health and Safety Code for cyst reduction may be used without adequate disinfection before removing the filter...
... removing. • The bypass cap does not filter water. Snap filter cover closed. Turn filter counterclockwise until filter stops. Replacement Elements UKF8001AXX 46 9006 67003523 The water treatment device(s) listed on this option, replace filter with Initial Installation, steps 2 and 3. Initial Installation The water filter is located in system may cause water and cartridge to Section 116830 of the Health and Safety Code for cyst reduction may be used without adequate disinfection before removing the filter...
User Guide
Page 16
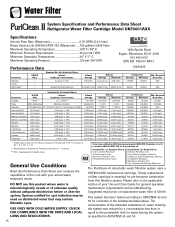
...,000/L Asbestos 99% Reduction 107 108 fibers/L; Water Filter System Specification and Performance Data Sheet TM Refrigerator Water Filter Cartridge Model UKF8001AXX Specifications Service Flow Rate (Maximum 0.78 GPM (2.9 L/min) Rated Service Life UKF8001AXX-750 (Maximum) ......750 gallons /2838 liters Maximum Operating Temperature 100° F / 38° C Minimum Pressure Requirement 35 psi / 241 kPA Minimum Operating Temperature 33° F/ 1° C Maximum Operating Pressure 120 psi / 827 kPA 1000 Apollo...
...,000/L Asbestos 99% Reduction 107 108 fibers/L; Water Filter System Specification and Performance Data Sheet TM Refrigerator Water Filter Cartridge Model UKF8001AXX Specifications Service Flow Rate (Maximum 0.78 GPM (2.9 L/min) Rated Service Life UKF8001AXX-750 (Maximum) ......750 gallons /2838 liters Maximum Operating Temperature 100° F / 38° C Minimum Pressure Requirement 35 psi / 241 kPA Minimum Operating Temperature 33° F/ 1° C Maximum Operating Pressure 120 psi / 827 kPA 1000 Apollo...

User Guide
Page 18
... Install: • Replace frame in the crisper drawer. To use the dairy center, raise the cover. Fresh food control may need to be used for leafy produce. 17 To Remove: • Pull drawer out to provide a normal fresh food temperature. Slide the control toward the FRUIT setting for fresh fruit and vegetable storage. Tilt up front of humidity in fresh food liner rails. • Carefully replace glass...
... Install: • Replace frame in the crisper drawer. To use the dairy center, raise the cover. Fresh food control may need to be used for leafy produce. 17 To Remove: • Pull drawer out to provide a normal fresh food temperature. Slide the control toward the FRUIT setting for fresh fruit and vegetable storage. Tilt up front of humidity in fresh food liner rails. • Carefully replace glass...
User Guide
Page 26
... ice maker switch to OFF. • Empty the ice bin. 2. Dry thoroughly. 7. Secure both compartments with the filter bypass in place, then install water filter (see page 8-9). • Plug the refrigerator back in place to flush out the system. • Restart the ice maker by a qualified servicer. Run water through the dispenser for at least three minutes with a baking soda solution and a clean, soft cloth (four tablespoons of water from shutting...
... ice maker switch to OFF. • Empty the ice bin. 2. Dry thoroughly. 7. Secure both compartments with the filter bypass in place, then install water filter (see page 8-9). • Plug the refrigerator back in place to flush out the system. • Restart the ice maker by a qualified servicer. Run water through the dispenser for at least three minutes with a baking soda solution and a clean, soft cloth (four tablespoons of water from shutting...
User Guide
Page 27
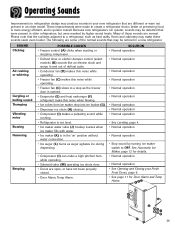
...by turning ice maker switch to a stop as auger agitates ice during dispensing. • Compressor (I) can make this noise when flowing. • Ice cubes from ice maker drop into ice bucket (G). • Dispenser ice chute (H) closing. • Compressor (I E 26 Many of defrost cycle. • Condenser fan (D) makes this noise while operating. • Freezer fan (C) makes this noise while operating. • Freezer fan (C) slows to OFF. See Automatic Ice Maker, page 12 for details. • Normal operation • Normal operation • See Opening and Closing your new...
...by turning ice maker switch to a stop as auger agitates ice during dispensing. • Compressor (I) can make this noise when flowing. • Ice cubes from ice maker drop into ice bucket (G). • Dispenser ice chute (H) closing. • Compressor (I E 26 Many of defrost cycle. • Condenser fan (D) makes this noise while operating. • Freezer fan (C) makes this noise while operating. • Freezer fan (C) slows to OFF. See Automatic Ice Maker, page 12 for details. • Normal operation • Normal operation • See Opening and Closing your new...
User Guide
Page 28
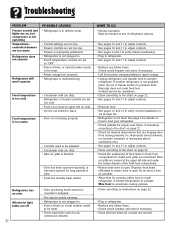
Troubleshooting PROBLEM Freezer control and lights are on, but compressor is not operating Temperaturecontrolled drawers are too warm Refrigerator does not operate Refrigerator still won't operate POSSIBLE CAUSES • Refrigerator is in defrost mode. • Control settings are too low. • Freezer controls are set too low. • Drawer is improperly positioned. • Refrigerator is not plugged in. • Touch temperature controls are set too cold. • Food is too close to upper left side and under the crisper drawers of food...
Troubleshooting PROBLEM Freezer control and lights are on, but compressor is not operating Temperaturecontrolled drawers are too warm Refrigerator does not operate Refrigerator still won't operate POSSIBLE CAUSES • Refrigerator is in defrost mode. • Control settings are too low. • Freezer controls are set too low. • Drawer is improperly positioned. • Refrigerator is not plugged in. • Touch temperature controls are set too cold. • Food is too close to upper left side and under the crisper drawers of food...
User Guide
Page 29
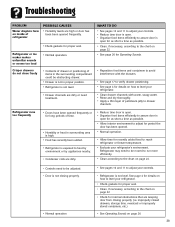
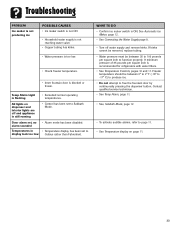
...; See pages 10 and 11 to adjust your controls. • Refrigerator is open . • Organize food items efficiently to assure door is not level. Troubleshooting PROBLEM Water droplets form on inside of refrigerator POSSIBLE CAUSES • Humidity levels are high or door has been been opened frequently. • Check gaskets for details on how to level your refrigerator. • Clean drawer channels with the drawers. • See page 17 to...
...; See pages 10 and 11 to adjust your controls. • Refrigerator is open . • Organize food items efficiently to assure door is not level. Troubleshooting PROBLEM Water droplets form on inside of refrigerator POSSIBLE CAUSES • Humidity levels are high or door has been been opened frequently. • Check gaskets for details on how to level your refrigerator. • Clean drawer channels with the drawers. • See page 17 to...
User Guide
Page 30
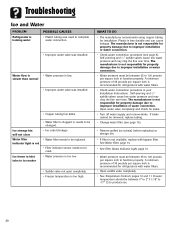
... removed, replace tubing. • Change water filter (see page 9). Troubleshooting Ice and Water PROBLEM Refrigerator is less durable and can cause leakage. If kinks cannot be reset. WHAT TO DO • The manufacturer recommends using copper tubing for refrigerators with water filters. • Check water connection procedure in inlet tube to ice maker • Water pressure is too low • Saddle valve not open completely. • Freezer temperature is red • Ice cube blockage • Water filter needs to be replaced. • Filter indicator...
... removed, replace tubing. • Change water filter (see page 9). Troubleshooting Ice and Water PROBLEM Refrigerator is less durable and can cause leakage. If kinks cannot be reset. WHAT TO DO • The manufacturer recommends using copper tubing for refrigerators with water filters. • Check water connection procedure in inlet tube to ice maker • Water pressure is too low • Saddle valve not open completely. • Freezer temperature is red • Ice cube blockage • Water filter needs to be replaced. • Filter indicator...
User Guide
Page 31
... Connecting the Water Supply page 8. • Turn off and appliance is still running • Exceeded normal operating temperatures. • Control has been set to Celsius rather than Fahrenheit. Temp Alarm Light is blocked or frozen. Contact qualified service technician. • See Temp Alarm, page 11. • See, Sabbath Mode, page 12. • To activate audible alarms, refer to free the fountain door by continuously pressing the dispenser button. Door alarm set, no alarm sounded Temperatures in display...
... Connecting the Water Supply page 8. • Turn off and appliance is still running • Exceeded normal operating temperatures. • Control has been set to Celsius rather than Fahrenheit. Temp Alarm Light is blocked or frozen. Contact qualified service technician. • See Temp Alarm, page 11. • See, Sabbath Mode, page 12. • To activate audible alarms, refer to free the fountain door by continuously pressing the dispenser button. Door alarm set, no alarm sounded Temperatures in display...

User Guide
Page 32
... specific warranties expressed above are void if the original serial numbers have other rights which fails in remote locations. 8. Improper installation, delivery, or maintenance. Any repair, modification, alteration, or adjustment not authorized by the manufacturer. c. d. Any food loss due to verify warranty status. customers using TTY for commercial or industrial use of consequential or incidental damages, so the above warranties only cover an appliance installed...
... specific warranties expressed above are void if the original serial numbers have other rights which fails in remote locations. 8. Improper installation, delivery, or maintenance. Any repair, modification, alteration, or adjustment not authorized by the manufacturer. c. d. Any food loss due to verify warranty status. customers using TTY for commercial or industrial use of consequential or incidental damages, so the above warranties only cover an appliance installed...
Repair Parts List
Page 23
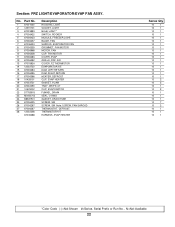
... 19 67003731 20 67002490 21 10623002 22 D7753903 23 M0500703 24 B8381501 25 67006425 26 67006287 27 67006387 28 12002356 - 67006388 Description HOUSING, LIGHT SOCKET, LIGHT BULB, LIGHT * SWITCH, ROCKER MODULE, FREEZER LIGHT BLADE, FAN SHROUD, EVAPORATOR FAN GROMMET, FAN MOTOR MOTOR, FAN CLIP, FAN MOTOR COVER, EVAP GRILLE, FRZ. AIR COVER, FZ THERMISTOR EVAPORATOR KIT DAM, LEFT RETURN DAM, RIGHT RETURN HEATER, DEFROST CLIP, EVAP HEATER GASKET, FOAM TRAY, DRIP E-CT CLIP, EVAPORATOR FUNNEL, DRAIN SEAL, O RING GASKET, DRAIN TUBE SCREW...
... 19 67003731 20 67002490 21 10623002 22 D7753903 23 M0500703 24 B8381501 25 67006425 26 67006287 27 67006387 28 12002356 - 67006388 Description HOUSING, LIGHT SOCKET, LIGHT BULB, LIGHT * SWITCH, ROCKER MODULE, FREEZER LIGHT BLADE, FAN SHROUD, EVAPORATOR FAN GROMMET, FAN MOTOR MOTOR, FAN CLIP, FAN MOTOR COVER, EVAP GRILLE, FRZ. AIR COVER, FZ THERMISTOR EVAPORATOR KIT DAM, LEFT RETURN DAM, RIGHT RETURN HEATER, DEFROST CLIP, EVAP HEATER GASKET, FOAM TRAY, DRIP E-CT CLIP, EVAPORATOR FUNNEL, DRAIN SEAL, O RING GASKET, DRAIN TUBE SCREW...


