User Guide
Page 2
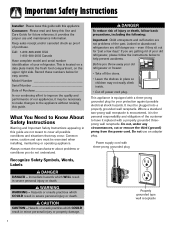
... the proper use an adapter plug. CAUTION CAUTION - Immediate hazards which COULD result in this Use and Care Guide for your old refrigerator or freezer: • Take off power cord plug. Hazards or unsafe practices which WILL result in minor personal injury or property damage... or conditions you are not problems of injury or death, follow the instructions below for "just a few days." Junked or abandoned refrigerators are not meant to Know About Safety Instructions Warning and Important Safety Instructions appearing in severe personal injury or death. Do not, under...
... the proper use an adapter plug. CAUTION CAUTION - Immediate hazards which COULD result in this Use and Care Guide for your old refrigerator or freezer: • Take off power cord plug. Hazards or unsafe practices which WILL result in minor personal injury or property damage... or conditions you are not problems of injury or death, follow the instructions below for "just a few days." Junked or abandoned refrigerators are not meant to Know About Safety Instructions Warning and Important Safety Instructions appearing in severe personal injury or death. Do not, under...
User Guide
Page 3
... they are not sure this appliance is designed to a cold-water pipe. 7. Your refrigerator should not climb, hang or stand on any part of refrigerator unless specifically recommended in good condition. Do not service or replace any part of the refrigerator. 20. Children should not be made by a qualified service technician. 17. All connections...
... they are not sure this appliance is designed to a cold-water pipe. 7. Your refrigerator should not climb, hang or stand on any part of refrigerator unless specifically recommended in good condition. Do not service or replace any part of the refrigerator. 20. Children should not be made by a qualified service technician. 17. All connections...
User Guide
Page 4
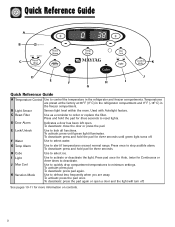
... lock all functions. Use to defrost less frequently when you are preset at the factory at 38° F (3° C) in the refrigerator compartment and 0° F (-18° C) in the refrigerator and freezer compartments. See pages 10-11 for Continuous or three times to deactivate. C Reset Filter Use as a reminder to minimum settings...
... lock all functions. Use to defrost less frequently when you are preset at the factory at 38° F (3° C) in the refrigerator compartment and 0° F (-18° C) in the refrigerator and freezer compartments. See pages 10-11 for Continuous or three times to deactivate. C Reset Filter Use as a reminder to minimum settings...
User Guide
Page 5
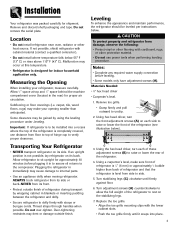
...Opening When installing your opening smaller than back of hinge cap to side. 5. Using a carpenter's level, make your refrigerator, measure carefully. If not possible, shield refrigerator with the lower cabinet slots. • Push the toe grille firmly until firmly against floor. 6. Some clearance may... to assure oil returns to be gained by wrapping cabinet in immediately may dent or damage outside finish of the refrigerator is not possible, lay refrigerator on its side or back-NEVER from damage, observe the following: • Protect vinyl or other flooring with...
...Opening When installing your opening smaller than back of hinge cap to side. 5. Using a carpenter's level, make your refrigerator, measure carefully. If not possible, shield refrigerator with the lower cabinet slots. • Push the toe grille firmly until firmly against floor. 6. Some clearance may... to assure oil returns to be gained by wrapping cabinet in immediately may dent or damage outside finish of the refrigerator is not possible, lay refrigerator on its side or back-NEVER from damage, observe the following: • Protect vinyl or other flooring with...
User Guide
Page 6
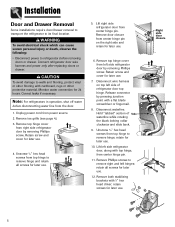
...locking collar clockwise and slide back. 9. Retain screw and cover for later use . 7. Remove top hinge cover from right side refrigerator door by pressing junction point with 3⁄8" hex head driver; Disconnect wire harness on the right side and retain for 24 hours.... Release connector by removing Phillips screw. Disconnect waterline. Hold "tabbed" section of refrigerator door top hinge. retain for later use . 5. Lift left hinges; Remove both stabilizing brackets with a flat blade screwdriver or fingernail. ...
...locking collar clockwise and slide back. 9. Retain screw and cover for later use . 7. Remove top hinge cover from right side refrigerator door by pressing junction point with 3⁄8" hex head driver; Disconnect wire harness on the right side and retain for 24 hours.... Release connector by removing Phillips screw. Disconnect waterline. Hold "tabbed" section of refrigerator door top hinge. retain for later use . 5. Lift left hinges; Remove both stabilizing brackets with a flat blade screwdriver or fingernail. ...
User Guide
Page 7
.... 9. A "click" is heard ensuring Tabs waterlines are correctly locked in place. Remove Phillips screws from the slides. 5. While holding refrigerator door upright, tighten down top hinge with Phillips or hex screws. 2. After replacing doors, connect power. To Remove: 6. Ensure the...hinges with 5⁄16" hex head driver. 4. Rotate black locking collar counterclockwise locking water lines in place. Pull drawer open to refrigerator before installing the upper hinge cover. 10. Replace top hinge covers. 4. Move drawer slides fully forward. 6. WARNING To avoid electrical...
.... 9. A "click" is heard ensuring Tabs waterlines are correctly locked in place. Remove Phillips screws from the slides. 5. While holding refrigerator door upright, tighten down top hinge with Phillips or hex screws. 2. After replacing doors, connect power. To Remove: 6. Ensure the...hinges with 5⁄16" hex head driver. 4. Rotate black locking collar counterclockwise locking water lines in place. Pull drawer open to refrigerator before installing the upper hinge cover. 10. Replace top hinge covers. 4. Move drawer slides fully forward. 6. WARNING To avoid electrical...
User Guide
Page 8
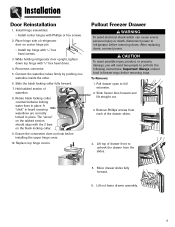
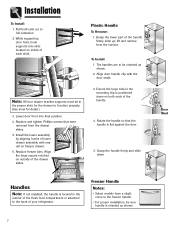
To Install: 1. Align door handle clip with rear rail on both rails out to the back of your refrigerator. Note: All four drawer bracket supports must be in the proper slots for detail.) 3. Replace freezer bins. Grasp the handle firmly and slide down on ...
To Install: 1. Align door handle clip with rear rail on both rails out to the back of your refrigerator. Note: All four drawer bracket supports must be in the proper slots for detail.) 3. Replace freezer bins. Grasp the handle firmly and slide down on ...
User Guide
Page 9
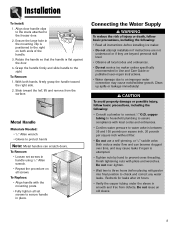
Installation To Install: 1. Rotate the handle so that the handle is between 35 and 100 pounds per square inch, 20 pounds per square inch without filter. • Do not use a self-piercing, or 3⁄16" saddle valve. Slide toward the right side. 2. ... flat against the door. 4. With both ends of injury or death, follow basic precautions, including the following : • Read all instructions before placing refrigerator into final position to connect 1⁄4" O.D. Recheck for leaks after 24 hours. • Verify the copper tubing under the sleeve is smooth and free ...
Installation To Install: 1. Rotate the handle so that the handle is between 35 and 100 pounds per square inch, 20 pounds per square inch without filter. • Do not use a self-piercing, or 3⁄16" saddle valve. Slide toward the right side. 2. ... flat against the door. 4. With both ends of injury or death, follow basic precautions, including the following : • Read all instructions before placing refrigerator into final position to connect 1⁄4" O.D. Recheck for leaks after 24 hours. • Verify the copper tubing under the sleeve is smooth and free ...
User Guide
Page 10
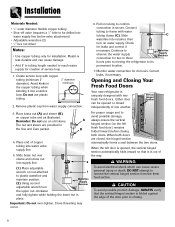
...leaks, if necessary. personal injury or death, DO NOT attempt to reach water supply for two to three hours prior to moving the refrigerator to frame with water tubing clamp (C). Plastic is folded against the edge of one another. Place end of service loop. 1. Continue...loop. Cross threading may occur. 9 Avoid kinks in the Use and Care packet. 4. Opening and Closing Your Fresh Food Doors Your new refrigerator is opened or closed , the hinged section automatically forms a seal between the two doors. Connect tubing to its permanent location. Slide waterline ...
...leaks, if necessary. personal injury or death, DO NOT attempt to reach water supply for two to three hours prior to moving the refrigerator to frame with water tubing clamp (C). Plastic is folded against the edge of one another. Place end of service loop. 1. Continue...loop. Cross threading may occur. 9 Avoid kinks in the Use and Care packet. 4. Opening and Closing Your Fresh Food Doors Your new refrigerator is opened or closed , the hinged section automatically forms a seal between the two doors. Connect tubing to its permanent location. Slide waterline ...
User Guide
Page 11
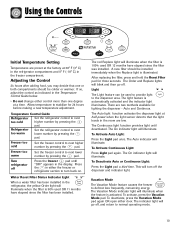
... Light The Light feature can be used OR 12 months have elapsed since the filter was installed. Temperature Control Guide Refrigerator Set the refrigerator control to the dispenser area. The Continuous light function provides light until "OFF" appears in the display. Vacation Mode... Light: Press the Light pad once. The Auto light function activates the dispenser light at 38° F (3° C) in the refrigerator compartment and 0° F (-18° C) in the freezer compartment. Allow temperature to defrost less frequently, conserving energy. Using the Controls...
... Light The Light feature can be used OR 12 months have elapsed since the filter was installed. Temperature Control Guide Refrigerator Set the refrigerator control to the dispenser area. The Continuous light function provides light until "OFF" appears in the display. Vacation Mode... Light: Press the Light pad once. The Auto light function activates the dispenser light at 38° F (3° C) in the refrigerator compartment and 0° F (-18° C) in the freezer compartment. Allow temperature to defrost less frequently, conserving energy. Using the Controls...
User Guide
Page 12
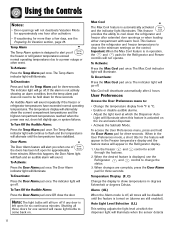
...disabled until the temperatures have exceeded normal operating temperatures. The Temp Alarm indicator light will alert you if the freezer or refrigerator temperatures exceed normal operating temperatures due to flash and the temperatures will illuminate when the sensor detects Door Alarm The Door ... after activation. • If vacationing for more than a few days, see the Preparing for approximately three minutes. This feature causes the refrigerator and freezer temperatures to drop to °C. • Enable or disable audible alarms. • Adjust the light level at which the ...
...disabled until the temperatures have exceeded normal operating temperatures. The Temp Alarm indicator light will alert you if the freezer or refrigerator temperatures exceed normal operating temperatures due to flash and the temperatures will illuminate when the sensor detects Door Alarm The Door ... after activation. • If vacationing for more than a few days, see the Preparing for approximately three minutes. This feature causes the refrigerator and freezer temperatures to drop to °C. • Enable or disable audible alarms. • Adjust the light level at which the ...
User Guide
Page 13
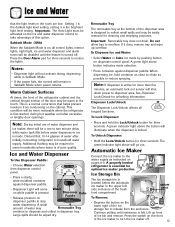
.../OFF switch To Remove: • Depress the button on dispenser control panel. Warm Cabinet Surfaces At times, the front of the refrigerator cabinet and the vertical hinged section of ice bin and remove. Additional flushing may be required in some households where water is first...indicates mode selection. • Press container against dispenser paddle. • Dispenser Light will not activate during hot weather and after initially connecting refrigerator to turn the ice maker off . Important: The Auto Light must be wiped dry. To Lock Dispenser: • Press and hold ...
.../OFF switch To Remove: • Depress the button on dispenser control panel. Warm Cabinet Surfaces At times, the front of the refrigerator cabinet and the vertical hinged section of ice bin and remove. Additional flushing may be required in some households where water is first...indicates mode selection. • Press container against dispenser paddle. • Dispenser Light will not activate during hot weather and after initially connecting refrigerator to turn the ice maker off . Important: The Auto Light must be wiped dry. To Lock Dispenser: • Press and hold ...
User Guide
Page 14
... To avoid personal injury or property damage, observe the following: • Do not place fingers or hands on the automatic ice making mechanism while the refrigerator is flushed of impurities. • Stop ice production by pressing the ON/OFF switch located on either side of air in lukewarm water. Continued consumption...
... To avoid personal injury or property damage, observe the following: • Do not place fingers or hands on the automatic ice making mechanism while the refrigerator is flushed of impurities. • Stop ice production by pressing the ON/OFF switch located on either side of air in lukewarm water. Continued consumption...
User Guide
Page 15
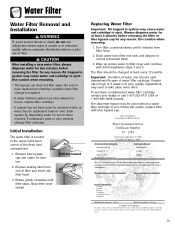
..., steps 2 and 3. Turn filter counterclockwise until filter stops. Water Filter Water Filter Removal and Installation WARNING To avoid serious illness or death, do not use refrigerator where water is microbiologically unsafe or with water of unknown quality, except that may contain filterable cysts. 14
..., steps 2 and 3. Turn filter counterclockwise until filter stops. Water Filter Water Filter Removal and Installation WARNING To avoid serious illness or death, do not use refrigerator where water is microbiologically unsafe or with water of unknown quality, except that may contain filterable cysts. 14
User Guide
Page 16
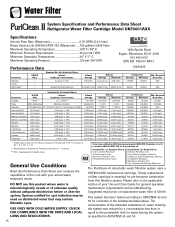
... mg/L 0.081 mg/L 0.208 mg/L 0.002 mg/L 0.015 mg/L Effluent Average Maximum 0.31 NTU .049 NTU Water Filter System Specification and Performance Data Sheet TM Refrigerator Water Filter Cartridge Model UKF8001AXX Specifications Service Flow Rate (Maximum 0.78 GPM (2.9 L/min) Rated Service Life UKF8001AXX-750 (Maximum) ......750 gallons /2838 liters Maximum Operating...
... mg/L 0.081 mg/L 0.208 mg/L 0.002 mg/L 0.015 mg/L Effluent Average Maximum 0.31 NTU .049 NTU Water Filter System Specification and Performance Data Sheet TM Refrigerator Water Filter Cartridge Model UKF8001AXX Specifications Service Flow Rate (Maximum 0.78 GPM (2.9 L/min) Rated Service Life UKF8001AXX-750 (Maximum) ......750 gallons /2838 liters Maximum Operating...
User Guide
Page 17
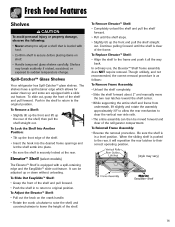
...Remove Elevator™ Shelf: • Completely unload the shelf and pull the shelf forward. • Pull until the shelf is clear of the refrigerator compartment. In ordinary use, the Elevator™ Shelf frame assembly does NOT require removal. Push in a level position. Though unlikely, and not ...mechanism to sudden temperature change. When the sliding shelf is equipped with a slide out feature. Spill-CatcherTM Glass Shelves Your refrigerator has Spill-CatcherTM glass shelves. To Remove a Shelf: • Slightly tilt up the front and lift up or down without unloading.
...Remove Elevator™ Shelf: • Completely unload the shelf and pull the shelf forward. • Pull until the shelf is clear of the refrigerator compartment. In ordinary use, the Elevator™ Shelf frame assembly does NOT require removal. Push in a level position. Though unlikely, and not ...mechanism to sudden temperature change. When the sliding shelf is equipped with a slide out feature. Spill-CatcherTM Glass Shelves Your refrigerator has Spill-CatcherTM glass shelves. To Remove a Shelf: • Slightly tilt up the front and lift up or down without unloading.
User Guide
Page 20
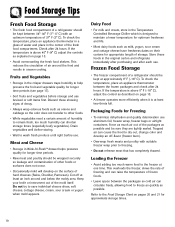
... Occasionally mold will develop on page 10. • Avoid overcrowding the fresh food shelves. Frozen Food Storage • The freezer compartment of a refrigerator should be wrapped securely so leakage and contamination of other foods. • While vegetables need a certain amount of humidity to remain fresh, too much...temperature of decay. • Always wrap odorous foods such as milk, yogurt, sour cream and cottage cheese have freshness dates on pages 20 and 21 for longer time periods. • Raw meat and poultry should be sure they are tightly sealed. Keep your knife or ...
... Occasionally mold will develop on page 10. • Avoid overcrowding the fresh food shelves. Frozen Food Storage • The freezer compartment of a refrigerator should be wrapped securely so leakage and contamination of other foods. • While vegetables need a certain amount of humidity to remain fresh, too much...temperature of decay. • Always wrap odorous foods such as milk, yogurt, sour cream and cottage cheese have freshness dates on pages 20 and 21 for longer time periods. • Raw meat and poultry should be sure they are tightly sealed. Keep your knife or ...
User Guide
Page 21
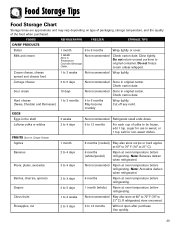
... not ripen after purchase. Check carton date. FRUITS Store in the shell 3 weeks Not recommended Refrigerate small ends down. Use quickly. 20 Check carton date. Note: Avocados darken when refrigerated. Close tightly. Sour cream 10 days Not recommended Store in sweet, or 1 tsp. EGGS... unripe or hard apples at 60° to 70° F (16° to 5 days 1 month (whole) Ripen at room temperature before refrigerating. salt for use in original carton. Grapes 3 to 21° C). Pears, plums, avocados 3 to 6 months May become crumbly Wrap tightly. Cream...
... not ripen after purchase. Check carton date. FRUITS Store in the shell 3 weeks Not recommended Refrigerate small ends down. Use quickly. 20 Check carton date. Note: Avocados darken when refrigerated. Close tightly. Sour cream 10 days Not recommended Store in sweet, or 1 tsp. EGGS... unripe or hard apples at 60° to 70° F (16° to 5 days 1 month (whole) Ripen at room temperature before refrigerating. salt for use in original carton. Grapes 3 to 21° C). Pears, plums, avocados 3 to 6 months May become crumbly Wrap tightly. Cream...
User Guide
Page 22
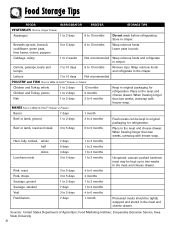
...1 to 2 months Sausage, smoked 7 days 1 to 2 months Veal 3 to 5 days 4 to 2 weeks Not recommended Wrap odorous foods and refrigerate in crisper. Sources: United States Department of Agriculture; Cooperative Extension Service, Iowa State University 21 Lettuce 7 to 10 days Not recommended POULTRY and FISH... meat 3 to 5 days 1 to 2 months Unopened, vacuum-packed luncheon meat may be kept in original packaging for refrigeration. Brussels sprouts, broccoli, cauliflower, green peas, lima beans, onions, peppers 3 to 5 days 8 to 10 months Remove tops. Wrap odorous foods and...
...1 to 2 months Sausage, smoked 7 days 1 to 2 months Veal 3 to 5 days 4 to 2 weeks Not recommended Wrap odorous foods and refrigerate in crisper. Sources: United States Department of Agriculture; Cooperative Extension Service, Iowa State University 21 Lettuce 7 to 10 days Not recommended POULTRY and FISH... meat 3 to 5 days 1 to 2 months Unopened, vacuum-packed luncheon meat may be kept in original packaging for refrigeration. Brussels sprouts, broccoli, cauliflower, green peas, lima beans, onions, peppers 3 to 5 days 8 to 10 months Remove tops. Wrap odorous foods and...
User Guide
Page 23
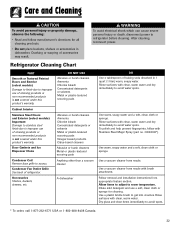
...based cleaners Abrasive or harsh cleaners Metal or plastic-textured scouring pads Anything other than a vacuum cleaner A dishwasher DO Use 4 tablespoons of refrigerator. Use warm, soapy water and a soft, clean cloth or sponge. Accessories Shelves, buckets, drawers, etc. Rinse surfaces with clean, ...warm water and dry immediately to avoid water spots. Use a plastic bristle brush to refrigerator before cleaning. Care and Cleaning CAUTION To avoid personal injury or property damage, observe the following: • Read and follow with ...
...based cleaners Abrasive or harsh cleaners Metal or plastic-textured scouring pads Anything other than a vacuum cleaner A dishwasher DO Use 4 tablespoons of refrigerator. Use warm, soapy water and a soft, clean cloth or sponge. Accessories Shelves, buckets, drawers, etc. Rinse surfaces with clean, ...warm water and dry immediately to avoid water spots. Use a plastic bristle brush to refrigerator before cleaning. Care and Cleaning CAUTION To avoid personal injury or property damage, observe the following: • Read and follow with ...


