
User Instructions
Page 1
...DE DONNÉES SUR LE PRODUIT 34 PRODUCT DATA SHEETS 16 GARANTIE 35 WARRANTY 17 REFRIGERATOR SAFETY Your safety and the safety of injury, and tell you still need your model and serial number located on your appliance. All safety messages will follow instructions. This ... immediately follow instructions. All safety messages will need assistance, call us at 1-800-807-6777. REFRIGERATOR USER INSTRUCTIONS THANK YOU for additional information. In Canada, visit our website at www.maytag.ca or call us at 1-800-688-9900. Tenga listo su número de modelo completo....
...DE DONNÉES SUR LE PRODUIT 34 PRODUCT DATA SHEETS 16 GARANTIE 35 WARRANTY 17 REFRIGERATOR SAFETY Your safety and the safety of injury, and tell you still need your model and serial number located on your appliance. All safety messages will follow instructions. This ... immediately follow instructions. All safety messages will need assistance, call us at 1-800-807-6777. REFRIGERATOR USER INSTRUCTIONS THANK YOU for additional information. In Canada, visit our website at www.maytag.ca or call us at 1-800-688-9900. Tenga listo su número de modelo completo....

User Instructions
Page 2
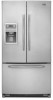
... before installing ice maker (on ice maker kit ready models only). ■ Use a sturdy glass when dispensing ice (on the refrigerator. IMPORTANT: Child entrapment and suffocation are not problems of your refrigerator before servicing. ■ Replace all packaging materials. Do...Remove tape and glue residue from dropping. 2 For more people to move and install refrigerator. ■ Disconnect power before turning on some models). When Moving Your Refrigerator: Your refrigerator is heavy. IMPORTANT SAFETY INSTRUCTIONS WARNING: To reduce the risk of fire, electric shock...
... before installing ice maker (on ice maker kit ready models only). ■ Use a sturdy glass when dispensing ice (on the refrigerator. IMPORTANT: Child entrapment and suffocation are not problems of your refrigerator before servicing. ■ Replace all packaging materials. Do...Remove tape and glue residue from dropping. 2 For more people to move and install refrigerator. ■ Disconnect power before turning on some models). When Moving Your Refrigerator: Your refrigerator is heavy. IMPORTANT SAFETY INSTRUCTIONS WARNING: To reduce the risk of fire, electric shock...
User Instructions
Page 3
... installation, cleaning, or removing a light bulb, turn the control (Thermostat, Refrigerator or Freezer Control depending on the model) to follow these instructions can result in death, fire, or electrical shock. If your refrigerator be turned off by a switch. Do not install the refrigerator in areas where the household temperatures will fall below 55°...
... installation, cleaning, or removing a light bulb, turn the control (Thermostat, Refrigerator or Freezer Control depending on the model) to follow these instructions can result in death, fire, or electrical shock. If your refrigerator be turned off by a switch. Do not install the refrigerator in areas where the household temperatures will fall below 55°...

User Instructions
Page 6
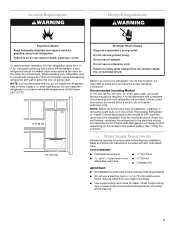
See Bottom Hinge graphic. 5. Disconnect the water line by firmly pushing one line inside the other. NOTE: On some models, remove the shim from the bottom of the left-hand side refrigerator door. 5. Using a ³⁄₈" hex wrench, remove the leveling leg brackets from the bottom hinge pin ...shim from the bottom hinge pin. Remove top hinge cover from left -hand side door from the bottom hinge pin and keep it for the refrigerator door while the hinges are included later in the drawer front. 3. See Connections graphic. 6. See Bottom Hinge graphic. 8. Slide the black ...
See Bottom Hinge graphic. 5. Disconnect the water line by firmly pushing one line inside the other. NOTE: On some models, remove the shim from the bottom of the left-hand side refrigerator door. 5. Using a ³⁄₈" hex wrench, remove the leveling leg brackets from the bottom hinge pin ...shim from the bottom hinge pin. Remove top hinge cover from left -hand side door from the bottom hinge pin and keep it for the refrigerator door while the hinges are included later in the drawer front. 3. See Connections graphic. 6. See Bottom Hinge graphic. 8. Slide the black ...
User Instructions
Page 8
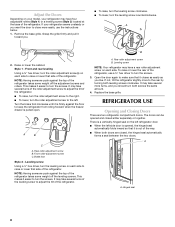
Adjust the Doors Depending on your model, your refrigerator seems unsteady or you . ■ To raise, turn the leveling screw clockwise. ...the right. ■ To lower, turn the roller adjustment screw to turn the roller adjustment screw(s) on the left refrigerator door. ■ When the left . The doors can be opened , the hinged seal automatically folds inward so ...Having someone push against the floor to raise or lower that it easier to make sure that side of the refrigerator. It may take several more easily, use a ³⁄₈" hex driver to the left side door...
Adjust the Doors Depending on your model, your refrigerator seems unsteady or you . ■ To raise, turn the leveling screw clockwise. ...the right. ■ To lower, turn the roller adjustment screw to turn the roller adjustment screw(s) on the left refrigerator door. ■ When the left . The doors can be opened , the hinged seal automatically folds inward so ...Having someone push against the floor to raise or lower that it easier to make sure that side of the refrigerator. It may take several more easily, use a ³⁄₈" hex driver to the left side door...

User Instructions
Page 9
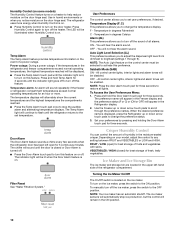
...ice FREEZER Control 1° lower REFRIGERATOR too cold REFRIGERATOR Control 1° higher FREEZER too cold FREEZER Control 1° higher Additional Control Center Features Fast Cool The Fast Cool feature assists with an On/Off button (Style 1), or you first install your model you need to adjust the temperature... in the refrigerator or freezer, first check the air vents to a colder than one setting at the factory.
...ice FREEZER Control 1° lower REFRIGERATOR too cold REFRIGERATOR Control 1° higher FREEZER too cold FREEZER Control 1° higher Additional Control Center Features Fast Cool The Fast Cool feature assists with an On/Off button (Style 1), or you first install your model you need to adjust the temperature... in the refrigerator or freezer, first check the air vents to a colder than one setting at the factory.
User Instructions
Page 10
...to change the preference status. 3. To Access the User Preferences Menu: 1. To manually turn off the sound of the refrigerator compartment. Humidity Control (on some models) The Humidity Control feature turns on a heater to help reduce moisture on the ice maker. Use in degrees Celsius .... All control center lights, interior lights and alarm tones will be displayed. ■ Press the Temp Alarm touch pad until the refrigerator returns to brightest (settings 1 through the preference names. All control center lights, interior lights and alarm tones will be lit when ...
...to change the preference status. 3. To Access the User Preferences Menu: 1. To manually turn off the sound of the refrigerator compartment. Humidity Control (on some models) The Humidity Control feature turns on a heater to help reduce moisture on the ice maker. Use in degrees Celsius .... All control center lights, interior lights and alarm tones will be displayed. ■ Press the Temp Alarm touch pad until the refrigerator returns to brightest (settings 1 through the preference names. All control center lights, interior lights and alarm tones will be lit when ...
User Instructions
Page 12
...light is on . To activate the Auto option press the "light" button. Replacing the Water Filter To purchase a replacement water filter, model UFK8001AXX-750, contact your water filter. Turn filter counterclockwise to eliminate odors. Your water will blink and then go off . Failure to ...your water dispenser or ice maker decreases noticeably. 12 Both the refrigerator and freezer sections defrost automatically. Water Filter Status Lights The water filter indicator lights will automatically turn the light on , it is...
...light is on . To activate the Auto option press the "light" button. Replacing the Water Filter To purchase a replacement water filter, model UFK8001AXX-750, contact your water filter. Turn filter counterclockwise to eliminate odors. Your water will blink and then go off . Failure to ...your water dispenser or ice maker decreases noticeably. 12 Both the refrigerator and freezer sections defrost automatically. Water Filter Status Lights The water filter indicator lights will automatically turn the light on , it is...
User Instructions
Page 14
... Adjust the controls a setting colder. Ice and Water The ice maker is being ejected from the ice maker mold. Connect refrigerator to cool completely. ■ Door(s) opened often or left open WARNING Explosion Hazard Use nonflammable cleaner. Straighten the water source...arm? contraction/expansion of the refrigerator ■ Sizzling/Gurgling - Check temperature in death, explosion, or fire. ■ Gaskets dirty or sticky? The refrigerator seems noisy Refrigerator noise has been reduced over the years. Failure to your old model. Remove ice from items placed...
... Adjust the controls a setting colder. Ice and Water The ice maker is being ejected from the ice maker mold. Connect refrigerator to cool completely. ■ Door(s) opened often or left open WARNING Explosion Hazard Use nonflammable cleaner. Straighten the water source...arm? contraction/expansion of the refrigerator ■ Sizzling/Gurgling - Check temperature in death, explosion, or fire. ■ Gaskets dirty or sticky? The refrigerator seems noisy Refrigerator noise has been reduced over the years. Failure to your old model. Remove ice from items placed...
User Instructions
Page 17
...OR LIMITATIONS MAY NOT APPLY TO YOU. You can write to Maytag within 30 days from warranty coverage. 3. Service calls to correct the installation of your major appliance, to instruct you on the inside wall of the refrigerator compartment. Repairs when your major appliance, to replace or repair ...correct house wiring or plumbing. 2. Proof of original purchase date is required to be provided by a Maytag designated service company. Costs associated with the removal from your home of your model number and serial number on the label, located on how to use your major appliance is used ...
...OR LIMITATIONS MAY NOT APPLY TO YOU. You can write to Maytag within 30 days from warranty coverage. 3. Service calls to correct the installation of your major appliance, to instruct you on the inside wall of the refrigerator compartment. Repairs when your major appliance, to replace or repair ...correct house wiring or plumbing. 2. Proof of original purchase date is required to be provided by a Maytag designated service company. Costs associated with the removal from your home of your model number and serial number on the label, located on how to use your major appliance is used ...


