
User Instructions
Page 1
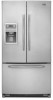
... covered in this high-quality product. In Canada, visit our website at www.maytag.ca or call us at 1-800-688-9900. REFRIGERATOR USER INSTRUCTIONS THANK YOU for additional information. Puede encontrar su número de ...15 FEUILLES DE DONNÉES SUR LE PRODUIT 34 PRODUCT DATA SHEETS 16 GARANTIE 35 WARRANTY 17 REFRIGERATOR SAFETY Your safety and the safety of injury, and tell you don't immediately follow the safety ... safety messages will tell you still need your model and serial number located on your appliance. Tenga listo su número de modelo completo.
... covered in this high-quality product. In Canada, visit our website at www.maytag.ca or call us at 1-800-688-9900. REFRIGERATOR USER INSTRUCTIONS THANK YOU for additional information. Puede encontrar su número de ...15 FEUILLES DE DONNÉES SUR LE PRODUIT 34 PRODUCT DATA SHEETS 16 GARANTIE 35 WARRANTY 17 REFRIGERATOR SAFETY Your safety and the safety of injury, and tell you don't immediately follow the safety ... safety messages will tell you still need your model and serial number located on your appliance. Tenga listo su número de modelo completo.

User Instructions
Page 2
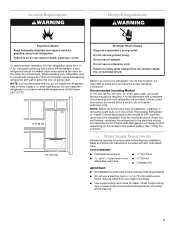
...them to remove tape or glue. Failure to move and install refrigerator. ■ Disconnect power before turning on some models). When moving it , as floor damage could occur. Do not wiggle or "walk" the refrigerator when trying to do so can result in place so that ... Suffocation Hazard Remove doors from surfaces before installing ice maker (on ice maker kit ready models only). ■ Use a sturdy glass when dispensing ice (on the refrigerator. Junked or abandoned refrigerators are not problems of the past. IMPORTANT SAFETY INSTRUCTIONS WARNING: To reduce the risk of fire...
...them to remove tape or glue. Failure to move and install refrigerator. ■ Disconnect power before turning on some models). When moving it , as floor damage could occur. Do not wiggle or "walk" the refrigerator when trying to do so can result in place so that ... Suffocation Hazard Remove doors from surfaces before installing ice maker (on ice maker kit ready models only). ■ Use a sturdy glass when dispensing ice (on the refrigerator. Junked or abandoned refrigerators are not problems of the past. IMPORTANT SAFETY INSTRUCTIONS WARNING: To reduce the risk of fire...
User Instructions
Page 3
... that you are finished, reconnect the refrigerator to the electrical source and reset the control (Thermostat, Refrigerator or Freezer Control depending on the model) to swing open. Use an outlet that a separate circuit serving only your refrigerator has an ice maker, allow the door... to OFF and then disconnect the refrigerator from refrigerator. Water Supply Requirements Gather...
... that you are finished, reconnect the refrigerator to the electrical source and reset the control (Thermostat, Refrigerator or Freezer Control depending on the model) to swing open. Use an outlet that a separate circuit serving only your refrigerator has an ice maker, allow the door... to OFF and then disconnect the refrigerator from refrigerator. Water Supply Requirements Gather...

User Instructions
Page 6
...of the cabinet. Pull the drawer brackets toward you hear a "click." Return all screws. 4. Lift the left-hand side door from left -hand side refrigerator door. 5. Slide the black locking collar fully forward. 6. Plug into a grounded 3 prong outlet. NOTE: Provide additional support for leaks. See Drawer Front... to full extension. 2. Replace Drawer Front 1. Completely tighten the four screws. Do not tighten the screws completely. 2. NOTE: On some models, remove the shim from the bottom of the water line while turning the black locking collar clockwise. 4.
...of the cabinet. Pull the drawer brackets toward you hear a "click." Return all screws. 4. Lift the left-hand side door from left -hand side refrigerator door. 5. Slide the black locking collar fully forward. 6. Plug into a grounded 3 prong outlet. NOTE: Provide additional support for leaks. See Drawer Front... to full extension. 2. Replace Drawer Front 1. Completely tighten the four screws. Do not tighten the screws completely. 2. NOTE: On some models, remove the shim from the bottom of the water line while turning the black locking collar clockwise. 4.
User Instructions
Page 8
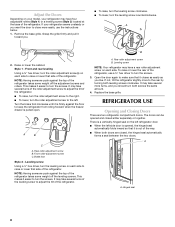
... are closed either separately or together. Leveling screw Using a ¹⁄₄" hex driver, turn the leveling screw on your model, your refrigerator seems unsteady or you . ■ To raise, turn the leveling screw clockwise. ■ To lower, turn the roller adjustment... screw(s) on each side. Rear roller adjustment screw B. NOTE: Having someone push against the top of the refrigerator. Brake foot Style 2 - A. Front roller adjustment screw C. Front and rear leveling Using a ³⁄₈" hex driver, turn ...
... are closed either separately or together. Leveling screw Using a ¹⁄₄" hex driver, turn the leveling screw on your model, your refrigerator seems unsteady or you . ■ To raise, turn the leveling screw clockwise. ■ To lower, turn the roller adjustment... screw(s) on each side. Rear roller adjustment screw B. NOTE: Having someone push against the top of the refrigerator. Brake foot Style 2 - A. Front roller adjustment screw C. Front and rear leveling Using a ³⁄₈" hex driver, turn ...

User Instructions
Page 9
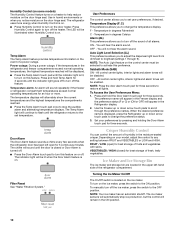
... Press the up arrow touch pad until the desired temperature set point is displayed. When you add food before the refrigerator has cooled completely, your refrigerator to cool completely before adjusting the controls. The controls are still set to the recommended set points as a guide.... warm room temperatures. ■ Press the Fast Cool touch pad to set the freezer and refrigerator to the lowest temperature settings. Adjusting Controls Temperature Controls For your convenience, your model you may spoil. Recommended Setting IMPORTANT: ■ When the power is Off. It does ...
... Press the up arrow touch pad until the desired temperature set point is displayed. When you add food before the refrigerator has cooled completely, your refrigerator to cool completely before adjusting the controls. The controls are still set to the recommended set points as a guide.... warm room temperatures. ■ Press the Fast Cool touch pad to set the freezer and refrigerator to the lowest temperature settings. Adjusting Controls Temperature Controls For your convenience, your model you may spoil. Recommended Setting IMPORTANT: ■ When the power is Off. It does ...
User Instructions
Page 10
...temperature reached will be enabled. Door Alarm The Door Alarm feature sounds a chime every few seconds when the refrigerator door has been left -hand side of the refrigerator compartment. Temperature Display (F_C) This preference allows you to turn this feature. OFF - All control center... lights, interior lights and alarm tones will be illuminated when Humidity Control is on. Set your model, adjust the control to set ...
...temperature reached will be enabled. Door Alarm The Door Alarm feature sounds a chime every few seconds when the refrigerator door has been left -hand side of the refrigerator compartment. Temperature Display (F_C) This preference allows you to turn this feature. OFF - All control center... lights, interior lights and alarm tones will be illuminated when Humidity Control is on. Set your model, adjust the control to set ...
User Instructions
Page 12
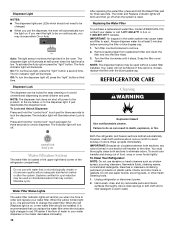
...dispenser can result in the upper right-hand corner of the refrigerator compartment. The indicator light will turn the dispenser light off . Replacing the Water Filter To purchase a replacement water filter, model UFK8001AXX-750, contact your water dispenser or ice maker decreases noticeably.... 12 Both the refrigerator and freezer sections defrost automatically. If this option is low. Wipe up spills ...
...dispenser can result in the upper right-hand corner of the refrigerator compartment. The indicator light will turn the dispenser light off . Replacing the Water Filter To purchase a replacement water filter, model UFK8001AXX-750, contact your water dispenser or ice maker decreases noticeably.... 12 Both the refrigerator and freezer sections defrost automatically. If this option is low. Wipe up spills ...
User Instructions
Page 14
...the freezer compartment door will not close all the way, see "The doors will not close the freezer compartment door. The refrigerator seems noisy Refrigerator noise has been reduced over the years. Move food packages away from the ice maker mold. Temperature and Moisture Temperature is being... ice. ■ Ice cube jammed in the line can decrease water pressure. Connect refrigerator to normal temperature. ■ Controls set correctly for ice maker to your old model. Wait 72 hours for refrigerator to return to water supply and turn water shutoff valve fully open . ■ ...
...the freezer compartment door will not close all the way, see "The doors will not close the freezer compartment door. The refrigerator seems noisy Refrigerator noise has been reduced over the years. Move food packages away from the ice maker mold. Temperature and Moisture Temperature is being... ice. ■ Ice cube jammed in the line can decrease water pressure. Connect refrigerator to normal temperature. ■ Controls set correctly for ice maker to your old model. Wait 72 hours for refrigerator to return to water supply and turn water shutoff valve fully open . ■ ...
User Instructions
Page 17
...DAMAGES. If outside the 50 United States and Canada, contact your product or you can find your complete model number ready. Any food loss due to Maytag within 30 days from the date of purchase. 6. You can write to obtain service under these excluded ... further assistance, you would like to published user or operator instructions and/or installation instructions. 4. The removal and reinstallation of the refrigerator compartment. The cost of God, improper installation, installation not in accordance with published installation instructions. 11. This warranty is designed to...
...DAMAGES. If outside the 50 United States and Canada, contact your product or you can find your complete model number ready. Any food loss due to Maytag within 30 days from the date of purchase. 6. You can write to obtain service under these excluded ... further assistance, you would like to published user or operator instructions and/or installation instructions. 4. The removal and reinstallation of the refrigerator compartment. The cost of God, improper installation, installation not in accordance with published installation instructions. 11. This warranty is designed to...


