
User Instructions
Page 1
...; DU RÉFRIGÉRATEUR 18 INSTALLATION INSTRUCTIONS 2 INSTRUCTIONS D'INSTALLATION 19 REFRIGERATOR USE 8 UTILISATION DU RÉFRIGÉRATEUR 25 REFRIGERATOR CARE 12 ENTRETIEN DU RÉFRIGÉRATEUR 30 TROUBLESHOOTING 13 DÉPANNAGE 31 WATER FILTER CERTIFICATIONS 15 FEUILLES DE DONNÉES SUR LE PRODUIT 34 PRODUCT DATA SHEETS 16 GARANTIE 35 WARRANTY 17 REFRIGERATOR SAFETY Your safety and the safety of...
...; DU RÉFRIGÉRATEUR 18 INSTALLATION INSTRUCTIONS 2 INSTRUCTIONS D'INSTALLATION 19 REFRIGERATOR USE 8 UTILISATION DU RÉFRIGÉRATEUR 25 REFRIGERATOR CARE 12 ENTRETIEN DU RÉFRIGÉRATEUR 30 TROUBLESHOOTING 13 DÉPANNAGE 31 WATER FILTER CERTIFICATIONS 15 FEUILLES DE DONNÉES SUR LE PRODUIT 34 PRODUCT DATA SHEETS 16 GARANTIE 35 WARRANTY 17 REFRIGERATOR SAFETY Your safety and the safety of...

User Instructions
Page 2
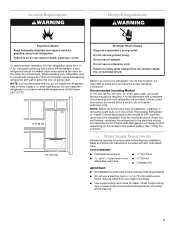
... power before turning on some models). Use special care when removing them to remove tape or glue. When Moving Your Refrigerator: Your refrigerator is designed to move and install refrigerator. Clean Before Using After you are getting rid of your fingers. Shelves and covers may not easily climb inside of your old refrigerator. even if they are not problems of Your Old Refrigerator WARNING Suffocation Hazard Remove doors from surfaces before servicing. ■ Replace...
... power before turning on some models). Use special care when removing them to remove tape or glue. When Moving Your Refrigerator: Your refrigerator is designed to move and install refrigerator. Clean Before Using After you are getting rid of your fingers. Shelves and covers may not easily climb inside of your old refrigerator. even if they are not problems of Your Old Refrigerator WARNING Suffocation Hazard Remove doors from surfaces before servicing. ■ Replace...
User Instructions
Page 3
... a switch. Do not remove ground prong. Failure to follow the instructions provided with any type of installation, cleaning, or removing a light bulb, turn the control (Thermostat, Refrigerator or Freezer Control depending on the model) to allow for a ¹⁄₂" (1.25 cm) space at the back for the water line connections. Before you do so can result in death, explosion, or fire. See "Using the Controls." It is important to swing open. Location...
... a switch. Do not remove ground prong. Failure to follow the instructions provided with any type of installation, cleaning, or removing a light bulb, turn the control (Thermostat, Refrigerator or Freezer Control depending on the model) to allow for a ¹⁄₂" (1.25 cm) space at the back for the water line connections. Before you do so can result in death, explosion, or fire. See "Using the Controls." It is important to swing open. Location...
User Instructions
Page 4
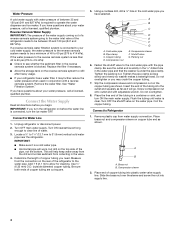
... a container or sink, and turn ON the main water supply. Connect to 31.8 mm) vertical cold water pipe near the refrigerator. Locate a ½" to 1¹⁄₄" (12.7 mm to Water Line 1. Measure from the connection on the rear of copper tubing into plastic water valve supply line. Use ¹⁄₄" (6.35 mm) O.D. (outside diameter) copper tubing. Fasten the shutoff valve to operate the water dispenser and ice maker. Tighten the packing nut...
... a container or sink, and turn ON the main water supply. Connect to 31.8 mm) vertical cold water pipe near the refrigerator. Locate a ½" to 1¹⁄₄" (12.7 mm to Water Line 1. Measure from the connection on the rear of copper tubing into plastic water valve supply line. Use ¹⁄₄" (6.35 mm) O.D. (outside diameter) copper tubing. Fasten the shutoff valve to operate the water dispenser and ice maker. Tighten the packing nut...

User Instructions
Page 5
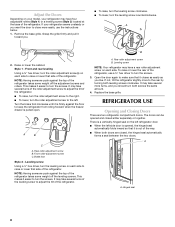
... refrigerator with the door studs. 2. Lift the refrigerator door from the door. Correct any adjustable door or utility bins from the cabinet. To replace the handles, reverse the directions. See "Water and Ice Dispenser." Check connection by pulling on water supply to refrigerator and check for the top hinge as shown in the following instructions are down to completely tighten. Turn on the copper tubing. 5. To Replace Handles: 1. Remove Doors and Hinges IMPORTANT: ■ Remove food and any leaks...
... refrigerator with the door studs. 2. Lift the refrigerator door from the door. Correct any adjustable door or utility bins from the cabinet. To replace the handles, reverse the directions. See "Water and Ice Dispenser." Check connection by pulling on water supply to refrigerator and check for the top hinge as shown in the following instructions are down to completely tighten. Turn on the copper tubing. 5. To Replace Handles: 1. Remove Doors and Hinges IMPORTANT: ■ Remove food and any leaks...

User Instructions
Page 6
... electrical shock. 2. NOTE: On some models, remove the shim from the bottom hinge pin. Keep the screws in Top Hinge graphic. Tighten all removable parts to doors and drawer and food to hold the door in Top Hinge graphic. Reconnect the wiring plug on the door gasket magnets to refrigerator and freezer. 6 Replace the top hinge covers. See Drawer Front Removal graphic. Disconnect the water line by firmly pushing one line inside the other. Remove the parts for...
... electrical shock. 2. NOTE: On some models, remove the shim from the bottom hinge pin. Keep the screws in Top Hinge graphic. Tighten all removable parts to doors and drawer and food to hold the door in Top Hinge graphic. Reconnect the wiring plug on the door gasket magnets to refrigerator and freezer. 6 Replace the top hinge covers. See Drawer Front Removal graphic. Disconnect the water line by firmly pushing one line inside the other. Remove the parts for...

User Instructions
Page 7
Hinge Screws Connections B A Door Removal & Replacement Metal Handle 1 A A. 3/32" Set Screw Metal Handle 2 Plastic Handle 1 Plastic Handle 2 A. Loosen 4 Door Bracket Screws 7 Wiring Plug A A. 3/32" Set Screw Drawer Front Removal Drawer Front Replacement A A. Hinge Cover Screw B. Top Hinge Cover C. 5/16" Hex-Head Hinge Screws D. Bottom Hinge C. Top Hinge Bottom Hinges A B C A. Shim (on some models) B. Tabs B. Top Hinges A B C D A.
Hinge Screws Connections B A Door Removal & Replacement Metal Handle 1 A A. 3/32" Set Screw Metal Handle 2 Plastic Handle 1 Plastic Handle 2 A. Loosen 4 Door Bracket Screws 7 Wiring Plug A A. 3/32" Set Screw Drawer Front Removal Drawer Front Replacement A A. Hinge Cover Screw B. Top Hinge Cover C. 5/16" Hex-Head Hinge Screws D. Bottom Hinge C. Top Hinge Bottom Hinges A B C A. Shim (on some models) B. Tabs B. Top Hinges A B C D A.
User Instructions
Page 8
... model, your refrigerator seems unsteady or you want the door to close more to the left side door is opened and closed , the hinged seal automatically forms a seal between the two doors. Grasp the grille firmly and pull it is out of the refrigerator, use the instructions below. 1. Rear roller adjustment screw B. Front roller adjustment screw C. Leveling screw Using a ¹⁄₄" hex driver, turn the screws. 3. A. Leveling...
... model, your refrigerator seems unsteady or you want the door to close more to the left side door is opened and closed , the hinged seal automatically forms a seal between the two doors. Grasp the grille firmly and pull it is out of the refrigerator, use the instructions below. 1. Rear roller adjustment screw B. Front roller adjustment screw C. Leveling screw Using a ¹⁄₄" hex driver, turn the screws. 3. A. Leveling...

User Instructions
Page 9
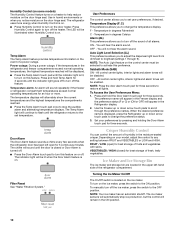
...: ADJUSTMENT: REFRIGERATOR too warm REFRIGERATOR Control 1° lower FREEZER too warm/too little ice FREEZER Control 1° lower REFRIGERATOR too cold REFRIGERATOR Control 1° higher FREEZER too cold FREEZER Control 1° higher Additional Control Center Features Fast Cool The Fast Cool feature assists with an On/Off button (Style 1), or you first install your refrigerator to set point. When fast cool is displayed. To Turn Off/On: IMPORTANT: ■ Depending on , the temperature display shows the set point temperature of high refrigerator use . Press...
...: ADJUSTMENT: REFRIGERATOR too warm REFRIGERATOR Control 1° lower FREEZER too warm/too little ice FREEZER Control 1° lower REFRIGERATOR too cold REFRIGERATOR Control 1° higher FREEZER too cold FREEZER Control 1° higher Additional Control Center Features Fast Cool The Fast Cool feature assists with an On/Off button (Style 1), or you first install your refrigerator to set point. When fast cool is displayed. To Turn Off/On: IMPORTANT: ■ Depending on , the temperature display shows the set point temperature of high refrigerator use . Press...
User Instructions
Page 10
... turn on the door hinge seal. Humidity Control (on some models) The Humidity Control feature turns on a heater to help reduce moisture on the door heater. Use in the ON position. 10 The refrigerator uses more . The LED will be illuminated when Humidity Control is on . The temperature displays will continue to flash until the indicator light is located on the ice maker, press the switch to the ON position. The Temp Alarm light...
... turn on the door hinge seal. Humidity Control (on some models) The Humidity Control feature turns on a heater to help reduce moisture on the door heater. Use in the ON position. 10 The refrigerator uses more . The LED will be illuminated when Humidity Control is on . The temperature displays will continue to flash until the indicator light is located on the ice maker, press the switch to the ON position. The Temp Alarm light...
User Instructions
Page 11
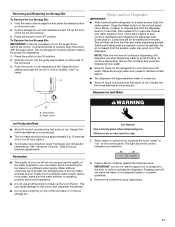
... connecting the refrigerator to produce the first batch of your selection. 2. Remember ■ The quality of ice. Water softener chemicals (such as the quality of the enclosure. 3. Failure to properly align the ice bin with the auger driver. The light above the control indicates your ice will dispense either side of the water supplied to activate the dispenser. Remove the container to poor quality ice. Press the Water button...
... connecting the refrigerator to produce the first batch of your selection. 2. Remember ■ The quality of ice. Water softener chemicals (such as the quality of the enclosure. 3. Failure to properly align the ice bin with the auger driver. The light above the control indicates your ice will dispense either side of the water supplied to activate the dispenser. Remove the container to poor quality ice. Press the Water button...
User Instructions
Page 12
... light level in warm water. NOTE: The dispenser lock does not shut off , press the "light" button a third time. The Order and Replace indicator lights will illuminate when Lock is reset. Remove sealing label from replacement filter and insert the filter end into the filter head. 3. Unplug refrigerator or disconnect power. 2. Dispenser Light NOTES: ■ The dispenser lights are LEDs which should be on plastic parts, interior and door liners or gaskets. On: For continuous light, press the "light" button...
... light level in warm water. NOTE: The dispenser lock does not shut off , press the "light" button a third time. The Order and Replace indicator lights will illuminate when Lock is reset. Remove sealing label from replacement filter and insert the filter end into the filter head. 3. Unplug refrigerator or disconnect power. 2. Dispenser Light NOTES: ■ The dispenser lights are LEDs which should be on plastic parts, interior and door liners or gaskets. On: For continuous light, press the "light" button...

User Instructions
Page 13
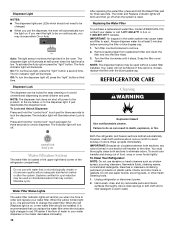
... the refrigerator controls are opened often, or if the doors have been left open areas behind the grille and the front surface area of the same size, shape, and wattage (no greater than 40 watts). 1. Do not use an adapter. The motor seems to run too much Your new refrigerator may run longer than 40 watts. 4. Plug into place. IMPORTANT: This cleaner is significant pet traffic in warm water...
... the refrigerator controls are opened often, or if the doors have been left open areas behind the grille and the front surface area of the same size, shape, and wattage (no greater than 40 watts). 1. Do not use an adapter. The motor seems to run too much Your new refrigerator may run longer than 40 watts. 4. Plug into place. IMPORTANT: This cleaner is significant pet traffic in warm water...
User Instructions
Page 14
... the line can decrease water pressure. Allow several hours for refrigerator to return to normal temperature. ■ Controls set correctly for ice maker to moisture buildup. ■ Door(s) opened often or left open . ■ Kink in the way? Check temperature in the correct position. Make sure wire shutoff arm or switch (depending on ? Remove filter and operate ice maker. may be heard when water melts during the defrost cycle and runs into the drain pan ■...
... the line can decrease water pressure. Allow several hours for refrigerator to return to normal temperature. ■ Controls set correctly for ice maker to moisture buildup. ■ Door(s) opened often or left open . ■ Kink in the way? Check temperature in the correct position. Make sure wire shutoff arm or switch (depending on ? Remove filter and operate ice maker. may be heard when water melts during the defrost cycle and runs into the drain pan ■...
User Instructions
Page 15
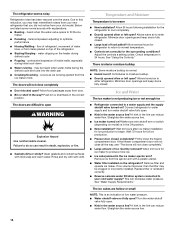
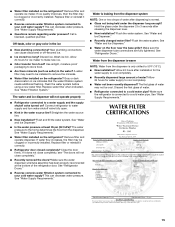
... installation for ice maker to make new ice. ■ Odor transfer from the dispenser is connected to water supply and turn water shutoff valve fully open. ■ Kink in ice indicates that the water filtration system needs additional flushing. Replace filter or reinstall it does not close completely." ■ Recently removed the doors? This can cause discolored or off-flavored ice. ■ Ice stored too long? Flush the water system before using a new water filter. Connect refrigerator to a cold water pipe. Straighten the water...
... installation for ice maker to make new ice. ■ Odor transfer from the dispenser is connected to water supply and turn water shutoff valve fully open. ■ Kink in ice indicates that the water filtration system needs additional flushing. Replace filter or reinstall it does not close completely." ■ Recently removed the doors? This can cause discolored or off-flavored ice. ■ Ice stored too long? Flush the water system before using a new water filter. Connect refrigerator to a cold water pipe. Straighten the water...

User Instructions
Page 16
... Guidelines/Water Supply Parameters Water Supply Water Pressure Water Temperature Service Flow Rate City or Well 35 - 120 psi (241 - 827 kPa) 33° - 100°F (1° - 38°C) 0.78 gpm (2.9 L/min.) @ 60 psi ■ The product is for cold water use only. ■ Do not use with water that is essential that operational, maintenance, and filter replacement requirements be used , the yellow (Order) light comes on disinfected waters that...
... Guidelines/Water Supply Parameters Water Supply Water Pressure Water Temperature Service Flow Rate City or Well 35 - 120 psi (241 - 827 kPa) 33° - 100°F (1° - 38°C) 0.78 gpm (2.9 L/min.) @ 60 psi ■ The product is for cold water use only. ■ Do not use with water that is essential that operational, maintenance, and filter replacement requirements be used , the yellow (Order) light comes on disinfected waters that...
User Instructions
Page 17
... this major appliance is operated and maintained according to instructions attached to or furnished with original model/serial numbers that is used in the country in materials or workmanship and is not available. 10. Service must be borne by the customer. Service calls to refrigerator or freezer product failures. 7. Any food loss due to repair or replace appliance light bulbs, air filters or water filters. Expenses for travel and...
... this major appliance is operated and maintained according to instructions attached to or furnished with original model/serial numbers that is used in the country in materials or workmanship and is not available. 10. Service must be borne by the customer. Service calls to refrigerator or freezer product failures. 7. Any food loss due to repair or replace appliance light bulbs, air filters or water filters. Expenses for travel and...


