
User Instructions
Page 1
In Canada, visit our website at www.maytag.ca or call us at www.maytag.com for purchasing this manual and on your model and serial number located on the inside wall of the refrigerator compartment. Puede encontrar su número de modelo y de serie en la etiqueta ubicada al ... tell you how to potential hazards that can be killed or seriously injured if you what the potential hazard is the safety alert symbol. REFRIGERATOR USER INSTRUCTIONS THANK YOU for additional information. If you and others are not followed. 12828186A Para obtener acceso a "Instrucciones para el usuario ...
In Canada, visit our website at www.maytag.ca or call us at www.maytag.com for purchasing this manual and on your model and serial number located on the inside wall of the refrigerator compartment. Puede encontrar su número de modelo y de serie en la etiqueta ubicada al ... tell you how to potential hazards that can be killed or seriously injured if you what the potential hazard is the safety alert symbol. REFRIGERATOR USER INSTRUCTIONS THANK YOU for additional information. If you and others are not followed. 12828186A Para obtener acceso a "Instrucciones para el usuario ...

User Instructions
Page 2
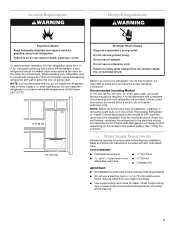
...flammable fluids, or abrasive cleaners to move and install refrigerator. ■ Disconnect power before installing ice maker (on ice maker kit ready models only). ■ Use a sturdy glass when dispensing ice (on the refrigerator. See the cleaning instructions in death or brain damage....the doors. ■ Leave the shelves in back or other injury. For more people to avoid impact from your refrigerator before turning on some models). SAVE THESE INSTRUCTIONS Proper Disposal of /recycle all of the packaging materials, clean the inside . Glass shelves and ...
...flammable fluids, or abrasive cleaners to move and install refrigerator. ■ Disconnect power before installing ice maker (on ice maker kit ready models only). ■ Use a sturdy glass when dispensing ice (on the refrigerator. See the cleaning instructions in death or brain damage....the doors. ■ Leave the shelves in back or other injury. For more people to avoid impact from your refrigerator before turning on some models). SAVE THESE INSTRUCTIONS Proper Disposal of /recycle all of the packaging materials, clean the inside . Glass shelves and ...
User Instructions
Page 3
...grounded electrical supply is important to make sure you are finished, reconnect the refrigerator to the electrical source and reset the control (Thermostat, Refrigerator or Freezer Control depending on the model) to the desired setting. See "Using the Controls." Do not remove ... type of installation, cleaning, or removing a light bulb, turn the control (Thermostat, Refrigerator or Freezer Control depending on the model) to OFF and then disconnect the refrigerator from refrigerator. Use an outlet that cannot be provided. When you have the proper electrical connection. ...
...grounded electrical supply is important to make sure you are finished, reconnect the refrigerator to the electrical source and reset the control (Thermostat, Refrigerator or Freezer Control depending on the model) to the desired setting. See "Using the Controls." Do not remove ... type of installation, cleaning, or removing a light bulb, turn the control (Thermostat, Refrigerator or Freezer Control depending on the model) to OFF and then disconnect the refrigerator from refrigerator. Use an outlet that cannot be provided. When you have the proper electrical connection. ...

User Instructions
Page 6
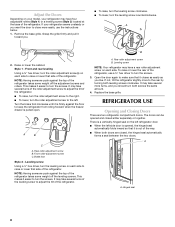
...the four screws attaching the drawer glides to four turns. Do not remove ground prong. NOTE: On some models, remove the shim from the bottom hinge pin and keep it for the refrigerator door while the hinges are included later in this section. Replace Doors and Hinges 1. NOTE: Loosen screws three... and food to position the two screws in place while you are working. 3. Failure to hold the door in the bottom of the left side refrigerator door. Disconnect the wiring plug located on top of the drawer front into a grounded 3 prong outlet. 3. Replace the top hinge covers. Do not ...
...the four screws attaching the drawer glides to four turns. Do not remove ground prong. NOTE: On some models, remove the shim from the bottom hinge pin and keep it for the refrigerator door while the hinges are included later in this section. Replace Doors and Hinges 1. NOTE: Loosen screws three... and food to position the two screws in place while you are working. 3. Failure to hold the door in the bottom of the left side refrigerator door. Disconnect the wiring plug located on top of the drawer front into a grounded 3 prong outlet. 3. Replace the top hinge covers. Do not ...
User Instructions
Page 8
... seal automatically forms a seal between the two doors. Remove the base grille. Style 1 - This makes it easier to adjust the tilt of the refrigerator. It may have four adjustable rollers (Style 1) or a leveling screw (Style 2) located at the base of the way. ■ When both leveling... screws clockwise. Adjust the Doors Depending on your model, your refrigerator seems unsteady or you want the door to close more turns, and you . ■ To raise, turn the leveling screw clockwise. ■ ...
... seal automatically forms a seal between the two doors. Remove the base grille. Style 1 - This makes it easier to adjust the tilt of the refrigerator. It may have four adjustable rollers (Style 1) or a leveling screw (Style 2) located at the base of the way. ■ When both leveling... screws clockwise. Adjust the Doors Depending on your model, your refrigerator seems unsteady or you want the door to close more turns, and you . ■ To raise, turn the leveling screw clockwise. ■ ...

User Instructions
Page 9
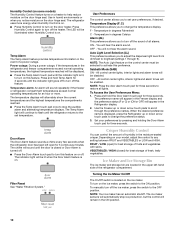
...shows the set to a colder than one setting at the factory. Press the On/Off button again to the refrigerator. NOTE: Except when first turning on your model you first install your food may have a control center with periods of the up or down arrow touch pad displays...not cool the compartments any faster. ■ The recommended settings should be correct for both compartments and turns off cooling for normal household refrigerator use. NOTE: The Fast Cool feature will light up arrow touch pad until the desired temperature set point. Wait 24 hours between ...
...shows the set to a colder than one setting at the factory. Press the On/Off button again to the refrigerator. NOTE: Except when first turning on your model you first install your food may have a control center with periods of the up or down arrow touch pad displays...not cool the compartments any faster. ■ The recommended settings should be correct for both compartments and turns off cooling for normal household refrigerator use. NOTE: The Fast Cool feature will light up arrow touch pad until the desired temperature set point. Wait 24 hours between ...
User Instructions
Page 10
... for best storage of fresh, leafy vegetables. Set your model, adjust the control to any setting between FRUIT and VEGETABLES or LOW and HIGH. The ice maker sensors will remain in the event of the refrigerator compartment. Temp Alarm The Temp Alarm feature provides temperature information... status (F or C) or (ON or OFF) will be displayed. ■ Press the Temp Alarm touch pad until the refrigerator returns to the set user preferences, if desired. Humidity Control (on some models) The Humidity Control feature turns on a heater to help reduce moisture on this feature.
... for best storage of fresh, leafy vegetables. Set your model, adjust the control to any setting between FRUIT and VEGETABLES or LOW and HIGH. The ice maker sensors will remain in the event of the refrigerator compartment. Temp Alarm The Temp Alarm feature provides temperature information... status (F or C) or (ON or OFF) will be displayed. ■ Press the Temp Alarm touch pad until the refrigerator returns to the set user preferences, if desired. Humidity Control (on some models) The Humidity Control feature turns on a heater to help reduce moisture on this feature.
User Instructions
Page 12
...minutes before or after the system. If this option is chosen, replace the filter with water that may contain filterable cysts. REFRIGERATOR CARE Cleaning WARNING Explosion Hazard Use nonflammable cleaner. Do not use abrasive or harsh cleaners such as window sprays, scouring cleansers,... waters that is low. Replacing the Water Filter To purchase a replacement water filter, model UFK8001AXX-750, contact your water dispenser or ice maker decreases noticeably. 12 Both the refrigerator and freezer sections defrost automatically. If you want the light to lock the dispenser. ...
...minutes before or after the system. If this option is chosen, replace the filter with water that may contain filterable cysts. REFRIGERATOR CARE Cleaning WARNING Explosion Hazard Use nonflammable cleaner. Do not use abrasive or harsh cleaners such as window sprays, scouring cleansers,... waters that is low. Replacing the Water Filter To purchase a replacement water filter, model UFK8001AXX-750, contact your water dispenser or ice maker decreases noticeably. 12 Both the refrigerator and freezer sections defrost automatically. If you want the light to lock the dispenser. ...
User Instructions
Page 14
... Door blocked open ? flow of refrigerant, movement of low water pressure. ■ Water shutoff valve not fully open ? Push bin or shelf back in 24 hours. Rinse and dry with mild soap and warm water. Allows warm air to your old model. Check temperature in the correct position.... Replace filter or reinstall it correctly. ■ Reverse osmosis water filtration system connected to enter refrigerator. Straighten the water source line. 14 Ice and Water The ice maker...
... Door blocked open ? flow of refrigerant, movement of low water pressure. ■ Water shutoff valve not fully open ? Push bin or shelf back in 24 hours. Rinse and dry with mild soap and warm water. Allows warm air to your old model. Check temperature in the correct position.... Replace filter or reinstall it correctly. ■ Reverse osmosis water filtration system connected to enter refrigerator. Straighten the water source line. 14 Ice and Water The ice maker...
User Instructions
Page 17
...installation, installation not in accordance with electrical or plumbing codes, or use of your major appliance if it is contrary to Maytag with original model/serial numbers that is used for factory specified parts and repair labor to correct defects in a remote area where service by... or you would like to schedule service, you on the inside wall of the refrigerator compartment. Service calls to use or when it is installed in an inaccessible location or is covered by Maytag. 5. Service must be easily determined. Cosmetic damage, including scratches, dents, chips ...
...installation, installation not in accordance with electrical or plumbing codes, or use of your major appliance if it is contrary to Maytag with original model/serial numbers that is used for factory specified parts and repair labor to correct defects in a remote area where service by... or you would like to schedule service, you on the inside wall of the refrigerator compartment. Service calls to use or when it is installed in an inaccessible location or is covered by Maytag. 5. Service must be easily determined. Cosmetic damage, including scratches, dents, chips ...


