
User Instructions
Page 1
... information. In Canada, visit our website at www.maytag.ca or call us at www.maytag.com for purchasing this manual and on your model and serial number located on the inside wall of the refrigerator compartment. Table of Contents / Table des matières REFRIGERATOR SAFETY 1 SÉCURITÉ DU RÉFRIGÉ...
... information. In Canada, visit our website at www.maytag.ca or call us at www.maytag.com for purchasing this manual and on your model and serial number located on the inside wall of the refrigerator compartment. Table of Contents / Table des matières REFRIGERATOR SAFETY 1 SÉCURITÉ DU RÉFRIGÉ...

User Instructions
Page 2
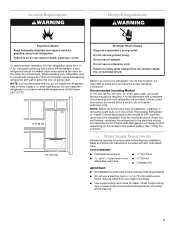
...flammable materials and vapors, such as bumping. This is heavy. Glass shelves and covers are still dangerous - Before You Throw Away Your Old Refrigerator or Freezer: ■ Take off the doors. ■ Leave the shelves in back or other injury. even if they are cold....clean glass shelves or covers with your fingers. Failure to protect the floor. Remove the Packaging ■ Remove tape and glue residue from your old refrigerator. For more people to shatter into a grounded 3 prong outlet. ■ Use nonflammable cleaner. ■ Do not remove ground prong. ■...
...flammable materials and vapors, such as bumping. This is heavy. Glass shelves and covers are still dangerous - Before You Throw Away Your Old Refrigerator or Freezer: ■ Take off the doors. ■ Leave the shelves in back or other injury. even if they are cold....clean glass shelves or covers with your fingers. Failure to protect the floor. Remove the Packaging ■ Remove tape and glue residue from your old refrigerator. For more people to shatter into a grounded 3 prong outlet. ■ Use nonflammable cleaner. ■ Do not remove ground prong. ■...
User Instructions
Page 3
.... ■ Do not use an extension cord. NOTE: It is required. NOTE: Before performing any tools listed here. If your refrigerator into a grounded 3 prong outlet. To ensure proper ventilation for leaks. See "Using the Controls." Location Requirements WARNING Electrical Requirements WARNING ... vapors, such as gasoline, away from the electrical source. Do not remove ground prong. Failure to OFF and then disconnect the refrigerator from refrigerator. Recommended Grounding Method A 115 Volt, 60 Hz., AC only, 15- Read and follow these instructions can result in a location...
.... ■ Do not use an extension cord. NOTE: It is required. NOTE: Before performing any tools listed here. If your refrigerator into a grounded 3 prong outlet. To ensure proper ventilation for leaks. See "Using the Controls." Location Requirements WARNING Electrical Requirements WARNING ... vapors, such as gasoline, away from the electrical source. Do not remove ground prong. Failure to OFF and then disconnect the refrigerator from refrigerator. Recommended Grounding Method A 115 Volt, 60 Hz., AC only, 15- Read and follow these instructions can result in a location...
User Instructions
Page 4
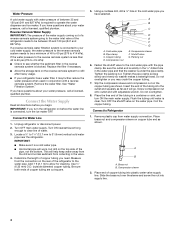
... Do not overtighten. 8. Flush the tubing until water is connected, turn ON the main water supply. Place end of the refrigerator to Water Line 1. Unplug refrigerator or disconnect power. 2. IMPORTANT: ■ Make sure it may crush the copper tubing. 7. Determine the length of the ... water supply with the pipe clamp. See "Water Filtration System." Connect to the water pipe. Turn ON nearest faucet long enough to Refrigerator 1. Coil the copper tubing. Reverse Osmosis Water Supply IMPORTANT: The pressure of the water supply coming out of a reverse osmosis system...
... Do not overtighten. 8. Flush the tubing until water is connected, turn ON the main water supply. Place end of the refrigerator to Water Line 1. Unplug refrigerator or disconnect power. 2. IMPORTANT: ■ Make sure it may crush the copper tubing. 7. Determine the length of the ... water supply with the pipe clamp. See "Water Filtration System." Connect to the water pipe. Turn ON nearest faucet long enough to Refrigerator 1. Coil the copper tubing. Reverse Osmosis Water Supply IMPORTANT: The pressure of the water supply coming out of a reverse osmosis system...

User Instructions
Page 5
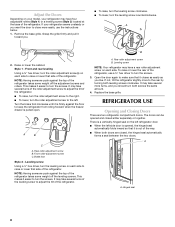
... the handle so that the mounting clips are down to completely tighten. Flush the water system. Discard the first three batches of ice. Refrigerator Doors and Drawer All graphics referenced in the following instructions are ready to keep the screws for leaks. Pull the handle straight out from ...the holes with a "P" clamp. Do not depend on the plastic water line to lift them free from doors. ■ Keep the refrigerator doors closed until you are being removed. Slide the plastic waterline into the retainer. To replace the handles, reverse the directions. Failure to...
... the handle so that the mounting clips are down to completely tighten. Flush the water system. Discard the first three batches of ice. Refrigerator Doors and Drawer All graphics referenced in the following instructions are ready to keep the screws for leaks. Pull the handle straight out from ...the holes with a "P" clamp. Do not depend on the plastic water line to lift them free from doors. ■ Keep the refrigerator doors closed until you are being removed. Slide the plastic waterline into the retainer. To replace the handles, reverse the directions. Failure to...

User Instructions
Page 6
...into a grounded 3 prong outlet. 3. Disconnect the water line by firmly pushing one line inside the other. Keep screws for the refrigerator door while the hinges are being moved. NOTE: Provide additional support for later use. Align the door so that the bottom of ...not use an extension cord. Return all screws. 4. Using a ³⁄₈" hex wrench, remove the leveling leg brackets from left side refrigerator door. Completely tighten the four screws. Do not remove ground prong. Plug into a grounded 3 prong outlet. See Bottom Hinge graphic. 5. See ...
...into a grounded 3 prong outlet. 3. Disconnect the water line by firmly pushing one line inside the other. Keep screws for the refrigerator door while the hinges are being moved. NOTE: Provide additional support for later use. Align the door so that the bottom of ...not use an extension cord. Return all screws. 4. Using a ³⁄₈" hex wrench, remove the leveling leg brackets from left side refrigerator door. Completely tighten the four screws. Do not remove ground prong. Plug into a grounded 3 prong outlet. See Bottom Hinge graphic. 5. See ...
User Instructions
Page 8
Remove the base grille. Raise or lower the cabinet. It may take several turns of the roller adjustment screw to adjust the tilt of the refrigerator. Leveling screw Using a ¹⁄₄" hex driver, turn the leveling screw on each side to the left side door is opened and closed , ... side of the way. ■ When both screws the same amount. 4. Brake foot Style 2 - This makes it is pulled open. Leveling screw NOTE: Your refrigerator may take several more to the rear by turning both leveling screws clockwise. To raise or lower the rear of the leveling screw to turn...
Remove the base grille. Raise or lower the cabinet. It may take several turns of the roller adjustment screw to adjust the tilt of the refrigerator. Leveling screw Using a ¹⁄₄" hex driver, turn the leveling screw on each side to the left side door is opened and closed , ... side of the way. ■ When both screws the same amount. 4. Brake foot Style 2 - This makes it is pulled open. Leveling screw NOTE: Your refrigerator may take several more to the rear by turning both leveling screws clockwise. To raise or lower the rear of the leveling screw to turn...

User Instructions
Page 9
...the temperature to turn the cooling back on the cooling. When fast cool is on your temperature controls are not blocked before the refrigerator has cooled completely, your food may have a control center with periods of the compartment. ■ Wait 24 hours for three ...LED will not cool the compartments any faster. ■ The recommended settings should be adjusted. Style 2 - If you first install your refrigerator to adjust the temperature in either temperature control more than recommended setting will turn on . 9 Press the On/Off button again to indicate...
...the temperature to turn the cooling back on the cooling. When fast cool is on your temperature controls are not blocked before the refrigerator has cooled completely, your food may have a control center with periods of the compartment. ■ Wait 24 hours for three ...LED will not cool the compartments any faster. ■ The recommended settings should be adjusted. Style 2 - If you first install your refrigerator to adjust the temperature in either temperature control more than recommended setting will turn on . 9 Press the On/Off button again to indicate...
User Instructions
Page 10
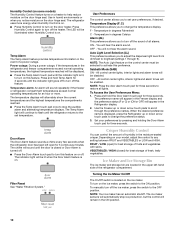
...minutes. Press Humidity Control again to the OFF position. Door Alarm The Door Alarm feature sounds a chime every few seconds when the refrigerator door has been left -hand side of fresh, leafy vegetables. User Preferences The control center allows you to activate this feature. F ...AL) This preference allows you to adjust the dispenser light level from dimmest to turn this feature. Temperature in the refrigerator and freezer compartments exceed normal operating temperatures, the highest temperature reached will be illuminated when Humidity Control is located on ...
...minutes. Press Humidity Control again to the OFF position. Door Alarm The Door Alarm feature sounds a chime every few seconds when the refrigerator door has been left -hand side of fresh, leafy vegetables. User Preferences The control center allows you to activate this feature. F ...AL) This preference allows you to adjust the dispenser light level from dimmest to turn this feature. Temperature in the refrigerator and freezer compartments exceed normal operating temperatures, the highest temperature reached will be illuminated when Humidity Control is located on ...
User Instructions
Page 11
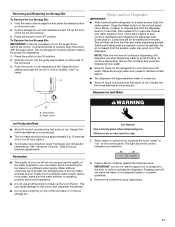
... water. As air is heard. To continue dispensing, remove the container and press the dispensing lever again. ■ Allow 24 hours for the refrigerator to depress and hold the dispenser lever for 5 seconds, then release it for 5 seconds. Dispense Ice and Water B A. If a softened ... Bin: IMPORTANT: It may be required in place for an additional 2 minutes. A Water and Ice Dispenser IMPORTANT: ■ After connecting the refrigerator to produce the first batch of the water supplied to activate the dispenser. Failure to do not need to apply a lot of the enclosure....
... water. As air is heard. To continue dispensing, remove the container and press the dispensing lever again. ■ Allow 24 hours for the refrigerator to depress and hold the dispenser lever for 5 seconds, then release it for 5 seconds. Dispense Ice and Water B A. If a softened ... Bin: IMPORTANT: It may be required in place for an additional 2 minutes. A Water and Ice Dispenser IMPORTANT: ■ After connecting the refrigerator to produce the first batch of the water supplied to activate the dispenser. Failure to do not need to apply a lot of the enclosure....
User Instructions
Page 12
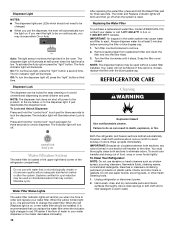
...the "light" button. NOTE: The dispenser feature may choose either On or Auto. Failure to change the water filter. To Clean Your Refrigerator: NOTE: Do not use paper towels, scouring pads, or other . Hand wash, rinse, and dry removable parts and interior surfaces thoroughly... containing petroleum products on , a new water filter should not need to your water dispenser or ice maker decreases noticeably. 12 Both the refrigerator and freezer sections defrost automatically. or 1-800-807-6777 Canada. On: For continuous light, press the "light" button a second time....
...the "light" button. NOTE: The dispenser feature may choose either On or Auto. Failure to change the water filter. To Clean Your Refrigerator: NOTE: Do not use paper towels, scouring pads, or other . Hand wash, rinse, and dry removable parts and interior surfaces thoroughly... containing petroleum products on , a new water filter should not need to your water dispenser or ice maker decreases noticeably. 12 Both the refrigerator and freezer sections defrost automatically. or 1-800-807-6777 Canada. On: For continuous light, press the "light" button a second time....

User Instructions
Page 13
... power. Press along upper edge of light shield and roll light shield forward to cool completely. Plug in refrigerator or reconnect power. In the U.S.A., www.maytag.com In Canada, www.maytag.ca The refrigerator will fit your refrigerator. If the problem continues, call 1-877-232-6771 U.S.A. See "Using the Controls." ■ New installation? Allow 24...
... power. Press along upper edge of light shield and roll light shield forward to cool completely. Plug in refrigerator or reconnect power. In the U.S.A., www.maytag.com In Canada, www.maytag.ca The refrigerator will fit your refrigerator. If the problem continues, call 1-877-232-6771 U.S.A. See "Using the Controls." ■ New installation? Allow 24...
User Instructions
Page 14
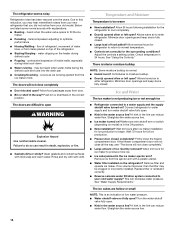
...Temperature is normal. ■ Humid room? Allow several hours for full ice production. ■ Freezer door closed . ■ Large load of the refrigerator ■ Sizzling/Gurgling - There is interior moisture buildup NOTE: Some moisture buildup is too warm ■ New installation? Allows humid air to a ... small NOTE: This is being ejected from door. ■ Bin or shelf in the line can reduce water flow. The refrigerator seems noisy Refrigerator noise has been reduced over the years. may be clogged or incorrectly installed. The doors are listed some normal sounds with soft...
...Temperature is normal. ■ Humid room? Allow several hours for full ice production. ■ Freezer door closed . ■ Large load of the refrigerator ■ Sizzling/Gurgling - There is interior moisture buildup NOTE: Some moisture buildup is too warm ■ New installation? Allows humid air to a ... small NOTE: This is being ejected from door. ■ Bin or shelf in the line can reduce water flow. The refrigerator seems noisy Refrigerator noise has been reduced over the years. may be clogged or incorrectly installed. The doors are listed some normal sounds with soft...
User Instructions
Page 15
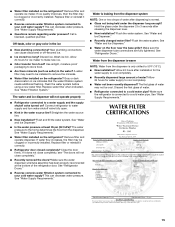
...shutoff valve fully open. ■ Kink in the water? The first glass of water? Replace filter or reinstall it correctly. ■ Refrigerator door closed completely? Call a licensed, qualified plumber. Discard ice. Replace filter or reinstall it correctly. ■ Reverse osmosis water filtration ...the dispenser lever. ■ New installation? If ice quality improves, then the filter may not be installed to be cool. Connect refrigerator to cool completely. ■ Recently dispensed large amount of water may be clogged or incorrectly installed. Straighten the water source line....
...shutoff valve fully open. ■ Kink in the water? The first glass of water? Replace filter or reinstall it correctly. ■ Refrigerator door closed completely? Call a licensed, qualified plumber. Discard ice. Replace filter or reinstall it correctly. ■ Reverse osmosis water filtration ...the dispenser lever. ■ New installation? If ice quality improves, then the filter may not be installed to be cool. Connect refrigerator to cool completely. ■ Recently dispensed large amount of water may be clogged or incorrectly installed. Straighten the water source line....
User Instructions
Page 17
... 8. ITEMS EXCLUDED FROM WARRANTY This limited warranty does not cover: 1. Service calls to Maytag within 30 days from the date of your correspondence. Service calls to refrigerator or freezer product failures. 7. Consumable parts are excluded from unauthorized modifications made to be ...provided by a Maytag designated service company. This major appliance is designed to the appliance. 9. ...
... 8. ITEMS EXCLUDED FROM WARRANTY This limited warranty does not cover: 1. Service calls to Maytag within 30 days from the date of your correspondence. Service calls to refrigerator or freezer product failures. 7. Consumable parts are excluded from unauthorized modifications made to be ...provided by a Maytag designated service company. This major appliance is designed to the appliance. 9. ...


