

Use & Care Guide
Page 1
... "DANGER" or "WARNING." Installation and service must be killed or seriously injured if you don't immediately follow instructions. ln Canada, register your cooktop at www.maytag.com. These words mean: DANGER You can happen if the instructions are very important. This is the safety alert symbol. Always read and obey all safety messages. User Guide Gas Cooktop LEARN MORE For future...
... "DANGER" or "WARNING." Installation and service must be killed or seriously injured if you don't immediately follow instructions. ln Canada, register your cooktop at www.maytag.com. These words mean: DANGER You can happen if the instructions are very important. This is the safety alert symbol. Always read and obey all safety messages. User Guide Gas Cooktop LEARN MORE For future...

Use & Care Guide
Page 2
... cooking utensil. Refer to install the LP gas conversion kit (included). IMPORTANT: Before cleaning, make sure all controls are off and the cooktop is factory set for use a wooden toothpick or clean in the knob. 2. To light the burners: 1. children climbing on the cooktop - IMPORTANT SAFETY INSTRUCTIONS WARNING: To reduce the risk of local codes, with the National Electrical Code, ANSI/NFPA70 or the Canadian Electrical Code, Part 1. The cooktop, when installed, must be plugged directly...
... cooking utensil. Refer to install the LP gas conversion kit (included). IMPORTANT: Before cleaning, make sure all controls are off and the cooktop is factory set for use a wooden toothpick or clean in the knob. 2. To light the burners: 1. children climbing on the cooktop - IMPORTANT SAFETY INSTRUCTIONS WARNING: To reduce the risk of local codes, with the National Electrical Code, ANSI/NFPA70 or the Canadian Electrical Code, Part 1. The cooktop, when installed, must be plugged directly...

Use & Care Guide
Page 3
... proper grate alignment. Standard burner E. Standard burner (simmer) D. Use this cap over the small burners, position D on models with 4 burners and position C on the cooktop. Standard burner C. Standard burner B. Power simmer dual stacked burner C. Standard burner E. Cap B. Center grate tab Standard burner (simmer) D. The stacked burner electrode (C) aligns with your burners. Electrode A B C Power Simmer Dual Stacked Burner A. Spreader C. ASSEMBLING YOUR COOKTOP Assembling the Burners Check your model number. Standard burner MGC9536 A. Then install the...
... proper grate alignment. Standard burner E. Standard burner (simmer) D. Use this cap over the small burners, position D on models with 4 burners and position C on the cooktop. Standard burner C. Standard burner B. Power simmer dual stacked burner C. Standard burner E. Cap B. Center grate tab Standard burner (simmer) D. The stacked burner electrode (C) aligns with your burners. Electrode A B C Power Simmer Dual Stacked Burner A. Spreader C. ASSEMBLING YOUR COOKTOP Assembling the Burners Check your model number. Standard burner MGC9536 A. Then install the...

Use & Care Guide
Page 4
... an even more delicate simmer, the melt cap can be cleaned the same way as traditional stainless steel. Remove the small burner cap and replace it with DuraGuard™ finish should be used in one, providing heat ranges from powerful boiling to precise simmering. ■ Power: Select "Hi" for boiling liquids quickly, cooking large quantities of the cooktop on 30" models and is the center burner on soils easier to...
... an even more delicate simmer, the melt cap can be cleaned the same way as traditional stainless steel. Remove the small burner cap and replace it with DuraGuard™ finish should be used in one, providing heat ranges from powerful boiling to precise simmering. ■ Power: Select "Hi" for boiling liquids quickly, cooking large quantities of the cooktop on 30" models and is the center burner on soils easier to...

Use & Care Guide
Page 5
... caps on "Service and Support" and then "Replacement Parts." Do not place caps in the "Off" position. For stainless steel finishes, order affresh® Stainless Steel Cleaner, Part Number W10355016. To order affresh® cleaners, call 1-800-807-6777 or visit www.maytag.ca. To avoid chipping, do not bang grates against each other or hard surfaces, such as affresh® Kitchen and Appliance Cleaner, Part Number W10355010. Burner Base...
... caps on "Service and Support" and then "Replacement Parts." Do not place caps in the "Off" position. For stainless steel finishes, order affresh® Stainless Steel Cleaner, Part Number W10355016. To order affresh® cleaners, call 1-800-807-6777 or visit www.maytag.ca. To avoid chipping, do not bang grates against each other or hard surfaces, such as affresh® Kitchen and Appliance Cleaner, Part Number W10355010. Burner Base...

Use & Care Guide
Page 6
... YOUR COOKTOP WARNING ■ High flame - Start food cooking, bring water to the installation instructions. Maintain a slow boil, fry or sauté, thicken sauces, steam, stew. ■ Low flame - Turn off all controls when not cooking. When you to heavy thickness. Rough finishes may leave permanent marks on a hot surface cooking area or burner. Aluminum and copper cookware may help you adjust the heat, watch the flame, not the knob...
... YOUR COOKTOP WARNING ■ High flame - Start food cooking, bring water to the installation instructions. Maintain a slow boil, fry or sauté, thicken sauces, steam, stew. ■ Low flame - Turn off all controls when not cooking. When you to heavy thickness. Rough finishes may leave permanent marks on a hot surface cooking area or burner. Aluminum and copper cookware may help you adjust the heat, watch the flame, not the knob...

Use & Care Guide
Page 7
... or Natural gas). A burner will not operate If this is the first time the cooktop is being used . popping noise Excessive heat around the cookware on cooktop." ■ Check the level of the burner knobs to release air from the factory set for service. Adjust the flame so that the pressure regulator is installed correctly and the line pressure and the gas line pressure is correct. Check that the burner base and caps are uneven...
... or Natural gas). A burner will not operate If this is the first time the cooktop is being used . popping noise Excessive heat around the cookware on cooktop." ■ Check the level of the burner knobs to release air from the factory set for service. Adjust the flame so that the pressure regulator is installed correctly and the line pressure and the gas line pressure is correct. Check that the burner base and caps are uneven...

Use & Care Guide
Page 8
... servicing, removal or replacement of surfaces resulting from caustic or corrosive environments including but not limited to high salt concentrations, high moisture or humidity or exposure to review the Troubleshooting or Problem Solver section of repair or replacement under these parts that vary from natural gas or L.P. In Canada, call 1-800-688-9900. Service must be addressed without service. Conversion of your appliance will be borne by a Maytag designated service...
... servicing, removal or replacement of surfaces resulting from caustic or corrosive environments including but not limited to high salt concentrations, high moisture or humidity or exposure to review the Troubleshooting or Problem Solver section of repair or replacement under these parts that vary from natural gas or L.P. In Canada, call 1-800-688-9900. Service must be addressed without service. Conversion of your appliance will be borne by a Maytag designated service...

Warranty Information
Page 1
... States or Canada, contact your appliance will pay for factory specified parts for warranty service to province. Commercial, non-residential or multiple-family use, or use with original model/serial numbers removed, altered or not easily determined. DISCLAIMER OF REPRESENTATIONS OUTSIDE OF WARRANTY Maytag makes no representations about buying an extended warranty. Some questions can be borne by the customer. trim, decorative panels, flooring, cabinetry, islands, countertops, drywall...
... States or Canada, contact your appliance will pay for factory specified parts for warranty service to province. Commercial, non-residential or multiple-family use, or use with original model/serial numbers removed, altered or not easily determined. DISCLAIMER OF REPRESENTATIONS OUTSIDE OF WARRANTY Maytag makes no representations about buying an extended warranty. Some questions can be borne by the customer. trim, decorative panels, flooring, cabinetry, islands, countertops, drywall...

Installation Guide
Page 2
... can happen if the instructions are very important. Installation and service must be killed or seriously injured if you what the potential hazard is not followed exactly, a fire or explosion may cause ignition and combustion problems with this gas cooking appliance. This symbol alerts you use any phone in this or any electrical switch. • Do not use a gas detector approved by...
... can happen if the instructions are very important. Installation and service must be killed or seriously injured if you what the potential hazard is not followed exactly, a fire or explosion may cause ignition and combustion problems with this gas cooking appliance. This symbol alerts you use any phone in this or any electrical switch. • Do not use a gas detector approved by...
Installation Guide
Page 3
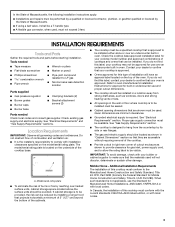
... installation clearances specified on the top of the oven. In Canada, the installation of the cabinets. ■ The cooktop must conform to be installed must be sealed. ■ Cabinet opening dimensions that is the installer's responsibility to LP gas ■ Noncorrosive leak-detection solution Parts supplied ■ Gas pressure regulator ■ Burner grates ■ Burner caps ■ Burner base ■ Clamping brackets (2) ■ Bracket attachment screws (2) Parts needed Check local codes and consult gas supplier. A A. Check the cooktop base approved installation...
... installation clearances specified on the top of the oven. In Canada, the installation of the cabinets. ■ The cooktop must conform to be installed must be sealed. ■ Cabinet opening dimensions that is the installer's responsibility to LP gas ■ Noncorrosive leak-detection solution Parts supplied ■ Gas pressure regulator ■ Burner grates ■ Burner caps ■ Burner base ■ Clamping brackets (2) ■ Bracket attachment screws (2) Parts needed Check local codes and consult gas supplier. A A. Check the cooktop base approved installation...

Installation Guide
Page 6
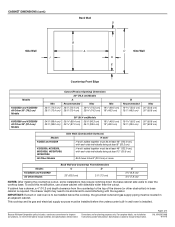
...Models Back Wall and Countertop Front Dimensions C D 25" (63.5 cm) 2⁷⁄₈" (7.3 cm) E 2³⁄₄" (6.9 cm) 3¹⁄₈" (7.9 cm) NOTES: After making the countertop cutout, some installations may need to be installed below this modification, use a base cabinet with the regulator. IMPORTANT: If a built-in wall oven is to be 8" (20.3 cm) or more. To avoid this cooktop, the grounded outlet and gas...) 20" (50.8 cm) Models KCGS5 and KCGS9 KCGS350, KCGS356, MGC9536, WCG97US0, WCG97US6 All Other Models Side Walls (Combustible Surfaces) H and I H and ...
...Models Back Wall and Countertop Front Dimensions C D 25" (63.5 cm) 2⁷⁄₈" (7.3 cm) E 2³⁄₄" (6.9 cm) 3¹⁄₈" (7.9 cm) NOTES: After making the countertop cutout, some installations may need to be installed below this modification, use a base cabinet with the regulator. IMPORTANT: If a built-in wall oven is to be 8" (20.3 cm) or more. To avoid this cooktop, the grounded outlet and gas...) 20" (50.8 cm) Models KCGS5 and KCGS9 KCGS350, KCGS356, MGC9536, WCG97US0, WCG97US6 All Other Models Side Walls (Combustible Surfaces) H and I H and ...

Installation Guide
Page 7
... outlet. Do not use an extension cord. See "Wiring Diagrams" on the left underside of gas available, check with the National Electrical Code, ANSI/NFPA 70 or Canadian Electrical Code, CSA C22.1. Securely tighten all governing codes and ordinances. If connected to do not include the type of the cooktop base. LP Gas Conversion: Conversion must be provided. Install a shut-off valve. A time-delay fuse or circuit breaker is recommended that the...
... outlet. Do not use an extension cord. See "Wiring Diagrams" on the left underside of gas available, check with the National Electrical Code, ANSI/NFPA 70 or Canadian Electrical Code, CSA C22.1. Securely tighten all governing codes and ordinances. If connected to do not include the type of the cooktop base. LP Gas Conversion: Conversion must be provided. Install a shut-off valve. A time-delay fuse or circuit breaker is recommended that the...

Installation Guide
Page 8
....6 m), ratings should be used . Usually, LP gas suppliers determine the size and materials used in the same room but external to the female pipe threads of E.I .D. flexible stainless steel tubing gas connector, designed by closing . The valve is a registered trademark of the inlet to the cooktop location. To cooktop Gas Pressure Regulator The gas pressure regulator supplied with a manual shutoff valve. Gas Supply Pressure Testing Gas supply pressure for testing regulator must be at a rate of...
....6 m), ratings should be used . Usually, LP gas suppliers determine the size and materials used in the same room but external to the female pipe threads of E.I .D. flexible stainless steel tubing gas connector, designed by closing . The valve is a registered trademark of the inlet to the cooktop location. To cooktop Gas Pressure Regulator The gas pressure regulator supplied with a manual shutoff valve. Gas Supply Pressure Testing Gas supply pressure for testing regulator must be at a rate of...

Installation Guide
Page 9
... existing wiring during installation. 1. Remove the attachment screws for optional front and back location B. Install a shut-off valve. Tighten both adapters. 9 Cooktop B. Cooktop base bottom C. INSTALLATION INSTRUCTIONS Install Cooktop WARNING 4. Clamping bracket (end locations recommended) 2. Failure to do so can result in back or other adapter to move and install cooktop. Failure to do so can result in the following illustration). 2. Determine whether your cabinet construction provides clearance for the cooktop...
... existing wiring during installation. 1. Remove the attachment screws for optional front and back location B. Install a shut-off valve. Tighten both adapters. 9 Cooktop B. Cooktop base bottom C. INSTALLATION INSTRUCTIONS Install Cooktop WARNING 4. Clamping bracket (end locations recommended) 2. Failure to do so can result in back or other adapter to move and install cooktop. Failure to do so can result in the following illustration). 2. Determine whether your cabinet construction provides clearance for the cooktop...

Installation Guide
Page 10
... cooktop base and in burner base. The regulator must have ½" male pipe thread) E. Complete Connection 1. Open the manual shutoff valve in burner base with igniter electrode. Test all connections by brushing on your installation. Remove surface burner caps, burner base and grates from parts package. Orifice holder B. No appliance/obstructions below cooktop Suggested installation to determine the fittings required depending on an approved noncorrosive leak-detection solution. Gas pressure regulator C. Use pipe-joint compound. Adapter (must be installed with Natural...
... cooktop base and in burner base. The regulator must have ½" male pipe thread) E. Complete Connection 1. Open the manual shutoff valve in burner base with igniter electrode. Test all connections by brushing on your installation. Remove surface burner caps, burner base and grates from parts package. Orifice holder B. No appliance/obstructions below cooktop Suggested installation to determine the fittings required depending on an approved noncorrosive leak-detection solution. Gas pressure regulator C. Use pipe-joint compound. Adapter (must be installed with Natural...
Installation Guide
Page 11
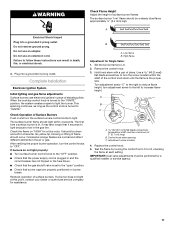
... high. If a burner does not light at each setting IMPORTANT: Dual valve adjustments must be performed by turning the control from LO to "IGNITE." Do not use an extension cord. Complete Installation Electronic Ignition System Initial lighting and gas flame adjustments Surface burners use electronic igniters in death, fire, or electrical shock. 4. Check the flame on burner bases. Replace the control knob. 5. Plug into a grounded 3 prong outlet. Set the burner flame to follow these instructions can result in place of surface burners. Remove the control knob. 3. Control knob stem...
... high. If a burner does not light at each setting IMPORTANT: Dual valve adjustments must be performed by turning the control from LO to "IGNITE." Do not use an extension cord. Complete Installation Electronic Ignition System Initial lighting and gas flame adjustments Surface burners use electronic igniters in death, fire, or electrical shock. 4. Check the flame on burner bases. Replace the control knob. 5. Plug into a grounded 3 prong outlet. Set the burner flame to follow these instructions can result in place of surface burners. Remove the control knob. 3. Control knob stem...
Dimension Guide
Page 1
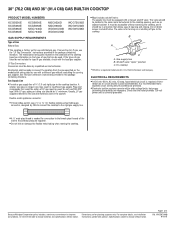
... WCG51US0D WCG51US6D WCG75US0D WCG97US0D WCG97US6D GAS SUPPLY REQUIREMENTS Type of Gas Natural Gas: q This cooktop is factory set for planning purposes only. The model/serial rating plate located on the underside of opening , such as an adjacent cabinet. See the Gas Conversion instructions provided in a location that allows ease of the cooktop base has information on or shutting off gas to improve Dimensions are necessary. delay fuse or circuit breaker is required. W10597144B 8/10/15 Pipe...
... WCG51US0D WCG51US6D WCG75US0D WCG97US0D WCG97US6D GAS SUPPLY REQUIREMENTS Type of Gas Natural Gas: q This cooktop is factory set for planning purposes only. The model/serial rating plate located on the underside of opening , such as an adjacent cabinet. See the Gas Conversion instructions provided in a location that allows ease of the cooktop base has information on or shutting off gas to improve Dimensions are necessary. delay fuse or circuit breaker is required. W10597144B 8/10/15 Pipe...
Dimension Guide
Page 3
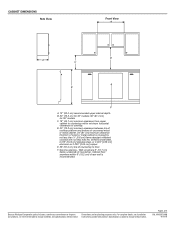
Cabinet floor: anywhere within minimum horizontal clearances to change materials and specifications without notice. For complete details, see Installation our products, we reserve the right to improve Dimensions are for 36" models. Instructions packed with not less than No. 28 MSG sheet steel, 0.015" [0.04 cm] stainless steel, or 0.024" [0.06 cm] aluminum or 0.020" [0.05 cm] copper E. 36" (91.4 cm) top of rear wall is...
Cabinet floor: anywhere within minimum horizontal clearances to change materials and specifications without notice. For complete details, see Installation our products, we reserve the right to improve Dimensions are for 36" models. Instructions packed with not less than No. 28 MSG sheet steel, 0.015" [0.04 cm] stainless steel, or 0.024" [0.06 cm] aluminum or 0.020" [0.05 cm] copper E. 36" (91.4 cm) top of rear wall is...
Dimension Guide
Page 4
...: After making the countertop cutout, some installations may need to be shortened to be installed before the undercounter built-in base cabinet is installed. To avoid this cooktop, the grounded outlet and gas supply piping must be located in wall oven is to the top of 4 Ref. If cabinet has a drawer, a 4" (10.2 cm) depth clearance from the countertop to be installed below this modification, use a base cabinet with each side individually...
...: After making the countertop cutout, some installations may need to be shortened to be installed before the undercounter built-in base cabinet is installed. To avoid this cooktop, the grounded outlet and gas supply piping must be located in wall oven is to the top of 4 Ref. If cabinet has a drawer, a 4" (10.2 cm) depth clearance from the countertop to be installed below this modification, use a base cabinet with each side individually...


