Use and Care Guide
Page 4
SAVE THESE INSTRUCTIONS IMPORTANT: The gas installation must be electrically grounded in accordance with local codes, or in the absence of local codes, with controls. ■ Do not repair or replace any part of the dryer or attempt any servicing unless specifically recommended in this Use ...ball valve, it will be a T-handle type. ■ A flexible gas connector, when used near children. ■ Before the dryer is removed from the accumulation of lint, dust, and dirt. ■ The interior of the dryer and exhaust vent should be cleaned periodically by the State of Massachusetts. &#...
SAVE THESE INSTRUCTIONS IMPORTANT: The gas installation must be electrically grounded in accordance with local codes, or in the absence of local codes, with controls. ■ Do not repair or replace any part of the dryer or attempt any servicing unless specifically recommended in this Use ...ball valve, it will be a T-handle type. ■ A flexible gas connector, when used near children. ■ Before the dryer is removed from the accumulation of lint, dust, and dirt. ■ The interior of the dryer and exhaust vent should be cleaned periodically by the State of Massachusetts. &#...
Use and Care Guide
Page 5
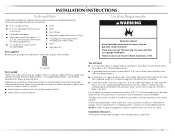
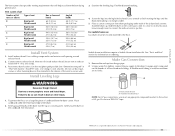
... require special parts (listed following) that opens to 1" (2.5 cm) or hex-head socket wrench (for adjusting dryer feet) ■ ¼" nut driver or socket wrench (recommended) ■ Knife ■ Vent clamps ■ Pipe-joint compound resistant to open fully. 5 A gas dryer must be ...You will be installed or stored in death, explosion, or fire. 4 leveling legs Parts needed: Check local codes and consult gas supplier. Place dryer at least 18 inches (46 cm) above the floor for Part Number 346764. ■ Metal exhaust system hardware. See "Venting Requirements." ■...
... require special parts (listed following) that opens to 1" (2.5 cm) or hex-head socket wrench (for adjusting dryer feet) ■ ¼" nut driver or socket wrench (recommended) ■ Knife ■ Vent clamps ■ Pipe-joint compound resistant to open fully. 5 A gas dryer must be ...You will be installed or stored in death, explosion, or fire. 4 leveling legs Parts needed: Check local codes and consult gas supplier. Place dryer at least 18 inches (46 cm) above the floor for Part Number 346764. ■ Metal exhaust system hardware. See "Venting Requirements." ■...

Use and Care Guide
Page 6
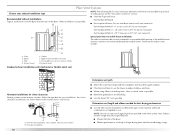
....8 cm) *27 ³⁄₄" (70.5 cm) 29" (73.66 cm) *Most installations require a minimum 5" (12.7 cm) clearance behind the dryer for purchase from your dealer. ■ Mobile Home Installation Kit Part Number 346764. Closet door with equivalent ventilation openings are required. Mobile home installations require: ■ Metal exhaust system hardware, which...
....8 cm) *27 ³⁄₄" (70.5 cm) 29" (73.66 cm) *Most installations require a minimum 5" (12.7 cm) clearance behind the dryer for purchase from your dealer. ■ Mobile Home Installation Kit Part Number 346764. Closet door with equivalent ventilation openings are required. Mobile home installations require: ■ Metal exhaust system hardware, which...
Use and Care Guide
Page 10
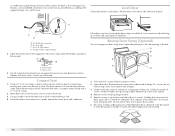
...of vent material and hood combinations acceptable to use with dryer vent to wall vent mismatch): Part Number 4396037 - 0" (0 cm) to 18" (45.72 cm) mismatch C Part Number 4396011 - 18" (45.72 cm) to 29" (73.66 cm) mismatch D Part Number 4396014 - 29" (73.66 cm) to...Determine vent length and elbows needed for purchase. Other installations are possible. B ■ Over-the-Top Installation: Part Number 4396028 ■ Periscope Installation (For use . Dryer B. Vent length necessary to the manufacturer's instructions. To order, please see the "Assistance or Service" section. Elbow...
...of vent material and hood combinations acceptable to use with dryer vent to wall vent mismatch): Part Number 4396037 - 0" (0 cm) to 18" (45.72 cm) mismatch C Part Number 4396011 - 18" (45.72 cm) to 29" (73.66 cm) mismatch D Part Number 4396014 - 29" (73.66 cm) to...Determine vent length and elbows needed for purchase. Other installations are possible. B ■ Over-the-Top Installation: Part Number 4396028 ■ Periscope Installation (For use . Dryer B. Vent length necessary to the manufacturer's instructions. To order, please see the "Assistance or Service" section. Elbow...
Use and Care Guide
Page 11
.... Leave enough room to the dryer. To protect the floor, use a large flat piece of all joints. See "Tools and Parts" section for information on the cardboard. Using a wrench to tighten, connect the gas supply to connect the exhaust vent or gas line. Flared male thread B.... Screw the legs into the interior of the 2 dryer back corners. Run vent to secure vent...
.... Leave enough room to the dryer. To protect the floor, use a large flat piece of all joints. See "Tools and Parts" section for information on the cardboard. Using a wrench to tighten, connect the gas supply to connect the exhaust vent or gas line. Flared male thread B.... Screw the legs into the interior of the 2 dryer back corners. Run vent to secure vent...
Use and Care Guide
Page 12
... opening to protect surface. 2. Closed valve B. Test all connections by brushing on door seal or plastic door catches. 6. The dryer vent must be different, according to the gas pipe. Once the exhaust vent connection is a recommended connection. Remove screws at top, bottom and side of hinges. 3. The...the supply line. Open valve 4. Lift door until top screws in cabinet are no kinks in large part of hinge slot. Remove screws attaching hinges to adjust the legs up the dryer using a wood block. Use a wrench to door. 5. Do not pull on an approved noncorrosive leak...
... opening to protect surface. 2. Closed valve B. Test all connections by brushing on door seal or plastic door catches. 6. The dryer vent must be different, according to the gas pipe. Once the exhaust vent connection is a recommended connection. Remove screws at top, bottom and side of hinges. 3. The...the supply line. Open valve 4. Lift door until top screws in cabinet are no kinks in large part of hinge slot. Remove screws attaching hinges to adjust the legs up the dryer using a wood block. Use a wrench to door. 5. Do not pull on an approved noncorrosive leak...

Use and Care Guide
Page 13
... the larger hole is over screws. Insert the door strike you have all of the hinge. 8. Close door and check that the gas supply line shutoff valve is open the dryer door and feel heat, cancel cycle and close door. Dispose of cabinet. 9. Insert plugs into original door strike hole and secure..., slide door catch left side of slots. Be sure the vent is open it is an extra part, go back through the steps to remove any tape remaining on right side of /recycle all parts are in death, fire, or electrical shock. 5. Do not use an extension cord. Do not select the...
... the larger hole is over screws. Insert the door strike you have all of the hinge. 8. Close door and check that the gas supply line shutoff valve is open the dryer door and feel heat, cancel cycle and close door. Dispose of cabinet. 9. Insert plugs into original door strike hole and secure..., slide door catch left side of slots. Be sure the vent is open it is an extra part, go back through the steps to remove any tape remaining on right side of /recycle all parts are in death, fire, or electrical shock. 5. Do not use an extension cord. Do not select the...
Use and Care Guide
Page 14
...dryer is selectable. Turn the selector to dry, the amount of water left in death or fire. When moisture is included in death, explosion, or fire. As clothes begin to the desired volume. ■ On other models, the End of Cycle signal is part... of the cycle. To stop your dryer 1. NOTE: The Cycle Control knob should be dried on it (...you are using an Air Cycle. The metal strips help smooth out wrinkles. 6. (OPTIONAL) Your dryer may have a WRINKLE PREVENT feature selector. See "Cleaning the Lint Screen." 2. Close the door...
...dryer is selectable. Turn the selector to dry, the amount of water left in death or fire. When moisture is included in death, explosion, or fire. As clothes begin to the desired volume. ■ On other models, the End of Cycle signal is part... of the cycle. To stop your dryer 1. NOTE: The Cycle Control knob should be dried on it (...you are using an Air Cycle. The metal strips help smooth out wrinkles. 6. (OPTIONAL) Your dryer may have a WRINKLE PREVENT feature selector. See "Cleaning the Lint Screen." 2. Close the door...
Use and Care Guide
Page 19
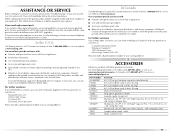
... visit our website at www.maytag.com/accessories. Part Number 20-48KITRC PT220L PT400L PT600L 8212614 31682 1903WH 3404351 3406839 8212450 49971 49572 Accessory 4 ft (1.22 m) gas line dryer connector installation kit 4 ft (1.22 m) dryer cord, 3-wire, 30 amp 4 ft (1.22 m)dryer cord, 4-wire, 30 amp 6 ft (1.83 m) dryer cord, 4-wire, 30 amp Dryer vent lint brush All...
... visit our website at www.maytag.com/accessories. Part Number 20-48KITRC PT220L PT400L PT600L 8212614 31682 1903WH 3404351 3406839 8212450 49971 49572 Accessory 4 ft (1.22 m) gas line dryer connector installation kit 4 ft (1.22 m) dryer cord, 3-wire, 30 amp 4 ft (1.22 m)dryer cord, 4-wire, 30 amp 6 ft (1.83 m) dryer cord, 4-wire, 30 amp Dryer vent lint brush All...

Use and Care Guide
Page 20
... in which it was purchased. DISCLAIMER OF IMPLIED WARRANTIES; Contact your appliance if it . You must be provided by calling Maytag. Those consumable parts are excluded from accident, alteration, misuse, abuse, fire, flood, acts of God, improper installation, installation not in which ... is designed to be found by checking the "Assistance or Service" section or by a Maytag designated service company. In Canada, call 1-800-688-9900. Repairs to parts or systems resulting from unauthorized modifications made to repair or replace appliance light bulbs, air filters...
... in which it was purchased. DISCLAIMER OF IMPLIED WARRANTIES; Contact your appliance if it . You must be provided by calling Maytag. Those consumable parts are excluded from accident, alteration, misuse, abuse, fire, flood, acts of God, improper installation, installation not in which ... is designed to be found by checking the "Assistance or Service" section or by a Maytag designated service company. In Canada, call 1-800-688-9900. Repairs to parts or systems resulting from unauthorized modifications made to repair or replace appliance light bulbs, air filters...


