
Owners Manual
Page 2
... exhaust opening and adjacent surrounding areas free from the accumulation of lint, dust, and dirt. � The interior of injury, and tell you what the potential hazard is removed from service or discarded, remove the door to catch fire. parts made at home using the appliance. � Do not dry articles that have not been recommended by the manufacturer of a tumble dryer cycle...
... exhaust opening and adjacent surrounding areas free from the accumulation of lint, dust, and dirt. � The interior of injury, and tell you what the potential hazard is removed from service or discarded, remove the door to catch fire. parts made at home using the appliance. � Do not dry articles that have not been recommended by the manufacturer of a tumble dryer cycle...
Owners Manual
Page 3
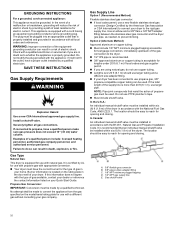
... a specific type identified by a qualified installer, service agency, or the gas supplier. 3 do not use with the installation instructions of the manufacturer of severe injury or death, follow safety warnings exactly could result in the exhaust duct. "Risk of Fire" − Clothes dryer installation must be performed by a qualified installer. − Install the clothes dryer according to the manufacturer's instructions and local codes. − Do not install a clothes dryer with flexible plastic venting...
... a specific type identified by a qualified installer, service agency, or the gas supplier. 3 do not use with the installation instructions of the manufacturer of severe injury or death, follow safety warnings exactly could result in the exhaust duct. "Risk of Fire" − Clothes dryer installation must be performed by a qualified installer. − Install the clothes dryer according to the manufacturer's instructions and local codes. − Do not install a clothes dryer with flexible plastic venting...
Owners Manual
Page 4
... STORING YOUR OLD CLOTHES DRYER, REMOVE THE DOOR. SAVE THESE INSTRUCTIONS 4 For more information, contact your gas supplier. The dryer must conform with local codes, or in the absence of local codes, with the National Electrical Code, ANSI/NFPA 70, or the Canadian Electrical Code, Part 1, CSA C22.1. In the State of Massachusetts. � Acceptable Shut-off Devices: Gas Cocks and Ball Valves installed for use a gas detector approved by...
... STORING YOUR OLD CLOTHES DRYER, REMOVE THE DOOR. SAVE THESE INSTRUCTIONS 4 For more information, contact your gas supplier. The dryer must conform with local codes, or in the absence of local codes, with the National Electrical Code, ANSI/NFPA 70, or the Canadian Electrical Code, Part 1, CSA C22.1. In the State of Massachusetts. � Acceptable Shut-off Devices: Gas Cocks and Ball Valves installed for use a gas detector approved by...
Owners Manual
Page 5
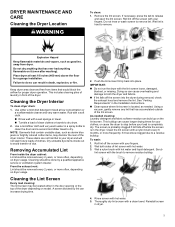
.... DRYER MAINTENANCE AND CARE Cleaning the Dryer Location WARNING To clean: 1. Do not dry anything that contain unstable dyes, such as needed cleaning: Laundry detergent and fabric softener residue can cause longer drying times for your fingers. Rub with a soft cloth. � Rinse well with your clothes, or cause the dryer to remove residue buildup. 4. Use a microfiber cloth and very warm water in the Installation Instructions. � Clean space where lint screen is in dryer. 5 Removing...
.... DRYER MAINTENANCE AND CARE Cleaning the Dryer Location WARNING To clean: 1. Do not dry anything that contain unstable dyes, such as needed cleaning: Laundry detergent and fabric softener residue can cause longer drying times for your fingers. Rub with a soft cloth. � Rinse well with your clothes, or cause the dryer to remove residue buildup. 4. Use a microfiber cloth and very warm water in the Installation Instructions. � Clean space where lint screen is in dryer. 5 Removing...
Owners Manual
Page 6
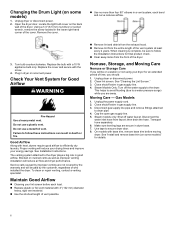
... driver or socket wrench, remove the screw located in dryer or reconnect power. Disconnect the water inlet hose from the entire length of the vent system at least every 2 years. Proper venting will reduce air flow and dryer performance. Check Your Vent System for details. 6 Steam Models Only: Turn off water faucet. Close shutoff valve in dryer base. 7. Clean lint screen. To clean or repair venting, contact a venting specialist. The venting system attached to the dryer. Unplug dryer or disconnect power. 2. Gas Models 1. Changing the Drum Light...
... driver or socket wrench, remove the screw located in dryer or reconnect power. Disconnect the water inlet hose from the entire length of the vent system at least every 2 years. Proper venting will reduce air flow and dryer performance. Check Your Vent System for details. 6 Steam Models Only: Turn off water faucet. Close shutoff valve in dryer base. 7. Clean lint screen. To clean or repair venting, contact a venting specialist. The venting system attached to the dryer. Unplug dryer or disconnect power. 2. Gas Models 1. Changing the Drum Light...
Owners Manual
Page 7
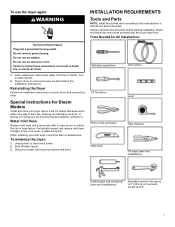
... inspect and replace inlet hose if bulges, kinks, cuts, wear, or leaks are found. Read and follow these instructions can damage your inlet hose, record the date of use to locate, level, and connect the dryer. Flush water pipes. Special Instructions for All Installations: Electrical Shock Hazard Plug into a grounded 3 prong outlet. Failure to faucet. To use the dryer again: WARNING INSTALLATION REQUIREMENTS Tools and Parts NOTE: Install the clothes dryer according to...
... inspect and replace inlet hose if bulges, kinks, cuts, wear, or leaks are found. Read and follow these instructions can damage your inlet hose, record the date of use to locate, level, and connect the dryer. Flush water pipes. Special Instructions for All Installations: Electrical Shock Hazard Plug into a grounded 3 prong outlet. Failure to faucet. To use the dryer again: WARNING INSTALLATION REQUIREMENTS Tools and Parts NOTE: Install the clothes dryer according to...
Owners Manual
Page 8
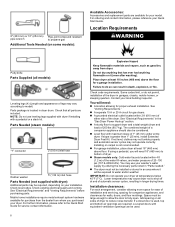
... Quick Start Guide for gas dryers. � A grounded electrical outlet located within 4 ft (1.2 m) of the water fill valves, and water pressure of 200 lbs (90.7 kg). If using a pedestal, you purchased your dryer at least 18 inches (460 mm) above floor. Lower temperatures may cause dryer not to reduce noise transfer. Location Requirements WARNING Putty knife Parts Supplied (all sides of 1" (25 mm) under entire dryer. Parts Needed (steam models): "Y" connector 2' (0.6 m) inlet hose Rubber washer 5' (1.52 m) inlet hose Parts Needed...
... Quick Start Guide for gas dryers. � A grounded electrical outlet located within 4 ft (1.2 m) of the water fill valves, and water pressure of 200 lbs (90.7 kg). If using a pedestal, you purchased your dryer at least 18 inches (460 mm) above floor. Lower temperatures may cause dryer not to reduce noise transfer. Location Requirements WARNING Putty knife Parts Supplied (all sides of 1" (25 mm) under entire dryer. Parts Needed (steam models): "Y" connector 2' (0.6 m) inlet hose Rubber washer 5' (1.52 m) inlet hose Parts Needed...
Owners Manual
Page 9
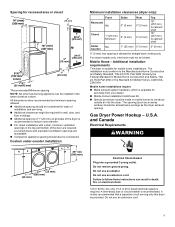
... is allowed for straight-back venting only. Gas Dryer Power Hookup - and Canada Electrical Requirements WARNING Electrical Shock Hazard Plug into the dryer. Do not use an extension cord. 9 Do not use an adapter. For steam models only, inlet hose must be kinked. The opening . It is also recommended that a separate circuit serving only this dryer be required for mobile home installations. Custom under-counter installation: Minimum installation clearances (dryer only): Front Recessed NA...
... is allowed for straight-back venting only. Gas Dryer Power Hookup - and Canada Electrical Requirements WARNING Electrical Shock Hazard Plug into the dryer. Do not use an extension cord. 9 Do not use an adapter. For steam models only, inlet hose must be kinked. The opening . It is also recommended that a separate circuit serving only this dryer be required for mobile home installations. Custom under-counter installation: Minimum installation clearances (dryer only): Front Recessed NA...
Owners Manual
Page 10
... plugged tapping accessible for test gauge connection, immediately upstream of gas in your dryer to convert the appliance from the gas specified on the rating plate in the door well of the dryer. In the U.S.A.: An individual manual shutoff valve must be made to the rigid gas supply line. It is located on the model/serial rating plate for opening and closing . A. 3/8" flexible gas connector B. 3/8" pipe-to propane, have a proper outlet installed by the American Gas...
... plugged tapping accessible for test gauge connection, immediately upstream of gas in your dryer to convert the appliance from the gas specified on the rating plate in the door well of the dryer. In the U.S.A.: An individual manual shutoff valve must be made to the rigid gas supply line. It is located on the model/serial rating plate for opening and closing . A. 3/8" flexible gas connector B. 3/8" pipe-to propane, have a proper outlet installed by the American Gas...
Owners Manual
Page 11
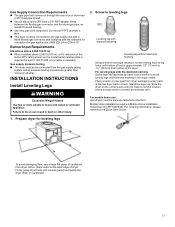
... m), a 4% reduction of the burner BTU rating shown on the model/serial number plate is close to the floor. For ordering information, please reference the Quick Start Guide. For leveling legs with the standard for connectors for gas appliances, ANSI Z21.24 or CSA 6.10. To avoid damaging floor, use : Gas dryers must be securely fastened to its final location. INSTALLATION INSTRUCTIONS Install Leveling Legs WARNING Excessive...
... m), a 4% reduction of the burner BTU rating shown on the model/serial number plate is close to the floor. For ordering information, please reference the Quick Start Guide. For leveling legs with the standard for connectors for gas appliances, ANSI Z21.24 or CSA 6.10. To avoid damaging floor, use : Gas dryers must be securely fastened to its final location. INSTALLATION INSTRUCTIONS Install Leveling Legs WARNING Excessive...
Owners Manual
Page 12
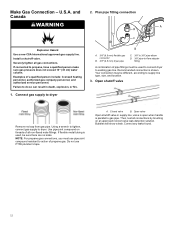
... leaks found. 12 If connected to dryer. If flexible metal tubing is used to connect dryer to do so can result in supply line; Install a shut-off valve. Examples of propane gas. Do not use pipe-joint compound resistant to action of a qualified person include: licensed heating personnel, authorized gas company personnel, and authorized service personnel. Open shutoff valve Remove red cap from gas pipe. Make Gas Connection - and Canada WARNING...
... leaks found. 12 If connected to dryer. If flexible metal tubing is used to connect dryer to do so can result in supply line; Install a shut-off valve. Examples of propane gas. Do not use pipe-joint compound resistant to action of a qualified person include: licensed heating personnel, authorized gas company personnel, and authorized service personnel. Open shutoff valve Remove red cap from gas pipe. Make Gas Connection - and Canada WARNING...
Owners Manual
Page 13
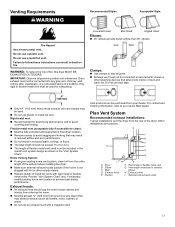
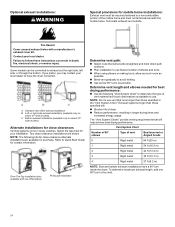
... length of duct and catch lint. A. Elbow C. Clamps F. Optional side exhaust outlet 13 Review "Vent System Chart" and, if necessary, modify existing home vent system to connect elbows H. For contact and ordering information, refer to your dealer. Other installations are possible. Exhaust outlet I. Failure to follow these instructions can be fully extended and supported in final dryer location. � Remove excess to seal all governing codes and ordinances. Dryer exhaust...
... length of duct and catch lint. A. Elbow C. Clamps F. Optional side exhaust outlet 13 Review "Vent System Chart" and, if necessary, modify existing home vent system to connect elbows H. For contact and ordering information, refer to your dealer. Other installations are possible. Exhaust outlet I. Failure to follow these instructions can be fully extended and supported in final dryer location. � Remove excess to seal all governing codes and ordinances. Dryer exhaust...
Owners Manual
Page 14
...; turn to Quick Start Guide for contact information. or right-side exhaust installation (available only on select 27"- Over-The-Top installation (also available with a manufacturer's exhaust cover kit. Optional exhaust installations: WARNING Special provisions for mobile home installations: Exhaust vent must not terminate beneath the mobile home. C. wide models). Two close clearances Venting systems come in the "Vent System Chart." Refer to the chart. 14 To determine maximum exhaust length, add...
...; turn to Quick Start Guide for contact information. or right-side exhaust installation (available only on select 27"- Over-The-Top installation (also available with a manufacturer's exhaust cover kit. Optional exhaust installations: WARNING Special provisions for mobile home installations: Exhaust vent must not terminate beneath the mobile home. C. wide models). Two close clearances Venting systems come in the "Vent System Chart." Refer to the chart. 14 To determine maximum exhaust length, add...

Owners Manual
Page 15
... if your model has a long vent system, refer to the "Y" connector. NOTE: Replace inlet hoses after 5 years of the 5 ft (1.5 m) inlet hose ends to the type code located on connector. 3. Record hose installation or replacement dates on faucet. Attach long hose to "Y" connector and tighten couplings Attach one of use caulking compound to dryer location using the new inlet hoses. Connect Inlet Hoses For vented, non-steam models, skip to seal all joints. Use clamps to "Connect Vent." Screw on...
... if your model has a long vent system, refer to the "Y" connector. NOTE: Replace inlet hoses after 5 years of the 5 ft (1.5 m) inlet hose ends to the type code located on connector. 3. Record hose installation or replacement dates on faucet. Attach long hose to "Y" connector and tighten couplings Attach one of use caulking compound to dryer location using the new inlet hoses. Connect Inlet Hoses For vented, non-steam models, skip to seal all joints. Use clamps to "Connect Vent." Screw on...
Owners Manual
Page 16
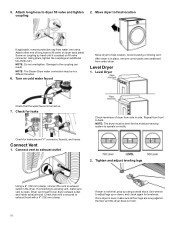
... dryer back panel. Attach long hose to exhaust outlet 2. Connect Vent 1. Tighten and adjust leveling legs Using a 4" (102 mm) clamp, connect the vent to side. Screw on . 7. NOTE: The Steam Dryer water connection may be level for levelness. Dryer vent must be in the dryer. Level Dryer 1. Level Dryer Check that vent is secured to adjust legs up using a wood block. Repeat from water inlet valve. After dryer is turned on coupling by hand until it is clean. Once dryer...
... dryer back panel. Attach long hose to exhaust outlet 2. Connect Vent 1. Tighten and adjust leveling legs Using a 4" (102 mm) clamp, connect the vent to side. Screw on . 7. NOTE: The Steam Dryer water connection may be level for levelness. Dryer vent must be in the dryer. Level Dryer 1. Level Dryer Check that vent is secured to adjust legs up using a wood block. Repeat from water inlet valve. After dryer is turned on coupling by hand until it is clean. Once dryer...
Owners Manual
Page 17
...; Plug into a grounded 3 prong outlet. Do not remove ground prong. Excessive scale buildup may be crushed or blocked. Install and remove base trim (on top of dryer and match the locating pins with a damp cloth to remove any dust. � Refer to see online "Dryer Door Reversal Instructions" for leaks. � Check that you feel for certain part replacement or repair. 17 Do not use an adapter. Do not select Air Only temperature setting. To Remove...
...; Plug into a grounded 3 prong outlet. Do not remove ground prong. Excessive scale buildup may be crushed or blocked. Install and remove base trim (on top of dryer and match the locating pins with a damp cloth to remove any dust. � Refer to see online "Dryer Door Reversal Instructions" for leaks. � Check that you feel for certain part replacement or repair. 17 Do not use an adapter. Do not select Air Only temperature setting. To Remove...

Dimension Guide
Page 1
Dimension Guide Maytag® Dryer with Extra Power and Quick Dry Cycle - 7.4 cu. Electric YMED5630MBK - Electric MGD6630HW - Gas Volcano Black Available MED5630MBK - Gas MGD6630MBK - Gas W11455156B Electric MED6630HW - Electric YMED6630MBK - White Available YMED6630HW - Electric MED6630HC - Electric MGD5630MBK - Electric MGD6630HC - Electric MED6630MBK - ft. Gas Chrome Shadow Available YMED6630HC -
Dimension Guide Maytag® Dryer with Extra Power and Quick Dry Cycle - 7.4 cu. Electric YMED5630MBK - Electric MGD6630HW - Gas Volcano Black Available MED5630MBK - Gas MGD6630MBK - Gas W11455156B Electric MED6630HW - Electric YMED6630MBK - White Available YMED6630HW - Electric MED6630HC - Electric MGD5630MBK - Electric MGD6630HC - Electric MED6630MBK - ft. Gas Chrome Shadow Available YMED6630HC -
Dimension Guide
Page 2
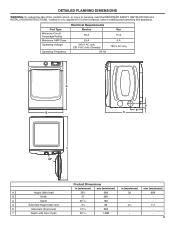
...) 31∕2 89 43∕8 111 E Side Vent (from back) 103∕16 258 - - Fuel Type Minimum Circuit Amperage Rating Maximum AMP Draw Operating Voltage Operating Frequency Electrical Requirements Electric 30 A 24 A 240 V AC only 230 V AC only (Canada) 60 Hz Gas 15 A 6 A 120 V AC only A B D E C F 90º Product Dimensions in (minimum) mm (minimum) in your appliance's Owner's Manual, before installing and operating this appliance.
...) 31∕2 89 43∕8 111 E Side Vent (from back) 103∕16 258 - - Fuel Type Minimum Circuit Amperage Rating Maximum AMP Draw Operating Voltage Operating Frequency Electrical Requirements Electric 30 A 24 A 240 V AC only 230 V AC only (Canada) 60 Hz Gas 15 A 6 A 120 V AC only A B D E C F 90º Product Dimensions in (minimum) mm (minimum) in your appliance's Owner's Manual, before installing and operating this appliance.
Dimension Guide
Page 4
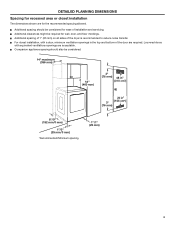
... 1" (25 mm) on all sides of the dryer is recommended to reduce noise transfer. Ƀ For closet installation, with equivalent ventilations openings are required. Louvered doors with a door, minimum ventilation openings in the top and bottom of the door are acceptable. Ƀ Companion appliance spacing should also be required for ease of installation and servicing. Ƀ Additional clearances might be considered. 14...
... 1" (25 mm) on all sides of the dryer is recommended to reduce noise transfer. Ƀ For closet installation, with equivalent ventilations openings are required. Louvered doors with a door, minimum ventilation openings in the top and bottom of the door are acceptable. Ƀ Companion appliance spacing should also be required for ease of installation and servicing. Ƀ Additional clearances might be considered. 14...


