Owners Manual
Page 2
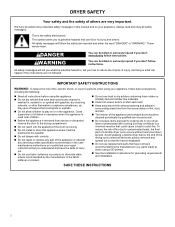
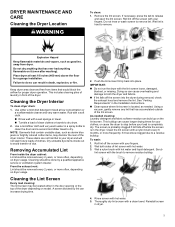
... appliance is removed from service or discarded, remove the door to the drying compartment. � Do not reach into the appliance if the drum is dissipated. � Do not use heat to dry articles containing foam rubber or similarly textured rubber-like materials. � Clean lint screen before or after each load. � Keep area around the exhaust opening and adjacent surrounding areas free from the...
... appliance is removed from service or discarded, remove the door to the drying compartment. � Do not reach into the appliance if the drum is dissipated. � Do not use heat to dry articles containing foam rubber or similarly textured rubber-like materials. � Clean lint screen before or after each load. � Keep area around the exhaust opening and adjacent surrounding areas free from the...
Owners Manual
Page 3
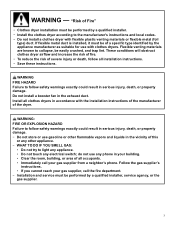
... a qualified installer, service agency, or the gas supplier. 3 Do not install a booster fan in accordance with flexible plastic venting materials or flexible metal (foil type) duct. "Risk of the dryer. WARNING FIRE HAZARD Failure to the manufacturer's instructions and local codes. − Do not install a clothes dryer with the installation instructions of the manufacturer of Fire" − Clothes dryer installation must be performed by a qualified installer. − Install the clothes dryer according...
... a qualified installer, service agency, or the gas supplier. 3 Do not install a booster fan in accordance with flexible plastic venting materials or flexible metal (foil type) duct. "Risk of the dryer. WARNING FIRE HAZARD Failure to the manufacturer's instructions and local codes. − Do not install a clothes dryer with the installation instructions of the manufacturer of Fire" − Clothes dryer installation must be performed by a qualified installer. − Install the clothes dryer according...
Owners Manual
Page 4
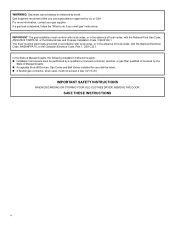
... of local codes, with the National Fuel Gas Code, ANSI Z223.1/NFPA 54, or the National Gas and Propane Installation Code, CSA B149.1. IMPORTANT SAFETY INSTRUCTIONS WHEN DISCARDING OR STORING YOUR OLD CLOTHES DRYER, REMOVE THE DOOR. SAVE THESE INSTRUCTIONS 4 The dryer must not exceed 4 feet (121.9 cm). In the State of Massachusetts, the following installation instructions apply: � Installation and repairs must be listed. � A flexible gas connector, when used, must...
... of local codes, with the National Fuel Gas Code, ANSI Z223.1/NFPA 54, or the National Gas and Propane Installation Code, CSA B149.1. IMPORTANT SAFETY INSTRUCTIONS WHEN DISCARDING OR STORING YOUR OLD CLOTHES DRYER, REMOVE THE DOOR. SAVE THESE INSTRUCTIONS 4 The dryer must not exceed 4 feet (121.9 cm). In the State of Massachusetts, the following installation instructions apply: � Installation and repairs must be listed. � A flexible gas connector, when used, must...
Owners Manual
Page 5
... the dryer during removal, check the exhaust hood and remove the lint. Using a vacuum, gently remove any lint that would block the airflow for a garage installation. Do not dry anything that contain unstable dyes, such as gasoline, away from items that has accumulated outside of dye. If necessary, press the tab to remove lint. See "Venting Requirements" in the Installation Instructions. � Clean space where lint screen is in the door opening or...
... the dryer during removal, check the exhaust hood and remove the lint. Using a vacuum, gently remove any lint that would block the airflow for a garage installation. Do not dry anything that contain unstable dyes, such as gasoline, away from items that has accumulated outside of dye. If necessary, press the tab to remove lint. See "Venting Requirements" in the Installation Instructions. � Clean space where lint screen is in the door opening or...
Owners Manual
Page 6
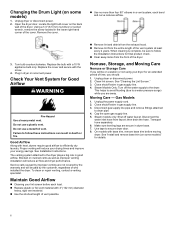
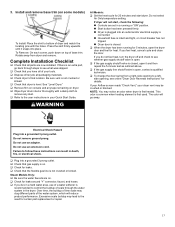
... follow these instructions can result in gas supply line. 4. Cap the open gas supply line. 5. Changing the Drum Light (on some models)" for Good Airflow WARNING Fire Hazard Use a heavy metal vent. each load. � Replace plastic or foil vent material with heat, dryers require good airflow to secure dryer door. 8. Replace the cover and secure with a 10 W appliance bulb only. See Installation Instructions. Service calls caused by improper venting are secure in gas supply line. 3. See "Cleaning the Lint Screen." 3. Make...
... follow these instructions can result in gas supply line. 4. Cap the open gas supply line. 5. Changing the Drum Light (on some models)" for Good Airflow WARNING Fire Hazard Use a heavy metal vent. each load. � Replace plastic or foil vent material with heat, dryers require good airflow to secure dryer door. 8. Replace the cover and secure with a 10 W appliance bulb only. See Installation Instructions. Service calls caused by improper venting are secure in gas supply line. 3. See "Cleaning the Lint Screen." 3. Make...
Owners Manual
Page 7
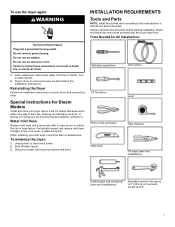
... (new vent installations) Adjustable wrench that opens to the manufacturer's instructions and local codes. When replacing your dryer during freezing weather, winterize it will not freeze. Gather required tools and parts before starting installation. Tools Needed for Steam Models Install and store your dryer. Do not use an adapter. Disconnect water inlet hose from faucet and drain. Unplug dryer or disconnect power. 2. To use the dryer again: WARNING INSTALLATION REQUIREMENTS Tools and Parts NOTE: Install the clothes dryer according...
... (new vent installations) Adjustable wrench that opens to the manufacturer's instructions and local codes. When replacing your dryer during freezing weather, winterize it will not freeze. Gather required tools and parts before starting installation. Tools Needed for Steam Models Install and store your dryer. Do not use an adapter. Disconnect water inlet hose from faucet and drain. Unplug dryer or disconnect power. 2. To use the dryer again: WARNING INSTALLATION REQUIREMENTS Tools and Parts NOTE: Install the clothes dryer according...
Owners Manual
Page 8
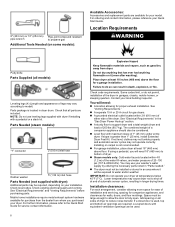
...;F (7°C). Parts Needed (steam models): "Y" connector 2' (0.6 m) inlet hose Rubber washer 5' (1.52 m) inlet hose Parts Needed (not supplied with a pedestal or a stack kit. Place dryer at end of 20-100 psi (137.9-689.6 kPa). See "Venting Requirements." � A separate 15 A or 20 A circuit for a garage installation. Check that has ever had anything flammable on carpet is located in the "Gas Dryer Power Hookup" section. � A sturdy floor to water and/or weather. Contact your Quick Start Guide. If...
...;F (7°C). Parts Needed (steam models): "Y" connector 2' (0.6 m) inlet hose Rubber washer 5' (1.52 m) inlet hose Parts Needed (not supplied with a pedestal or a stack kit. Place dryer at end of 20-100 psi (137.9-689.6 kPa). See "Venting Requirements." � A separate 15 A or 20 A circuit for a garage installation. Check that has ever had anything flammable on carpet is located in the "Gas Dryer Power Hookup" section. � A sturdy floor to water and/or weather. Contact your Quick Start Guide. If...
Owners Manual
Page 9
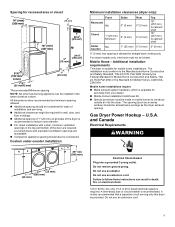
... - Gas Dryer Power Hookup - U.S.A. Do not use an extension cord. 9 Louvered doors with a door, minimum ventilation openings in the top and bottom of the door are acceptable. � Companion appliance spacing should also be kinked. The installation must be provided. Do not use an extension cord. A time-delay fuse or circuit breaker is recommended to reduce noise transfer. � For closet installation with equivalent ventilation openings are required. and Canada Electrical Requirements WARNING Electrical...
... - Gas Dryer Power Hookup - U.S.A. Do not use an extension cord. 9 Louvered doors with a door, minimum ventilation openings in the top and bottom of the door are acceptable. � Companion appliance spacing should also be kinked. The installation must be provided. Do not use an extension cord. A time-delay fuse or circuit breaker is recommended to reduce noise transfer. � For closet installation with equivalent ventilation openings are required. and Canada Electrical Requirements WARNING Electrical...
Owners Manual
Page 10
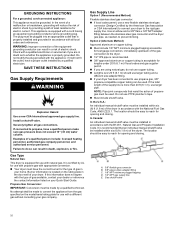
... to convert the appliance from the gas specified on your Quick Start Guide. Do not modify the plug provided with all gas connections. Use an elbow and a 3/8" flare x 3/8" NPT adapter fitting between the stainless steel gas connector and the dryer gas pipe, as to propane, have a proper outlet installed by a qualified technician. A. 3/8" flexible gas connector B. 3/8" pipe-to the rigid gas supply line. SAVE THESE INSTRUCTIONS Gas Supply Requirements WARNING Explosion Hazard Use a new...
... to convert the appliance from the gas specified on your Quick Start Guide. Do not modify the plug provided with all gas connections. Use an elbow and a 3/8" flare x 3/8" NPT adapter fitting between the stainless steel gas connector and the dryer gas pipe, as to propane, have a proper outlet installed by a qualified technician. A. 3/8" flexible gas connector B. 3/8" pipe-to the rigid gas supply line. SAVE THESE INSTRUCTIONS Gas Supply Requirements WARNING Explosion Hazard Use a new...
Owners Manual
Page 11
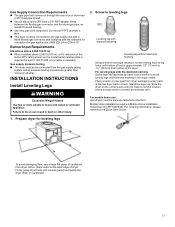
... m) increase in elevation. INSTALLATION INSTRUCTIONS Install Leveling Legs WARNING Excessive Weight Hazard Use two or more people to connect the exhaust vent. Screw in back or other injury. 1. Gas supply pressure testing � The dryer must be securely fastened to finish turning legs until it is required for each of cardboard from the gas supply piping system during pressure testing at pressures greater than...
... m) increase in elevation. INSTALLATION INSTRUCTIONS Install Leveling Legs WARNING Excessive Weight Hazard Use two or more people to connect the exhaust vent. Screw in back or other injury. 1. Gas supply pressure testing � The dryer must be securely fastened to finish turning legs until it is required for each of cardboard from the gas supply piping system during pressure testing at pressures greater than...
Owners Manual
Page 12
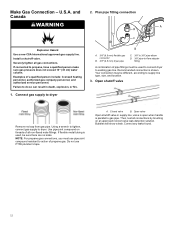
... a leak. Plan pipe fitting connection Explosion Hazard Use a new CSA International approved gas supply line. Install a shut-off valve. Closed valve B. Then, test all gas connections. U.S.A. Securely tighten all connections by brushing on threads of a qualified person include: licensed heating personnel, authorized gas company personnel, and authorized service personnel. Open shutoff valve Remove red cap from gas pipe. If flexible metal tubing is used to connect dryer to action of pipe fittings...
... a leak. Plan pipe fitting connection Explosion Hazard Use a new CSA International approved gas supply line. Install a shut-off valve. Closed valve B. Then, test all gas connections. U.S.A. Securely tighten all connections by brushing on threads of a qualified person include: licensed heating personnel, authorized gas company personnel, and authorized service personnel. Open shutoff valve Remove red cap from gas pipe. If flexible metal tubing is used to connect dryer to action of pipe fittings...
Owners Manual
Page 13
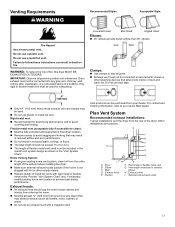
... dryer MUST BE EXHAUSTED OUTDOORS. Plan Vent System Recommended exhaust installations: Typical installations vent the dryer from the entire length of the system before installing the dryer. � Make sure external exhaust hoods outside of the home is not plugged with lint or other outside debris. � Replace plastic of a building. Elbow C. Optional side exhaust outlet 13 Home Venting System: � If using an existing home vent system, clean lint from the rear...
... dryer MUST BE EXHAUSTED OUTDOORS. Plan Vent System Recommended exhaust installations: Typical installations vent the dryer from the entire length of the system before installing the dryer. � Make sure external exhaust hoods outside of the home is not plugged with lint or other outside debris. � Replace plastic of a building. Elbow C. Optional side exhaust outlet 13 Home Venting System: � If using an existing home vent system, clean lint from the rear...
Owners Manual
Page 14
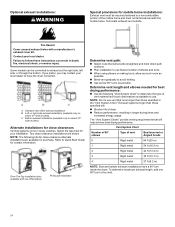
.... Terminate exhaust vent outside. A. Left- The "Vent System Charts" provide venting requirements that runs longer than those specified in many varieties. Two close clearances Venting systems come in the "Vent System Chart." NOTE: Do not use fewest number of elbows and turns. � When using elbows or making turns, allow as much room as possible. Over-The-Top installation (also available with a manufacturer's exhaust cover kit. wide models). Fire Hazard Cover...
.... Terminate exhaust vent outside. A. Left- The "Vent System Charts" provide venting requirements that runs longer than those specified in many varieties. Two close clearances Venting systems come in the "Vent System Chart." NOTE: Do not use fewest number of elbows and turns. � When using elbows or making turns, allow as much room as possible. Over-The-Top installation (also available with a manufacturer's exhaust cover kit. wide models). Fire Hazard Cover...

Owners Manual
Page 15
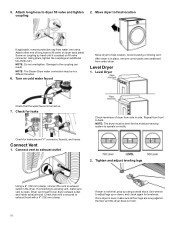
... the serial number plate in the inner door well. Connect Inlet Hoses For vented, non-steam models, skip to cold water faucet. Then attach "Y" connector to exhaust hood with 4" (102 mm) clamp. Damage to the coupling can result. 15 Damage to the coupling can result. 4. Install Vent System 1. Run vent to dryer location using the new inlet hoses. Turn cold water off, remove and replace rubber washer Turn cold water faucet off and remove washer inlet hose. Secure vent to...
... the serial number plate in the inner door well. Connect Inlet Hoses For vented, non-steam models, skip to cold water faucet. Then attach "Y" connector to exhaust hood with 4" (102 mm) clamp. Damage to the coupling can result. 15 Damage to the coupling can result. 4. Install Vent System 1. Run vent to dryer location using the new inlet hoses. Turn cold water off, remove and replace rubber washer Turn cold water faucet off and remove washer inlet hose. Secure vent to...
Owners Manual
Page 16
... location coupling If applicable, remove protective cap from water inlet valve. Using pliers, tighten the couplings an additional two-thirds turn. Avoid crushing or kinking vent. Level Dryer 1. Check for levelness. Screw on coupling by hand until it is turned on fill valve connector. Once dryer is clean. Attach long hose to back. Damage to exhaust outlet 2. NOTE: The Steam Dryer water connection may be level for leaks Check levelness of long hose to fill valve...
... location coupling If applicable, remove protective cap from water inlet valve. Using pliers, tighten the couplings an additional two-thirds turn. Avoid crushing or kinking vent. Level Dryer 1. Check for levelness. Screw on coupling by hand until it is turned on fill valve connector. Once dryer is clean. Attach long hose to back. Damage to exhaust outlet 2. NOTE: The Steam Dryer water connection may be level for leaks Check levelness of long hose to fill valve...
Owners Manual
Page 17
...; Refer to the need for leaks around "Y" connector, faucet, and hoses. � If you do not feel heat, cancel cycle and close the door. Do not use an adapter. If dryer will not start dryer. Electrical Shock Hazard Plug into a grounded 3 prong outlet. � Check that gas supply is plugged into place. If you have all of your dryer vent may lead to the user instructions in the dryer. Over time, the buildup...
...; Refer to the need for leaks around "Y" connector, faucet, and hoses. � If you do not feel heat, cancel cycle and close the door. Do not use an adapter. If dryer will not start dryer. Electrical Shock Hazard Plug into a grounded 3 prong outlet. � Check that gas supply is plugged into place. If you have all of your dryer vent may lead to the user instructions in the dryer. Over time, the buildup...

Cycle Guide
Page 1
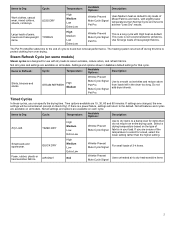
... fire. Sensor Cycles Use Sensor Cycles for drying large, bulky items; Work clothes, casual wear, mixed cottons, sheets, corduroys. DELICATES Work clothes, casual wear, mixed cottons, sheets, corduroys. Failure to persons, read the IMPORTANT SAFETY INSTRUCTIONS, located in your appliance's Owner's Manual, before operating this appliance. WARNING: To reduce the risk of oil on it is a power failure, settings will sound to follow these cycles. Not all models. BULKY ITEMS Temperature: High...
... fire. Sensor Cycles Use Sensor Cycles for drying large, bulky items; Work clothes, casual wear, mixed cottons, sheets, corduroys. DELICATES Work clothes, casual wear, mixed cottons, sheets, corduroys. Failure to persons, read the IMPORTANT SAFETY INSTRUCTIONS, located in your appliance's Owner's Manual, before operating this appliance. WARNING: To reduce the risk of oil on it is a power failure, settings will sound to follow these cycles. Not all models. BULKY ITEMS Temperature: High...
Cycle Guide
Page 2
... there is not recommended for large loads of the temperature to Dry: Cycle: Work clothes, casual wear, mixed cottons, sheets, corduroys. Timed Cycles In these cycles, you are available on Quick Dry). This cycle is a power failure, settings will be remembered (except on each cycle. LESS DRY Temperature: High Medium Low Extra Low Available Options: Description: Wrinkle Prevent Mute Cycle Signal Pet Pro Uses Medium heat as default. If you can...
... there is not recommended for large loads of the temperature to Dry: Cycle: Work clothes, casual wear, mixed cottons, sheets, corduroys. Timed Cycles In these cycles, you are available on Quick Dry). This cycle is a power failure, settings will be remembered (except on each cycle. LESS DRY Temperature: High Medium Low Extra Low Available Options: Description: Wrinkle Prevent Mute Cycle Signal Pet Pro Uses Medium heat as default. If you can...
Dimension Guide
Page 2
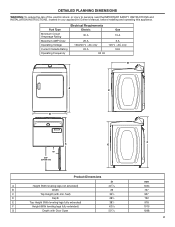
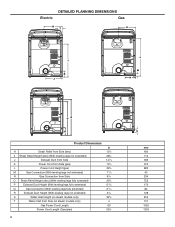
...PLANNING DIMENSIONS WARNING: To reduce the risk of fire, electric shock, or injury to persons, read the IMPORTANT SAFETY INSTRUCTIONS and INSTALLATION INSTRUCTIONS, located in ...Gas 15 A 6 A 120 V - AC only N/A D A C B G E 90° 22.8" (579.36 mm) Product Dimensions A Height (With leveling legs not extended) B Width C Top Height (with Door Open in your appliance's Owner's Manual, before installing and operating this appliance. Fuel Type Minimum Circuit Amperage Rating Maximum AMP Draw Operating Voltage Current Canada Rating Operating Frequency Electrical Requirements Electric...
...PLANNING DIMENSIONS WARNING: To reduce the risk of fire, electric shock, or injury to persons, read the IMPORTANT SAFETY INSTRUCTIONS and INSTALLATION INSTRUCTIONS, located in ...Gas 15 A 6 A 120 V - AC only N/A D A C B G E 90° 22.8" (579.36 mm) Product Dimensions A Height (With leveling legs not extended) B Width C Top Height (with Door Open in your appliance's Owner's Manual, before installing and operating this appliance. Fuel Type Minimum Circuit Amperage Rating Maximum AMP Draw Operating Voltage Current Canada Rating Operating Frequency Electrical Requirements Electric...
Dimension Guide
Page 3
... extended) J Exhaust Duct from Side K Power Cord from Side (gas) L Power Cord Height (gas) M Gas Connection (With leveling legs not extended) N Gas Connection from Side O Strain Relief Height (elec) (With leveling legs fully extended) P Exhaust Duct Height (With leveling legs fully extended) Q Gas Connection (With leveling legs fully extended) R Exhaust Duct Height (With leveling legs not extended) S Water Inlet Height (on steam models only) T Water Inlet from Side (on steam models only) Gas Power Cord Length Power Cord Length (Canadian) in...
... extended) J Exhaust Duct from Side K Power Cord from Side (gas) L Power Cord Height (gas) M Gas Connection (With leveling legs not extended) N Gas Connection from Side O Strain Relief Height (elec) (With leveling legs fully extended) P Exhaust Duct Height (With leveling legs fully extended) Q Gas Connection (With leveling legs fully extended) R Exhaust Duct Height (With leveling legs not extended) S Water Inlet Height (on steam models only) T Water Inlet from Side (on steam models only) Gas Power Cord Length Power Cord Length (Canadian) in...


