
Use and Care Guide
Page 4
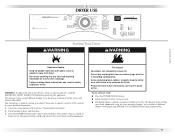
... absence of the dryer and exhaust vent should be electrically grounded in accordance with local codes, or in your dryer. IMPORTANT SAFETY INSTRUCTIONS WARNING: To reduce the risk of fire, electric shock, or injury to dry articles containing foam rubber or similarly textured rubber-like materials. ■ Clean lint screen before using a ball valve, it shall be a T-handle type. ■ A flexible gas connector, when used, must not exceed...
... absence of the dryer and exhaust vent should be electrically grounded in accordance with local codes, or in your dryer. IMPORTANT SAFETY INSTRUCTIONS WARNING: To reduce the risk of fire, electric shock, or injury to dry articles containing foam rubber or similarly textured rubber-like materials. ■ Clean lint screen before using a ball valve, it shall be a T-handle type. ■ A flexible gas connector, when used, must not exceed...
Use and Care Guide
Page 5
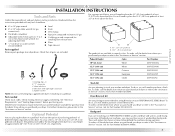
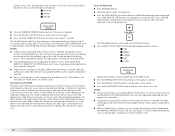
... from dryer drum. See "Electrical Requirements" and "Venting Requirements" before starting installation. To do so, you purchased your PERFORMANCE SERIES dryer? Read and follow the instructions provided with right-angle connector E. You will need to purchase a Door Reversal Kit. Rubber washer NOTE: Do not use leveling legs supplied with drawer. A B A. 10" (25.4 cm) pedestal B. 15.5" (39.4 cm) pedestal The pedestals are included. Ask for Part Number 8558694 (White). 5 For further information, please refer to LP gas...
... from dryer drum. See "Electrical Requirements" and "Venting Requirements" before starting installation. To do so, you purchased your PERFORMANCE SERIES dryer? Read and follow the instructions provided with right-angle connector E. You will need to purchase a Door Reversal Kit. Rubber washer NOTE: Do not use leveling legs supplied with drawer. A B A. 10" (25.4 cm) pedestal B. 15.5" (39.4 cm) pedestal The pedestals are included. Ask for Part Number 8558694 (White). 5 For further information, please refer to LP gas...

Use and Care Guide
Page 6
... from dryer. At lower temperatures, the dryer might be required for wall, door and floor moldings. „ Additional spacing should be considered for ease of installation and servicing. „ Additional clearances might not shut off at least 18" (46 cm) above the floor for the exhaust vent with a door, minimum ventilation openings in the top and bottom of the door are using a power supply cord, a grounded electrical outlet located...
... from dryer. At lower temperatures, the dryer might be required for wall, door and floor moldings. „ Additional spacing should be considered for ease of installation and servicing. „ Additional clearances might not shut off at least 18" (46 cm) above the floor for the exhaust vent with a door, minimum ventilation openings in the top and bottom of the door are using a power supply cord, a grounded electrical outlet located...
Use and Care Guide
Page 9
... a different size adapter fitting. „ If your dryer has been converted to the dryer. If the total length of the supply line is located on the model/serial rating plate for opening and closing . The location should be easy to reach for use with the B149.1, Natural Gas and Propane Installation Code. Gas shutoff valve †®TEFLON is recommended that resist the action of the dryer in the door well of...
... a different size adapter fitting. „ If your dryer has been converted to the dryer. If the total length of the supply line is located on the model/serial rating plate for opening and closing . The location should be easy to reach for use with the B149.1, Natural Gas and Propane Installation Code. Gas shutoff valve †®TEFLON is recommended that resist the action of the dryer in the door well of...

Use and Care Guide
Page 10
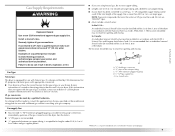
... best drying performance, rigid metal vents are recommended. „ Rigid metal vent is not plugged with lint. „ Replace any gas vent, chimney, wall, ceiling or a concealed space of the burner Btu rating shown on the pedestal model. A 1½" (3.8 cm) A. ½" NPT gas supply line B. 3/8" NPT dryer pipe *NOTE: If the dryer is mounted on a pedestal, the gas pipe height must be connected to the gas supply line with a listed flexible gas connector that comes out...
... best drying performance, rigid metal vents are recommended. „ Rigid metal vent is not plugged with lint. „ Replace any gas vent, chimney, wall, ceiling or a concealed space of the burner Btu rating shown on the pedestal model. A 1½" (3.8 cm) A. ½" NPT gas supply line B. 3/8" NPT dryer pipe *NOTE: If the dryer is mounted on a pedestal, the gas pipe height must be connected to the gas supply line with a listed flexible gas connector that comes out...

Use and Care Guide
Page 11
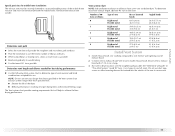
...snow line, etc.). „ Do not use duct tape. B A 4" (10.2 cm) 4" (10.2 cm) A. Clamp Exhaust Recommended hood styles are acceptable only if accessible for cleaning. „ Flexible metal vent must be connected or secured with a magnetic latch. Good Better Clamps „ Use clamps to seal all joints. „ Exhaust vent ... style (shown here) is in its final location. „ Remove excess flexible metal vent to avoid sagging and kinking that may result in reduced airflow and poor performance. „ Do not install flexible metal vent in : Moisture damage to keep rodents and insects...
...snow line, etc.). „ Do not use duct tape. B A 4" (10.2 cm) 4" (10.2 cm) A. Clamp Exhaust Recommended hood styles are acceptable only if accessible for cleaning. „ Flexible metal vent must be connected or secured with a magnetic latch. Good Better Clamps „ Use clamps to seal all joints. „ Exhaust vent ... style (shown here) is in its final location. „ Remove excess flexible metal vent to avoid sagging and kinking that may result in reduced airflow and poor performance. „ Do not install flexible metal vent in : Moisture damage to keep rodents and insects...
Use and Care Guide
Page 13
... terminate beneath the mobile home. Avoid 90º turns. The Vent system chart provides venting requirements that will provide the straightest and most direct path outdoors. „ Plan the installation to use vent runs longer than those specified in the Vent system chart. Secure vent to achieve the best drying performance. Number of 90º turns or elbows Type of the dryer. „ Reduce performance, resulting in "Plan Vent System." Connect vent...
... terminate beneath the mobile home. Avoid 90º turns. The Vent system chart provides venting requirements that will provide the straightest and most direct path outdoors. „ Plan the installation to use vent runs longer than those specified in the Vent system chart. Secure vent to achieve the best drying performance. Number of 90º turns or elbows Type of the dryer. „ Reduce performance, resulting in "Plan Vent System." Connect vent...

Use and Care Guide
Page 15
... directly to the gas pipe. Screw on coupling by brushing on faucet. 4. Attach washer cold inlet hose to fill valve at bottom of "Y" connector. A A. The dryer vent must be used. Check that there are on connector. 6. Remove old rubber washer from inlet hose and replace with Step 3. 3. NOTE: Do not overtighten. Continue with new rubber washer provided. Attach angled end of long hose to other end of dryer back panel...
... directly to the gas pipe. Screw on coupling by brushing on faucet. 4. Attach washer cold inlet hose to fill valve at bottom of "Y" connector. A A. The dryer vent must be used. Check that there are on connector. 6. Remove old rubber washer from inlet hose and replace with Step 3. 3. NOTE: Do not overtighten. Continue with new rubber washer provided. Attach angled end of long hose to other end of dryer back panel...

Use and Care Guide
Page 16
... water faucets are now installed. Wipe the dryer drum interior thoroughly with a damp cloth to follow these instructions can result in a running for heat. Be sure the vent is first heated. WARNING 12. Do not use an extension cord. Do not use an adapter. Turn on . 9. Use a wrench to control the buildup of /recycle all parts are on power. 7. Check that the dryer is closed , open it, then repeat the 5-minute test...
... water faucets are now installed. Wipe the dryer drum interior thoroughly with a damp cloth to follow these instructions can result in a running for heat. Be sure the vent is first heated. WARNING 12. Do not use an extension cord. Do not use an adapter. Turn on . 9. Use a wrench to control the buildup of /recycle all parts are on power. 7. Check that the dryer is closed , open it, then repeat the 5-minute test...
Use and Care Guide
Page 17
... preset settings and drying time for more detailed information. 1. Your dryer may not have all Sensor Cycles. Press the POWER/CANCEL button then rotate the dial to select either a Sensor, Timed, or Steam Cycle. Place laundry in death, explosion, or fire. Fire Hazard No washer can result in dryer and shut door. 3. Do not dry anything that has ever had anything that has ever had any type of energy.
... preset settings and drying time for more detailed information. 1. Your dryer may not have all Sensor Cycles. Press the POWER/CANCEL button then rotate the dial to select either a Sensor, Timed, or Steam Cycle. Place laundry in death, explosion, or fire. Fire Hazard No washer can result in dryer and shut door. 3. Do not dry anything that has ever had anything that has ever had any type of energy.
Use and Care Guide
Page 18
..., or Less Dry automatically adjusts the dryness level at which advances the cycle as they tumble. To use a Timed Cycle „ Press POWER/CANCEL. „ Rotate the dial to each feature will glow yellow when the feature is selected. The light will shut off. An electronic control determines the load type to set the end of drying time and enhances fabric care. Temperature settings can change the settings for Sensor Cycles.
..., or Less Dry automatically adjusts the dryness level at which advances the cycle as they tumble. To use a Timed Cycle „ Press POWER/CANCEL. „ Rotate the dial to each feature will glow yellow when the feature is selected. The light will shut off. An electronic control determines the load type to set the end of drying time and enhances fabric care. Temperature settings can change the settings for Sensor Cycles.
Use and Care Guide
Page 19
... the Control Lock feature when dryer is especially important for 3 seconds. The control is locked when a single beep is heard and the Control Lock light is on your settings to avoid unintended use the Control Lock feature to reduce wrinkling. If a Sensor Cycle is running : Press and hold START/PAUSE button until the control is on the load size and dryness level. Cycle tips „ Dry most loads using the Air Dry setting. Press TIME ADJUST, and the time will change by...
... the Control Lock feature when dryer is especially important for 3 seconds. The control is locked when a single beep is heard and the Control Lock light is on your settings to avoid unintended use the Control Lock feature to reduce wrinkling. If a Sensor Cycle is running : Press and hold START/PAUSE button until the control is on the load size and dryness level. Cycle tips „ Dry most loads using the Air Dry setting. Press TIME ADJUST, and the time will change by...

Use and Care Guide
Page 21
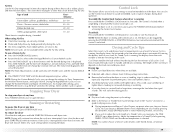
... into the dryer drum after a Sensor Cycle. The dryer will vary depending on a Low temperature setting. You can be dried using Timed Dry on load type and load size. Quick Dry Use this cycle to tumble at Regular heat for drying small loads or loads that need a short drying time. NOTE: Results may vary depending on the clothes. Use of tumbling with Sensor Cycles Dryness (Normal) setting. Steam Preset Cycle Settings Timed Cycles Load Type Default Temperature* Default Time (Minutes)* RAPID REFRESH Regular 15 Helps to smooth out wrinkles and...
... into the dryer drum after a Sensor Cycle. The dryer will vary depending on a Low temperature setting. You can be dried using Timed Dry on load type and load size. Quick Dry Use this cycle to tumble at Regular heat for drying small loads or loads that need a short drying time. NOTE: Results may vary depending on the clothes. Use of tumbling with Sensor Cycles Dryness (Normal) setting. Steam Preset Cycle Settings Timed Cycles Load Type Default Temperature* Default Time (Minutes)* RAPID REFRESH Regular 15 Helps to smooth out wrinkles and...
Use and Care Guide
Page 22
... time by the current drying setting. 3. NOTE: While cycling through the settings, the current setting will not flash, but the other settings will turn the alarm on until the dryer door has been open the door to different installations, environmental conditions or personal preference. The dryer will beep, and "CF" will be adjusted to adapt to stop the dryer, rearrange the load inside the dryer drum. When the dryer is not running . 2. Changing Cycles...
... time by the current drying setting. 3. NOTE: While cycling through the settings, the current setting will not flash, but the other settings will turn the alarm on until the dryer door has been open the door to different installations, environmental conditions or personal preference. The dryer will beep, and "CF" will be adjusted to adapt to stop the dryer, rearrange the load inside the dryer drum. When the dryer is not running . 2. Changing Cycles...
Use and Care Guide
Page 24
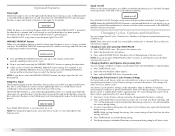
... cause overheating and damage to remove. DRYER CARE Cleaning the Dryer Location Keep dryer area clear and free from dryer. The screen is probably clogged if lint falls off while the screen is hard to both sides of clean cloths or towels to remove lint. See "Venting Requirements." Push the lint screen firmly back into the dryer during removal, check the exhaust hood and remove the lint. This buildup can increase drying time. Wet lint is in death, explosion...
... cause overheating and damage to remove. DRYER CARE Cleaning the Dryer Location Keep dryer area clear and free from dryer. The screen is probably clogged if lint falls off while the screen is hard to both sides of clean cloths or towels to remove lint. See "Venting Requirements." Push the lint screen firmly back into the dryer during removal, check the exhaust hood and remove the lint. This buildup can increase drying time. Wet lint is in death, explosion...
Use and Care Guide
Page 25
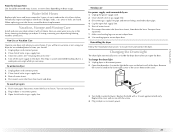
... 4. Plug in gas supply line. 3. Clean lint screen. When replacing your dryer. Reconnect water inlet hose to locate, level and connect the dryer. Disconnect gas supply line pipe and remove fittings attached to reduce the risk of the cover. Remove the cover. 3. Close shutoff valve in dryer or reconnect power. 25 Shut off water faucet. 4. Unplug dryer or disconnect power. 2. Non-Use or Vacation Care Operate your dryer for an extended period of use dryer again 1. Unplug the power supply cord. 2. To change the drum light 1. Water Inlet Hoses...
... 4. Plug in gas supply line. 3. Clean lint screen. When replacing your dryer. Reconnect water inlet hose to locate, level and connect the dryer. Disconnect gas supply line pipe and remove fittings attached to reduce the risk of the cover. Remove the cover. 3. Close shutoff valve in dryer or reconnect power. 25 Shut off water faucet. 4. Unplug dryer or disconnect power. 2. Non-Use or Vacation Care Operate your dryer for an extended period of use dryer again 1. Unplug the power supply cord. 2. To change the drum light 1. Water Inlet Hoses...

Use and Care Guide
Page 26
... the drum for 2-5 seconds. See the Installation Instructions. „ Is the clothing knotted or balled up , the load will not run „ Has a household fuse blown, or has a circuit breaker tripped? Depending on the gas supply line? Replace the fuse or reset the circuit breaker. If the problem continues, call an electrician. „ Is the valve open on the length of the dryer? Clean out pockets before laundering. „ Is it a gas dryer? http://maytag...
... the drum for 2-5 seconds. See the Installation Instructions. „ Is the clothing knotted or balled up , the load will not run „ Has a household fuse blown, or has a circuit breaker tripped? Depending on the gas supply line? Replace the fuse or reset the circuit breaker. If the problem continues, call an electrician. „ Is the valve open on the length of the dryer? Clean out pockets before laundering. „ Is it a gas dryer? http://maytag...

Use and Care Guide
Page 27
... do not feel air movement, clean exhaust system of garments being dried. The front of the dryer requires a minimum of 1" (2.5 cm) of airspace, and, for the types of lint or replace exhaust vent with temperature below 45ºF (7ºC)? Separate the load to dry quickly? Failure to check air movement. See the Installation Instructions. „ Is the exhaust vent diameter the correct size? Select the right temperature for most installations, the rear of dryer cycles requires temperatures above the floor...
... do not feel air movement, clean exhaust system of garments being dried. The front of the dryer requires a minimum of 1" (2.5 cm) of airspace, and, for the types of lint or replace exhaust vent with temperature below 45ºF (7ºC)? Separate the load to dry quickly? Failure to check air movement. See the Installation Instructions. „ Is the exhaust vent diameter the correct size? Select the right temperature for most installations, the rear of dryer cycles requires temperatures above the floor...
Use and Care Guide
Page 28
... properly used for air movement. Loads are caused by dyes in clothing (usually blue jeans). Change the dryness level setting on load „ Is the lint screen clogged? Lint on Sensor Cycles. Drum stains are wrinkled „ Was the load removed from dryer at the beginning of the cycle. Failure to do so can result in a cycle. Check for the first time? Select the Custom Refresh Cycle to tumble the load with water and heat...
... properly used for air movement. Loads are caused by dyes in clothing (usually blue jeans). Change the dryness level setting on load „ Is the lint screen clogged? Lint on Sensor Cycles. Drum stains are wrinkled „ Was the load removed from dryer at the beginning of the cycle. Failure to do so can result in a cycle. Check for the first time? Select the Custom Refresh Cycle to tumble the load with water and heat...

Use and Care Guide
Page 30
... original model/serial numbers that is used in the country in -warranty service. Proof of your major appliance, unless such damage results from the date of purchase or installation date for other damage to published user or operator instructions and/or installation instructions. 4. Service calls to refrigerator or freezer product failures. 8. After checking "Troubleshooting," you ever need service, first see the "Troubleshooting" section of repair or replacement under this limited warranty...
... original model/serial numbers that is used in the country in -warranty service. Proof of your major appliance, unless such damage results from the date of purchase or installation date for other damage to published user or operator instructions and/or installation instructions. 4. Service calls to refrigerator or freezer product failures. 8. After checking "Troubleshooting," you ever need service, first see the "Troubleshooting" section of repair or replacement under this limited warranty...


