
Use and Care Guide
Page 1
MAYFAG Gas Range Tabl Important Safety instructions 1-4 Surface Cooking 5-8 Surface Controls Sealed Gas Burners Form No. C/05/05 Oven Cooking 7-1 8 Manual Cleon Oven Controls CHock Baking Timer Broiling Manual Clean Oven }(nob Control Baking Broiling Self=Clean Oven Controls CHock Timer Baking Keep Warm Cook & Hold Broiling Dday Bake Oven Racks Pall: No. 8113P512 60 Care & Cleaning Stir-Clean Oven Cleaning Procedures t 9-22 Maintenance Oven Whldow & Light Removal of Gas Appliance 23-24 TtoubJeshooting 25-26 Warranty & Service 27 Guide d'ntilisation ...
MAYFAG Gas Range Tabl Important Safety instructions 1-4 Surface Cooking 5-8 Surface Controls Sealed Gas Burners Form No. C/05/05 Oven Cooking 7-1 8 Manual Cleon Oven Controls CHock Baking Timer Broiling Manual Clean Oven }(nob Control Baking Broiling Self=Clean Oven Controls CHock Timer Baking Keep Warm Cook & Hold Broiling Dday Bake Oven Racks Pall: No. 8113P512 60 Care & Cleaning Stir-Clean Oven Cleaning Procedures t 9-22 Maintenance Oven Whldow & Light Removal of Gas Appliance 23-24 TtoubJeshooting 25-26 Warranty & Service 27 Guide d'ntilisation ...

Use and Care Guide
Page 2
... anti.tip device, Use appliance only for future reference. Common sense, caution, and care must be exercised when installing, maintaining, or operating the appliance. Always contact the manufacturer about problems or conditions you the location of the oven door, the appliance mest be performed by a qnalified installer, service agency or the #as described in this gnide is specifically recommended in this guide. and use any part...
... anti.tip device, Use appliance only for future reference. Common sense, caution, and care must be exercised when installing, maintaining, or operating the appliance. Always contact the manufacturer about problems or conditions you the location of the oven door, the appliance mest be performed by a qnalified installer, service agency or the #as described in this gnide is specifically recommended in this guide. and use any part...

Use and Care Guide
Page 3
... on backguard 0f a range. Keep area around appliance clear and free from parts of air flow to the burner prevents proper performance and increases carbon monoxide emission to the appliance, and serious !nJur!es. NEVER allow children to the vent or a lighted surface burner. To eliminate the hazard of Fire Turn off , do not use appliance as they have had sufficient time to...
... on backguard 0f a range. Keep area around appliance clear and free from parts of air flow to the burner prevents proper performance and increases carbon monoxide emission to the appliance, and serious !nJur!es. NEVER allow children to the vent or a lighted surface burner. To eliminate the hazard of Fire Turn off , do not use appliance as they have had sufficient time to...

Use and Care Guide
Page 4
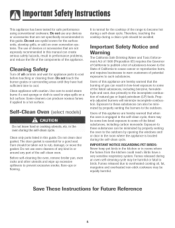
Cooking Safety Always place a pan on . Always adjust surface burner flame so that the burner has ignited. Pressure build-up greasy spills as soon as directed in or near the vent opening the oven door. NEVER use a dry, sturdy potholder. Otherpotentiallyhotsurfacesinclude cooktop, areas facing the cooktop, oven vent, surfaces near the appliance, hood or vent fan. Make sure the correct burner is hazardous, wastes energy and may cause container to burst resulting in serious personal...
Cooking Safety Always place a pan on . Always adjust surface burner flame so that the burner has ignited. Pressure build-up greasy spills as soon as directed in or near the vent opening the oven door. NEVER use a dry, sturdy potholder. Otherpotentiallyhotsurfacesinclude cooktop, areas facing the cooktop, oven vent, surfaces near the appliance, hood or vent fan. Make sure the correct burner is hazardous, wastes energy and may cause container to burst resulting in serious personal...
Use and Care Guide
Page 5
... the kitchen or in the room where the appliance is located during an oven self-cbaning cycle may be equally harmful Save These instructions for the cooktop of natural gas or liquid petroleum (LP} fuels. Do not touch the burner grates or surrounding areas until they have a very sensitive respiratory system. Users of the listed substances, including carbon monoxide. Before self-cleaning the oven, remove broiler pan, oven racks and...
... the kitchen or in the room where the appliance is located during an oven self-cbaning cycle may be equally harmful Save These instructions for the cooktop of natural gas or liquid petroleum (LP} fuels. Do not touch the burner grates or surrounding areas until they have a very sensitive respiratory system. Users of the listed substances, including carbon monoxide. Before self-cleaning the oven, remove broiler pan, oven racks and...
Use and Care Guide
Page 6
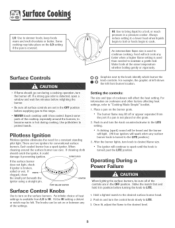
... a lighted match to the desired level. 5 An intermediate flame size is not placed on or between any surface burner knob is detected, open a window and wait five minutes before supplying gas to Hi. Expect some parts of cookware will be felt. Use potholders to LmTE. 3. the small port beneath tl}e __IGNITOR ignitor using a straight pit,. Push in and turn the control knob slowly to protect hands Pilotless ignition...
... a lighted match to the desired level. 5 An intermediate flame size is not placed on or between any surface burner knob is detected, open a window and wait five minutes before supplying gas to Hi. Expect some parts of cookware will be felt. Use potholders to LmTE. 3. the small port beneath tl}e __IGNITOR ignitor using a straight pit,. Push in and turn the control knob slowly to protect hands Pilotless ignition...

Use and Care Guide
Page 7
...[thg chocolate= BTU ratings will not seep underneath the cooktop. However, the burner should be blue with standard gas burners, this occurs, turn the knob to order, Seamed Burners The sealed burners of the cooktop= o A propedy adjusted burner with dean ports will light within a few seconds. [f using LP gas. Since the burners are available for largequantity' cooking. " The flame should be removed. Optional Removeab[e porcelain covered drip pans are seaHedinto the cooktop, boilovers or...
...[thg chocolate= BTU ratings will not seep underneath the cooktop. However, the burner should be blue with standard gas burners, this occurs, turn the knob to order, Seamed Burners The sealed burners of the cooktop= o A propedy adjusted burner with dean ports will light within a few seconds. [f using LP gas. Since the burners are available for largequantity' cooking. " The flame should be removed. Optional Removeab[e porcelain covered drip pans are seaHedinto the cooktop, boilovers or...

Use and Care Guide
Page 11
... includes model specific features. (Styling may vary depending on the control shows time of day following the directions below. Sets HJor LO broil Sets Timer. TJlqqer G H 1 J The control panel is supplied or after pressing the More+ or Lesspad, the time or temperature will return to set at a later time. Use to enter time or temperature. , A beep will sound when any pad is set time-of day when another time function is showing, press the Clock...
... includes model specific features. (Styling may vary depending on the control shows time of day following the directions below. Sets HJor LO broil Sets Timer. TJlqqer G H 1 J The control panel is supplied or after pressing the More+ or Lesspad, the time or temperature will return to set at a later time. Use to enter time or temperature. , A beep will sound when any pad is set time-of day when another time function is showing, press the Clock...

Use and Care Guide
Page 20
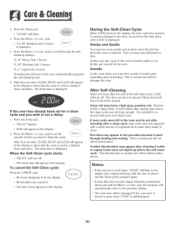
... the oven. Turn off the oven light before a selfclean cycle. - CL-M" (Medium Soil, 3 hours) CL-L" (Light Soil+2 hours) Choosing the soil level of the respective manufacturers. 19 This prevents excessive smoking, flare-ups or flaming during a clean cycle. , Do not use cemmercial oven cleaners on during the clean cycle. {The gasket is displayed + Avoid touching cooktop, door. After four seconds, the oven will start cleaning. , The cleaning time will start...
... the oven. Turn off the oven light before a selfclean cycle. - CL-M" (Medium Soil, 3 hours) CL-L" (Light Soil+2 hours) Choosing the soil level of the respective manufacturers. 19 This prevents excessive smoking, flare-ups or flaming during a clean cycle. , Do not use cemmercial oven cleaners on during the clean cycle. {The gasket is displayed + Avoid touching cooktop, door. After four seconds, the oven will start cleaning. , The cleaning time will start...
Use and Care Guide
Page 21
... More+ or Less- If the oven has already been set for a clean cycle and you may also occur if the oven is dispiayed. mfoven racks were left to the door, do not slide , "DELAY" flashes. , 00:00 will be removed during the next clean cycb. 1. 3. To prevent damage to unlock. This is normal and will appear in the dispiay. The delay time is displayed.
... More+ or Less- If the oven has already been set for a clean cycle and you may also occur if the oven is dispiayed. mfoven racks were left to the door, do not slide , "DELAY" flashes. , 00:00 will be removed during the next clean cycb. 1. 3. To prevent damage to unlock. This is normal and will appear in the dispiay. The delay time is displayed.

Use and Care Guide
Page 22
... surface and may crack or chip with warm soapy water, rinse and dry. Cleaning Procedures or cleaning. This is correct!y replaced. , Brand names are registered trademarks of range. If the cleaner does enter the ports, clean with alumit_um foil as baking soda paste or Ban Ami*. Wearing rubber gloves, remove from seeping into burner ports. ° Use care when cleaning the ignitor. Storage Drawer, Lower Broiler Door...
... surface and may crack or chip with warm soapy water, rinse and dry. Cleaning Procedures or cleaning. This is correct!y replaced. , Brand names are registered trademarks of range. If the cleaner does enter the ports, clean with alumit_um foil as baking soda paste or Ban Ami*. Wearing rubber gloves, remove from seeping into burner ports. ° Use care when cleaning the ignitor. Storage Drawer, Lower Broiler Door...
Use and Care Guide
Page 24
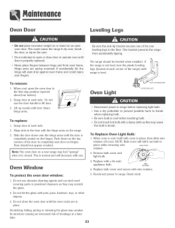
... first stop position (opened about four inches}. 2. Remove bulb cover and light bulb. Oven Window 3. Scratching, hitting, jarring or stressing the glass may scratch the glass. 2. This is normal and will slam shut against oven frame and could cause the range to hands To replace: 1. BULBCOVER 2. Replace bulb cover and secure with pots, pans, furniture, toys, or other objects. 3. Do not close door or operate oven until the oven racks are spnng mounted...
... first stop position (opened about four inches}. 2. Remove bulb cover and light bulb. Oven Window 3. Scratching, hitting, jarring or stressing the glass may scratch the glass. 2. This is normal and will slam shut against oven frame and could cause the range to hands To replace: 1. BULBCOVER 2. Replace bulb cover and secure with pots, pans, furniture, toys, or other objects. 3. Do not close door or operate oven until the oven racks are spnng mounted...
Use and Care Guide
Page 26
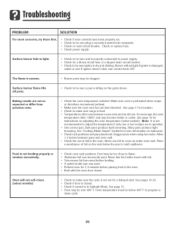
... foil in question. , Use correct pan. If ignitor doesn't chick, turn controHknob OFF. See page 15 for instructions on the grate above. Check or repHacefuse. , Check power suppHy. Stagger pans when using two racks. Food is preheated when recipe or directions recommend preheat. , Make sure the oven vent has not been blocked. Surface burner flame lifts off ports. , Check to program a clean cycle. 25 PROBLEM SOLUTION For most concerns...
... foil in question. , Use correct pan. If ignitor doesn't chick, turn controHknob OFF. See page 15 for instructions on the grate above. Check or repHacefuse. , Check power suppHy. Stagger pans when using two racks. Food is preheated when recipe or directions recommend preheat. , Make sure the oven vent has not been blocked. Surface burner flame lifts off ports. , Check to program a clean cycle. 25 PROBLEM SOLUTION For most concerns...

Use and Care Guide
Page 27
... reset the clean cycle. Press the CANCEL pad and allow the oven to the appliance and call an authorized servicer. ° If the oven is heavily soiled, excessive flareups may result in Sabbath Mode. Oven interior is normal when cooking foods high in the display to cool after semf-cmeancycme (semect modems). Use a self-clean cycle. If BAKE or LOCK appear in Sabbath Mode. This is an error...
... reset the clean cycle. Press the CANCEL pad and allow the oven to the appliance and call an authorized servicer. ° If the oven is heavily soiled, excessive flareups may result in Sabbath Mode. Oven interior is normal when cooking foods high in the display to cool after semf-cmeancycme (semect modems). Use a self-clean cycle. If BAKE or LOCK appear in Sabbath Mode. This is an error...

Use and Care Guide
Page 28
... been removed, altered, or cannot be repaired or replaced free of your Use and Care Guide or calI Maytag ServicessM,Maytag Customer Assistance at 1-800-888-9900 U.S.A. or 1-800-888-2002 Canada. Should you Need Service Firstsee the Troubleshooting section in your appliance. A clear description of these warranties. Correct instaIIation errors. b. d. e. Use and Care guides, service manuals and parts information are the ONLY warrantiesprovided bv the manubcture_ Thiswarran_ glves you specific...
... been removed, altered, or cannot be repaired or replaced free of your Use and Care Guide or calI Maytag ServicessM,Maytag Customer Assistance at 1-800-888-9900 U.S.A. or 1-800-888-2002 Canada. Should you Need Service Firstsee the Troubleshooting section in your appliance. A clear description of these warranties. Correct instaIIation errors. b. d. e. Use and Care guides, service manuals and parts information are the ONLY warrantiesprovided bv the manubcture_ Thiswarran_ glves you specific...

Installation Manual
Page 1
...; INSTALL ANTI-TIP DEVICES PACKED WITH RANGE. • FOLLOW ALL INSTALLATION INSTRUCTIONS. INSTALLER: LEAVE THESE INSTRUCTIONS WITH THE APPLIANCE INSTALLATION MANUAL 'Gas 30-inch Wide Free-standingRange PLEASE KEEP THIS MANUAL FOR FUTURE REFERENCE THE MANUAL IS INTENDED TO ASSIST IN THE INITIAL INSTALLATION AND ADJUSTMENTS OF THE RANGE. National Fuel Gas Code or in mobile homes when they are protected with fireproof materials in accordance with the requirements of range can be installed...
...; INSTALL ANTI-TIP DEVICES PACKED WITH RANGE. • FOLLOW ALL INSTALLATION INSTRUCTIONS. INSTALLER: LEAVE THESE INSTRUCTIONS WITH THE APPLIANCE INSTALLATION MANUAL 'Gas 30-inch Wide Free-standingRange PLEASE KEEP THIS MANUAL FOR FUTURE REFERENCE THE MANUAL IS INTENDED TO ASSIST IN THE INITIAL INSTALLATION AND ADJUSTMENTS OF THE RANGE. National Fuel Gas Code or in mobile homes when they are protected with fireproof materials in accordance with the requirements of range can be installed...
Installation Manual
Page 3
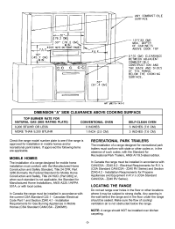
...). iI ' ART _9215-143-0 DIMENSION "A" SIDE CLEARANCE ABOVE COOKING SURFACE TOP BURNER RATE FOR NATURAL GAS (SEE RATING PLATE) 9,200 BTU/HR OR LESS MORE THAN 9,200 BTU/HR CONVENTIONAL OVEN 0 INCHES 1 INCH (2.5 CM) SELF-CLEAN OVEN 3 INCHES (7.6 CM) 3 INCHES (7.6 CM) Check the range model number plate to strong drafts. In Canada the range must be installed in accordance with CAN/CSA - MOBILE HOMES The installation of a range designed for Propane Appliances and Equipment in Mobile...
...). iI ' ART _9215-143-0 DIMENSION "A" SIDE CLEARANCE ABOVE COOKING SURFACE TOP BURNER RATE FOR NATURAL GAS (SEE RATING PLATE) 9,200 BTU/HR OR LESS MORE THAN 9,200 BTU/HR CONVENTIONAL OVEN 0 INCHES 1 INCH (2.5 CM) SELF-CLEAN OVEN 3 INCHES (7.6 CM) 3 INCHES (7.6 CM) Check the range model number plate to strong drafts. In Canada the range must be installed in accordance with CAN/CSA - MOBILE HOMES The installation of a range designed for Propane Appliances and Equipment in Mobile...

Installation Manual
Page 5
Canadian Electrical Code Part 1. GAS SUPPLY Installation of the gas valves or controls and clog burners and/or pilot orifices. NATURAL GAS SUPPLY LINE MUST HAVE A NATURAL GAS SERVICE REGULATOR. THE CONNECTORS MUST BE INSTALLED WITH ADAPTORS PROVIDED WITH THE CONNECTOR. Before connecting range, apply pipe thread compound approved for . See rating plate for type of gas range has been manufactured for LPG to the instructions given in turn cause failure of this plug. , WARNING DISCONNECT ELECTRICAL SUPPLY BEFORE SERVICING THE APPLIANCE. Leak...
Canadian Electrical Code Part 1. GAS SUPPLY Installation of the gas valves or controls and clog burners and/or pilot orifices. NATURAL GAS SUPPLY LINE MUST HAVE A NATURAL GAS SERVICE REGULATOR. THE CONNECTORS MUST BE INSTALLED WITH ADAPTORS PROVIDED WITH THE CONNECTOR. Before connecting range, apply pipe thread compound approved for . See rating plate for type of gas range has been manufactured for LPG to the instructions given in turn cause failure of this plug. , WARNING DISCONNECT ELECTRICAL SUPPLY BEFORE SERVICING THE APPLIANCE. Leak...
Installation Manual
Page 6
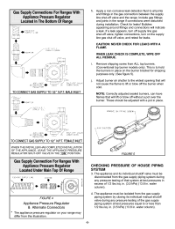
... flame to all joints and fittings in . The appliance and its individual manual shutoff valve during installation. in. (3.5 kPa) (13.8 in the gas connection between the supply line shut-off valve and the range. FEMALE INLET WHEN THE INSTALLER HAS COMPLETED INSTALLATION OF THE APPLIANCE, LEAVE THE APPLIANCE PRESSURE REGULATOR SHUT-OFF VALVE IN THE "ON" POSITION. water column). j, Adjust burner air shutter to the widest opening that will indicate a leak. ! / // / TO CONNECT GAS SUPPLY...
... flame to all joints and fittings in . The appliance and its individual manual shutoff valve during installation. in. (3.5 kPa) (13.8 in the gas connection between the supply line shut-off valve and the range. FEMALE INLET WHEN THE INSTALLER HAS COMPLETED INSTALLATION OF THE APPLIANCE, LEAVE THE APPLIANCE PRESSURE REGULATOR SHUT-OFF VALVE IN THE "ON" POSITION. water column). j, Adjust burner air shutter to the widest opening that will indicate a leak. ! / // / TO CONNECT GAS SUPPLY...
Installation Manual
Page 10
... by sliding rear leveling leg into the anti-tip bracket. If gas line has been disconnected, check for servicing: 1. SERVICE-PARTS INFORMATION When your range requires service or replacement parts, contact your dealer or authorized service agency. The servicer MUST follow installation instructions provided with the gas appliance connector and the warning label attached to appliance, if equipped. 3. Disconnect electrical supply to the connector. 6. Please give the complete model and serial numbers of the range which is located...
... by sliding rear leveling leg into the anti-tip bracket. If gas line has been disconnected, check for servicing: 1. SERVICE-PARTS INFORMATION When your range requires service or replacement parts, contact your dealer or authorized service agency. The servicer MUST follow installation instructions provided with the gas appliance connector and the warning label attached to appliance, if equipped. 3. Disconnect electrical supply to the connector. 6. Please give the complete model and serial numbers of the range which is located...


