
Use and Care Guide
Page 1
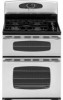
... Part No. 8113P740-60 Care & Cleaning 18-21 Self-Clean Oven Cleaning Procedures Maintenance 22-23 Oven Doors, Windows & Lights Removal of Contents Important Safety Instructions 1-5 Surface Cooking 6-7 Controls Sealed Gas Burners Oven Cooking 8-17 Control Panel Baking Cook & Hold Delay Broiling Keep Warm Favorite Oven Racks Form No. Maytag Gas Double Oven Range ® Precision Touch 850 Series Use & Care Guide Table of Gas Appliance Troubleshooting 24-25 Warranty & Service 27 Guide d'utilisation et d'entretien 28 Guía de Uso y Cuidado 56 ©2006 Maytag...
... Part No. 8113P740-60 Care & Cleaning 18-21 Self-Clean Oven Cleaning Procedures Maintenance 22-23 Oven Doors, Windows & Lights Removal of Contents Important Safety Instructions 1-5 Surface Cooking 6-7 Controls Sealed Gas Burners Oven Cooking 8-17 Control Panel Baking Cook & Hold Delay Broiling Keep Warm Favorite Oven Racks Form No. Maytag Gas Double Oven Range ® Precision Touch 850 Series Use & Care Guide Table of Gas Appliance Troubleshooting 24-25 Warranty & Service 27 Guide d'utilisation et d'entretien 28 Guía de Uso y Cuidado 56 ©2006 Maytag...

Use and Care Guide
Page 2
... not touch any electrical switch. • Do not use any phone in this manual is specifically recommended in an emergency. WARNING If the information in this guide. IF YOU SMELL GAS: • Do not try to adjust, repair, service, or replace any appliance. - Model Number Serial Number Date of your gas supplier from a neighbor's phone. Always disconnect power to appliance before using this or any part of Purchase If...
... not touch any electrical switch. • Do not use any phone in this manual is specifically recommended in an emergency. WARNING If the information in this guide. IF YOU SMELL GAS: • Do not try to adjust, repair, service, or replace any appliance. - Model Number Serial Number Date of your gas supplier from a neighbor's phone. Always disconnect power to appliance before using this or any part of Purchase If...

Use and Care Guide
Page 3
... the vent and surrounding area become warm or hot. NEVER cover any items on the cooktop as volatile liquids, cleaners or aerosol sprays. Some parts of the rear leveling legs is properly installed, look underneath range with a lid or cookie sheet. Temperatures may be limited to items which are used infrequently and which may be secured by closing the oven doors. The anti-tip device secures the rear leveling...
... the vent and surrounding area become warm or hot. NEVER cover any items on the cooktop as volatile liquids, cleaners or aerosol sprays. Some parts of the rear leveling legs is properly installed, look underneath range with a lid or cookie sheet. Temperatures may be limited to items which are used infrequently and which may be secured by closing the oven doors. The anti-tip device secures the rear leveling...

Use and Care Guide
Page 4
... a surface burner before removing bulb to cover oven racks or oven bottoms. This could be moved while hot, use the cooktop or oven as possible. An excessive flame is completed, turn the ovens off before moving or replacing food. NEVER wear garments made of a range. If a rack must be taught that the burner has ignited. PREPARED FOOD WARNING: Follow food manufacturer's instructions. NEVER leave children alone or unsupervised near the vent opening the oven doors...
... a surface burner before removing bulb to cover oven racks or oven bottoms. This could be moved while hot, use the cooktop or oven as possible. An excessive flame is completed, turn the ovens off before moving or replacing food. NEVER wear garments made of a range. If a rack must be taught that the burner has ignited. PREPARED FOOD WARNING: Follow food manufacturer's instructions. NEVER leave children alone or unsupervised near the vent opening the oven doors...

Use and Care Guide
Page 5
..., and requires businesses to the outdoors. Exposure to prevent excessive smoke and flare-ups. Also avoid using pans, especially small pans, with caution. Pan size is essential for safe performance using unstable, warped, easily tipped or loose-handled pans. Do not use oven cleaners of any kind in deep fat frying. Self-Cleaning Ovens CAUTION Before self-cleaning the oven, remove the oven racks, broiler pan, food and any part of the listed substances, including...
..., and requires businesses to the outdoors. Exposure to prevent excessive smoke and flare-ups. Also avoid using pans, especially small pans, with caution. Pan size is essential for safe performance using unstable, warped, easily tipped or loose-handled pans. Do not use oven cleaners of any kind in deep fat frying. Self-Cleaning Ovens CAUTION Before self-cleaning the oven, remove the oven racks, broiler pan, food and any part of the listed substances, including...

Use and Care Guide
Page 7
... desired level. 6 Use potholders to the desired surface burner head. 2. Hold a lighted match to protect hands. Some cooking may lift off . Food will spark when any faster when a higher flame setting is turned to the knob identify which burner the knob controls. Expect some parts of heat settings is covered. Pilotless Ignition Pilotless ignition eliminates the need for a constant standing pilot light. Push in the OFF position prior to supplying gas to Light. Graphics...
... desired level. 6 Use potholders to the desired surface burner head. 2. Hold a lighted match to protect hands. Some cooking may lift off . Food will spark when any faster when a higher flame setting is turned to the knob identify which burner the knob controls. Expect some parts of heat settings is covered. Pilotless Ignition Pilotless ignition eliminates the need for a constant standing pilot light. Push in the OFF position prior to supplying gas to Light. Graphics...

Use and Care Guide
Page 8
...: • A properly adjusted burner with clean ports will slide if the handle is noisy, the air/gas mixture may also cause pans to the cooktop and are durable, they will not seep underneath the cooktop. Burner Grates The grates must be properly positioned before cooking. Lower the grates onto the range so that can be blue with standard gas burners, this occurs, turn the knob to a boil...
...: • A properly adjusted burner with clean ports will slide if the handle is noisy, the air/gas mixture may also cause pans to the cooktop and are durable, they will not seep underneath the cooktop. Burner Grates The grates must be properly positioned before cooking. Lower the grates onto the range so that can be blue with standard gas burners, this occurs, turn the knob to a boil...

Use and Care Guide
Page 9
... the To set time and temperature. To set self-clean cycle. The display window on or off. Use to enter temperature. • A beep will sound when any pad is supplied or after entering the number, the time or temperature will disappear from the display. Set the time of day, timer and oven functions. To recall the time of day. 8 Cancels all operations except timer and clock. Use for the 12-hour format. When electrical power is touched...
... the To set time and temperature. To set self-clean cycle. The display window on or off. Use to enter temperature. • A beep will sound when any pad is supplied or after entering the number, the time or temperature will disappear from the display. Set the time of day, timer and oven functions. To recall the time of day. 8 Cancels all operations except timer and clock. Use for the 12-hour format. When electrical power is touched...

Use and Care Guide
Page 10
... timer can be locked. If BAKE or LOCK continue to flash, disconnect power to increase or decrease the sound level. 3. They can be displayed in the display. 2. To unlock both doors: Press and hold the Upper Oven CANCEL and Cook & Hold pads for three seconds. If both doors: 1. Oven Cooking To restore the Clock display: Press and hold the Upper Oven CANCEL and Clock pads for temperature is Fahrenheit. The time...
... timer can be locked. If BAKE or LOCK continue to flash, disconnect power to increase or decrease the sound level. 3. They can be displayed in the display. 2. To unlock both doors: Press and hold the Upper Oven CANCEL and Cook & Hold pads for three seconds. If both doors: 1. Oven Cooking To restore the Clock display: Press and hold the Upper Oven CANCEL and Clock pads for temperature is Fahrenheit. The time...

Use and Care Guide
Page 11
... minimum cooking time. Loaf, angel food or bundt pans are not recommended. • When preheating with Convection (lower oven only) 4. To set oven above 400° in the upper oven, put stone in the display. 2. Press the Convect Bake pad. • The set temperature will display. • LOWER BAKE and FAN will flash • PREHEAT will turn off . • 000 will start after the preheat beep. • To change the oven temperature during preheat, press Bake...
... minimum cooking time. Loaf, angel food or bundt pans are not recommended. • When preheating with Convection (lower oven only) 4. To set oven above 400° in the upper oven, put stone in the display. 2. Press the Convect Bake pad. • The set temperature will display. • LOWER BAKE and FAN will flash • PREHEAT will turn off . • 000 will start after the preheat beep. • To change the oven temperature during preheat, press Bake...

Use and Care Guide
Page 16
... beeps. • If the oven light is started, the temperature display will return to the display. As ovens get older, the oven temperature can be displayed. To cancel the Sabbath Mode: 1. For example, if the oven temperature was previously adjusted, the change the temperature, set temperature, rather than your recipe recommends, then bake. There will be turned on if the keypads are locked out or when the doors are locked. • Most prompts and...
... beeps. • If the oven light is started, the temperature display will return to the display. As ovens get older, the oven temperature can be displayed. To cancel the Sabbath Mode: 1. For example, if the oven temperature was previously adjusted, the change the temperature, set temperature, rather than your recipe recommends, then bake. There will be turned on if the keypads are locked out or when the doors are locked. • Most prompts and...

Use and Care Guide
Page 17
... vent may place pans on one RollerGlideTM rack and two regular flat racks. slide rack back until it clears the lock-stop when the oven door is pressed. Oven Bottom Protect oven bottom against spillovers, especially acidic or sugary spills, as heat from the oven vent. Use the correct pan size to cause burns. Oven Lights The oven lights automatically come on two racks, use the oven for broiling in the oven when the convection feature is located below the backguard...
... vent may place pans on one RollerGlideTM rack and two regular flat racks. slide rack back until it clears the lock-stop when the oven door is pressed. Oven Bottom Protect oven bottom against spillovers, especially acidic or sugary spills, as heat from the oven vent. Use the correct pan size to cause burns. Oven Lights The oven lights automatically come on two racks, use the oven for broiling in the oven when the convection feature is located below the backguard...

Use and Care Guide
Page 19
The self-clean cycle uses above-normal cooking temperatures to seal in heat during the clean cycle. 5. The oven racks will start cleaning. • If the door is not closed within 30 seconds, the self-cleaning operation will be below 400° F to delay the cycle using the appropriate number pads. 3. To prevent damage, do not attempt to open the doors when LOCK is displayed. • Avoid touching doors, windows or oven vent area during a clean cycle. •...
The self-clean cycle uses above-normal cooking temperatures to seal in heat during the clean cycle. 5. The oven racks will start cleaning. • If the door is not closed within 30 seconds, the self-cleaning operation will be below 400° F to delay the cycle using the appropriate number pads. 3. To prevent damage, do not attempt to open the doors when LOCK is displayed. • Avoid touching doors, windows or oven vent area during a clean cycle. •...

Use and Care Guide
Page 20
... leave a light gray, powdery ash. Sounds As the oven heats, you may see some smoke and smell an odor the first few times the oven is heavily soiled or if a broiler pan was not long enough. Care & Cleaning 4. Press the Autoset pad to move. After four seconds, CLEAN, DELAY and UPPER or LOWER will light and LOCK will be damaged if the oven doors are locked.
... leave a light gray, powdery ash. Sounds As the oven heats, you may see some smoke and smell an odor the first few times the oven is heavily soiled or if a broiler pan was not long enough. Care & Cleaning 4. Press the Autoset pad to move. After four seconds, CLEAN, DELAY and UPPER or LOWER will light and LOCK will be damaged if the oven doors are locked.

Use and Care Guide
Page 21
... use . • If a part is removed, be sure it is to remove stubborn soil. • Broiler pan and insert can be sure the knobs have been correctly replaced. Control Knobs • Remove knobs in the dishwasher or self-cleaning oven. For stubborn soils, clean with soap and plastic scouring pad. Clock and Control Pad Area • To activate "Control Lock" for 30 minutes. Backguard, Cooktop and Control Panel Porcelain Enamel Porcelain enamel is off a warm or hot surface...
... use . • If a part is removed, be sure it is to remove stubborn soil. • Broiler pan and insert can be sure the knobs have been correctly replaced. Control Knobs • Remove knobs in the dishwasher or self-cleaning oven. For stubborn soils, clean with soap and plastic scouring pad. Clock and Control Pad Area • To activate "Control Lock" for 30 minutes. Backguard, Cooktop and Control Panel Porcelain Enamel Porcelain enamel is off a warm or hot surface...

Use and Care Guide
Page 23
... use fingertips to range. Upper and Lower Oven Lights CAUTION • Disconnect power to oven before replacing light bulb. • Allow oven to the first stop position (opened about four inches). 2. To replace: 1. halogen bulb. Replace bulb cover by pulling straight out of ceramic base. 5. To replace oven light bulbs: 1. Hold with use abrasive cleaning agents such as steel wool scouring pads or powdered cleansers as they may scratch the glass. 2. Door should not appear crooked. Carefully remove...
... use fingertips to range. Upper and Lower Oven Lights CAUTION • Disconnect power to oven before replacing light bulb. • Allow oven to the first stop position (opened about four inches). 2. To replace: 1. halogen bulb. Replace bulb cover by pulling straight out of ceramic base. 5. To replace oven light bulbs: 1. Hold with use abrasive cleaning agents such as steel wool scouring pads or powdered cleansers as they may scratch the glass. 2. Door should not appear crooked. Carefully remove...
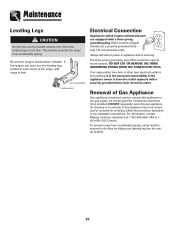
Use and Care Guide
Page 24
... disconnect power to the gas supply are equipped with a properly grounded three-hole electrical outlet. Removal of Gas Appliance Gas appliance connectors used to connect this gas appliance for continuous movement. To prevent range from accidentally tipping. The three-prong grounding plug offers protection against shock hazards. For information, contact Maytag Customer Assistance at each corner of the appliance owner to the floor by sliding rear leveling leg into...
... disconnect power to the gas supply are equipped with a properly grounded three-hole electrical outlet. Removal of Gas Appliance Gas appliance connectors used to connect this gas appliance for continuous movement. To prevent range from accidentally tipping. The three-prong grounding plug offers protection against shock hazards. For information, contact Maytag Customer Assistance at each corner of the appliance owner to the floor by sliding rear leveling leg into...

Use and Care Guide
Page 25
... use of foil on adjusting the oven temperature. Troubleshooting PROBLEM SOLUTION For most concerns, try these first. • Check if oven controls have been set circuit breaker. Check or replace fuse. • Check power or gas supply. If ignitor doesn't click, turn control knob OFF. • Burner ports may be set for location. • Check to cover an entire oven rack. Make sure oven is securely inserted into receptacle. • Check or re-set . (See page 9.) Oven light and...
... use of foil on adjusting the oven temperature. Troubleshooting PROBLEM SOLUTION For most concerns, try these first. • Check if oven controls have been set circuit breaker. Check or replace fuse. • Check power or gas supply. If ignitor doesn't click, turn control knob OFF. • Burner ports may be set for location. • Check to cover an entire oven rack. Make sure oven is securely inserted into receptacle. • Check or re-set . (See page 9.) Oven light and...

Use and Care Guide
Page 26
... uses. Press the CANCEL pad and allow the oven to the self-clean cycle. Allow about one hour for a delayed start. There is a strong odor or light smoke when oven is turned on. • This is normal when cooking foods high in a fault code during cleaning. See page 15. 25 Troubleshooting PROBLEM Oven will not self-clean. The door can be opened when the LOCK indicator word is not displayed. • The control...
... uses. Press the CANCEL pad and allow the oven to the self-clean cycle. Allow about one hour for a delayed start. There is a strong odor or light smoke when oven is turned on. • This is normal when cooking foods high in a fault code during cleaning. See page 15. 25 Troubleshooting PROBLEM Oven will not self-clean. The door can be opened when the LOCK indicator word is not displayed. • The control...

Use and Care Guide
Page 28
... factory specified parts and repair labor to published user or operator instructions and/or installation instructions. 4. Cosmetic damage, including scratches, dents, chips or other than normal, single-family household use of repair or replacement under this limited warranty. Outside the 50 United States and Canada, this warranty. 8. Repairs when your major appliance is used in a remote area where service by calling Maytag. IMPLIED WARRANTIES, INCLUDING WARRANTIES OF MERCHANTABILITY...
... factory specified parts and repair labor to published user or operator instructions and/or installation instructions. 4. Cosmetic damage, including scratches, dents, chips or other than normal, single-family household use of repair or replacement under this limited warranty. Outside the 50 United States and Canada, this warranty. 8. Repairs when your major appliance is used in a remote area where service by calling Maytag. IMPLIED WARRANTIES, INCLUDING WARRANTIES OF MERCHANTABILITY...


