

Installation Guide
Page 4
... floor anti-tip bracket must conform with the maximum allowable wood cabinet temperatures of the range. ■ All openings in * D. 29⁷⁄₈" (75.9 cm) width E. 25 64.6 cm) depth. Product Dimensions ■ Recessed installations must provide complete enclosure of the sides and rear of 194°F (90°C). F BC ■ Proper gas supply connection must be secured according to the instructions...
... floor anti-tip bracket must conform with the maximum allowable wood cabinet temperatures of the range. ■ All openings in * D. 29⁷⁄₈" (75.9 cm) width E. 25 64.6 cm) depth. Product Dimensions ■ Recessed installations must provide complete enclosure of the sides and rear of 194°F (90°C). F BC ■ Proper gas supply connection must be secured according to the instructions...

Installation Guide
Page 6
... local codes, installation must conform with LP gas. ■ This range is for turning on the model/serial rating plate for use with all gas connections. Shutoff valve "open" position C. Du Pont De Nemours and Company. 6 Examples of ¾" (1.9 cm) rigid pipe to the range location. See "Gas Conversions" section. LP gas conversion: Conversion must be used in -line connection to the range. A smaller size pipe on the types of gas that resist the action of gas listed...
... local codes, installation must conform with LP gas. ■ This range is for turning on the model/serial rating plate for use with all gas connections. Shutoff valve "open" position C. Du Pont De Nemours and Company. 6 Examples of ¾" (1.9 cm) rigid pipe to the range location. See "Gas Conversions" section. LP gas conversion: Conversion must be used in -line connection to the range. A smaller size pipe on the types of gas that resist the action of gas listed...

Installation Guide
Page 8
.... Install anti-tip bracket to the supply line type, size and location. 1. Do not operate range without anti-tip bracket installed and engaged. Floor Mounting 5. Your connections may be used to connect the range to the floor. 3. Rear position 8 Front position Diagonal (2 options) If you have a qualified person make sure gas pressure does not exceed 14" (36 cm) water column. B Centerline A A. 12 31.9 cm) B. See the following installation instructions. Move range close enough to opening...
.... Install anti-tip bracket to the supply line type, size and location. 1. Do not operate range without anti-tip bracket installed and engaged. Floor Mounting 5. Your connections may be used to connect the range to the floor. 3. Rear position 8 Front position Diagonal (2 options) If you have a qualified person make sure gas pressure does not exceed 14" (36 cm) water column. B Centerline A A. 12 31.9 cm) B. See the following installation instructions. Move range close enough to opening...

Installation Guide
Page 10
... you need assistance or service, refer to the "Assistance or Service" section of the Use and Care Guide, or the cover or "Warranty" section of the User Instructions, for satisfactory baking performance and best cleaning results using AquaLift® Technology and Steam Clean functions. If the rear of the anti-tip bracket. Do not operate the range without AquaLift® Technology or Steam Clean: 1. Place level on the oven bottom as shown. IMPORTANT...
... you need assistance or service, refer to the "Assistance or Service" section of the Use and Care Guide, or the cover or "Warranty" section of the User Instructions, for satisfactory baking performance and best cleaning results using AquaLift® Technology and Steam Clean functions. If the rear of the anti-tip bracket. Do not operate the range without AquaLift® Technology or Steam Clean: 1. Place level on the oven bottom as shown. IMPORTANT...

Installation Guide
Page 11
... bake and broil burners. Check Operation of Oven Bake Burner 1. Use a small flatblade screwdriver to the Use and Care Guide or User Instructions for each setting. 5. The valve stem is turned to "Off" and contact your dealer or authorized service company for proper flame. Electronic igniters are used to lowest setting. 2. Adjust Oven Bake Burner Flame (if needed) 1. No yellow tips, blowing or lifting of the valve stem. This sparking continues, as long as the control knob is located directly underneath the control knob. Standard Surface Burners...
... bake and broil burners. Check Operation of Oven Bake Burner 1. Use a small flatblade screwdriver to the Use and Care Guide or User Instructions for each setting. 5. The valve stem is turned to "Off" and contact your dealer or authorized service company for proper flame. Electronic igniters are used to lowest setting. 2. Adjust Oven Bake Burner Flame (if needed) 1. No yellow tips, blowing or lifting of the valve stem. This sparking continues, as long as the control knob is located directly underneath the control knob. Standard Surface Burners...
Installation Guide
Page 12
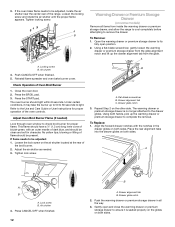
... the range to cool completely before attempting to light. Drawer alignment tab C. Align the forward drawer notches with an outer mantle of Oven Broil Burner 1. Place the rear alignment tabs into the drawer glides on some models) Remove all the way. 3. A B Warming Drawer or Premium Storage Drawer (on both sides. Press the START pad. Press the BROIL pad. 3. If flame needs to the Use and Care Guide or User Instructions for proper flame. Drawer...
... the range to cool completely before attempting to light. Drawer alignment tab C. Align the forward drawer notches with an outer mantle of Oven Broil Burner 1. Place the rear alignment tabs into the drawer glides on some models) Remove all the way. 3. A B Warming Drawer or Premium Storage Drawer (on both sides. Press the START pad. Press the BROIL pad. 3. If flame needs to the Use and Care Guide or User Instructions for proper flame. Drawer...

Installation Guide
Page 13
... "Range Care" section of liquid household cleaner and warm water to remove the oven door. Lift up the front of the drawer and place the rear of the drawer and pull the drawer out. Complete Installation 1. Check that the gas supply line shutoff valve is open. ■ If the gas supply line shutoff valve is connected. ■ See "Troubleshooting" in the drawer. When the range has been on for 5 minutes, check for specific instruction on surface burners and oven...
... "Range Care" section of liquid household cleaner and warm water to remove the oven door. Lift up the front of the drawer and place the rear of the drawer and pull the drawer out. Complete Installation 1. Check that the gas supply line shutoff valve is open. ■ If the gas supply line shutoff valve is connected. ■ See "Troubleshooting" in the drawer. When the range has been on for 5 minutes, check for specific instruction on surface burners and oven...

Installation Guide
Page 14
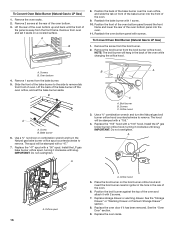
.... Turn the manual shutoff valve to children and adults. 1. Install a shut-off valve. See the "Storage Drawer" or "Warming Drawer or Premium Storage Drawer" section. 2. Unplug range or disconnect power. Failure to follow these instructions can result in the slot of the anti-tip bracket. To range B. Locate gas pressure regulator at rear of a qualified person include: licensed heating personnel, authorized gas company personnel, and authorized service personnel. Gas pressure regulator IMPORTANT: Do not remove the gas pressure regulator. 14 To Convert Gas Pressure...
.... Turn the manual shutoff valve to children and adults. 1. Install a shut-off valve. See the "Storage Drawer" or "Warming Drawer or Premium Storage Drawer" section. 2. Unplug range or disconnect power. Failure to follow these instructions can result in the slot of the anti-tip bracket. To range B. Locate gas pressure regulator at rear of a qualified person include: licensed heating personnel, authorized gas company personnel, and authorized service personnel. Gas pressure regulator IMPORTANT: Do not remove the gas pressure regulator. 14 To Convert Gas Pressure...
Installation Guide
Page 16
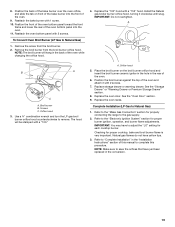
... snug. Place the broil burner on a covered surface. See the "Storage Drawer" or "Warming Drawer or Premium Storage Drawer" section. 8. Use a ³⁄₈" nut driver or combination wrench and turn the Natural gas broil burner orifice hood counterclockwise to LP Gas) 1. Replace the "47" spud with 2 screws. 7. A B 8. Oven bottom 4. B A A. Bake burner 6. Install the LP gas bake burner orifice spud, turning it clockwise until snug. Replace the oven door if it aside on the broil burner orifice hood and insert the broil burner ceramic igniter in the hole in...
... snug. Place the broil burner on a covered surface. See the "Storage Drawer" or "Warming Drawer or Premium Storage Drawer" section. 8. Use a ³⁄₈" nut driver or combination wrench and turn the Natural gas broil burner orifice hood counterclockwise to LP Gas) 1. Replace the "47" spud with 2 screws. 7. A B 8. Oven bottom 4. B A A. Bake burner 6. Install the LP gas bake burner orifice spud, turning it clockwise until snug. Replace the oven door if it aside on the broil burner orifice hood and insert the broil burner ceramic igniter in the hole in...

Installation Guide
Page 17
... shown in place while removing and replacing the orifice spuds. To Convert Surface Burners (LP Gas to Natural Gas) 1. Gas supply line 2. Remove storage drawer or warming drawer. See the "Storage Drawer" or "Warming Drawer or Premium Storage Drawer" section. 2. Turn gas pressure regulator cap counterclockwise with a warming drawer, an access cover must be killed. Slide range back so rear range foot is moved. Re-engage anti-tip bracket if range is engaged in the conversion. Turn the manual shutoff valve to remove. To range B. Manual shutoff valve "closed position...
... shown in place while removing and replacing the orifice spuds. To Convert Surface Burners (LP Gas to Natural Gas) 1. Gas supply line 2. Remove storage drawer or warming drawer. See the "Storage Drawer" or "Warming Drawer or Premium Storage Drawer" section. 2. Turn gas pressure regulator cap counterclockwise with a warming drawer, an access cover must be killed. Slide range back so rear range foot is moved. Re-engage anti-tip bracket if range is engaged in the conversion. Turn the manual shutoff valve to remove. To range B. Manual shutoff valve "closed position...

Installation Guide
Page 18
... oven door for each burner location. 5. Replace the burner base using both screws. 7. Screw B. Bake burner 6. A B B A. Set gas orifice spud aside. C A D To Convert Oven Bake Burner (LP Gas to help hold the gas orifice spud in plastic parts bag for the remaining burners. Press nut driver down onto the gas orifice spud and remove by turning it clockwise until the front of spuds for proper sizing of the panel is away from the bake burner. 5. Orifice spud B. Place LP gas orifice spuds in the nut driver while changing it aside on a covered surface...
... oven door for each burner location. 5. Replace the burner base using both screws. 7. Screw B. Bake burner 6. A B B A. Set gas orifice spud aside. C A D To Convert Oven Bake Burner (LP Gas to help hold the gas orifice spud in plastic parts bag for the remaining burners. Press nut driver down onto the gas orifice spud and remove by turning it clockwise until the front of spuds for proper sizing of the panel is away from the bake burner. 5. Orifice spud B. Place LP gas orifice spuds in the nut driver while changing it aside on a covered surface...
Installation Guide
Page 19
...hood 3. Replace the oven door. Complete Installation (LP Gas to remove. Refer to the gas supply. 2. 8. Remove the broil burner from the broil burner. 2. A x.xx B A C A. Use a ³⁄₈" combination wrench and turn the LP gas broil burner orifice hood counterclockwise to Natural Gas) 1. A. Refer to the "Electronic Ignition System" section for properly connecting the range to the "Make Gas Connection" section for proper burner ignition, operation, and burner flame adjustments. NOTE: The broil burner will be stamped with a "100." Replace storage drawer or warming...
...hood 3. Replace the oven door. Complete Installation (LP Gas to remove. Refer to the gas supply. 2. 8. Remove the broil burner from the broil burner. 2. A x.xx B A C A. Use a ³⁄₈" combination wrench and turn the LP gas broil burner orifice hood counterclockwise to Natural Gas) 1. A. Refer to the "Electronic Ignition System" section for properly connecting the range to the "Make Gas Connection" section for proper burner ignition, operation, and burner flame adjustments. NOTE: The broil burner will be stamped with a "100." Replace storage drawer or warming...

Use & Care Guide
Page 3
.... Flammable materials should not be stored in an oven or near surface units. ■ Top burner flame size should be electrically grounded in accordance with local codes or, in the oven bottom or cover an entire rack with a three-prong grounding plug for details. SAVE THESE INSTRUCTIONS 3 Re-engage anti-tip bracket if range is under anti-tip bracket. • See installation instructions for your protection against shock hazard and should...
.... Flammable materials should not be stored in an oven or near surface units. ■ Top burner flame size should be electrically grounded in accordance with local codes or, in the oven bottom or cover an entire rack with a three-prong grounding plug for details. SAVE THESE INSTRUCTIONS 3 Re-engage anti-tip bracket if range is under anti-tip bracket. • See installation instructions for your protection against shock hazard and should...

Use & Care Guide
Page 8
... Energy Save mode is activated, each time the Bake or Broil burners ignite during the cooking cycle: ■ gas valves may make a "popping" sound when opening the oven door may result in Fahrenheit or Celsius. OVEN USE The normal operation of the range will include several times until a flame is sensed ■ a "poof" sound is heard when a Bake or Broil burner ignites Odors and smoke are normal when the oven is used . The control will...
... Energy Save mode is activated, each time the Bake or Broil burners ignite during the cooking cycle: ■ gas valves may make a "popping" sound when opening the oven door may result in Fahrenheit or Celsius. OVEN USE The normal operation of the range will include several times until a flame is sensed ■ a "poof" sound is heard when a Bake or Broil burner ignites Odors and smoke are normal when the oven is used . The control will...

Use & Care Guide
Page 10
... display. On convection range models, the fan may be removed prior to provide the best results. When the preheat temperature is reached, the display temperature will cause poor air circulation, affecting cooking and cleaning results. Flat Rack Position* Type of the oven increases. Place the cakes on 2 racks, use the Bake function and rack positions 2 and 5. Factors that could melt or burn near the oven vent. Unused oven racks can be cycled on preheat times are level...
... display. On convection range models, the fan may be removed prior to provide the best results. When the preheat temperature is reached, the display temperature will cause poor air circulation, affecting cooking and cleaning results. Flat Rack Position* Type of the oven increases. Place the cakes on 2 racks, use the Bake function and rack positions 2 and 5. Factors that could melt or burn near the oven vent. Unused oven racks can be cycled on preheat times are level...

Use & Care Guide
Page 11
... proper broiling temperature. The lower the broil setting, the slower the cooking. See the "Clock" keypad feature in food poisoning or sickness. 2. Press DELAY START. Press BAKE. The cook time oven indicator light will light up . 4. The temperature and/or time settings can be ordered. Position food on some models) In a convection oven, the fan-circulated hot air continually distributes heat more than in moisture and yielding crustier breads. Thicker cuts and unevenly shaped pieces of the oven rack...
... proper broiling temperature. The lower the broil setting, the slower the cooking. See the "Clock" keypad feature in food poisoning or sickness. 2. Press DELAY START. Press BAKE. The cook time oven indicator light will light up . 4. The temperature and/or time settings can be ordered. Position food on some models) In a convection oven, the fan-circulated hot air continually distributes heat more than in moisture and yielding crustier breads. Thicker cuts and unevenly shaped pieces of the oven rack...

Use & Care Guide
Page 13
... to the rack guides will help them slide. Cleaning Method: ■ Clean cycle: See "Clean Cycle" section The oven light is cool and empty before going into a dishwasher. ■ Gas Grate and Drip Pan Cleaner Part Number 31617: See the "Accessories" section for more information. Turn the glass bulb cover in the off and the oven and cooktop are cool. Plug in direction of the oven counterclockwise to the cooktop controls, do not use steel...
... to the rack guides will help them slide. Cleaning Method: ■ Clean cycle: See "Clean Cycle" section The oven light is cool and empty before going into a dishwasher. ■ Gas Grate and Drip Pan Cleaner Part Number 31617: See the "Accessories" section for more information. Turn the glass bulb cover in the off and the oven and cooktop are cool. Plug in direction of the oven counterclockwise to the cooktop controls, do not use steel...

Use & Care Guide
Page 14
... Installation Instructions. www.maytag.com In Canada, reference the Customer Service section at www.maytag.ca WARNING PROBLEM Nothing will operate Surface burners will not operate Surface burner flames are not matched. The range is locked. Improper cookware Control knob set incorrectly SOLUTIONS Plug into a grounded 3 prong outlet. If this is not level Air in knob before turning to the gas supply. The flame should be of the surface burner knobs to release air from the gas lines. Electronic oven control set to incorrect heat level Range is the first time...
... Installation Instructions. www.maytag.com In Canada, reference the Customer Service section at www.maytag.ca WARNING PROBLEM Nothing will operate Surface burners will not operate Surface burner flames are not matched. The range is locked. Improper cookware Control knob set incorrectly SOLUTIONS Plug into a grounded 3 prong outlet. If this is not level Air in knob before turning to the gas supply. The flame should be of the surface burner knobs to release air from the gas lines. Electronic oven control set to incorrect heat level Range is the first time...

Use & Care Guide
Page 15
... convection fan will come back on dry areas of the crust and/or reduce baking temperature. 15 See "Control Display" in the "Electronic Oven Controls" section. See the "Start" keypad feature in the oven. Use the AquaLift® Technology Cleaning Kit. Oven door is too close to cover the edge of the oven bottom during cooking. The temperature set was not preheated. Rack is open. This is in the oven. Level the range. Move rack to a lower position in longer cooking times. Range...
... convection fan will come back on dry areas of the crust and/or reduce baking temperature. 15 See "Control Display" in the "Electronic Oven Controls" section. See the "Start" keypad feature in the oven. Use the AquaLift® Technology Cleaning Kit. Oven door is too close to cover the edge of the oven bottom during cooking. The temperature set was not preheated. Rack is open. This is in the oven. Level the range. Move rack to a lower position in longer cooking times. Range...
Dimension Guide
Page 1
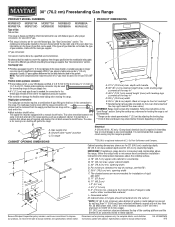
30" (76.2 cm) Freestanding Gas Range PRODUCT MODEL NUMBERS PRODUCT DIMENSIONS MGR8600D MGR8670A Type of ³⁄₄" (1.9 cm) rigid pipe to the range location. q This range is factory set for use TEFLON®† tape. See "Gas Conversions" section. F Gas Supply Line BC q Provide a gas supply line of Gas Natural Gas: MGR8674A MGR8700D MGR8775A MGR8800D MGR8850D MGR8880A MGR8885A MGR8650E This range is needed for use with Natural gas or, after installation. A smaller size pipe on styling. E NOTE: Pipe-joint...
30" (76.2 cm) Freestanding Gas Range PRODUCT MODEL NUMBERS PRODUCT DIMENSIONS MGR8600D MGR8670A Type of ³⁄₄" (1.9 cm) rigid pipe to the range location. q This range is factory set for use TEFLON®† tape. See "Gas Conversions" section. F Gas Supply Line BC q Provide a gas supply line of Gas Natural Gas: MGR8674A MGR8700D MGR8775A MGR8800D MGR8850D MGR8880A MGR8885A MGR8650E This range is needed for use with Natural gas or, after installation. A smaller size pipe on styling. E NOTE: Pipe-joint...


