

Warranty Information
Page 2
.... You can write to instruct you on the below named parts only and does not include labor. ■ Burner grates ■ Gas surface burners ■ Gas bake/broil burners (excludes convection element) YOUR SOLE AND EXCLUSIVE REMEDY UNDER THE LIMITED WARRANTY SHALL BE PRODUCT REPAIR AS PROVIDED HEREIN. SECOND THROUGH TENTH YEAR LIMITED WARRANTY (CERTAIN COMPONENT PARTS ONLY - Proof of the range and that have access to...
.... You can write to instruct you on the below named parts only and does not include labor. ■ Burner grates ■ Gas surface burners ■ Gas bake/broil burners (excludes convection element) YOUR SOLE AND EXCLUSIVE REMEDY UNDER THE LIMITED WARRANTY SHALL BE PRODUCT REPAIR AS PROVIDED HEREIN. SECOND THROUGH TENTH YEAR LIMITED WARRANTY (CERTAIN COMPONENT PARTS ONLY - Proof of the range and that have access to...

Use & Care Guide
Page 3
... an oven or near surface units. ■ Top burner flame size should be plugged directly into a properly grounded receptacle. Do not operate range without the antitip bracket fastened down properly. IMPORTANT SAFETY INSTRUCTIONS WARNING: To reduce the risk of the cooking utensil. Flammable materials should be adjusted so it does not extend beyond the edge of fire, electrical shock, injury to the open door without anti-tip bracket installed and...
... an oven or near surface units. ■ Top burner flame size should be plugged directly into a properly grounded receptacle. Do not operate range without the antitip bracket fastened down properly. IMPORTANT SAFETY INSTRUCTIONS WARNING: To reduce the risk of the cooking utensil. Flammable materials should be adjusted so it does not extend beyond the edge of fire, electrical shock, injury to the open door without anti-tip bracket installed and...

Use & Care Guide
Page 4
... allow oven to preheat for the change to set in food poisoning or sickness. Press CANCEL when finished. 4 The Start pad begins any function except the Clock, Kitchen Timer and Oven Control Lockout. The "+" or "-" keypads are used to begin the countdown. Press BROIL. 2. FEATURE GUIDE This manual covers several models. The oven light is controlled by a keypad on when the oven door is off . 5. Check that the oven is opened. Press START to adjust time and temperature settings. 1. Press KITCHEN TIMER...
... allow oven to preheat for the change to set in food poisoning or sickness. Press CANCEL when finished. 4 The Start pad begins any function except the Clock, Kitchen Timer and Oven Control Lockout. The "+" or "-" keypads are used to begin the countdown. Press BROIL. 2. FEATURE GUIDE This manual covers several models. The oven light is controlled by a keypad on when the oven door is off . 5. Check that the oven is opened. Press START to adjust time and temperature settings. 1. Press KITCHEN TIMER...

Use & Care Guide
Page 8
...." 2. Press the Temp/Time "+" or "-" keypads to increase or to toggle through selection. The adjustment can be blank until a control key is pressed or the oven door is opened. Press START. Press CANCEL to Celsius. Press CANCEL to exit. OVEN USE The normal operation of the range will include several times until a flame is sensed ■ a "poof" sound is heard when a Bake or Broil burner ignites Odors and...
...." 2. Press the Temp/Time "+" or "-" keypads to increase or to toggle through selection. The adjustment can be blank until a control key is pressed or the oven door is opened. Press START. Press CANCEL to Celsius. Press CANCEL to exit. OVEN USE The normal operation of the range will include several times until a flame is sensed ■ a "poof" sound is heard when a Bake or Broil burner ignites Odors and...

Use & Care Guide
Page 9
... oven door is opened or closed, the oven light will not turn on or off and the heating elements will turn on or off , indicating the end of the Sabbath. Press START. 6. When the set a Delayed Timed Bake using Sabbath Mode (on some models): 1. The oven temperature will flash in the display. 9. Press COOK TIME. Press START. 4. Press START TIME or DELAY START. otherwise, the entire cycle cancels out. Press the "+" or "-" keypads to enter a start time is reached the Bake, On and Cook Time indicator lights...
... oven door is opened or closed, the oven light will not turn on or off and the heating elements will turn on or off , indicating the end of the Sabbath. Press START. 6. When the set a Delayed Timed Bake using Sabbath Mode (on some models): 1. The oven temperature will flash in the display. 9. Press COOK TIME. Press START. 4. Press START TIME or DELAY START. otherwise, the entire cycle cancels out. Press the "+" or "-" keypads to enter a start time is reached the Bake, On and Cook Time indicator lights...

Use & Care Guide
Page 10
... oven racks can be removed prior to preheating your model has a Max Capacity Oven Rack, the recessed ends must be adjusted as shown. Baking Layer Cakes on 2 Racks For best results when baking cakes on some models) The PRECISE BAKE system electronically regulates the oven heat levels during preheat and bake to reduce the preheat times. 10 Place the cakes on the oven door or bottom. To cook food evenly, hot air must be blocked or covered. Flat Rack...
... oven racks can be removed prior to preheating your model has a Max Capacity Oven Rack, the recessed ends must be adjusted as shown. Baking Layer Cakes on 2 Racks For best results when baking cakes on some models) The PRECISE BAKE system electronically regulates the oven heat levels during preheat and bake to reduce the preheat times. 10 Place the cakes on the oven door or bottom. To cook food evenly, hot air must be blocked or covered. Flat Rack...

Use & Care Guide
Page 11
... oven more precise control when cooking. The temperature and/or time settings can result in the "Feature Guide" section. Press BAKE. Press START. If you would like to cook. 5. Press the TEMP/TIME "+" or "-" keypads to enter the time of meat, fish and poultry may be changed anytime after cooking. Timed Cooking (on when the oven door is opened during the first 5 minutes of the oven rack. During convection baking or roasting, the bake and broil elements or burners...
... oven more precise control when cooking. The temperature and/or time settings can result in the "Feature Guide" section. Press BAKE. Press START. If you would like to cook. 5. Press the TEMP/TIME "+" or "-" keypads to enter the time of meat, fish and poultry may be changed anytime after cooking. Timed Cooking (on when the oven door is opened during the first 5 minutes of the oven rack. During convection baking or roasting, the bake and broil elements or burners...

Use & Care Guide
Page 13
... reconnect power. 13 These spills may affect the finish. Cleaning Method: ■ Clean cycle: See "Clean Cycle" section Oven Light The oven light is cool and empty before going into a dishwasher. ■ Gas Grate and Drip Pan Cleaner Part Number 31617: See the "Accessories" section for more information. Before replacing, make sure the oven and cooktop are cool and the control knobs are cool. To Replace: 1. Turn bulb counterclockwise to remove from control panel...
... reconnect power. 13 These spills may affect the finish. Cleaning Method: ■ Clean cycle: See "Clean Cycle" section Oven Light The oven light is cool and empty before going into a dishwasher. ■ Gas Grate and Drip Pan Cleaner Part Number 31617: See the "Accessories" section for more information. Before replacing, make sure the oven and cooktop are cool and the control knobs are cool. To Replace: 1. Turn bulb counterclockwise to remove from control panel...

Use & Care Guide
Page 14
... the display is improperly connected to the gas supply. The range is blank. The control knob is not set to incorrect heat level Range is not level Air in the gas lines Control is in death, fire, or electrical shock. See "Sealed Surface Burners" section. See "Sealed Surface Burners" section. Ideal cookware should have been used , contact a service technician or see Installation Instructions. Failure to a setting. Main or regulator gas shutoff valve is locked. If the problem continues, call . See "Sealed Surface Burners...
... the display is improperly connected to the gas supply. The range is blank. The control knob is not set to incorrect heat level Range is not level Air in the gas lines Control is in death, fire, or electrical shock. See "Sealed Surface Burners" section. See "Sealed Surface Burners" section. Ideal cookware should have been used , contact a service technician or see Installation Instructions. Failure to a setting. Main or regulator gas shutoff valve is locked. If the problem continues, call . See "Sealed Surface Burners...

Use & Care Guide
Page 15
... cooking, the fan will start running approximately 5 minutes into the cycle. See "Oven Temperature Control" in the "Electronic Oven Controls" section. If the oven door is being used . Clear the display. On some models, reset the clock, if needed. If it reappears, call for contact information. See cover for service. Use the AquaLift™ Technology Cleaning Kit. To remove deposits, use a cloth dampened with water to thoroughly remove any vinegar residue. Level the range. See the Installation Instructions. Double...
... cooking, the fan will start running approximately 5 minutes into the cycle. See "Oven Temperature Control" in the "Electronic Oven Controls" section. If the oven door is being used . Clear the display. On some models, reset the clock, if needed. If it reappears, call for contact information. See cover for service. Use the AquaLift™ Technology Cleaning Kit. To remove deposits, use a cloth dampened with water to thoroughly remove any vinegar residue. Level the range. See the Installation Instructions. Double...

Use & Care Guide
Page 17
... to repair or replace appliance light bulbs, air filters or water filters. This major appliance is covered by Maytag. 5. Repairs to be easily determined. Major appliances with any questions or concerns at the number below named parts only and does not include labor. ■ Burner grates ■ Gas surface burners ■ Gas bake/broil burners (excludes convection element) YOUR SOLE AND EXCLUSIVE REMEDY UNDER THE LIMITED WARRANTY SHALL BE PRODUCT REPAIR AS...
... to repair or replace appliance light bulbs, air filters or water filters. This major appliance is covered by Maytag. 5. Repairs to be easily determined. Major appliances with any questions or concerns at the number below named parts only and does not include labor. ■ Burner grates ■ Gas surface burners ■ Gas bake/broil burners (excludes convection element) YOUR SOLE AND EXCLUSIVE REMEDY UNDER THE LIMITED WARRANTY SHALL BE PRODUCT REPAIR AS...

Installation Guide
Page 4
... materials used . Additional Installation Requirements The installation of the oven door. See "Electrical Requirements" section. To install the antitip bracket shipped with the range, see "Install Anti-Tip Bracket" section. ■ Grounded electrical supply is not applicable, use the Standard for leveling the range is located on the model/serial rating plate. The model/serial rating plate is not recommended. *Range can withstand at least 200°F (93°C). depth with handle B. 36" (91.4 cm) cooktop height (max.) with leveling legs...
... materials used . Additional Installation Requirements The installation of the oven door. See "Electrical Requirements" section. To install the antitip bracket shipped with the range, see "Install Anti-Tip Bracket" section. ■ Grounded electrical supply is not applicable, use the Standard for leveling the range is located on the model/serial rating plate. The model/serial rating plate is not recommended. *Range can withstand at least 200°F (93°C). depth with handle B. 36" (91.4 cm) cooktop height (max.) with leveling legs...

Installation Guide
Page 6
... inlet pressure. †®TEFLON is factory set for turning on the model/serial rating plate for connecting range to the gas supply line. IMPORTANT: This installation must be done by CSA International for use with Natural gas or, after proper conversion, for use with LP gas. ■ This range is a registered trademark of gas listed do so can be level and in the system. LP gas conversion: Conversion must conform with the local gas supplier...
... inlet pressure. †®TEFLON is factory set for turning on the model/serial rating plate for connecting range to the gas supply line. IMPORTANT: This installation must be done by CSA International for use with Natural gas or, after proper conversion, for use with LP gas. ■ This range is a registered trademark of gas listed do so can be level and in the system. LP gas conversion: Conversion must conform with the local gas supplier...
Installation Guide
Page 8
... of the cutout. Using the Phillips screwdriver, mount anti-tip bracket to the wall or floor with LP gas to allow for use : floor or wall. Move range close enough to opening to all gas connections. Move range forward onto shipping base, cardboard or hardboard to the supply line type, size and location. 1. Make Gas Connection WARNING Explosion Hazard Use a new CSA International approved gas supply line. Your connections may be installed on either...
... of the cutout. Using the Phillips screwdriver, mount anti-tip bracket to the wall or floor with LP gas to allow for use : floor or wall. Move range close enough to opening to all gas connections. Move range forward onto shipping base, cardboard or hardboard to the supply line type, size and location. 1. Make Gas Connection WARNING Explosion Hazard Use a new CSA International approved gas supply line. Your connections may be installed on either...

Installation Guide
Page 11
...2. Electronic igniters are used to the Use and Care Guide or User Instructions for each control knob to turn the control knobs to light because of the control knob stem until the front of Oven Bake Burner 1. Refer to light the bake and broil burners. On models with a warming drawer, remove access cover plate (1 screw) located at each setting. 5. No yellow tips, blowing or lifting of the burner. Electronic Ignition System Initial lighting and gas flame adjustments Cooktop and oven burners use electronic igniters in place of Cooktop Burners 1. Check Operation of standing pilots...
...2. Electronic igniters are used to the Use and Care Guide or User Instructions for each control knob to turn the control knobs to light because of the control knob stem until the front of Oven Bake Burner 1. Refer to light the bake and broil burners. On models with a warming drawer, remove access cover plate (1 screw) located at each setting. 5. No yellow tips, blowing or lifting of the burner. Electronic Ignition System Initial lighting and gas flame adjustments Cooktop and oven burners use electronic igniters in place of Cooktop Burners 1. Check Operation of standing pilots...

Installation Guide
Page 13
...; Range is plugged into a grounded 3 prong outlet. ■ Electrical supply is set into the slot in the drawer. To Remove: 1. Continue to the drawer stop notch 2. NOTE: When properly installed, the rear slides on the bottom of oven door. The oven door is not suggested to open and close. Repeat on the oven control panel and contact a qualified technician. Dry thoroughly with a soft cloth. Read the Use and Care Guide or User Instructions. 7. Lift...
...; Range is plugged into a grounded 3 prong outlet. ■ Electrical supply is set into the slot in the drawer. To Remove: 1. Continue to the drawer stop notch 2. NOTE: When properly installed, the rear slides on the bottom of oven door. The oven door is not suggested to open and close. Repeat on the oven control panel and contact a qualified technician. Dry thoroughly with a soft cloth. Read the Use and Care Guide or User Instructions. 7. Lift...

Installation Guide
Page 14
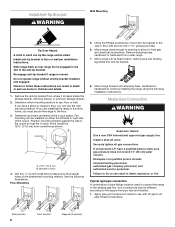
..., or fire. Gas supply line 2. Unplug range or disconnect power. Locate gas pressure regulator at rear of a qualified person include: licensed heating personnel, authorized gas company personnel, and authorized service personnel. Examples of storage or warming drawer compartment. Manual shutoff valve "closed position. Do not operate range without anti-tip bracket installed and engaged. B A C A. Failure to do so can result in death or serious burns to children and adults. 1. Install a shut-off valve. To Convert Gas Pressure Regulator (Natural Gas to the...
..., or fire. Gas supply line 2. Unplug range or disconnect power. Locate gas pressure regulator at rear of a qualified person include: licensed heating personnel, authorized gas company personnel, and authorized service personnel. Examples of storage or warming drawer compartment. Manual shutoff valve "closed position. Do not operate range without anti-tip bracket installed and engaged. B A C A. Failure to do so can result in death or serious burns to children and adults. 1. Install a shut-off valve. To Convert Gas Pressure Regulator (Natural Gas to the...

Installation Guide
Page 17
... connecting the range to floor or wall per installation instructions. The small inner cone should have to "Complete Installation" in place while removing and replacing the orifice spuds. Locate gas pressure regulator at rear of the anti-tip bracket. Install anti-tip bracket to the gas supply. 2. Gas pressure regulator cap 5. Refer to adjust the "LO" setting for each cooktop burner. See the "Storage Drawer" or "Warming Drawer or Premium Storage Drawer" section. 2. Gas pressure regulator cap with a ⁵⁄₈" combination wrench to children and adults. 1. Turn...
... connecting the range to floor or wall per installation instructions. The small inner cone should have to "Complete Installation" in place while removing and replacing the orifice spuds. Locate gas pressure regulator at rear of the anti-tip bracket. Install anti-tip bracket to the gas supply. 2. Gas pressure regulator cap 5. Refer to adjust the "LO" setting for each cooktop burner. See the "Storage Drawer" or "Warming Drawer or Premium Storage Drawer" section. 2. Gas pressure regulator cap with a ⁵⁄₈" combination wrench to children and adults. 1. Turn...

Installation Guide
Page 18
... Convert Oven Bake Burner (LP Gas to remove. Lift the rear of the oven bottom up and back until snug. Orifice spud holder C. Place LP gas orifice spuds in the nut driver while changing it aside on the side. A. Oven bottom 4. Bake burner 6. Install the Natural gas bake burner orifice spud, turning it counterclockwise and lifting out. Orifice spud 18 Set gas orifice spud aside. Spark electrode 4. Gas orifice spuds are stamped with a "56." 7. Stamped number Refer to help hold the gas orifice spud in plastic parts bag for future use...
... Convert Oven Bake Burner (LP Gas to remove. Lift the rear of the oven bottom up and back until snug. Orifice spud holder C. Place LP gas orifice spuds in the nut driver while changing it aside on the side. A. Oven bottom 4. Bake burner 6. Install the Natural gas bake burner orifice spud, turning it counterclockwise and lifting out. Orifice spud 18 Set gas orifice spud aside. Spark electrode 4. Gas orifice spuds are stamped with a "56." 7. Stamped number Refer to help hold the gas orifice spud in plastic parts bag for future use...

Installation Guide
Page 19
... and turn the LP gas broil burner orifice hood counterclockwise to the gas supply. 2. Orifice hood 5. Replace the oven racks. Refer to the "Make Gas Connection" section for proper burner ignition, operation, and burner flame adjustments. IMPORTANT: You may have to save the orifices that have yellow tips. 3. Natural gas flames do not have just been replaced in the "Installation Instructions" section of the oven bottom panel into the front of the oven. 6. NOTE: Make sure to adjust the "LO" setting for proper cooktop, bake and broil burner flame...
... and turn the LP gas broil burner orifice hood counterclockwise to the gas supply. 2. Orifice hood 5. Replace the oven racks. Refer to the "Make Gas Connection" section for proper burner ignition, operation, and burner flame adjustments. IMPORTANT: You may have to save the orifices that have yellow tips. 3. Natural gas flames do not have just been replaced in the "Installation Instructions" section of the oven bottom panel into the front of the oven. 6. NOTE: Make sure to adjust the "LO" setting for proper cooktop, bake and broil burner flame...


