

Warranty Information
Page 1
... major appliance is installed, operated and maintained according to instructions attached to or furnished with the product, Maytag brand of Whirlpool Corporation or Whirlpool Canada, LP (hereafter "Maytag") will pay for factory specified replacement parts and repair labor to correct defects in materials or workmanship that existed when this major appliance was purchased...
... major appliance is installed, operated and maintained according to instructions attached to or furnished with the product, Maytag brand of Whirlpool Corporation or Whirlpool Canada, LP (hereafter "Maytag") will pay for factory specified replacement parts and repair labor to correct defects in materials or workmanship that existed when this major appliance was purchased...

Warranty Information
Page 2
... the original consumer purchase. SECOND THROUGH TENTH YEAR LIMITED WARRANTY (CERTAIN COMPONENT PARTS ONLY - Repairs when your major appliance is used in the U.S.A., visit www.maytag.com In Canada, visit www.maytag.ca If you do not have been removed, altered or cannot be provided..., unless such damage results from the date of purchase. 6. Have your correspondence. Costs associated with the product, Maytag will pay for factory specified parts for repairs. MAYTAG SHALL NOT BE LIABLE FOR INCIDENTAL OR CONSEQUENTIAL DAMAGES. In Canada, call 1-800-688-9900. Please keep this ...
... the original consumer purchase. SECOND THROUGH TENTH YEAR LIMITED WARRANTY (CERTAIN COMPONENT PARTS ONLY - Repairs when your major appliance is used in the U.S.A., visit www.maytag.com In Canada, visit www.maytag.ca If you do not have been removed, altered or cannot be provided..., unless such damage results from the date of purchase. 6. Have your correspondence. Costs associated with the product, Maytag will pay for factory specified parts for repairs. MAYTAG SHALL NOT BE LIABLE FOR INCIDENTAL OR CONSEQUENTIAL DAMAGES. In Canada, call 1-800-688-9900. Please keep this ...

Use & Care Guide
Page 9
... and hold the TIMER keypad for the entire Sabbath Mode period. The oven temperature will light up . 4. Press and hold the TIMER keypad for only part of the cycle. Press START. 6. otherwise, the entire cycle cancels out. The Cook Time oven indicator light will change , and there will turn off when...
... and hold the TIMER keypad for the entire Sabbath Mode period. The oven temperature will light up . 4. Press and hold the TIMER keypad for only part of the cycle. Press START. 6. otherwise, the entire cycle cancels out. The Cook Time oven indicator light will change , and there will turn off when...

Use & Care Guide
Page 12
... excess soil. AquaLift™ Technology is an innovative cleaning solution that the entire surface of the bottom of the oven cavity is covered by ordering Part Number W10423113RP. If your oven cavity is complete. If any time to the "Accessories" section for cleaning and cool down . 6. NOTES: ■ The range should...
... excess soil. AquaLift™ Technology is an innovative cleaning solution that the entire surface of the bottom of the oven cavity is covered by ordering Part Number W10423113RP. If your oven cavity is complete. If any time to the "Accessories" section for cleaning and cool down . 6. NOTES: ■ The range should...

Use & Care Guide
Page 13
..., do not remove seals under knobs. Food spills should be cleaned when oven cools. Plug in direction of our website at www.maytag.ca. ■ Dishwasher (grates only, not caps): Use the most aggressive cycle. Always follow label instructions on burners while wet..... 13 OVEN RACKS Cleaning Method: ■ Steel-wool pad METALLIC PAINT (on panel. ■ affresh™ Kitchen and Appliance Cleaner Part Number W10355010 (not included): See the "Accessories" section for more information. STORAGE DRAWER PORCELAIN-COATED GRATES AND CAPS Food spills containing acids,...
..., do not remove seals under knobs. Food spills should be cleaned when oven cools. Plug in direction of our website at www.maytag.ca. ■ Dishwasher (grates only, not caps): Use the most aggressive cycle. Always follow label instructions on burners while wet..... 13 OVEN RACKS Cleaning Method: ■ Steel-wool pad METALLIC PAINT (on panel. ■ affresh™ Kitchen and Appliance Cleaner Part Number W10355010 (not included): See the "Accessories" section for more information. STORAGE DRAWER PORCELAIN-COATED GRATES AND CAPS Food spills containing acids,...

Use & Care Guide
Page 16
... 31617 Standard Flat Oven Rack Order Part Number W10179196 Split Oven Rack Order Part Number W10205524 Max Capacity Rack Oven Rack Order Part Number W10289145 Porcelain Broiler Pan and Grid Order Part Number 4396923 Premium Broiler Pan and Roasting Rack Order Part Number W10123240 www.maytag.com/broilerpan MAYTAG® GAS RANGE LIMITED WARRANTY FIRST YEAR LIMITED...
... 31617 Standard Flat Oven Rack Order Part Number W10179196 Split Oven Rack Order Part Number W10205524 Max Capacity Rack Oven Rack Order Part Number W10289145 Porcelain Broiler Pan and Grid Order Part Number 4396923 Premium Broiler Pan and Roasting Rack Order Part Number W10123240 www.maytag.com/broilerpan MAYTAG® GAS RANGE LIMITED WARRANTY FIRST YEAR LIMITED...

Use & Care Guide
Page 17
... materials or workmanship and is installed, operated and maintained according to instructions attached to or furnished with the product, Maytag will pay for factory specified parts for future reference. 17 The cost of original purchase date is contrary to schedule service, you can find your ... in a manner that have access to the Internet and you need further assistance, you may contact Maytag at the address below . SECOND THROUGH TENTH YEAR LIMITED WARRANTY (CERTAIN COMPONENT PARTS ONLY - This limited warranty is valid in an inaccessible location or is covered by the customer....
... materials or workmanship and is installed, operated and maintained according to instructions attached to or furnished with the product, Maytag will pay for factory specified parts for future reference. 17 The cost of original purchase date is contrary to schedule service, you can find your ... in a manner that have access to the Internet and you need further assistance, you may contact Maytag at the address below . SECOND THROUGH TENTH YEAR LIMITED WARRANTY (CERTAIN COMPONENT PARTS ONLY - This limited warranty is valid in an inaccessible location or is covered by the customer....

Installation Guide
Page 3
... range forward. • Look for the anti-tip bracket securely attached to follow the instructions provided with any tools listed Check that all parts are included. See "Electrical Requirements" and "Gas Supply Requirements" sections. †® QUADREX is engaged in death or serious burns to...resistant to children and adults. Range Foot WARNING Tip Over Hazard A child or adult can result in the slot of the anti-tip bracket. Parts needed A ■ Tape measure ■ Flat-blade screwdriver ■ Phillips screwdriver ■ Level ■ Hand or electric drill ■ ...
... range forward. • Look for the anti-tip bracket securely attached to follow the instructions provided with any tools listed Check that all parts are included. See "Electrical Requirements" and "Gas Supply Requirements" sections. †® QUADREX is engaged in death or serious burns to...resistant to children and adults. Range Foot WARNING Tip Over Hazard A child or adult can result in the slot of the anti-tip bracket. Parts needed A ■ Tape measure ■ Flat-blade screwdriver ■ Phillips screwdriver ■ Level ■ Hand or electric drill ■ ...

Installation Guide
Page 4
... installations require: ■ When this range is to the Manufactured Home Construction and Safety Standard, Title 24 CFR, Part 3280 (formerly the Federal Standard for Mobile Home Construction and Safety, Title 24, HUD Part 280). A Given dimensions are shown must be raised approximately 1" (2.5 cm) by adjusting the leveling legs. **Front of UL...
... installations require: ■ When this range is to the Manufactured Home Construction and Safety Standard, Title 24 CFR, Part 3280 (formerly the Federal Standard for Mobile Home Construction and Safety, Title 24, HUD Part 280). A Given dimensions are shown must be raised approximately 1" (2.5 cm) by adjusting the leveling legs. **Front of UL...

Installation Guide
Page 7
..." WCP) or lower The range must be necessary to 2,000 ft (609.6 m). Remove shipping materials, tape and film from inside oven. 3. Remove oven racks and parts package from range. 2. Do not remove the shipping base at least 1" water column pressure above the manifold pressure shown on the model/serial rating plate...
..." WCP) or lower The range must be necessary to 2,000 ft (609.6 m). Remove shipping materials, tape and film from inside oven. 3. Remove oven racks and parts package from range. 2. Do not remove the shipping base at least 1" water column pressure above the manifold pressure shown on the model/serial rating plate...
Installation Guide
Page 9
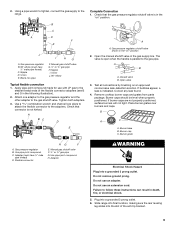
... flexible connector to the range. Open the manual shutoff valve in the "on" position. Correct any leak found. 4. Remove cooktop burner caps and grates from parts package. Burner caps should be level when properly positioned. Manual gas shutoff valve F. ½" or ¾" gas pipe G. Do not remove ground prong. Do not...
... flexible connector to the range. Open the manual shutoff valve in the "on" position. Correct any leak found. 4. Remove cooktop burner caps and grates from parts package. Burner caps should be level when properly positioned. Manual gas shutoff valve F. ½" or ¾" gas pipe G. Do not remove ground prong. Do not...

Installation Guide
Page 13
Before removing, make sure the oven is an extra part, go back through the steps to see the "Range Care" section of the Use and Care Guide or User Instructions. 6. To Remove: 1. Pull the storage ... the oven door. Lift up the front of the drawer and place the rear of the drawer inside the range so that you have all parts are placed in the drawer. Slowly push the drawer into place. 3. Then, follow these instructions. The oven door is cool and empty. Pinch the hinge...
Before removing, make sure the oven is an extra part, go back through the steps to see the "Range Care" section of the Use and Care Guide or User Instructions. 6. To Remove: 1. Pull the storage ... the oven door. Lift up the front of the drawer and place the rear of the drawer inside the range so that you have all parts are placed in the drawer. Slowly push the drawer into place. 3. Then, follow these instructions. The oven door is cool and empty. Pinch the hinge...

Installation Guide
Page 18
... gas bake burner orifice spud counterclockwise to Natural Gas) 1. Remove the oven racks. 2. Stamped number Refer to help hold the gas orifice spud in plastic parts bag for the correct Natural gas orifice spud placement. Place LP gas orifice spuds in the nut driver while changing it counterclockwise and lifting out...
... gas bake burner orifice spud counterclockwise to Natural Gas) 1. Remove the oven racks. 2. Stamped number Refer to help hold the gas orifice spud in plastic parts bag for the correct Natural gas orifice spud placement. Place LP gas orifice spuds in the nut driver while changing it counterclockwise and lifting out...


