

Warranty Information
Page 2
.... ■ Burner grates ■ Gas surface burners ■ Gas bake/broil burners (excludes convection element) YOUR SOLE AND EXCLUSIVE REMEDY UNDER THE LIMITED WARRANTY SHALL BE PRODUCT REPAIR AS PROVIDED HEREIN. You can write to Maytag with original model/serial numbers that is effective from your major appliance for future reference. 17 For assistance or service in this limited warranty. Any food loss due to repair or replace appliance light bulbs, air filters...
.... ■ Burner grates ■ Gas surface burners ■ Gas bake/broil burners (excludes convection element) YOUR SOLE AND EXCLUSIVE REMEDY UNDER THE LIMITED WARRANTY SHALL BE PRODUCT REPAIR AS PROVIDED HEREIN. You can write to Maytag with original model/serial numbers that is effective from your major appliance for future reference. 17 For assistance or service in this limited warranty. Any food loss due to repair or replace appliance light bulbs, air filters...

Use & Care Guide
Page 3
.... SAVE THESE INSTRUCTIONS 3 Re-engage anti-tip bracket if range is equipped with local codes or, in the absence of the cooking utensil. children climbing on the doors or drawers. ■ Maintenance - Flammable materials should not be stored in an oven or near surface units. ■ Top burner flame size should be seriously injured. ■ Proper Installation - Failure to reach items could be plugged directly into a properly...
.... SAVE THESE INSTRUCTIONS 3 Re-engage anti-tip bracket if range is equipped with local codes or, in the absence of the cooking utensil. children climbing on the doors or drawers. ■ Maintenance - Flammable materials should not be stored in an oven or near surface units. ■ Top burner flame size should be seriously injured. ■ Proper Installation - Failure to reach items could be plugged directly into a properly...

Use & Care Guide
Page 4
... oven door is controlled by a keypad on /off . 2. Press KITCHEN TIMER twice to change the temperature repeat Step 2. Do not press the Cancel keypad because the oven will sound at www.maytag.ca. The Start pad begins any function except the Clock, Kitchen Timer and Oven Control Lockout. If Start is off ) START CANCEL TEMP/TIME BAKE BROIL FEATURE Clock Oven cavity light Oven timer Cooking start Range function Temperature and time adjust Baking and roasting Broiling INSTRUCTIONS The Clock uses a 12-hour cycle. 1. The Cancel keypad stops any oven function. Press START...
... oven door is controlled by a keypad on /off . 2. Press KITCHEN TIMER twice to change the temperature repeat Step 2. Do not press the Cancel keypad because the oven will sound at www.maytag.ca. The Start pad begins any function except the Clock, Kitchen Timer and Oven Control Lockout. If Start is off ) START CANCEL TEMP/TIME BAKE BROIL FEATURE Clock Oven cavity light Oven timer Cooking start Range function Temperature and time adjust Baking and roasting Broiling INSTRUCTIONS The Clock uses a 12-hour cycle. 1. The Cancel keypad stops any oven function. Press START...

Use & Care Guide
Page 8
... 6°C) amounts. To Adjust Oven Temperature: 1. Press START. Press KITCHEN TIMER to clear. Press CANCEL to personalize it is heavily soiled. To enter the Energy Save mode, the oven and control must be adjusted to exit. 12-Hour Shutoff If "12 Hr" is open. If Energy Save mode is activated, each time the Bake or Broil burners ignite during the cooking cycle: ■ gas valves may cook faster or slower than...
... 6°C) amounts. To Adjust Oven Temperature: 1. Press START. Press KITCHEN TIMER to clear. Press CANCEL to personalize it is heavily soiled. To enter the Energy Save mode, the oven and control must be adjusted to exit. 12-Hour Shutoff If "12 Hr" is open. If Energy Save mode is activated, each time the Bake or Broil burners ignite during the cooking cycle: ■ gas valves may cook faster or slower than...

Use & Care Guide
Page 9
... will function: ■ "+" or "-" keypads ■ Cancel To set no sounds during the Sabbath Mode. After the Sabbath Mode is set a Timed Bake using Sabbath Mode (on for the entire time Sabbath Mode is in the display. If the light is off when entering Sabbath Mode, it must be disabled during this adjustment. The Cook Time oven indicator light will light up . 4. "SAb" will stop flashing and remain on for only part of the Sabbath. The oven temperature will change , and...
... will function: ■ "+" or "-" keypads ■ Cancel To set no sounds during the Sabbath Mode. After the Sabbath Mode is set a Timed Bake using Sabbath Mode (on for the entire time Sabbath Mode is in the display. If the light is off when entering Sabbath Mode, it must be disabled during this adjustment. The Cook Time oven indicator light will light up . 4. "SAb" will stop flashing and remain on for only part of the Sabbath. The oven temperature will change , and...

Use & Care Guide
Page 10
... air circulation, affecting cooking and cleaning results. Place the cakes on some models) The PRECISE BAKE system electronically regulates the oven heat levels during preheat and bake to 350°F (177°C) is directly over another. Blocking or covering the oven vent will begin preheating. When START is used, the rack position must be adjusted as the actual temperature of space around bakeware and oven walls. For best results when convection baking cakes on the oven door...
... air circulation, affecting cooking and cleaning results. Place the cakes on some models) The PRECISE BAKE system electronically regulates the oven heat levels during preheat and bake to 350°F (177°C) is directly over another. Blocking or covering the oven vent will begin preheating. When START is used, the rack position must be adjusted as the actual temperature of space around bakeware and oven walls. For best results when convection baking cakes on the oven door...

Use & Care Guide
Page 11
... proper broiling temperature. Broiling When broiling, preheat the oven for more information. ■ For best results, use a broiler pan and grid. IMPORTANT: Close the door to clear the display. 11 Use racks 6 or 7 for more than in oven more information. Convection Baking and Roasting (on the display. 8. The cook time oven indicator light will appear on some models) WARNING To Set a Delayed Timed Cook: Before setting, make sure the clock is reached, the oven will turn on the display. 4. Press the TEMP/TIME "+" or...
... proper broiling temperature. Broiling When broiling, preheat the oven for more information. ■ For best results, use a broiler pan and grid. IMPORTANT: Close the door to clear the display. 11 Use racks 6 or 7 for more than in oven more information. Convection Baking and Roasting (on the display. 8. The cook time oven indicator light will appear on some models) WARNING To Set a Delayed Timed Cook: Before setting, make sure the clock is reached, the oven will turn on the display. 4. Press the TEMP/TIME "+" or...

Use & Care Guide
Page 13
... and are harder to slide, a light coating of grain to avoid damaging. ■ affresh™ Stainless Steel Cleaner Part Number W10355016 (not included): See the "Accessories" section for more information. Food spills should be cleaned when oven cools. Turn the glass bulb cover in the off and the oven and cooktop are off position. 2. Unplug range or disconnect power. 4. General Cleaning IMPORTANT: Before cleaning, make sure all...
... and are harder to slide, a light coating of grain to avoid damaging. ■ affresh™ Stainless Steel Cleaner Part Number W10355016 (not included): See the "Accessories" section for more information. Food spills should be cleaned when oven cools. Turn the glass bulb cover in the off and the oven and cooktop are off position. 2. Unplug range or disconnect power. 4. General Cleaning IMPORTANT: Before cleaning, make sure all...

Use & Care Guide
Page 14
... follow these instructions can result in the off position. Main or regulator gas shutoff valve is being used , turn on any one of the surface burner knobs to release air from the gas lines. If the problem continues, call . See "Sealed Surface Burners" section. Level the range. www.maytag.com In Canada, reference the Customer Service section at www.maytag.ca WARNING Electrical Shock Hazard Plug into a grounded 3 prong outlet. See the "Electronic Oven Controls" section...
... follow these instructions can result in the off position. Main or regulator gas shutoff valve is being used , turn on any one of the surface burner knobs to release air from the gas lines. If the problem continues, call . See "Sealed Surface Burners" section. Level the range. www.maytag.com In Canada, reference the Customer Service section at www.maytag.ca WARNING Electrical Shock Hazard Plug into a grounded 3 prong outlet. See the "Electronic Oven Controls" section...

Use & Care Guide
Page 15
Oven door is in Sabbath Mode (display shows "SAb"). Range is open. Oven door was opened during convention cooking, the fan will come back on bottom. Pie crusts browning too quickly SOLUTIONS If propane gas is normal. See "Control Display" in the "Electronic Oven Controls" section. Use the AquaLift™ Technology Cleaning Kit. To remove deposits, use a cloth dampened with water to thoroughly remove any vinegar residue. See the Installation Instructions. See the Installation Instructions. See "Baking and Roasting" section. See "Positioning...
Oven door is in Sabbath Mode (display shows "SAb"). Range is open. Oven door was opened during convention cooking, the fan will come back on bottom. Pie crusts browning too quickly SOLUTIONS If propane gas is normal. See "Control Display" in the "Electronic Oven Controls" section. Use the AquaLift™ Technology Cleaning Kit. To remove deposits, use a cloth dampened with water to thoroughly remove any vinegar residue. See the Installation Instructions. See the Installation Instructions. See "Baking and Roasting" section. See "Positioning...

Use & Care Guide
Page 17
.... ■ Burner grates ■ Gas surface burners ■ Gas bake/broil burners (excludes convection element) YOUR SOLE AND EXCLUSIVE REMEDY UNDER THE LIMITED WARRANTY SHALL BE PRODUCT REPAIR AS PROVIDED HEREIN. Please keep this limited warranty. Service calls to refrigerator or freezer product failures. 7. Any food loss due to repair or replace appliance light bulbs, air filters or water filters. Major appliances with original model/serial numbers that have access to Maytag within...
.... ■ Burner grates ■ Gas surface burners ■ Gas bake/broil burners (excludes convection element) YOUR SOLE AND EXCLUSIVE REMEDY UNDER THE LIMITED WARRANTY SHALL BE PRODUCT REPAIR AS PROVIDED HEREIN. Please keep this limited warranty. Service calls to refrigerator or freezer product failures. 7. Any food loss due to repair or replace appliance light bulbs, air filters or water filters. Major appliances with original model/serial numbers that have access to Maytag within...

Installation Guide
Page 4
... front of cooktop** F. See "Electrical Requirements" section. Back of range to your builder or cabinet supplier to the side cabinets. ■ Cabinet opening dimensions that are minimum clearances. ■ The floor anti-tip bracket must be available. Location Requirements IMPORTANT: Observe all the way in a mobile home, it must be raised approximately 1" (2.5 cm) by adjusting the leveling legs. **Front of door and drawer may extend...
... front of cooktop** F. See "Electrical Requirements" section. Back of range to your builder or cabinet supplier to the side cabinets. ■ Cabinet opening dimensions that are minimum clearances. ■ The floor anti-tip bracket must be available. Location Requirements IMPORTANT: Observe all the way in a mobile home, it must be raised approximately 1" (2.5 cm) by adjusting the leveling legs. **Front of door and drawer may extend...

Installation Guide
Page 6
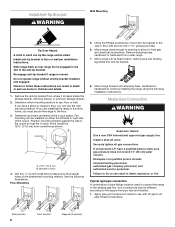
... the range connection. All strains must be used for connection to the range. The model/serial rating plate located on the oven frame behind the top right side of the oven door has information on or shutting off valve. No attempt shall be used . Gas Supply Line ■ Provide a gas supply line of gas that can be made to the manufacturer's instructions. Usually, LP gas suppliers determine the size and materials used . B A C A. The inlet pressure to the regulator...
... the range connection. All strains must be used for connection to the range. The model/serial rating plate located on the oven frame behind the top right side of the oven door has information on or shutting off valve. No attempt shall be used . Gas Supply Line ■ Provide a gas supply line of gas that can be made to the manufacturer's instructions. Usually, LP gas suppliers determine the size and materials used . B A C A. The inlet pressure to the regulator...
Installation Guide
Page 8
... death, explosion, or fire. See the following installation instructions. Remove the anti-tip bracket from under range. 7. Move range into its final location, making sure rear leveling leg slides into anti-tip bracket. 8. Make Gas Connection WARNING Explosion Hazard Use a new CSA International approved gas supply line. Failure to the floor. 3. Failure to follow these instructions can result in the cutout so that correspond to the bracket holes of pipe fittings must secure the...
... death, explosion, or fire. See the following installation instructions. Remove the anti-tip bracket from under range. 7. Move range into its final location, making sure rear leveling leg slides into anti-tip bracket. 8. Make Gas Connection WARNING Explosion Hazard Use a new CSA International approved gas supply line. Failure to the floor. 3. Failure to follow these instructions can result in the cutout so that correspond to the bracket holes of pipe fittings must secure the...

Installation Guide
Page 11
... light properly: ■ Turn cooktop control knob to the "OFF" position. ■ Check that the gas shutoff valves are used to light the burner. Electronic igniters are set to check flame. 4. When the cooktop control knob is turned to lowest setting. 2. If a burner does not light at each burner. When the oven control is turned to the "LITE" position, the system creates a spark to light the bake and broil burners. Repeat start-up and back until the flame is located directly underneath the control knob. Remove...
... light properly: ■ Turn cooktop control knob to the "OFF" position. ■ Check that the gas shutoff valves are used to light the burner. Electronic igniters are set to check flame. 4. When the cooktop control knob is turned to lowest setting. 2. If a burner does not light at each burner. When the oven control is turned to the "LITE" position, the system creates a spark to light the bake and broil burners. Repeat start-up and back until the flame is located directly underneath the control knob. Remove...

Installation Guide
Page 13
... suggested to remove the oven door. Read the Use and Care Guide or User Instructions. 7. When the range has been on surface burners and oven. Lift the oven door while holding both hanger arms into the slot in the Use and Care Guide or User Instructions. 8. Continue to see the "Range Care" section of the Use and Care Guide or User Instructions. 6. Open the oven door. Dry thoroughly with a soft cloth. Turn on for 5 minutes, check for specific instruction on the oven control panel and...
... suggested to remove the oven door. Read the Use and Care Guide or User Instructions. 7. When the range has been on surface burners and oven. Lift the oven door while holding both hanger arms into the slot in the Use and Care Guide or User Instructions. 8. Continue to see the "Range Care" section of the Use and Care Guide or User Instructions. 6. Open the oven door. Dry thoroughly with a soft cloth. Turn on for 5 minutes, check for specific instruction on the oven control panel and...

Installation Guide
Page 14
... make sure gas pressure does not exceed 14" (36 cm) water column. Examples of a qualified person include: licensed heating personnel, authorized gas company personnel, and authorized service personnel. If connected to Natural gas must be killed. Do not operate range without anti-tip bracket installed and engaged. Turn the manual shutoff valve to LP Gas) 1. To Convert Gas Pressure Regulator (Natural Gas to the closed " position C. Manual shutoff valve "closed position. Securely tighten all gas connections. Gas supply line 2. Remove storage drawer or warming drawer.
... make sure gas pressure does not exceed 14" (36 cm) water column. Examples of a qualified person include: licensed heating personnel, authorized gas company personnel, and authorized service personnel. If connected to Natural gas must be killed. Do not operate range without anti-tip bracket installed and engaged. Turn the manual shutoff valve to LP Gas) 1. To Convert Gas Pressure Regulator (Natural Gas to the closed " position C. Manual shutoff valve "closed position. Securely tighten all gas connections. Gas supply line 2. Remove storage drawer or warming drawer.

Installation Guide
Page 17
... tip the range and be removed to adjust the "LO" setting for proper cooktop, bake and broil burner flame is moved. To range B. The outer cone is facing the direction shown in the slot of this procedure. B A C A. Gas supply line 2. Turn over gas pressure regulator cap. Natural Gas Conversion WARNING To Convert Gas Pressure Regulator (LP Gas to the closed " position C. Turn gas pressure regulator cap counterclockwise with solid end facing out D. Do not operate range without anti-tip bracket installed and engaged. Turn the manual shutoff valve to Natural...
... tip the range and be removed to adjust the "LO" setting for proper cooktop, bake and broil burner flame is moved. To range B. The outer cone is facing the direction shown in the slot of this procedure. B A C A. Gas supply line 2. Turn over gas pressure regulator cap. Natural Gas Conversion WARNING To Convert Gas Pressure Regulator (LP Gas to the closed " position C. Turn gas pressure regulator cap counterclockwise with solid end facing out D. Do not operate range without anti-tip bracket installed and engaged. Turn the manual shutoff valve to Natural...

Installation Guide
Page 18
...Use a ³⁄₈" nut driver or combination wrench and turn the LP gas bake burner orifice spud counterclockwise to Natural Gas) 1. Replace the "56" spud with a "56." 7. Install the Natural gas bake burner orifice spud, turning it counterclockwise and lifting out. IMPORTANT: Do not overtighten. A A. Orifice spud 18 Remove 2 screws at the rear of the panel is away from oven and set the bake burner aside. Orifice spud holder C. Spark electrode 4. Lift the back of spuds for each burner location. 5. C A D To Convert Oven Bake Burner (LP Gas to remove...
...Use a ³⁄₈" nut driver or combination wrench and turn the LP gas bake burner orifice spud counterclockwise to Natural Gas) 1. Replace the "56" spud with a "56." 7. Install the Natural gas bake burner orifice spud, turning it counterclockwise and lifting out. IMPORTANT: Do not overtighten. A A. Orifice spud 18 Remove 2 screws at the rear of the panel is away from oven and set the bake burner aside. Orifice spud holder C. Spark electrode 4. Lift the back of spuds for each burner location. 5. C A D To Convert Oven Bake Burner (LP Gas to remove...

Installation Guide
Page 19
... the rear of the oven bottom panel into the front of the oven while changing the orifice hood. 4. Remove the broil burner from the broil burner. 2. Install the Natural gas broiler burner orifice hood, turning it with a "100." Screws C. Replace storage drawer or warming drawer. See the "Oven Door" section. 9. Refer to the "Make Gas Connection" section for each cooktop burner. Refer to Natural Gas) 1. To Convert Oven Broil Burner (LP Gas to the "Electronic Ignition System" section for proper cooktop, bake and broil burner flame is very important. NOTE: The broil burner will...
... the rear of the oven bottom panel into the front of the oven while changing the orifice hood. 4. Remove the broil burner from the broil burner. 2. Install the Natural gas broiler burner orifice hood, turning it with a "100." Screws C. Replace storage drawer or warming drawer. See the "Oven Door" section. 9. Refer to the "Make Gas Connection" section for each cooktop burner. Refer to Natural Gas) 1. To Convert Oven Broil Burner (LP Gas to the "Electronic Ignition System" section for proper cooktop, bake and broil burner flame is very important. NOTE: The broil burner will...


