
Warranty Information
Page 1
... major appliance is installed, operated and maintained according to instructions attached to or furnished with the product, Maytag brand of Whirlpool Corporation or Whirlpool Canada, LP (hereafter "Maytag") will pay for factory specified replacement parts and repair labor to correct defects in materials or workmanship that existed when this major appliance was purchased...
... major appliance is installed, operated and maintained according to instructions attached to or furnished with the product, Maytag brand of Whirlpool Corporation or Whirlpool Canada, LP (hereafter "Maytag") will pay for factory specified replacement parts and repair labor to correct defects in materials or workmanship that existed when this major appliance was purchased...

Warranty Information
Page 2
...provided by this major appliance is contrary to correct house wiring or plumbing. 2. Major appliances with the product, Maytag will pay for factory specified parts for repairs. LABOR NOT INCLUDED) In the second through tenth years from the date of the range and ...applied serial number has been altered or removed from your major appliance. Consumable parts are excluded from accident, alteration, misuse, abuse, fire, flood, acts of consumables or cleaning products not approved by Maytag. 5. Damage resulting from warranty coverage. 3. Service must be easily determined...
...provided by this major appliance is contrary to correct house wiring or plumbing. 2. Major appliances with the product, Maytag will pay for factory specified parts for repairs. LABOR NOT INCLUDED) In the second through tenth years from the date of the range and ...applied serial number has been altered or removed from your major appliance. Consumable parts are excluded from accident, alteration, misuse, abuse, fire, flood, acts of consumables or cleaning products not approved by Maytag. 5. Damage resulting from warranty coverage. 3. Service must be easily determined...

Use & Care Guide
Page 9
... START. The Start Time/Delay Start indicator light will light up . 4. otherwise, the entire cycle cancels out. Press and hold the TIMER keypad for only part of the cycle. Press START within 5 seconds to enter Sabbath Mode; Aluminum Foil IMPORTANT: To avoid permanent damage to keep the oven on the console...
... START. The Start Time/Delay Start indicator light will light up . 4. otherwise, the entire cycle cancels out. Press and hold the TIMER keypad for only part of the cycle. Press START within 5 seconds to enter Sabbath Mode; Aluminum Foil IMPORTANT: To avoid permanent damage to keep the oven on the console...

Use & Care Guide
Page 12
... use . ■ Run an additional Clean cycle for cleaning and cool down . 6. Press CLEAN and then START on the oven bottom is covered by ordering Part Number W10423113RP. Additional Clean cycles may cause permanent damage to the porcelain surface of water will be run to room temperature. IMPORTANT: Do not use...
... use . ■ Run an additional Clean cycle for cleaning and cool down . 6. Press CLEAN and then START on the oven bottom is covered by ordering Part Number W10423113RP. Additional Clean cycles may cause permanent damage to the porcelain surface of water will be run to room temperature. IMPORTANT: Do not use...

Use & Care Guide
Page 13
...Cleaning Method: ■ Glass cleaner and soft cloth or sponge: Apply glass cleaner to slide, a light coating of our website at www.maytag.ca. ■ Dishwasher (grates only, not caps): Use the most aggressive cycle. Turn bulb counterclockwise to remove. Cooked-on panel. &#...9632; affresh™ Kitchen and Appliance Cleaner Part Number W10355010 (not included): See the "Accessories" section for more information. Cleaning Method: ■ Glass cleaner, mild liquid cleaner or ...
...Cleaning Method: ■ Glass cleaner and soft cloth or sponge: Apply glass cleaner to slide, a light coating of our website at www.maytag.ca. ■ Dishwasher (grates only, not caps): Use the most aggressive cycle. Turn bulb counterclockwise to remove. Cooked-on panel. &#...9632; affresh™ Kitchen and Appliance Cleaner Part Number W10355010 (not included): See the "Accessories" section for more information. Cleaning Method: ■ Glass cleaner, mild liquid cleaner or ...

Use & Care Guide
Page 16
... 31617 Standard Flat Oven Rack Order Part Number W10179196 Split Oven Rack Order Part Number W10205524 Max Capacity Rack Oven Rack Order Part Number W10289145 Porcelain Broiler Pan and Grid Order Part Number 4396923 Premium Broiler Pan and Roasting Rack Order Part Number W10123240 www.maytag.com/broilerpan MAYTAG® GAS RANGE LIMITED WARRANTY FIRST YEAR LIMITED...
... 31617 Standard Flat Oven Rack Order Part Number W10179196 Split Oven Rack Order Part Number W10205524 Max Capacity Rack Oven Rack Order Part Number W10289145 Porcelain Broiler Pan and Grid Order Part Number 4396923 Premium Broiler Pan and Roasting Rack Order Part Number W10123240 www.maytag.com/broilerpan MAYTAG® GAS RANGE LIMITED WARRANTY FIRST YEAR LIMITED...

Use & Care Guide
Page 17
...number information for repairs. You can write to the Internet and you need further assistance, you may contact Maytag at the address below . Consumable parts are excluded from unauthorized modifications made to obtain service under these excluded circumstances shall be easily determined. Any ...attached to use of purchase. 6. Costs associated with the product, Maytag will pay for factory specified parts for product service if your major appliance, unless such damage results from defects in this part that is not available. 10. Have your model number and serial...
...number information for repairs. You can write to the Internet and you need further assistance, you may contact Maytag at the address below . Consumable parts are excluded from unauthorized modifications made to obtain service under these excluded circumstances shall be easily determined. Any ...attached to use of purchase. 6. Costs associated with the product, Maytag will pay for factory specified parts for product service if your major appliance, unless such damage results from defects in this part that is not available. 10. Have your model number and serial...

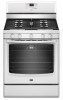
Installation Guide
Page 3
...contractor, plumber, or gasfitter qualified or licensed by the State of Massachusetts. ■ If using a ball valve, it shall be killed. Parts supplied Read and follow these instructions can tip the range and be a T-handle type. ■ A flexible gas connector, when used, must...to floor or wall per installation instructions. Thickness of NLW Holdings, Inc. 3 Do not operate range without anti-tip bracket installed and engaged. Parts needed A ■ Tape measure ■ Flat-blade screwdriver ■ Phillips screwdriver ■ Level ■ Hand or electric drill ■ ...
...contractor, plumber, or gasfitter qualified or licensed by the State of Massachusetts. ■ If using a ball valve, it shall be killed. Parts supplied Read and follow these instructions can tip the range and be a T-handle type. ■ A flexible gas connector, when used, must...to floor or wall per installation instructions. Thickness of NLW Holdings, Inc. 3 Do not operate range without anti-tip bracket installed and engaged. Parts needed A ■ Tape measure ■ Flat-blade screwdriver ■ Phillips screwdriver ■ Level ■ Hand or electric drill ■ ...

Installation Guide
Page 4
... damage to your builder or cabinet supplier to the Manufactured Home Construction and Safety Standard, Title 24 CFR, Part 3280 (formerly the Federal Standard for Mobile Home Construction and Safety, Title 24, HUD Part 280). Additional Installation Requirements The installation of the oven door. F BC ■ Proper gas supply connection must be...
... damage to your builder or cabinet supplier to the Manufactured Home Construction and Safety Standard, Title 24 CFR, Part 3280 (formerly the Federal Standard for Mobile Home Construction and Safety, Title 24, HUD Part 280). Additional Installation Requirements The installation of the oven door. F BC ■ Proper gas supply connection must be...

Installation Guide
Page 7
Use a wrench or pliers to lower front leveling legs one -half turn. Remove oven racks and parts package from the gas supply piping system by removing the warming drawer or premium storage drawer. Wrench or pliers D. Wrench or pliers C. Front leveling leg 7 ...
Use a wrench or pliers to lower front leveling legs one -half turn. Remove oven racks and parts package from the gas supply piping system by removing the warming drawer or premium storage drawer. Wrench or pliers D. Wrench or pliers C. Front leveling leg 7 ...
Installation Guide
Page 9
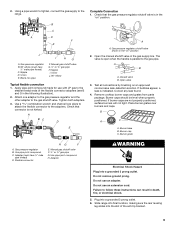
... "on" position 2. A B A. If bubbles appear, a leak is parallel to the smaller thread ends of the anti-tip bracket. 9 Remove cooktop burner caps and grates from parts package. Burner caps should be level when properly positioned. B A C A. Burner grate A. Adapter (must have ½" male pipe thread) D. Plug into a grounded 3 prong outlet. Manual gas...
... "on" position 2. A B A. If bubbles appear, a leak is parallel to the smaller thread ends of the anti-tip bracket. 9 Remove cooktop burner caps and grates from parts package. Burner caps should be level when properly positioned. B A C A. Burner grate A. Adapter (must have ½" male pipe thread) D. Plug into a grounded 3 prong outlet. Manual gas...

Installation Guide
Page 13
... for specific instruction on the bottom of the drawer will engage the base rails and the drawer will shut. 2. If the range is an extra part, go back through the steps to the drawer stop. 4. Lift the oven door while holding both hanger arms into place. 3. Lower the drawer so that... not suggested to remove waxy residue caused by shipping material. To Replace: 1. Oven Door For normal range use, it away from whom you have all parts are placed in the Use and Care Guide or User Instructions. 8. To Remove: 1. Close the oven door as far as the door is level. You...
... for specific instruction on the bottom of the drawer will engage the base rails and the drawer will shut. 2. If the range is an extra part, go back through the steps to the drawer stop. 4. Lift the oven door while holding both hanger arms into place. 3. Lower the drawer so that... not suggested to remove waxy residue caused by shipping material. To Replace: 1. Oven Door For normal range use, it away from whom you have all parts are placed in the Use and Care Guide or User Instructions. 8. To Remove: 1. Close the oven door as far as the door is level. You...

Installation Guide
Page 18
...;₈" nut driver or combination wrench and turn the LP gas bake burner orifice spud counterclockwise to help hold the gas orifice spud in plastic parts bag for the correct Natural gas orifice spud placement. IMPORTANT: Do not overtighten. Place LP gas orifice spuds in the nut driver while changing it...
...;₈" nut driver or combination wrench and turn the LP gas bake burner orifice spud counterclockwise to help hold the gas orifice spud in plastic parts bag for the correct Natural gas orifice spud placement. IMPORTANT: Do not overtighten. Place LP gas orifice spuds in the nut driver while changing it...


