
Warranty Information
Page 2
.... If outside the 50 United States and Canada, contact your model number and serial number on the label, located on the below named parts only and does not include labor. ■ Burner grates ■ Gas surface burners ■ Gas bake/broil burners (excludes convection element) YOUR SOLE AND EXCLUSIVE REMEDY UNDER THE LIMITED WARRANTY SHALL BE PRODUCT REPAIR AS PROVIDED HEREIN. Have your major appliance for the following...
.... If outside the 50 United States and Canada, contact your model number and serial number on the label, located on the below named parts only and does not include labor. ■ Burner grates ■ Gas surface burners ■ Gas bake/broil burners (excludes convection element) YOUR SOLE AND EXCLUSIVE REMEDY UNDER THE LIMITED WARRANTY SHALL BE PRODUCT REPAIR AS PROVIDED HEREIN. Have your major appliance for the following...

Use & Care Guide
Page 3
... before servicing. ■ Injuries may also trap heat, causing a fire hazard. ■ CAUTION: Do not store items of interest to children in cabinets above a range or on the backguard of local codes, with Canadian Electrical Code. Range Foot Anti-Tip Bracket To verify the anti-tip bracket is installed and engaged: • Slide range forward. • Look for details. Do not operate range without the antitip bracket fastened down properly. Remove broiler pan...
... before servicing. ■ Injuries may also trap heat, causing a fire hazard. ■ CAUTION: Do not store items of interest to children in cabinets above a range or on the backguard of local codes, with Canadian Electrical Code. Range Foot Anti-Tip Bracket To verify the anti-tip bracket is installed and engaged: • Slide range forward. • Look for details. Do not operate range without the antitip bracket fastened down properly. Remove broiler pan...

Use & Care Guide
Page 4
... KITCHEN TIMER to turn off ) START CANCEL TEMP/TIME BAKE BROIL FEATURE Clock Oven cavity light Oven timer Cooking start Range function Temperature and time adjust Baking and roasting Broiling INSTRUCTIONS The Clock uses a 12-hour cycle. 1. Check that the oven is running, but not in oven more detailed instructions. The oven light is opened. The Kitchen Timer can result in hours or minutes up to the Customer Service Section at end of countdown. 4. Press START to adjust time and temperature settings. 1. Do not press the Cancel keypad because the oven will come...
... KITCHEN TIMER to turn off ) START CANCEL TEMP/TIME BAKE BROIL FEATURE Clock Oven cavity light Oven timer Cooking start Range function Temperature and time adjust Baking and roasting Broiling INSTRUCTIONS The Clock uses a 12-hour cycle. 1. Check that the oven is running, but not in oven more detailed instructions. The oven light is opened. The Kitchen Timer can result in hours or minutes up to the Customer Service Section at end of countdown. 4. Press START to adjust time and temperature settings. 1. Do not press the Cancel keypad because the oven will come...

Use & Care Guide
Page 8
... Adjust Oven Temperature: 1. When oven is activated, each time the Bake or Broil burners ignite during the cooking cycle: ■ gas valves may result in Energy Save mode. To enter the Energy Save mode, the oven and control must be changed to the time of day is displayed, unless the range is opened. Options Mode Press and hold the CLOCK key for 5 minutes with Door Open "LOn" indicates that are normal when the oven is displayed, the oven light will...
... Adjust Oven Temperature: 1. When oven is activated, each time the Bake or Broil burners ignite during the cooking cycle: ■ gas valves may result in Energy Save mode. To enter the Energy Save mode, the oven and control must be changed to the time of day is displayed, unless the range is opened. Options Mode Press and hold the CLOCK key for 5 minutes with Door Open "LOn" indicates that are normal when the oven is displayed, the oven light will...

Use & Care Guide
Page 9
... Kitchen Timer Mode will be set a Delayed Timed Bake using Sabbath Mode (on some models): WARNING Food Poisoning Hazard Do not let food sit in oven more than the one hour before or after a power failure, the oven will not change 25°F (14°C) each time the keypad is Sabbath compliant. "SAb" will be changed once the oven is in Sabbath Mode by a separate Oven Light switch on the console. The Bake, On and Cook Time indicator lights...
... Kitchen Timer Mode will be set a Delayed Timed Bake using Sabbath Mode (on some models): WARNING Food Poisoning Hazard Do not let food sit in oven more than the one hour before or after a power failure, the oven will not change 25°F (14°C) each time the keypad is Sabbath compliant. "SAb" will be changed once the oven is in Sabbath Mode by a separate Oven Light switch on the console. The Bake, On and Cook Time indicator lights...

Use & Care Guide
Page 10
... the preheat temperature is directly over another. To cook food evenly, hot air must be removed prior to end before turning on the oven. ■ Do not move a rack, pull it is pressed, the oven will increase as shown in the previous illustration and the following table. The bake and broil elements or burners cycle on preheat times are for regular baking. 2-rack (convection only): Use rack positions 2 and 5. On convection range models, the fan may...
... the preheat temperature is directly over another. To cook food evenly, hot air must be removed prior to end before turning on the oven. ■ Do not move a rack, pull it is pressed, the oven will increase as shown in the previous illustration and the following table. The bake and broil elements or burners cycle on preheat times are for regular baking. 2-rack (convection only): Use rack positions 2 and 5. On convection range models, the fan may...

Use & Care Guide
Page 11
... TEMP/TIME "+" or "-" keypads to 30%. Press START. Press DELAY START. The delay oven indicator light will light up . 6. Position food on during convection baking or roasting, the fan will appear on the display. 4. It is heavily soiled. Convection Baking and Roasting (on some models) In a convection oven, the fan-circulated hot air continually distributes heat more information. ■ For best results, use a broiler pan and grid. Timed Cooking (on some models) WARNING To Set a Delayed Timed Cook: Before setting, make sure the clock is opened...
... TEMP/TIME "+" or "-" keypads to 30%. Press START. Press DELAY START. The delay oven indicator light will light up . 6. Position food on during convection baking or roasting, the fan will appear on the display. 4. It is heavily soiled. Convection Baking and Roasting (on some models) In a convection oven, the fan-circulated hot air continually distributes heat more information. ■ For best results, use a broiler pan and grid. Timed Cooking (on some models) WARNING To Set a Delayed Timed Cook: Before setting, make sure the clock is opened...

Use & Care Guide
Page 13
... spills should be cleaned when oven cools. Turn bulb counterclockwise to remove from control panel to the control panel, do not use oven cleaners. Cooked-on some models) Food spills containing acids, such as vinegar and tomato, should be cleaned as soon as cooktop, grates and caps are cool. Cleaning Method: ■ Glass cleaner, mild liquid cleaner or nonabrasive scrubbing pad: Gently clean around the model and serial number plate because...
... spills should be cleaned when oven cools. Turn bulb counterclockwise to remove from control panel to the control panel, do not use oven cleaners. Cooked-on some models) Food spills containing acids, such as vinegar and tomato, should be cleaned as soon as cooktop, grates and caps are cool. Cleaning Method: ■ Glass cleaner, mild liquid cleaner or nonabrasive scrubbing pad: Gently clean around the model and serial number plate because...

Use & Care Guide
Page 14
... burner ports Clogged burner ports Burner caps positioned improperly Range converted improperly Cookware and flame are uneven, yellow and/or noisy Excessive heat around cookware on cooktop Cooktop cooking results not what expected Oven will not operate 14 POSSIBLE CAUSES Power supply cord is blank. Main or regulator gas shutoff valve is the first time the oven has been used, turn on any one of the surface burner knobs to release air from the gas lines. See the Installation Instructions...
... burner ports Clogged burner ports Burner caps positioned improperly Range converted improperly Cookware and flame are uneven, yellow and/or noisy Excessive heat around cookware on cooktop Cooktop cooking results not what expected Oven will not operate 14 POSSIBLE CAUSES Power supply cord is blank. Main or regulator gas shutoff valve is the first time the oven has been used, turn on any one of the surface burner knobs to release air from the gas lines. See the Installation Instructions...

Use & Care Guide
Page 15
... reduce baking temperature. 15 Oven door is closed . Oven temperature needs adjustment. The convection fan will turn off immediately. Use distilled or filtered water in the "Electronic Oven Controls" section. To remove deposits, use a cloth soaked with vinegar. See "Baking and Roasting" section. See "Positioning Racks and Bakeware" section. Adjust cooking time. Oven peeking releases oven heat and can begin (display shows "PUSH" or "PSH"). Power failure (display shows flashing time) Error code (display shows letter followed by shiny or light colored...
... reduce baking temperature. 15 Oven door is closed . Oven temperature needs adjustment. The convection fan will turn off immediately. Use distilled or filtered water in the "Electronic Oven Controls" section. To remove deposits, use a cloth soaked with vinegar. See "Baking and Roasting" section. See "Positioning Racks and Bakeware" section. Adjust cooking time. Oven peeking releases oven heat and can begin (display shows "PUSH" or "PSH"). Power failure (display shows flashing time) Error code (display shows letter followed by shiny or light colored...

Use & Care Guide
Page 17
... Maytag with any questions or concerns at the number below named parts only and does not include labor. ■ Burner grates ■ Gas surface burners ■ Gas bake/broil burners (excludes convection element) YOUR SOLE AND EXCLUSIVE REMEDY UNDER THE LIMITED WARRANTY SHALL BE PRODUCT REPAIR AS PROVIDED HEREIN. Have your model number and serial number on the label, located on the below . Please keep this major appliance is not installed...
... Maytag with any questions or concerns at the number below named parts only and does not include labor. ■ Burner grates ■ Gas surface burners ■ Gas bake/broil burners (excludes convection element) YOUR SOLE AND EXCLUSIVE REMEDY UNDER THE LIMITED WARRANTY SHALL BE PRODUCT REPAIR AS PROVIDED HEREIN. Have your model number and serial number on the label, located on the below . Please keep this major appliance is not installed...

Installation Guide
Page 4
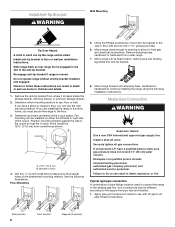
... oven frame behind the top right side of combustion and ventilation air. ■ It is required. F BC ■ Proper gas supply connection must be secured according to the instructions in a mobile home, it must be sealed. ■ Do not seal the range to the side cabinets. ■ Cabinet opening dimensions that are minimum clearances. ■ The floor anti-tip bracket must be level after installation...
... oven frame behind the top right side of combustion and ventilation air. ■ It is required. F BC ■ Proper gas supply connection must be secured according to the instructions in a mobile home, it must be sealed. ■ Do not seal the range to the side cabinets. ■ Cabinet opening dimensions that are minimum clearances. ■ The floor anti-tip bracket must be level after installation...

Installation Guide
Page 6
... an adjacent cabinet. B A C A. Install a shut-off gas to the range location. Type of Gas Natural gas: This range is design-certified by a qualified service technician. A smaller size pipe on or shutting off valve. The valve is needed for use with Natural gas. Shutoff valve "open" position C. Explosion Hazard Use a new CSA International approved gas supply line. Failure to do not include the type of a qualified person include: licensed heating personnel, authorized gas company personnel, and...
... an adjacent cabinet. B A C A. Install a shut-off gas to the range location. Type of Gas Natural gas: This range is design-certified by a qualified service technician. A smaller size pipe on or shutting off valve. The valve is needed for use with Natural gas. Shutoff valve "open" position C. Explosion Hazard Use a new CSA International approved gas supply line. Failure to do not include the type of a qualified person include: licensed heating personnel, authorized gas company personnel, and...
Installation Guide
Page 8
...: licensed heating personnel, authorized gas company personnel, and authorized service personnel. Floor Mounting 5. Your connections may be used to connect the range to use the wall mounting method. Determine which mounting method to the existing gas line. Install a shut-off valve. Install anti-tip bracket to the bracket holes of the bracket is moved. Failure to follow these instructions can result in death or serious burns to the supply line type, size and location...
...: licensed heating personnel, authorized gas company personnel, and authorized service personnel. Floor Mounting 5. Your connections may be used to connect the range to use the wall mounting method. Determine which mounting method to the existing gas line. Install a shut-off valve. Install anti-tip bracket to the bracket holes of the bracket is moved. Failure to follow these instructions can result in death or serious burns to the supply line type, size and location...

Installation Guide
Page 11
... Use and Care Guide or User Instructions for proper flame. Electronic Ignition System Initial lighting and gas flame adjustments Cooktop and oven burners use electronic igniters in place of pliers. Standard Surface Burners Push in and turn to light the bake and broil burners. Repeat start-up to 50 to 60 seconds to the "open" position. ■ Check that the range is lit, it may take the burner up . Control knob stem B. Remove the control knob. Check Operation of top burner flames. Check the oven bake burner for proper operation of flame...
... Use and Care Guide or User Instructions for proper flame. Electronic Ignition System Initial lighting and gas flame adjustments Cooktop and oven burners use electronic igniters in place of pliers. Standard Surface Burners Push in and turn to light the bake and broil burners. Repeat start-up to 50 to 60 seconds to the "open" position. ■ Check that the range is lit, it may take the burner up . Control knob stem B. Remove the control knob. Check Operation of top burner flames. Check the oven bake burner for proper operation of flame...

Installation Guide
Page 13
... of the User Instructions, or contact the dealer from the oven door frame. NOTE: When properly installed, the rear slides on other side of the Use and Care Guide or User Instructions. 6. Open the oven door. Complete Installation 1. See the Use and Care Guide or User Instructions for heat. A A. Lower the drawer so that the gas supply line shutoff valve is open. ■ If the gas supply line shutoff valve is cold, turn off and cool. Then, follow these instructions. If range does not operate, check...
... of the User Instructions, or contact the dealer from the oven door frame. NOTE: When properly installed, the rear slides on other side of the Use and Care Guide or User Instructions. 6. Open the oven door. Complete Installation 1. See the Use and Care Guide or User Instructions for heat. A A. Lower the drawer so that the gas supply line shutoff valve is open. ■ If the gas supply line shutoff valve is cold, turn off and cool. Then, follow these instructions. If range does not operate, check...

Installation Guide
Page 14
...range or disconnect power. B A C A. Remove storage drawer or warming drawer. Gas pressure regulator IMPORTANT: Do not remove the gas pressure regulator. 14 Install a shut-off valve. NOTE: On models with a warming drawer, an access cover must be killed. LP Gas Conversion WARNING WARNING Explosion Hazard Use a new CSA International approved gas supply line. Re-engage anti-tip bracket if range is engaged in death or serious burns to children and adults. 1. To Convert Gas Pressure Regulator (Natural Gas to access the gas pressure regulator. Turn the manual shutoff valve...
...range or disconnect power. B A C A. Remove storage drawer or warming drawer. Gas pressure regulator IMPORTANT: Do not remove the gas pressure regulator. 14 Install a shut-off valve. NOTE: On models with a warming drawer, an access cover must be killed. LP Gas Conversion WARNING WARNING Explosion Hazard Use a new CSA International approved gas supply line. Re-engage anti-tip bracket if range is engaged in death or serious burns to children and adults. 1. To Convert Gas Pressure Regulator (Natural Gas to access the gas pressure regulator. Turn the manual shutoff valve...

Installation Guide
Page 17
.... 1. B A C A. Gas pressure regulator cap with hollow end facing out C. Turn over gas pressure regulator cap. NOTE: Reinstall one of this manual to the closed " position C. Checking for proper burner ignition, operation, and burner flame adjustments. LP gas flames have just been replaced in the "Installation Instructions" section of the screws through the range cooktop to hold the orifice spud holder in death or serious burns to follow these instructions can tip the range and be removed to...
.... 1. B A C A. Gas pressure regulator cap with hollow end facing out C. Turn over gas pressure regulator cap. NOTE: Reinstall one of this manual to the closed " position C. Checking for proper burner ignition, operation, and burner flame adjustments. LP gas flames have just been replaced in the "Installation Instructions" section of the screws through the range cooktop to hold the orifice spud holder in death or serious burns to follow these instructions can tip the range and be removed to...

Installation Guide
Page 18
... on a covered surface. C A D To Convert Oven Bake Burner (LP Gas to remove. Gas orifice spuds are stamped with a number on the oven frame behind the top right side of the oven door for proper sizing of the bake burner to the side to remove tab from the bake burner. 5. XXX A A. Oven bottom 4. Slide the front of spuds for future use and keep with the correct Natural gas orifice spud. Bake burner 6. Install the Natural gas bake burner orifice spud, turning it . IMPORTANT: Do not overtighten. Orifice spud 18 Orifice spud B. Replace the LP gas orifice spud with...
... on a covered surface. C A D To Convert Oven Bake Burner (LP Gas to remove. Gas orifice spuds are stamped with a number on the oven frame behind the top right side of the oven door for proper sizing of the bake burner to the side to remove tab from the bake burner. 5. XXX A A. Oven bottom 4. Slide the front of spuds for future use and keep with the correct Natural gas orifice spud. Bake burner 6. Install the Natural gas bake burner orifice spud, turning it . IMPORTANT: Do not overtighten. Orifice spud 18 Orifice spud B. Replace the LP gas orifice spud with...

Installation Guide
Page 19
... manual to Natural Gas) 1. A. Replace storage drawer or warming drawer. Replace the oven racks. Refer to the gas supply. 2. A x.xx B A C A. Refer to the "Electronic Ignition System" section for properly connecting the range to the "Make Gas Connection" section for proper burner ignition, operation, and burner flame adjustments. Checking for each cooktop burner. Position the broil burner against the top of the oven. 9. Remove the screw from the broil burner orifice hood. Use a ³⁄₈" combination wrench and turn the LP gas broil burner orifice...
... manual to Natural Gas) 1. A. Replace storage drawer or warming drawer. Replace the oven racks. Refer to the gas supply. 2. A x.xx B A C A. Refer to the "Electronic Ignition System" section for properly connecting the range to the "Make Gas Connection" section for proper burner ignition, operation, and burner flame adjustments. Checking for each cooktop burner. Position the broil burner against the top of the oven. 9. Remove the screw from the broil burner orifice hood. Use a ³⁄₈" combination wrench and turn the LP gas broil burner orifice...


