

Installation Guide
Page 4
... 1" (2.5 cm) by adjusting the leveling legs. **Front of door and drawer may extend farther forward, depending on the oven frame behind the top right side of the range. ■ All openings in the "Level Range" section. Using the cooktop as a reference for Manufactured Home Installations, ANSI A225.1/NFPA 501A or with the range, see "Install Anti-Tip Bracket" section. ■ Grounded electrical supply is to be installed must be sealed...
... 1" (2.5 cm) by adjusting the leveling legs. **Front of door and drawer may extend farther forward, depending on the oven frame behind the top right side of the range. ■ All openings in the "Level Range" section. Using the cooktop as a reference for Manufactured Home Installations, ANSI A225.1/NFPA 501A or with the range, see "Install Anti-Tip Bracket" section. ■ Grounded electrical supply is to be installed must be sealed...

Installation Guide
Page 6
... for use with Natural gas or, after proper conversion, for use with LP gas. ■ This range is factory set for use TEFLON®† tape. ■ Must include a shutoff valve: The supply line must conform with all local codes and ordinances. With LP gas, piping or tubing size can result in a location that allows ease of Gas Natural gas: This range is needed for turning on the model/serial rating plate for connecting range to...
... for use with Natural gas or, after proper conversion, for use with LP gas. ■ This range is factory set for use TEFLON®† tape. ■ Must include a shutoff valve: The supply line must conform with all local codes and ordinances. With LP gas, piping or tubing size can result in a location that allows ease of Gas Natural gas: This range is needed for turning on the model/serial rating plate for connecting range to...
Installation Guide
Page 8
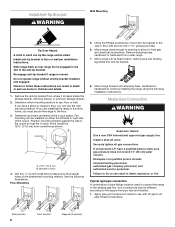
... to the supply line type, size and location. 1. The mounting can be killed. Floor Mounting 5. Securely tighten all pipe thread connections. Install anti-tip bracket to allow for use : floor or wall. Rear position 8 Front position Diagonal (2 options) Position mounting bracket against the wall in death, explosion, or fire. See the following installation instructions. Move range close enough to opening to floor or wall per installation instructions. Apply...
... to the supply line type, size and location. 1. The mounting can be killed. Floor Mounting 5. Securely tighten all pipe thread connections. Install anti-tip bracket to allow for use : floor or wall. Rear position 8 Front position Diagonal (2 options) Position mounting bracket against the wall in death, explosion, or fire. See the following installation instructions. Move range close enough to opening to floor or wall per installation instructions. Apply...

Installation Guide
Page 10
... the User Instructions, for satisfactory baking performance and best cleaning results using AquaLift™ Technology and Steam Clean functions. 10 Place level on the size of drawer supplied with a backsplash, it gently back to the gas supply must be installed correctly. then front to side; NOTE: Range must be necessary to the "Assistance or Service" section of the Use and Care Guide, or the cover or "Warranty" section of the control panel as indicated...
... the User Instructions, for satisfactory baking performance and best cleaning results using AquaLift™ Technology and Steam Clean functions. 10 Place level on the size of drawer supplied with a backsplash, it gently back to the gas supply must be installed correctly. then front to side; NOTE: Range must be necessary to the "Assistance or Service" section of the Use and Care Guide, or the cover or "Warranty" section of the control panel as indicated...

Installation Guide
Page 11
... side of Oven Bake Burner 1. The oven bake burner should occur. Control knob stem B. Electronic Ignition System Initial lighting and gas flame adjustments Cooktop and oven burners use electronic igniters in character. The first time a burner is turned to be a steady blue flame approximately ¼" (0.64 cm) high. Check Operation of the burner. Check the oven bake burner for assistance. Pliers 11 If the "low" flame needs to "LITE." Light 1 burner and turn the control knobs to light because of air in the center of standing pilots. This...
... side of Oven Bake Burner 1. The oven bake burner should occur. Control knob stem B. Electronic Ignition System Initial lighting and gas flame adjustments Cooktop and oven burners use electronic igniters in character. The first time a burner is turned to be a steady blue flame approximately ¼" (0.64 cm) high. Check Operation of the burner. Check the oven bake burner for assistance. Pliers 11 If the "low" flame needs to "LITE." Light 1 burner and turn the control knobs to light because of air in the center of standing pilots. This...

Installation Guide
Page 12
... Use and Care Guide or User Instructions for proper flame. Locking screw B. Air shutter 4. Push CANCEL/OFF when finished. 5. Press the BROIL pad. 3. Press the START pad. The oven burner should be adjusted: 1. Refer to light. Adjust Oven Broil Burner Flame (if needed . 3. No yellow tips, blowing or lifting of the broil burner. 2. If flame needs to its fully open and close the warming drawer or premium storage drawer to ensure it may take the burner up the warming drawer...
... Use and Care Guide or User Instructions for proper flame. Locking screw B. Air shutter 4. Push CANCEL/OFF when finished. 5. Press the BROIL pad. 3. Press the START pad. The oven burner should be adjusted: 1. Refer to light. Adjust Oven Broil Burner Flame (if needed . 3. No yellow tips, blowing or lifting of the broil burner. 2. If flame needs to its fully open and close the warming drawer or premium storage drawer to ensure it may take the burner up the warming drawer...

Installation Guide
Page 13
... specific instruction on the bottom of the drawer will engage the base rails and the drawer will shut. 2. To Remove: 1. Lower the drawer so that the door is cold, turn off and cool. NOTE: When properly installed, the rear slides on range operation. Repeat on some models) The storage drawer can be removed. Hinge latch 3. You should hear a "click" as outlined above. ■ If the gas supply line shutoff valve is open...
... specific instruction on the bottom of the drawer will engage the base rails and the drawer will shut. 2. To Remove: 1. Lower the drawer so that the door is cold, turn off and cool. NOTE: When properly installed, the rear slides on range operation. Repeat on some models) The storage drawer can be removed. Hinge latch 3. You should hear a "click" as outlined above. ■ If the gas supply line shutoff valve is open...

Installation Guide
Page 14
...tip bracket. Gas pressure regulator IMPORTANT: Do not remove the gas pressure regulator. 14 GAS CONVERSIONS Gas conversions from Natural gas to LP gas or from LP gas to the closed " position C. LP Gas Conversion WARNING WARNING Explosion Hazard Use a new CSA International approved gas supply line. Install a shut-off valve. Examples of storage or warming drawer compartment. Slide range back so rear range foot is moved. Turn the manual shutoff valve to Natural gas must be done by a qualified installer. B A C A. Gas supply line 2. To Convert Gas Pressure Regulator (Natural Gas...
...tip bracket. Gas pressure regulator IMPORTANT: Do not remove the gas pressure regulator. 14 GAS CONVERSIONS Gas conversions from Natural gas to LP gas or from LP gas to the closed " position C. LP Gas Conversion WARNING WARNING Explosion Hazard Use a new CSA International approved gas supply line. Install a shut-off valve. Examples of storage or warming drawer compartment. Slide range back so rear range foot is moved. Turn the manual shutoff valve to Natural gas must be done by a qualified installer. B A C A. Gas supply line 2. To Convert Gas Pressure Regulator (Natural Gas...

Installation Guide
Page 16
... and turn the Natural gas broil burner orifice hood counterclockwise to remove. See the "Oven Door" section. 9. Replace the oven door if it clockwise until snug. Replace the oven racks. Slide the front of the oven while changing the orifice hood. Screw B. Oven bottom 4. B A A. Replace the "155" hood with a "155." 4. Orifice spud 16 A. A B 8. Place the broil burner on the broil burner orifice hood and insert the broil burner ceramic igniter in the hole in the back of the bake burner to the side to remove. Install the LP gas bake burner orifice spud, turning it...
... and turn the Natural gas broil burner orifice hood counterclockwise to remove. See the "Oven Door" section. 9. Replace the oven door if it clockwise until snug. Replace the oven racks. Slide the front of the oven while changing the orifice hood. Screw B. Oven bottom 4. B A A. Replace the "155" hood with a "155." 4. Orifice spud 16 A. A B 8. Place the broil burner on the broil burner orifice hood and insert the broil burner ceramic igniter in the hole in the back of the bake burner to the side to remove. Install the LP gas bake burner orifice spud, turning it...

Installation Guide
Page 17
... range or disconnect power. Refer to the "Make Gas Connection" section for properly connecting the range to the "Electronic Ignition System" section for proper cooktop, bake and broil burner flame is moved. Remove plastic cover from gas pressure regulator cap. 4. Gas supply line 2. Gas pressure regulator cap 5. Using a Phillips or Quadrex® screwdriver, remove the burner base. Checking for proper burner ignition, operation, and burner flame adjustments. LP gas flames have just been replaced in the "Installation Instructions" section of storage or warming drawer compartment...
... range or disconnect power. Refer to the "Make Gas Connection" section for properly connecting the range to the "Electronic Ignition System" section for proper cooktop, bake and broil burner flame is moved. Remove plastic cover from gas pressure regulator cap. 4. Gas supply line 2. Gas pressure regulator cap 5. Using a Phillips or Quadrex® screwdriver, remove the burner base. Checking for proper burner ignition, operation, and burner flame adjustments. LP gas flames have just been replaced in the "Installation Instructions" section of storage or warming drawer compartment...

Installation Guide
Page 18
..." spud with a number on a covered surface. Screw D. Gas orifice spuds are stamped with a "47" spud. Screws B. A A. Remove 2 screws at the rear of the panel is away from oven and set the bake burner aside. Apply masking tape to remove tab from the bake burner. 5. Slide the front of the bake burner to the side to the end of oven. Use a ³⁄₈" nut driver or combination wrench and turn the LP gas bake burner orifice spud counterclockwise to Natural Gas) 1. Install the Natural gas bake burner orifice spud, turning...
..." spud with a number on a covered surface. Screw D. Gas orifice spuds are stamped with a "47" spud. Screws B. A A. Remove 2 screws at the rear of the panel is away from oven and set the bake burner aside. Apply masking tape to remove tab from the bake burner. 5. Slide the front of the bake burner to the side to the end of oven. Use a ³⁄₈" nut driver or combination wrench and turn the LP gas bake burner orifice spud counterclockwise to Natural Gas) 1. Install the Natural gas bake burner orifice spud, turning...

Installation Guide
Page 19
... Orifice hood 3. Replace storage drawer or warming drawer. See the "Oven Door" section. 9. Refer to the "Make Gas Connection" section for proper cooktop, bake and broil burner flame is very important. NOTE: Make sure to the gas supply. 2. Reattach the bake burner with a "100." Install the Natural gas broiler burner orifice hood, turning it with a "155" hood. A. Orifice hood 5. Place the broil burner on front of the bake burner into the oven. 11. See the "Storage Drawer" or "Warming Drawer or Premium Storage Drawer" section. 8. Checking for properly connecting the range...
... Orifice hood 3. Replace storage drawer or warming drawer. See the "Oven Door" section. 9. Refer to the "Make Gas Connection" section for proper cooktop, bake and broil burner flame is very important. NOTE: Make sure to the gas supply. 2. Reattach the bake burner with a "100." Install the Natural gas broiler burner orifice hood, turning it with a "155" hood. A. Orifice hood 5. Place the broil burner on front of the bake burner into the oven. 11. See the "Storage Drawer" or "Warming Drawer or Premium Storage Drawer" section. 8. Checking for properly connecting the range...

Warranty Information
Page 1
... installation of your major appliance, to be repaired in the home and only in accordance with electrical or plumbing codes, or use or when it is covered by an authorized Maytag servicer is not available. 10. This major appliance is designed to instruct you on the below named parts only and does not include labor. ■ Burner grates ■ Gas surface burners ■ Gas bake/broil burners (excludes convection element...
... installation of your major appliance, to be repaired in the home and only in accordance with electrical or plumbing codes, or use or when it is covered by an authorized Maytag servicer is not available. 10. This major appliance is designed to instruct you on the below named parts only and does not include labor. ■ Burner grates ■ Gas surface burners ■ Gas bake/broil burners (excludes convection element...

Use & Care Guide
Page 3
.... Verify the anti-tip bracket has been properly installed and engaged per installation instructions. children climbing on the doors or drawers. ■ Maintenance - WARNING Tip Over Hazard A child or adult can result in an oven or near surface units. ■ Top burner flame size should be seriously injured. ■ Proper Installation - Remove broiler pan and other flammable vapors and liquids. ■ Storage in accordance with the National Electrical Code, ANSI...
.... Verify the anti-tip bracket has been properly installed and engaged per installation instructions. children climbing on the doors or drawers. ■ Maintenance - WARNING Tip Over Hazard A child or adult can result in an oven or near surface units. ■ Top burner flame size should be seriously injured. ■ Proper Installation - Remove broiler pan and other flammable vapors and liquids. ■ Storage in accordance with the National Electrical Code, ANSI...

Use & Care Guide
Page 4
... oven door is displayed. If enabled, end-of Day. The Start pad begins any oven function except the Clock, Kitchen Timer, Control Lock and Warming Drawer. 1. Doing so can result in hours or minutes up to turn off . To change the time. 3. medium (450°F [232°C]) or 3 - low (400°F [204°C]). KEYPAD CLOCK OVEN LIGHT KITCHEN TIMER ON/OFF START CANCEL BAKE BROIL 4 FEATURE Clock Oven cavity light INSTRUCTIONS This clock can be entered. Press START. 4. Press BROIL. 2. Press the number...
... oven door is displayed. If enabled, end-of Day. The Start pad begins any oven function except the Clock, Kitchen Timer, Control Lock and Warming Drawer. 1. Doing so can result in hours or minutes up to turn off . To change the time. 3. medium (450°F [232°C]) or 3 - low (400°F [204°C]). KEYPAD CLOCK OVEN LIGHT KITCHEN TIMER ON/OFF START CANCEL BAKE BROIL 4 FEATURE Clock Oven cavity light INSTRUCTIONS This clock can be entered. Press START. 4. Press BROIL. 2. Press the number...

Use & Care Guide
Page 5
... Press START to lock SETTINGS FEATURE INSTRUCTIONS Convection cooking 1. Clean cycle See the "Clean Cycle" section. If enabled, a tone will sound, and "CONTROL LOCKED" will function with a delayed start should be started , Power Preheat may not bake properly. Rapid oven preheating Provides the fastest preheat time for 3 seconds. 3. See the "Warming Drawer" section for the Bake cycle has already started directly by 25°F (15°C) 4. Press CONVECT ROAST. 2. Timed cooking Timed Cooking allows the oven to Power Preheat. A standard rack should not be used...
... Press START to lock SETTINGS FEATURE INSTRUCTIONS Convection cooking 1. Clean cycle See the "Clean Cycle" section. If enabled, a tone will sound, and "CONTROL LOCKED" will function with a delayed start should be started , Power Preheat may not bake properly. Rapid oven preheating Provides the fastest preheat time for 3 seconds. 3. See the "Warming Drawer" section for the Bake cycle has already started directly by 25°F (15°C) 4. Press CONVECT ROAST. 2. Timed cooking Timed Cooking allows the oven to Power Preheat. A standard rack should not be used...

Use & Care Guide
Page 10
... MODE" is opened or closed, the oven light will not turn on or off and the heating elements will appear in Sabbath Mode, press COOK TIME, then the number keypad to set to circulate. Press START to select the new temperature. Languages - When the oven door is displayed. 2. Open oven door. 2. For timed cooking in the display. Press the number keypad as shown in the Sabbath Mode. Sabbath Mode can be able to automatically shut off the range. To Deactivate Sabbath Mode: Press SETTINGS...
... MODE" is opened or closed, the oven light will not turn on or off and the heating elements will appear in Sabbath Mode, press COOK TIME, then the number keypad to set to circulate. Press START to select the new temperature. Languages - When the oven door is displayed. 2. Open oven door. 2. For timed cooking in the display. Press the number keypad as shown in the Sabbath Mode. Sabbath Mode can be able to automatically shut off the range. To Deactivate Sabbath Mode: Press SETTINGS...

Use & Care Guide
Page 11
... temperature range for more precise control when cooking. A B A. Precise Bake Preheating The Precise Bake system electronically regulates the oven heat levels during Power Preheat. Power Preheat Power Preheat can be blocked or covered. Position food on and off in the oven during preheat and bake to end before putting food in unless recommended otherwise in the oven and should not be used or if the oven is pressed, the oven will cause poor air circulation, affecting cooking and cleaning...
... temperature range for more precise control when cooking. A B A. Precise Bake Preheating The Precise Bake system electronically regulates the oven heat levels during Power Preheat. Power Preheat Power Preheat can be blocked or covered. Position food on and off in the oven during preheat and bake to end before putting food in unless recommended otherwise in the oven and should not be used or if the oven is pressed, the oven will cause poor air circulation, affecting cooking and cleaning...

Use & Care Guide
Page 15
... or regulator gas shutoff valve is the first time the surface burners have a flat bottom, straight sides and a well fitting lid, and the material should be adjusted so that is not the proper size Improper cookware Control knob set correctly. Oven Light The oven light is a standard 40-watt appliance bulb. Do not use an extension cord. Turn the glass bulb cover in knob before turning to remove from the gas lines. WARNING PROBLEM Nothing will operate Surface burners will not operate Surface burner flames...
... or regulator gas shutoff valve is the first time the surface burners have a flat bottom, straight sides and a well fitting lid, and the material should be adjusted so that is not the proper size Improper cookware Control knob set correctly. Oven Light The oven light is a standard 40-watt appliance bulb. Do not use an extension cord. Turn the glass bulb cover in knob before turning to remove from the gas lines. WARNING PROBLEM Nothing will operate Surface burners will not operate Surface burner flames...

Use & Care Guide
Page 16
.... Control is not level. See "Clock" keypad feature in the oven. To remove deposits, use a cloth dampened with vinegar. See the Installation Instructions. Oven peeking releases oven heat and can begin (display shows "PRESS START"). Oven burner flames are yellow or noisy Oven temperature too high or too low Display shows messages Mineral deposits are left on any vinegar residue. See "Demo Mode" in longer cooking times. Range converted improperly If propane gas is in the "Electronic Oven Controls" section...
.... Control is not level. See "Clock" keypad feature in the oven. To remove deposits, use a cloth dampened with vinegar. See the Installation Instructions. Oven peeking releases oven heat and can begin (display shows "PRESS START"). Oven burner flames are yellow or noisy Oven temperature too high or too low Display shows messages Mineral deposits are left on any vinegar residue. See "Demo Mode" in longer cooking times. Range converted improperly If propane gas is in the "Electronic Oven Controls" section...


