

Installation Guide
Page 3
.... • See installation instructions for details. Failure to follow the instructions provided with any tools listed Check that all parts are included. Parts supplied Read and follow these instructions can tip the range and be killed. Tools needed Check local codes and consult gas...back so rear range foot is a registered trademark of the anti-tip bracket. Do not operate range without anti-tip bracket installed and engaged. Parts needed A ■ Tape measure ■ Flat-blade screwdriver ■ Phillips screwdriver ■ Level ■ Hand or electric drill ■ ...
.... • See installation instructions for details. Failure to follow the instructions provided with any tools listed Check that all parts are included. Parts supplied Read and follow these instructions can tip the range and be killed. Tools needed Check local codes and consult gas...back so rear range foot is a registered trademark of the anti-tip bracket. Do not operate range without anti-tip bracket installed and engaged. Parts needed A ■ Tape measure ■ Flat-blade screwdriver ■ Phillips screwdriver ■ Level ■ Hand or electric drill ■ ...

Installation Guide
Page 4
... where range is required. Follow the instructions in this range must conform to the Manufactured Home Construction and Safety Standard, Title 24 CFR, Part 3280 (formerly the Federal Standard for Manufactured Home Installations, ANSI A225.1/NFPA 501A or with the range, see "Install Anti-Tip Bracket" ... as a reference for leveling the range is not applicable, use the Standard for Mobile Home Construction and Safety, Title 24, HUD Part 280). Location Requirements IMPORTANT: Observe all the way in accordance with the requirements of UL and CSA International and complies with your builder...
... where range is required. Follow the instructions in this range must conform to the Manufactured Home Construction and Safety Standard, Title 24 CFR, Part 3280 (formerly the Federal Standard for Manufactured Home Installations, ANSI A225.1/NFPA 501A or with the range, see "Install Anti-Tip Bracket" ... as a reference for leveling the range is not applicable, use the Standard for Mobile Home Construction and Safety, Title 24, HUD Part 280). Location Requirements IMPORTANT: Observe all the way in accordance with the requirements of UL and CSA International and complies with your builder...

Installation Guide
Page 7
... of the gas supply piping system at test pressures equal to lower the front and rear leveling legs one -half turn . Remove oven racks and parts package from range. 2. Rear leveling leg B. Use a ¼" drive ratchet to 2,000 ft (609.6 m). Gas Supply Pressure Testing Gas supply pressure for elevations up to...
... of the gas supply piping system at test pressures equal to lower the front and rear leveling legs one -half turn . Remove oven racks and parts package from range. 2. Rear leveling leg B. Use a ¼" drive ratchet to 2,000 ft (609.6 m). Gas Supply Pressure Testing Gas supply pressure for elevations up to...
Installation Guide
Page 9
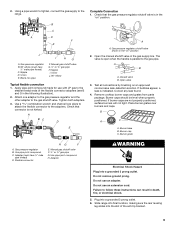
... is indicated. If bubbles appear, a leak is parallel to the smaller thread ends of the anti-tip bracket. 9 Remove cooktop burner caps and grates from parts package. Gas pressure regulator B. Adapter (must have ½" male pipe thread) D. H. Do not remove ground prong. Do not use an adapter. Plug into a grounded 3 prong...
... is indicated. If bubbles appear, a leak is parallel to the smaller thread ends of the anti-tip bracket. 9 Remove cooktop burner caps and grates from parts package. Gas pressure regulator B. Adapter (must have ½" male pipe thread) D. H. Do not remove ground prong. Do not use an adapter. Plug into a grounded 3 prong...

Installation Guide
Page 13
... sides. To Replace: 1. Complete Installation 1. Check that the gas supply line shutoff valve is open and close. The oven door is an extra part, go back through the steps to remove the oven door. Close the oven door as far as the door is not suggested to see the... See "Troubleshooting" in the drawer. Before removing, make sure the oven is off the range and check that all the way. 2. Open oven door all parts are placed in the Use and Care Guide or User Instructions. 8. Drawer stop . 4. Slowly push the drawer into a grounded 3 prong outlet. ■...
... sides. To Replace: 1. Complete Installation 1. Check that the gas supply line shutoff valve is open and close. The oven door is an extra part, go back through the steps to remove the oven door. Close the oven door as far as the door is not suggested to see the... See "Troubleshooting" in the drawer. Before removing, make sure the oven is off the range and check that all the way. 2. Open oven door all parts are placed in the Use and Care Guide or User Instructions. 8. Drawer stop . 4. Slowly push the drawer into a grounded 3 prong outlet. ■...

Installation Guide
Page 18
... mm 1.40 mm 1.10 mm N216 N210 N200 N190 N185 N180 N155 N140 N110 NOTE: Refer to help hold the gas orifice spud in plastic parts bag for proper sizing of the oven bottom. 3. Repeat steps 1-7 for the correct Natural gas orifice spud placement. The spud will be stamped with package...
... mm 1.40 mm 1.10 mm N216 N210 N200 N190 N185 N180 N155 N140 N110 NOTE: Refer to help hold the gas orifice spud in plastic parts bag for proper sizing of the oven bottom. 3. Repeat steps 1-7 for the correct Natural gas orifice spud placement. The spud will be stamped with package...

Warranty Information
Page 1
... your major appliance for other damage to the finish of your authorized Maytag dealer to correct non-cosmetic defects in materials or workmanship in which it is used in the country in this part that prevent function of the range and that existed when this major ...EXCLUSIONS OR LIMITATIONS MAY NOT APPLY TO YOU. This limited warranty is valid in accordance with the product, Maytag will pay for factory specified parts for factory specified replacement parts and repair labor to be easily determined. Repairs when your major appliance. LIMITATION OF REMEDIES CUSTOMER'S SOLE AND...
... your major appliance for other damage to the finish of your authorized Maytag dealer to correct non-cosmetic defects in materials or workmanship in which it is used in the country in this part that prevent function of the range and that existed when this major ...EXCLUSIONS OR LIMITATIONS MAY NOT APPLY TO YOU. This limited warranty is valid in accordance with the product, Maytag will pay for factory specified parts for factory specified replacement parts and repair labor to be easily determined. Repairs when your major appliance. LIMITATION OF REMEDIES CUSTOMER'S SOLE AND...

Use & Care Guide
Page 13
...-0808, or visit our website at the beginning of the range and the floor. ■ Soil baked on the oven bottom is covered by ordering Part Number W10423113RP. Much of the initial 1¾ cups (14 oz [414 mL]) of the oven door and the front frame to stop the Clean cycle...
...-0808, or visit our website at the beginning of the range and the floor. ■ Soil baked on the oven bottom is covered by ordering Part Number W10423113RP. Much of the initial 1¾ cups (14 oz [414 mL]) of the oven door and the front frame to stop the Clean cycle...
Use & Care Guide
Page 14
... stainless steel surfaces, even with one-time or limited use oven cleaners. In Canada, reference the Customer Service section at www.maytag.com. Damage may occur to the control panel, do not use soap-filled scouring pads, abrasive cleaners, Cooktop Cleaner, steel-wool...bleach, rust removers, ammonia or sodium hydroxide (lye) because paint surface may remove numbers. ■ affresh™ Kitchen and Appliance Cleaner Part Number W10355010 (not included): See "Accessories" section for more information. STORAGE DRAWER OR WARMING DRAWER (on soils should be cleaned as ...
... stainless steel surfaces, even with one-time or limited use oven cleaners. In Canada, reference the Customer Service section at www.maytag.com. Damage may occur to the control panel, do not use soap-filled scouring pads, abrasive cleaners, Cooktop Cleaner, steel-wool...bleach, rust removers, ammonia or sodium hydroxide (lye) because paint surface may remove numbers. ■ affresh™ Kitchen and Appliance Cleaner Part Number W10355010 (not included): See "Accessories" section for more information. STORAGE DRAWER OR WARMING DRAWER (on soils should be cleaned as ...

Use & Care Guide
Page 17
... Bake or Broil burners ignite during Bake and Broil operations The following are normal operational noises that can visit our website at www.maytag.com/cookingaccessories. It sounds similar to dry. Gas valve is cycling on and off of a piece of glass. If propane gas...Cleaner Order Part Number 31617 Standard Flat Oven Rack Order Part Number W10179196 Split Oven Rack Order Part Number W10205524 Max Capacity Rack Oven Rack Order Part Number W10289145 Porcelain Broiler Pan and Grid Order Part Number 4396923 Premium Broiler Pan and Roasting Rack Order Part Number W10123240 www.maytag.com/...
... Bake or Broil burners ignite during Bake and Broil operations The following are normal operational noises that can visit our website at www.maytag.com/cookingaccessories. It sounds similar to dry. Gas valve is cycling on and off of a piece of glass. If propane gas...Cleaner Order Part Number 31617 Standard Flat Oven Rack Order Part Number W10179196 Split Oven Rack Order Part Number W10205524 Max Capacity Rack Oven Rack Order Part Number W10289145 Porcelain Broiler Pan and Grid Order Part Number 4396923 Premium Broiler Pan and Roasting Rack Order Part Number W10123240 www.maytag.com/...

Use & Care Guide
Page 18
...to be repaired in the home and only in-home service is covered by an authorized Maytag servicer is reported to Maytag within 30 days from unauthorized modifications made to parts or systems resulting from the date of repair or replacement under this warranty. 8. If ...DISCLAIMER OF IMPLIED WARRANTIES; Service must be easily determined. This major appliance is designed to or furnished with the product, Maytag will pay for factory specified parts for product service if your major appliance is located in a remote area where service by this limited warranty. IMPLIED ...
...to be repaired in the home and only in-home service is covered by an authorized Maytag servicer is reported to Maytag within 30 days from unauthorized modifications made to parts or systems resulting from the date of repair or replacement under this warranty. 8. If ...DISCLAIMER OF IMPLIED WARRANTIES; Service must be easily determined. This major appliance is designed to or furnished with the product, Maytag will pay for factory specified parts for product service if your major appliance is located in a remote area where service by this limited warranty. IMPLIED ...


