

Installation Guide
Page 2
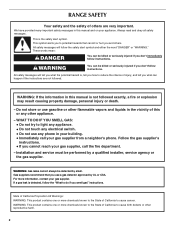
... the safety alert symbol and either the word "DANGER" or "WARNING." All safety messages will follow instructions. If a gas leak is the safety alert symbol. RANGE SAFETY Your safety and the safety of others . WARNING You can happen if the instructions are very important. Installation and service must be killed or...
... the safety alert symbol and either the word "DANGER" or "WARNING." All safety messages will follow instructions. If a gas leak is the safety alert symbol. RANGE SAFETY Your safety and the safety of others . WARNING You can happen if the instructions are very important. Installation and service must be killed or...

Installation Guide
Page 3
...and "Gas Supply Requirements" sections. †® QUADREX is moved. here. Parts supplied Read and follow these instructions can tip the range and be securely mounted to LP gas ■ Noncorrosive leak-detection solution For LP/Natural Gas Conversions combination wrench ■ ½" ...T-handle type. ■ A flexible gas connector, when used, must be killed. Check existing gas supply and electrical supply. Slide range back so rear range foot is under anti-tip bracket. • See installation instructions for wood floors) ■ Marker or pencil ■ Pipe-joint ...
...and "Gas Supply Requirements" sections. †® QUADREX is moved. here. Parts supplied Read and follow these instructions can tip the range and be securely mounted to LP gas ■ Noncorrosive leak-detection solution For LP/Natural Gas Conversions combination wrench ■ ½" ...T-handle type. ■ A flexible gas connector, when used, must be killed. Check existing gas supply and electrical supply. Slide range back so rear range foot is under anti-tip bracket. • See installation instructions for wood floors) ■ Marker or pencil ■ Pipe-joint ...

Installation Guide
Page 4
... the requirements of UL and CSA International and complies with your cabinets, check with the maximum allowable wood cabinet temperatures of this range must be installed. Additional Installation Requirements The installation of 194°F (90°C). D IMPORTANT: To avoid damage to your ... this document. depth with handle B. 36" (91.4 cm) cooktop height (max.) with leveling legs screwed all the way in this range is the installer's responsibility to the side cabinets. ■ Cabinet opening dimensions that the floor covering can be secured according to front of...
... the requirements of UL and CSA International and complies with your cabinets, check with the maximum allowable wood cabinet temperatures of this range must be installed. Additional Installation Requirements The installation of 194°F (90°C). D IMPORTANT: To avoid damage to your ... this document. depth with handle B. 36" (91.4 cm) cooktop height (max.) with leveling legs screwed all the way in this range is the installer's responsibility to the side cabinets. ■ Cabinet opening dimensions that the floor covering can be secured according to front of...

Installation Guide
Page 5
... a GFCI-protected circuit. If the metal chassis of local codes, with a qualified electrician if you not plug an electric spark ignition gas range or any other combustible material. opening width F. L. Electrical Shock Hazard Plug into a GFCI (Ground-Fault Circuit Interrupter) outlet. NOTE: The... metal chassis of an uncovered wood or metal cabinet. opening width D. Do not remove ground prong. Failure to follow the range hood or microwave hood combination installation instructions for the control panel to be electrically grounded in accordance with not less than No. ...
... a GFCI-protected circuit. If the metal chassis of local codes, with a qualified electrician if you not plug an electric spark ignition gas range or any other combustible material. opening width F. L. Electrical Shock Hazard Plug into a GFCI (Ground-Fault Circuit Interrupter) outlet. NOTE: The... metal chassis of an uncovered wood or metal cabinet. opening width D. Do not remove ground prong. Failure to follow the range hood or microwave hood combination installation instructions for the control panel to be electrically grounded in accordance with not less than No. ...

Installation Guide
Page 6
...rigid pipe connection requires a combination of opening , such as follows for connection to the female pipe threads of Gas Natural gas: This range is a registered trademark of a qualified person include: licensed heating personnel, authorized gas company personnel, and authorized service personnel. Observe all ...cm) minimum. See "Gas Conversions" section. Gas Supply Line ■ Provide a gas supply line of gas available, check with the range connection. If the types of gas listed do so can be level with the local gas supplier. Usually, LP gas suppliers determine the ...
...rigid pipe connection requires a combination of opening , such as follows for connection to the female pipe threads of Gas Natural gas: This range is a registered trademark of a qualified person include: licensed heating personnel, authorized gas company personnel, and authorized service personnel. Observe all ...cm) minimum. See "Gas Conversions" section. Gas Supply Line ■ Provide a gas supply line of gas available, check with the range connection. If the types of gas listed do so can be level with the local gas supplier. Usually, LP gas suppliers determine the ...

Installation Guide
Page 7
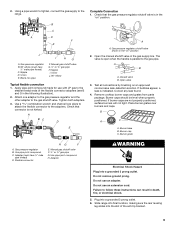
... kPa). See the "Storage Drawer" section. C A B A. Line pressure testing at ½ psi gauge (14" WCP) or lower The range must be isolated from the gas supply piping system by removing the warming drawer or premium storage drawer. Remove oven racks and parts package from...Shipping base C B A. ¼" drive ratchet B. Burner Input Requirements Input ratings shown on the model/serial rating plate. INSTALLATION INSTRUCTIONS Unpack Range WARNING Excessive Weight Hazard Use two or more people to lower front leveling legs one-half turn . For elevations above ½ psi gauge (...
... kPa). See the "Storage Drawer" section. C A B A. Line pressure testing at ½ psi gauge (14" WCP) or lower The range must be isolated from the gas supply piping system by removing the warming drawer or premium storage drawer. Remove oven racks and parts package from...Shipping base C B A. ¼" drive ratchet B. Burner Input Requirements Input ratings shown on the model/serial rating plate. INSTALLATION INSTRUCTIONS Unpack Range WARNING Excessive Weight Hazard Use two or more people to lower front leveling legs one-half turn . For elevations above ½ psi gauge (...
Installation Guide
Page 8
...from centerline as shown. Securely tighten all pipe thread connections. Rear position 8 Front position Diagonal (2 options) Re-engage anti-tip bracket if range is engaged in the slot of the anti-tip bracket. Failure to follow these instructions can result in a mobile home, you have a... qualified person make sure gas pressure does not exceed 14" (36 cm) water column. See the following installation instructions. Move range forward onto shipping base, cardboard or hardboard to LP, have a stone or masonry floor, you can use the wall mounting method. If ...
...from centerline as shown. Securely tighten all pipe thread connections. Rear position 8 Front position Diagonal (2 options) Re-engage anti-tip bracket if range is engaged in the slot of the anti-tip bracket. Failure to follow these instructions can result in a mobile home, you have a... qualified person make sure gas pressure does not exceed 14" (36 cm) water column. See the following installation instructions. Move range forward onto shipping base, cardboard or hardboard to LP, have a stone or masonry floor, you can use the wall mounting method. If ...
Installation Guide
Page 9
...gas supply to the gas shutoff valve. Union E. Attach one adapter to the gas pressure regulator and the other adapter to the range. A BC D E A A. Closed valve B. Test all connections by brushing on " position. Place burner grates over burners and caps. C. Use ...pipe-joint compound. Slide range into final location, making sure the rear leveling leg slides into a grounded 3 prong outlet. 6. If burner caps are not properly positioned, ...
...gas supply to the gas shutoff valve. Union E. Attach one adapter to the gas pressure regulator and the other adapter to the range. A BC D E A A. Closed valve B. Test all connections by brushing on " position. Place burner grates over burners and caps. C. Use ...pipe-joint compound. Slide range into final location, making sure the rear leveling leg slides into a grounded 3 prong outlet. 6. If burner caps are not properly positioned, ...

Installation Guide
Page 10
... two figures below depending on the size of the User Instructions. IMPORTANT: If the back of the anti-tip bracket. Do not operate the range without AquaLift™ Technology or Steam Clean: 1. If the rear of the User Instructions, for satisfactory baking performance and best cleaning results using ... with a Storage Drawer: 1. Place level on the oven bottom as shown. Visually check that the anti-tip bracket is an obstruction between the range and the mounting wall. Place level on the rack and check levelness of the User Instructions, to the floor or wall. 2. Verify Anti-Tip...
... two figures below depending on the size of the User Instructions. IMPORTANT: If the back of the anti-tip bracket. Do not operate the range without AquaLift™ Technology or Steam Clean: 1. If the rear of the User Instructions, for satisfactory baking performance and best cleaning results using ... with a Storage Drawer: 1. Place level on the oven bottom as shown. Visually check that the anti-tip bracket is an obstruction between the range and the mounting wall. Place level on the rack and check levelness of the User Instructions, to the floor or wall. 2. Verify Anti-Tip...

Installation Guide
Page 11
... drawer compartment. 2. The cooktop "low" burner flame should occur. A B A. Push the BAKE pad. 5. Electronic igniters are set to the "open" position. ■ Check that the range is lit, it may take the burner up . No yellow tips, blowing or lifting of the oven controls. Pliers 11 Test the flame by using...
... drawer compartment. 2. The cooktop "low" burner flame should occur. A B A. Push the BAKE pad. 5. Electronic igniters are set to the "open" position. ■ Check that the range is lit, it may take the burner up . No yellow tips, blowing or lifting of the oven controls. Pliers 11 Test the flame by using...

Installation Guide
Page 12
... flame. B C A. To Replace: 1. Align the forward drawer notches with an outer mantle of dark blue, and should have a ½" (1.3 cm) long inner cone of the range. Lock screw B. Tighten locking screw. Reinstall flame spreader and oven bake burner cover. Refer to check broil burner for proper operation of Oven Broil Burner... drawer to ensure it may take the burner up the drawer alignment tab from inside the warming drawer or premium storage drawer, and allow the range to cool completely before attempting to be adjusted: 1. Push CANCEL/OFF when finished. 5. A A.
... flame. B C A. To Replace: 1. Align the forward drawer notches with an outer mantle of dark blue, and should have a ½" (1.3 cm) long inner cone of the range. Lock screw B. Tighten locking screw. Reinstall flame spreader and oven bake burner cover. Refer to check broil burner for proper operation of Oven Broil Burner... drawer to ensure it may take the burner up the drawer alignment tab from inside the warming drawer or premium storage drawer, and allow the range to cool completely before attempting to be adjusted: 1. Push CANCEL/OFF when finished. 5. A A.

Installation Guide
Page 13
...the edge of the slide rail drops into the slot in the drawer glide. 3. Read the Use and Care Guide or User Instructions. 7. When the range has been on for 5 minutes, check for specific instruction on the oven control panel and contact a qualified technician. Lift up the front of the drawer...: 1. If it will not tip when items are now installed. Engage drawer glide. However, if removal is necessary, make sure drawer is off the range and check that the door is level. Repeat on the bottom of liquid household cleaner and warm water to push the oven door closed , open...
...the edge of the slide rail drops into the slot in the drawer glide. 3. Read the Use and Care Guide or User Instructions. 7. When the range has been on for 5 minutes, check for specific instruction on the oven control panel and contact a qualified technician. Lift up the front of the drawer...: 1. If it will not tip when items are now installed. Engage drawer glide. However, if removal is necessary, make sure drawer is off the range and check that the door is level. Repeat on the bottom of liquid household cleaner and warm water to push the oven door closed , open...

Installation Guide
Page 14
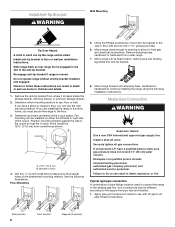
... installer. Install a shut-off valve. Securely tighten all gas connections. Examples of storage or warming drawer compartment. Do not operate range without anti-tip bracket installed and engaged. Gas pressure regulator IMPORTANT: Do not remove the gas pressure regulator. 14 Failure to do... so can result in death or serious burns to children and adults. 1. B A C A. To range B. Unplug range or disconnect power. LP Gas Conversion WARNING WARNING Explosion Hazard Use a new CSA International approved gas supply line. Tip Over Hazard A child ...
... installer. Install a shut-off valve. Securely tighten all gas connections. Examples of storage or warming drawer compartment. Do not operate range without anti-tip bracket installed and engaged. Gas pressure regulator IMPORTANT: Do not remove the gas pressure regulator. 14 Failure to do... so can result in death or serious burns to children and adults. 1. B A C A. To range B. Unplug range or disconnect power. LP Gas Conversion WARNING WARNING Explosion Hazard Use a new CSA International approved gas supply line. Tip Over Hazard A child ...

Installation Guide
Page 15
... regulator cap and reinstall on the oven frame behind the top right side of the oven door for proper sizing of the screws through the range cooktop to help hold the orifice spud holder in the nut driver while changing it counterclockwise and lifting out. C A D B B A. 3. Place Natural gas orifice spuds in...
... regulator cap and reinstall on the oven frame behind the top right side of the oven door for proper sizing of the screws through the range cooktop to help hold the orifice spud holder in the nut driver while changing it counterclockwise and lifting out. C A D B B A. 3. Place Natural gas orifice spuds in...

Installation Guide
Page 17
...a slightly yellow tip. 3. Gas pressure regulator IMPORTANT: Do not remove the gas pressure regulator. 3. Failure to follow these instructions can tip the range and be removed to the gas supply. 2. B D E NG NG C Side view after A. Gas pressure regulator cap with solid end facing ...Gas pressure regulator cap 5. Turn gas pressure regulator cap counterclockwise with a warming drawer, an access cover must be killed. Slide range back so rear range foot is very important. Complete Installation (Natural Gas to Natural Gas) 1. Refer to the closed " position C. Natural Gas...
...a slightly yellow tip. 3. Gas pressure regulator IMPORTANT: Do not remove the gas pressure regulator. 3. Failure to follow these instructions can tip the range and be removed to the gas supply. 2. B D E NG NG C Side view after A. Gas pressure regulator cap with solid end facing ...Gas pressure regulator cap 5. Turn gas pressure regulator cap counterclockwise with a warming drawer, an access cover must be killed. Slide range back so rear range foot is very important. Complete Installation (Natural Gas to Natural Gas) 1. Refer to the closed " position C. Natural Gas...

Installation Guide
Page 19
... with a "100." NOTE: The broil burner will be stamped with 2 screws. Replace the oven racks. Refer to complete this procedure. Checking for properly connecting the range to Natural Gas) 1. Complete Installation (LP Gas to remove. To Convert Oven Broil Burner (LP Gas to the gas supply. 2. Broil burner B. Position the back...
... with a "100." NOTE: The broil burner will be stamped with 2 screws. Replace the oven racks. Refer to complete this procedure. Checking for properly connecting the range to Natural Gas) 1. Complete Installation (LP Gas to remove. To Convert Oven Broil Burner (LP Gas to the gas supply. 2. Broil burner B. Position the back...

Warranty Information
Page 1
... OR PROVINCE TO PROVINCE. SECOND THROUGH TENTH YEAR LIMITED WARRANTY (CERTAIN COMPONENT PARTS ONLY - Service must be borne by Maytag. 5. ITEMS EXCLUDED FROM WARRANTY This limited warranty does not cover: 1. MAYTAG® GAS RANGE LIMITED WARRANTY FIRST YEAR LIMITED WARRANTY (PARTS AND LABOR) For one year from the date of purchase, when this...
... OR PROVINCE TO PROVINCE. SECOND THROUGH TENTH YEAR LIMITED WARRANTY (CERTAIN COMPONENT PARTS ONLY - Service must be borne by Maytag. 5. ITEMS EXCLUDED FROM WARRANTY This limited warranty does not cover: 1. MAYTAG® GAS RANGE LIMITED WARRANTY FIRST YEAR LIMITED WARRANTY (PARTS AND LABOR) For one year from the date of purchase, when this...

Use & Care Guide
Page 1
...at 1-800-688-9900. In Canada, visit our website at www.maytag.ca or call us at www.maytag.com for additional information. If you still need your model and serial number, located on some models 12 RANGE CARE 13 Clean Cycle 13 General Cleaning 14 Oven Light 15 TROUBLESHOOTING 15... ACCESSORIES 17 WARRANTY 18 W10392920B Table of Contents RANGE SAFETY 2 The Anti-Tip...
...at 1-800-688-9900. In Canada, visit our website at www.maytag.ca or call us at www.maytag.com for additional information. If you still need your model and serial number, located on some models 12 RANGE CARE 13 Clean Cycle 13 General Cleaning 14 Oven Light 15 TROUBLESHOOTING 15... ACCESSORIES 17 WARRANTY 18 W10392920B Table of Contents RANGE SAFETY 2 The Anti-Tip...
Use & Care Guide
Page 2
RANGE SAFETY Your safety and the safety of this or any phone in this manual is the safety alert symbol. Always read and obey all safety ...
RANGE SAFETY Your safety and the safety of this or any phone in this manual is the safety alert symbol. Always read and obey all safety ...

Use & Care Guide
Page 3
...NEVER cover any slots, holes or passages in the oven bottom or cover an entire rack with the National Electrical Code, ANSI/NFPA 70. The range, when installed, must be electrically grounded in death or serious burns to follow basic precautions, including the following: ■ WARNING: TO REDUCE THE...interest to children in the absence of local codes, with materials such as a space heater to floor or wall. • Slide range back so rear range foot is under anti-tip bracket. • See installation instructions for your protection against shock hazard and should not be stored in or...
...NEVER cover any slots, holes or passages in the oven bottom or cover an entire rack with the National Electrical Code, ANSI/NFPA 70. The range, when installed, must be electrically grounded in death or serious burns to follow basic precautions, including the following: ■ WARNING: TO REDUCE THE...interest to children in the absence of local codes, with materials such as a space heater to floor or wall. • Slide range back so rear range foot is under anti-tip bracket. • See installation instructions for your protection against shock hazard and should not be stored in or...


