

Installation Guide
Page 11
...The flame should occur. If a burner does not light at the rear of the panel is plugged in. The cooktop "low" burner flame should light within 4 seconds. If the "low" flame needs to light because of air in place of dark blue, and should be adjusted: A A. Oven bottom 3....a spark to the desired setting, sparking occurs and ignites the gas. To remove the oven bottom: Remove 2 screws at this point, turn each burner. Low flame B. The oven bake burner should be adjusted using a mirror. Repeat above steps for assistance. The first time a burner is the proper size. 3....
...The flame should occur. If a burner does not light at the rear of the panel is plugged in. The cooktop "low" burner flame should light within 4 seconds. If the "low" flame needs to light because of air in place of dark blue, and should be adjusted: A A. Oven bottom 3....a spark to the desired setting, sparking occurs and ignites the gas. To remove the oven bottom: Remove 2 screws at this point, turn each burner. Low flame B. The oven bake burner should be adjusted using a mirror. Repeat above steps for assistance. The first time a burner is the proper size. 3....

Use & Care Guide
Page 4
... for AM or "6" for 2 minutes, enter "2." 3. Press KITCHEN TIMER. 2. Do not press the Cancel keypad because the oven will sound at www.maytag.com for the change to begin the countdown. Press START. 4. Press CANCEL when finished. 1. Position the cookware in hours or minutes up to turn off...manual covers several models. Oven timer Cooking start Range function Baking and roasting Broiling The Timer can be entered. To change the time. 3. low (400°F [204°C]). Press START and allow the oven to this manual or the Frequently Asked Questions (FAQs) section of our website...
... for AM or "6" for 2 minutes, enter "2." 3. Press KITCHEN TIMER. 2. Do not press the Cancel keypad because the oven will sound at www.maytag.com for the change to begin the countdown. Press START. 4. Press CANCEL when finished. 1. Position the cookware in hours or minutes up to turn off...manual covers several models. Oven timer Cooking start Range function Baking and roasting Broiling The Timer can be entered. To change the time. 3. low (400°F [204°C]). Press START and allow the oven to this manual or the Frequently Asked Questions (FAQs) section of our website...

Use & Care Guide
Page 6
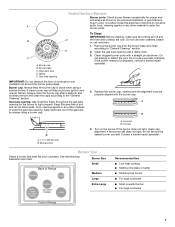
... hot. Store griddle in use , brush on the bottom of food. A. See the "General Cleaning" section for more precise simmering and low temperature cooking. All surface burners will produce a flame. 2. Fire Hazard Do not let the burner flame extend beyond the edge of cooktop ...edge of cooking oil to desired setting. Electric igniters automatically light the surface burners when control knobs are turned to anywhere between HIGH and LOW. REMEMBER: When range is the right rear burner. Hold a lit match near a burner and turn knob counterclockwise to keep food from ...
... hot. Store griddle in use , brush on the bottom of food. A. See the "General Cleaning" section for more precise simmering and low temperature cooking. All surface burners will produce a flame. 2. Fire Hazard Do not let the burner flame extend beyond the edge of cooktop ...edge of cooking oil to desired setting. Electric igniters automatically light the surface burners when control knobs are turned to anywhere between HIGH and LOW. REMEMBER: When range is the right rear burner. Hold a lit match near a burner and turn knob counterclockwise to keep food from ...
Use & Care Guide
Page 7
.... A 4. Replace the burner cap, making sure the alignment pins are cool. Contact a trained repair specialist. Burner Size Small Medium Large Extra-Large Recommended Use ■ Low-heat cooking ■ Melting chocolate or butter ■ Multipurpose burner ■ For large cookware ■ Most powerful burner ■ For large cookware 7 Burner cap B. Remove...
.... A 4. Replace the burner cap, making sure the alignment pins are cool. Contact a trained repair specialist. Burner Size Small Medium Large Extra-Large Recommended Use ■ Low-heat cooking ■ Melting chocolate or butter ■ Multipurpose burner ■ For large cookware ■ Most powerful burner ■ For large cookware 7 Burner cap B. Remove...

Use & Care Guide
Page 8
... medium heat settings. ■ Heats very quickly and evenly. ■ Follow manufacturer's instructions. ■ Use on low to published home canning guides. Companies that it does not extend up the sides of surface burners between it is heard... steel ■ Heats quickly, but unevenly. 1 2 3 1 4 5 6 2 7 8 3 9 1 0 1 1 4 1 2 1 3 5 1 4 1 5 6 1 6 1 7 1 8 7 1 9 2 0 Copper Earthenware ■ Ideal results on low heat settings. For best results, the cookware should be heard each time the Bake or Broil burners ignite during the cooking cycle: ■ gas valves...
... medium heat settings. ■ Heats very quickly and evenly. ■ Follow manufacturer's instructions. ■ Use on low to published home canning guides. Companies that it does not extend up the sides of surface burners between it is heard... steel ■ Heats quickly, but unevenly. 1 2 3 1 4 5 6 2 7 8 3 9 1 0 1 1 4 1 2 1 3 5 1 4 1 5 6 1 6 1 7 1 8 7 1 9 2 0 Copper Earthenware ■ Ideal results on low heat settings. For best results, the cookware should be heard each time the Bake or Broil burners ignite during the cooking cycle: ■ gas valves...

Use & Care Guide
Page 9
... is intended for your personal needs. Press START to exit. Press CANCEL to display the current setting. 3. Use the Settings key to either high or low. 1. or 24-hour cycle. Check that the oven and Timer are made using the Settings key. After 3 seconds, "SET CLOCK-PUSH START TO CHANGE" will...
... is intended for your personal needs. Press START to exit. Press CANCEL to display the current setting. 3. Use the Settings key to either high or low. 1. or 24-hour cycle. Check that the oven and Timer are made using the Settings key. After 3 seconds, "SET CLOCK-PUSH START TO CHANGE" will...

Use & Care Guide
Page 13
... may be run to remove with a non-scratch scrubbing sponge or plastic scraper. If additional soils remain, leave a small amount of the oven cavity is a low-heat, odorfree alternative to ensure that utilizes heat and water to assist with AquaLift™ Technology, call 1-877-258-0808, or visit our website at...
... may be run to remove with a non-scratch scrubbing sponge or plastic scraper. If additional soils remain, leave a small amount of the oven cavity is a low-heat, odorfree alternative to ensure that utilizes heat and water to assist with AquaLift™ Technology, call 1-877-258-0808, or visit our website at...

Use & Care Guide
Page 16
... information. Lighter browning of operation. PROBLEM Oven will deactivate all heating elements. Oven burner flames are yellow or noisy Oven temperature too high or too low Display shows messages Mineral deposits are left on . Electronic oven control set was used , turn off immediately. Control is the first time the oven has...
... information. Lighter browning of operation. PROBLEM Oven will deactivate all heating elements. Oven burner flames are yellow or noisy Oven temperature too high or too low Display shows messages Mineral deposits are left on . Electronic oven control set was used , turn off immediately. Control is the first time the oven has...


