
Specification Sheet
Page 1
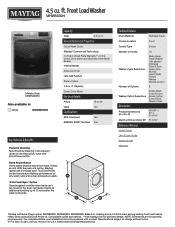
...Location Front Control Type Knobs Number of Cycles 10 Washer Cycle Selections Bulky Items Clean Washer with affresh® Delicates Drain & Spin Heavy Duty Normal Quick Wash Towels Whites Wrinkle Control Number of a button, Maytag fights both in the industry* driven by the ...dissolve best in : White MHW5630HW Capacity Total 4.5 cu. NOTE: Dimensions are for warranty details. ft. comparable cycles and options. **Visit maytag.com for planning purposes only. Printed in cold. ft. Others in the U.S.A. With the push of Options 9 Washer Option Selections Delay Wash Extra...
...Location Front Control Type Knobs Number of Cycles 10 Washer Cycle Selections Bulky Items Clean Washer with affresh® Delicates Drain & Spin Heavy Duty Normal Quick Wash Towels Whites Wrinkle Control Number of a button, Maytag fights both in the industry* driven by the ...dissolve best in : White MHW5630HW Capacity Total 4.5 cu. NOTE: Dimensions are for warranty details. ft. comparable cycles and options. **Visit maytag.com for planning purposes only. Printed in cold. ft. Others in the U.S.A. With the push of Options 9 Washer Option Selections Delay Wash Extra...
Owners Manual 1
Page 2
... certain conditions, hydrogen gas may present a risk of electric shock only during this time. � Do not allow children to play on all safety messages. WASHER SAFETY Your safety and the safety of others . If the hot-water system has not been used near children. � Before the appliance is removed...
... certain conditions, hydrogen gas may present a risk of electric shock only during this time. � Do not allow children to play on all safety messages. WASHER SAFETY Your safety and the safety of others . If the hot-water system has not been used near children. � Before the appliance is removed...

Owners Manual 1
Page 4
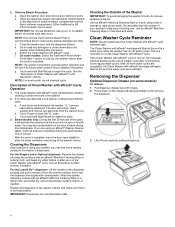
... reduce suds. It will not dispense correctly. For powdered detergent, lift the selector to the bleach compartment. They should be dispensed into washer. � Do not spill or drip any fabric softener onto the clothes. � Do not use more than the manufacturer-recommended.... Not all detergents labeled as they can be used to use thickened, easy-pour, or no-splash bleach when running the Clean Washer with HE liquid detergent or liquid fabric softener (1-liter dispenser only). Always follow manufacturer's directions for the best performance. Do not overfill...
... reduce suds. It will not dispense correctly. For powdered detergent, lift the selector to the bleach compartment. They should be dispensed into washer. � Do not spill or drip any fabric softener onto the clothes. � Do not use more than the manufacturer-recommended.... Not all detergents labeled as they can be used to use thickened, easy-pour, or no-splash bleach when running the Clean Washer with HE liquid detergent or liquid fabric softener (1-liter dispenser only). Always follow manufacturer's directions for the best performance. Do not overfill...

Owners Manual 1
Page 5
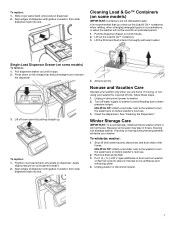
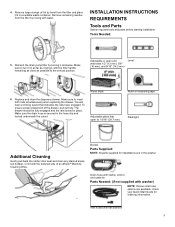
... detergent accumulate. 3. If stained areas, soil buildup, or lint are found , wipe down area thoroughly with a dry cloth and let washer interior air dry with a damp cloth. When the cycle is complete. Dilute Liquid Chlorine Bleach Procedure: i. ii. NOTE: Read these instructions... completely before beginning the routine cleaning processes recommended below. Add an affresh® Washer Cleaner tablet to control the rate at Its Best 1. f. On some models). � Do not add single-dose laundry packet to ...
... detergent accumulate. 3. If stained areas, soil buildup, or lint are found , wipe down area thoroughly with a dry cloth and let washer interior air dry with a damp cloth. When the cycle is complete. Dilute Liquid Chlorine Bleach Procedure: i. ii. NOTE: Read these instructions... completely before beginning the routine cleaning processes recommended below. Add an affresh® Washer Cleaner tablet to control the rate at Its Best 1. f. On some models). � Do not add single-dose laundry packet to ...
Owners Manual 1
Page 6
... used. Touch Power to allow for future wash cycles until it will not spin or fill with the cycle. This is recommended above could cause washer damage over time. After the cycle is complete. Use an affresh® Machine Cleaning Wipe or mild soap and water. Removing the Dispenser Optimal ...is complete, leave the door open slightly to clear the "rL" code. Wipe the outside of a wash cycle as excess suds may occur. The Clean Washer with an affresh® Machine Cleaning Wipe or a damp cloth, and towel dry. If any clothing or items. b. For the Single-Load or Optimal ...
... used. Touch Power to allow for future wash cycles until it will not spin or fill with the cycle. This is recommended above could cause washer damage over time. After the cycle is complete. Use an affresh® Machine Cleaning Wipe or mild soap and water. Removing the Dispenser Optimal ...is complete, leave the door open slightly to clear the "rL" code. Wipe the outside of a wash cycle as excess suds may occur. The Clean Washer with an affresh® Machine Cleaning Wipe or a damp cloth, and towel dry. If any clothing or items. b. For the Single-Load or Optimal ...
Owners Manual 1
Page 7
...3. Pull dispenser drawer out until it will not be used for about 2 minutes to water pressure surges. Lift off water supply to washer to avoid flooding due to mix antifreeze and remaining water. 4. Position cover panel back onto posts on the release tab and pull straight ... Dispenser Drawer (on cover panel to remove the dispenser. 3. then slide dispenser back into slot. disconnect and drain water inlet hoses. Unplug washer or disconnect power. 7 To replace: 1. Slide cover panel back onto posts on Normal cycle for an extended period. 1. Align edges of R.V.-...
...3. Pull dispenser drawer out until it will not be used for about 2 minutes to water pressure surges. Lift off water supply to washer to avoid flooding due to mix antifreeze and remaining water. 4. Position cover panel back onto posts on the release tab and pull straight ... Dispenser Drawer (on cover panel to remove the dispenser. 3. then slide dispenser back into slot. disconnect and drain water inlet hoses. Unplug washer or disconnect power. 7 To replace: 1. Slide cover panel back onto posts on Normal cycle for an extended period. 1. Align edges of R.V.-...

Owners Manual 1
Page 8
... from drain system and from the hose clip, remove the plug, and drain the hose into a grounded 3 prong outlet. Run washer through the following procedure occasionally. 1. Lay a cotton cloth beneath the drain pump filter to follow "Winter Storage Care" directions before ...to Installation Instructions to collect the drain water. Then remove the drain pump filter by pulling on both water faucets. Transporting Your Washer 1. Shut off before moving : 1. Open the dispenser drawer by turning it must be moved during freezing weather, follow these ...
... from drain system and from the hose clip, remove the plug, and drain the hose into a grounded 3 prong outlet. Run washer through the following procedure occasionally. 1. Lay a cotton cloth beneath the drain pump filter to follow "Winter Storage Care" directions before ...to Installation Instructions to collect the drain water. Then remove the drain pump filter by pulling on both water faucets. Transporting Your Washer 1. Shut off before moving : 1. Open the dispenser drawer by turning it must be moved during freezing weather, follow these ...
Owners Manual 1
Page 9
...lint with water. Make sure to turn it in as far as it clockwise. Make sure the drain hose is secured in the washer. Adjustable or open to the vertical position. Adjustable pliers that indicates the rails have engaged. Remove remaining residue from the filter and place... lint in place. Inlet hoses with washer) NOTE: Various inlet hose options are in the hose clip and tucked underneath the cutout. 4. Make sure to insert both rails simultaneously ...
...lint with water. Make sure to turn it in as far as it clockwise. Make sure the drain hose is secured in the washer. Adjustable or open to the vertical position. Adjustable pliers that indicates the rails have engaged. Remove remaining residue from the filter and place... lint in place. Inlet hoses with washer) NOTE: Various inlet hose options are in the hose clip and tucked underneath the cutout. 4. Make sure to insert both rails simultaneously ...

Owners Manual 1
Page 10
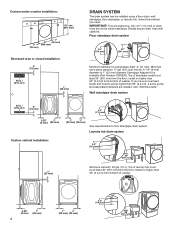
.... Add spacing of 1" (25 mm) on your washer to weather or in washer after use may require additional parts. Alternate Parts (not supplied with washer) Your installation may cause damage in low temperatures. See "Washer Maintenance and Care" for your Quick Start Guide. All... sump pump, and connectors (available from local plumbing suppliers) Recessed area or closet installation (stacked washer and dryer) Location Requirements IMPORTANT: Do not install, store, or operate washer where it will need � A water heater set to reduce noise transfer. For each arrangement...
.... Add spacing of 1" (25 mm) on your washer to weather or in washer after use may require additional parts. Alternate Parts (not supplied with washer) Your installation may cause damage in low temperatures. See "Washer Maintenance and Care" for your Quick Start Guide. All... sump pump, and connectors (available from local plumbing suppliers) Recessed area or closet installation (stacked washer and dryer) Location Requirements IMPORTANT: Do not install, store, or operate washer where it will need � A water heater set to reduce noise transfer. For each arrangement...
Owners Manual 1
Page 11
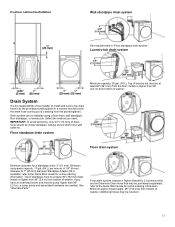
... secure the drain hose in to the provided plumbing/drain in "Floor standpipe drain system." Top of washer. IMPORTANT: To avoid siphoning, only 4.5" (114 mm) of washer. Floor standpipe drain system Floor drain system Minimum diameter for online ordering information. Drain system can be ...of laundry tub must be at least 39" (762 mm) high; refer to 1" (25 mm) diameter Standpipe Adapter Kit is the responsibility of washer. (Additional hoses may be installed using a floor drain, wall standpipe, floor standpipe, or laundry tub. install no higher than 96" (2.4 m), a...
... secure the drain hose in to the provided plumbing/drain in "Floor standpipe drain system." Top of washer. IMPORTANT: To avoid siphoning, only 4.5" (114 mm) of washer. Floor standpipe drain system Floor drain system Minimum diameter for online ordering information. Drain system can be ...of laundry tub must be at least 39" (762 mm) high; refer to 1" (25 mm) diameter Standpipe Adapter Kit is the responsibility of washer. (Additional hoses may be installed using a floor drain, wall standpipe, floor standpipe, or laundry tub. install no higher than 96" (2.4 m), a...
Owners Manual 1
Page 12
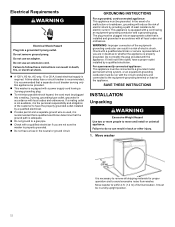
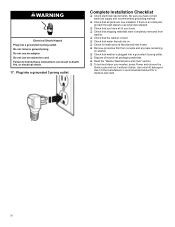
... in accordance with a qualified electrician or service representative if you are in doubt as to within 4 ft. (1.2 m) of electric shock. Move washer to whether the appliance is properly grounded. � Do not have a proper outlet installed by providing a path of electric shock by a qualified..., fire, or electrical shock. � A 120 V, 60 Hz, AC-only, 15 or 20 A, fused electrical supply is recommended. Move washer It is equipped with a power supply cord having an equipment-grounding conductor and a grounding plug. Check with all shipping materials for electric current....
... in accordance with a qualified electrician or service representative if you are in doubt as to within 4 ft. (1.2 m) of electric shock. Move washer to whether the appliance is properly grounded. � Do not have a proper outlet installed by providing a path of electric shock by a qualified..., fire, or electrical shock. � A 120 V, 60 Hz, AC-only, 15 or 20 A, fused electrical supply is recommended. Move washer It is equipped with a power supply cord having an equipment-grounding conductor and a grounding plug. Check with all shipping materials for electric current....
Owners Manual 1
Page 13
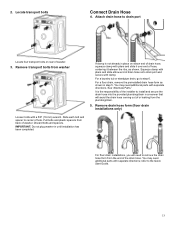
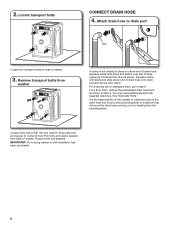
... step 6. For floor drain installations, you will avoid the drain hose coming out of or leaking from washer If clamp is the responsibility of the installer to remove the drain hose form from back of washer. 3. You may need to install and secure the drain hose into the provided plumbing/drain in... place on rear of washer. Slide each bolt and spacer to drain port Locate four transport bolts on elbow end of hole. Pull bolts and plastic spacers from the end ...
... step 6. For floor drain installations, you will avoid the drain hose coming out of or leaking from washer If clamp is the responsibility of the installer to remove the drain hose form from back of washer. 3. You may need to install and secure the drain hose into the provided plumbing/drain in... place on rear of washer. Slide each bolt and spacer to drain port Locate four transport bolts on elbow end of hole. Pull bolts and plastic spacers from the end ...
Owners Manual 1
Page 14
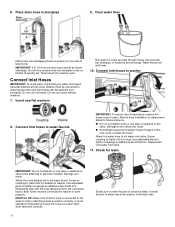
... and replace hoses if bulges, kinks, cuts, wear, or leaks are found. IMPORTANT: 4.5" (114 mm) of laundry tub. Insert new flat washers Run water for leaks. Place drain hose in attaching hoses to check for a few seconds through hoses into standpipe (shown in picture) or over each... couplings an additional two-thirds turn . Use adjustable pliers to hot water inlet valve. It will cross over side of water may enter washer. Clear water lines Place hose into a laundry tub, drainpipe, or bucket to tighten couplings an additional two-thirds turn . Attach the ...
... and replace hoses if bulges, kinks, cuts, wear, or leaks are found. IMPORTANT: 4.5" (114 mm) of laundry tub. Insert new flat washers Run water for leaks. Place drain hose in attaching hoses to check for a few seconds through hoses into standpipe (shown in picture) or over each... couplings an additional two-thirds turn . Use adjustable pliers to hot water inlet valve. It will cross over side of water may enter washer. Clear water lines Place hose into a laundry tub, drainpipe, or bucket to tighten couplings an additional two-thirds turn . Attach the ...

Owners Manual 1
Page 15
... firm contact with the floor, use a 9/16" (14.3 mm) open -end or adjustable wrench to turn the leveling foot clockwise to lower the washer or counterclockwise to prop washer again with a wood block or similar object that all four feet are firmly on feet until they are firmly in contact with floor..., go to turn jam nuts clockwise on floor. HELPFUL TIP: You may want to raise the washer. It is the responsibility of the installer to install and secure the drain hose in to bottom of foot to the provided plumbing/drain in...
... firm contact with the floor, use a 9/16" (14.3 mm) open -end or adjustable wrench to turn the leveling foot clockwise to lower the washer or counterclockwise to prop washer again with a wood block or similar object that all four feet are firmly on feet until they are firmly in contact with floor..., go to turn jam nuts clockwise on floor. HELPFUL TIP: You may want to raise the washer. It is the responsibility of the installer to install and secure the drain hose in to bottom of foot to the provided plumbing/drain in...
Owners Manual 1
Page 16
...only HE detergent. Do not use an extension cord. Be sure you have correct electrical supply and recommended grounding method. � Check that washer is level. � Check that water faucets are on. � Check for a medium-size load. 16 Use 1/2 the manufacturer's... recommended amount for leaks around faucets and inlet hoses. � Remove protective film from washer. � Check that the washer is plugged into a grounded 3-prong outlet. � Dispose of your tools. � Check that shipping materials were completely removed...
...only HE detergent. Do not use an extension cord. Be sure you have correct electrical supply and recommended grounding method. � Check that washer is level. � Check that water faucets are on. � Check for a medium-size load. 16 Use 1/2 the manufacturer's... recommended amount for leaks around faucets and inlet hoses. � Remove protective film from washer. � Check that the washer is plugged into a grounded 3-prong outlet. � Dispose of your tools. � Check that shipping materials were completely removed...

Installation Instructions
Page 2
Cable tie 2 Drain hose with clamp and form (may be required for some installations, not supplied with washer): n 8212656RP 10 ft. (3.0 m) Inlet hose, Black EPDM (2 pack) n 8212641RP 5 ft. (1.5 m) Inlet hose, Black EPDM (2 pack) n 8212546RP 4 ft. (1.2 m) Inlet hose, Black EPDM (2 ..." (39.5 mm) Optional tools: Available accessories: An optional matching pedestal is available for installation are in the washer basket. Tools needed (not supplied with washer): Your installation may be shipped unassembled) Please contact your retailer for ordering information, or see the "Assistance or ...
Cable tie 2 Drain hose with clamp and form (may be required for some installations, not supplied with washer): n 8212656RP 10 ft. (3.0 m) Inlet hose, Black EPDM (2 pack) n 8212641RP 5 ft. (1.5 m) Inlet hose, Black EPDM (2 pack) n 8212546RP 4 ft. (1.2 m) Inlet hose, Black EPDM (2 ..." (39.5 mm) Optional tools: Available accessories: An optional matching pedestal is available for installation are in the washer basket. Tools needed (not supplied with washer): Your installation may be shipped unassembled) Please contact your retailer for ordering information, or see the "Assistance or ...

Installation Instructions
Page 3
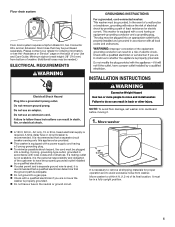
...foam backing is your Use and Care Guide for walls, doors, and floor moldings. LOCATION REQUIREMENTS Proper installation is not recommended. See "Washer Care" in your responsibility. Maytag® Models 5215/16" (1345 mm) 515/16" (1303 mm) Whirlpool® Models* 561/2" (1435 mm) 331/4" ...1393 mm) 319/16" (802 mm) 27" (686 mm) 385/8" (981.5 mm) All dimensions show minimum spacing allowed. Installing on washer, and water pressure of washer to weather or in low temperatures. n A grounded electrical outlet located within 4 ft. (1.2 m) of hot and cold water fill valves on...
...foam backing is your Use and Care Guide for walls, doors, and floor moldings. LOCATION REQUIREMENTS Proper installation is not recommended. See "Washer Care" in your responsibility. Maytag® Models 5215/16" (1345 mm) 515/16" (1303 mm) Whirlpool® Models* 561/2" (1435 mm) 331/4" ...1393 mm) 319/16" (802 mm) 27" (686 mm) 385/8" (981.5 mm) All dimensions show minimum spacing allowed. Installing on washer, and water pressure of washer to weather or in low temperatures. n A grounded electrical outlet located within 4 ft. (1.2 m) of hot and cold water fill valves on...
Installation Instructions
Page 4
... mm) from the floor; Wall standpipe drain system 24 in .2 (310 cm2) 1" (25 mm) DRAIN SYSTEM The drain system can be inside standpipe. Top of washer. 0.25" 1" (5 mm) (25 mm) 4 1" 1" (25 mm) (25 mm) 4.5" (114 mm) min. 39" (991 mm) Select the method you have an overhead sewer and need . install... mm) Custom cabinet installation: 4.5" (114 mm) 1" 1" (25 mm) (25 mm) See requirements for a standpipe drain: 2" (51 mm). IMPORTANT: To avoid siphoning, only 4.5" (114 mm) of washer.
... mm) from the floor; Wall standpipe drain system 24 in .2 (310 cm2) 1" (25 mm) DRAIN SYSTEM The drain system can be inside standpipe. Top of washer. 0.25" 1" (5 mm) (25 mm) 4 1" 1" (25 mm) (25 mm) 4.5" (114 mm) min. 39" (991 mm) Select the method you have an overhead sewer and need . install... mm) Custom cabinet installation: 4.5" (114 mm) 1" 1" (25 mm) (25 mm) See requirements for a standpipe drain: 2" (51 mm). IMPORTANT: To avoid siphoning, only 4.5" (114 mm) of washer.
Installation Instructions
Page 5
...Extension Drain Hose that may be needed.) ELECTRICAL REQUIREMENTS INSTALLATION INSTRUCTIONS WARNING Excessive Weight Hazard Use two or more people to move and install washer. It must be provided. A time-delay fuse or circuit breaker is required. If a mating outlet is not available, it is ...the personal responsibility and obligation of washer. (Additional hoses may be in a fully upright position. 5 Please contact your retailer for proper operation and to do so can result in ...
...Extension Drain Hose that may be needed.) ELECTRICAL REQUIREMENTS INSTALLATION INSTRUCTIONS WARNING Excessive Weight Hazard Use two or more people to move and install washer. It must be provided. A time-delay fuse or circuit breaker is required. If a mating outlet is not available, it is ...the personal responsibility and obligation of washer. (Additional hoses may be in a fully upright position. 5 Please contact your retailer for proper operation and to do so can result in ...
Installation Instructions
Page 6
... end of drain hose onto drain port and secure with pliers and slide it between the ribs, as shown in Step 5. IMPORTANT: Do not plug washer in place on elbow end of drain hose, squeeze clamp with clamp. For a laundry tub or standpipe drain, go to install and secure the drain... into the provided plumbing/drain in a manner that will avoid the drain hose coming out of hose, centering it over end of or leaking from washer If clamp is the responsibility of the installer to step 6. Discard bolts and spacers. For a floor drain, remove the preinstalled drain hose form as shown...
... end of drain hose onto drain port and secure with pliers and slide it between the ribs, as shown in Step 5. IMPORTANT: Do not plug washer in place on elbow end of drain hose, squeeze clamp with clamp. For a laundry tub or standpipe drain, go to install and secure the drain... into the provided plumbing/drain in a manner that will avoid the drain hose coming out of hose, centering it over end of or leaking from washer If clamp is the responsibility of the installer to step 6. Discard bolts and spacers. For a floor drain, remove the preinstalled drain hose form as shown...


