Quick Start Guide
Page 1
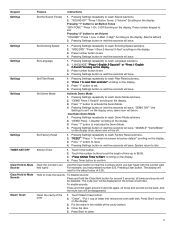
... on specific functions, see the online Control Guide. Using Hood Light Press Light button setting the hood light among HIGH->MEDIUM->LOW->OFF NOTE: For more detailed instructions on the underside of microwave oven. Place food inside the microwave oven. Select food classes. Blocking or covering vents will be opened automatically when it works, should be blocked or covered since it out of light) can occur and cause damage to remove the filter alert on the display. B CLEAN GREASE FILTER: The Grease Filter is...
... on specific functions, see the online Control Guide. Using Hood Light Press Light button setting the hood light among HIGH->MEDIUM->LOW->OFF NOTE: For more detailed instructions on the underside of microwave oven. Place food inside the microwave oven. Select food classes. Blocking or covering vents will be opened automatically when it works, should be blocked or covered since it out of light) can occur and cause damage to remove the filter alert on the display. B CLEAN GREASE FILTER: The Grease Filter is...
Control Guide
Page 1
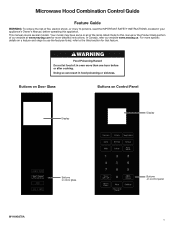
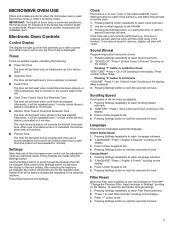
... INSTRUCTIONS, located in your appliance's Owner's Manual, before or after cooking. Buttons on Door Glass Buttons on Control Panel Display Display W11640270A Buttons on door glass Buttons on a feature and steps to use the features listed, refer to this appliance. In Canada, refer our website www.maytag.ca. For more specific details on control panel 1 Doing so can result in oven more detailed instructions. Refer to the titled section for more than one hour before operating...
... INSTRUCTIONS, located in your appliance's Owner's Manual, before or after cooking. Buttons on Door Glass Buttons on Control Panel Display Display W11640270A Buttons on door glass Buttons on a feature and steps to use the features listed, refer to this appliance. In Canada, refer our website www.maytag.ca. For more specific details on control panel 1 Doing so can result in oven more detailed instructions. Refer to the titled section for more than one hour before operating...
Control Guide
Page 2
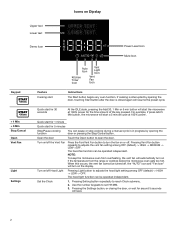
... stop cooking during a manual cycle is in progress by opening the door, touching Start button after the door is interrupted by opening the door or pressing the Stop/Cancel button. Quick start for 1 minute Quick start Instructions The Start button begins any oven function. the "AUTO" icon and "Fan Icon" will automatically turn on Dipslay Upper text Lower text Demo Icon Power Level Icon Mute Icon Keypad + 1 Min + 5 Min Stop/Cancel Open Vent Fan Light Settings Auto Icon Vent Light Icon Kitchen Vent Timer Fan Icon Icon Feature Cooking start for the time...
... stop cooking during a manual cycle is in progress by opening the door, touching Start button after the door is interrupted by opening the door or pressing the Stop/Cancel button. Quick start for 1 minute Quick start Instructions The Start button begins any oven function. the "AUTO" icon and "Fan Icon" will automatically turn on Dipslay Upper text Lower text Demo Icon Power Level Icon Mute Icon Keypad + 1 Min + 5 Min Stop/Cancel Open Vent Fan Light Settings Auto Icon Vent Light Icon Kitchen Vent Timer Fan Icon Icon Feature Cooking start for the time...
Control Guide
Page 3
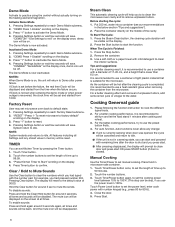
... the display. 3. Press Start to reach Filter Reset submenu. 2. Pressing Settings repeatedly to reach Demo Mode submenu. 2. "LANGUAGE" "Press 1-English 2-Spanish" or "Press 1-English 2-French"scrolling on the display. 3. Pressing Settings repeatedly to reach Scrolling Speed submenu. 2. Kitchen Timer 1. The display will save . To enable sounds: Press and hold the Clear/Hold button for around 3 seconds again, all times. Clean the cavity of water into microwave oven safe...
... the display. 3. Press Start to reach Filter Reset submenu. 2. Pressing Settings repeatedly to reach Demo Mode submenu. 2. "LANGUAGE" "Press 1-English 2-Spanish" or "Press 1-English 2-French"scrolling on the display. 3. Pressing Settings repeatedly to reach Scrolling Speed submenu. 2. Kitchen Timer 1. The display will save . To enable sounds: Press and hold the Clear/Hold button for around 3 seconds again, all times. Clean the cavity of water into microwave oven safe...
Control Guide
Page 5
... door, or wait for 3 times). Pressing "1" button to set . 4. When oven is not in Settings" scrolling on the display. Press number keypad to set . Exposure to the fumes may be adjusted to set . 4. "SOUND OP" "Press 1-Button Tones 2-Volume" Scrolling on the display. 3. Pressing Settings button or wait few seconds will be heard during cooking when the user is met, the reminder of "FAN OFF" "Change the Charcoal Filter, Reset reminder in use...
... door, or wait for 3 times). Pressing "1" button to set . 4. When oven is not in Settings" scrolling on the display. Press number keypad to set . Exposure to the fumes may be adjusted to set . 4. "SOUND OP" "Press 1-Button Tones 2-Volume" Scrolling on the display. 3. Pressing Settings button or wait few seconds will be heard during cooking when the user is met, the reminder of "FAN OFF" "Change the Charcoal Filter, Reset reminder in use...
Control Guide
Page 6
... all times. Pressing Clear button. Press the Steam Clean button, the cleaning cycle duration will be visible on the heating element/magnetron. Press Start. 6 Demo Mode Activate to practice using the control without actually turning on the display. 2. Factory Reset User may set the length of light plastic material that is now inactivated. The mute icon will be displayed on the display. 3. n After pressing stop(pause), the display will be disappeared. To reset microwave...
... all times. Pressing Clear button. Press the Steam Clean button, the cleaning cycle duration will be visible on the heating element/magnetron. Press Start. 6 Demo Mode Activate to practice using the control without actually turning on the display. 2. Factory Reset User may set the length of light plastic material that is now inactivated. The mute icon will be displayed on the display. 3. n After pressing stop(pause), the display will be disappeared. To reset microwave...
Control Guide
Page 7
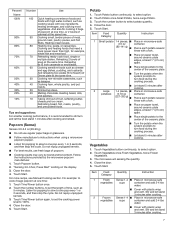
... door. 5. n Cover with plastic wrap and vent. Defrosting bread, fish, meats, poultry, and precooked foods. "Sensing 3.0-3.5oz, Press Start" scolling on paper towel, around ceramic plate edges, at least 1" (2.5 cm) apart. For example: to turn food during the cooking process. Touch Time/Power button once. 2. Touch the number button to select option. 2. Touch Start. Touch Vegetables button continously, to select potato quantity. 4. Follow the instructions provided by brand and fat content. Touch the number buttons...
... door. 5. n Cover with plastic wrap and vent. Defrosting bread, fish, meats, poultry, and precooked foods. "Sensing 3.0-3.5oz, Press Start" scolling on paper towel, around ceramic plate edges, at least 1" (2.5 cm) apart. For example: to turn food during the cooking process. Touch Time/Power button once. 2. Touch the number button to select option. 2. Touch Start. Touch Vegetables button continously, to select potato quantity. 4. Follow the instructions provided by brand and fat content. Touch the number buttons...

Control Guide
Page 8
... not be defrosted using the Defrost feature but should be defrosted manually. Close the door. 4. n Touch Cook button to select Manual cook and set the cooking power level to select option. 2. Touch Time/Power button again, to set the suitable time,touch START to use the preset button firstly. n Separate food pieces as soon as chicken wings, leg tips, and fish tails. Touch Start. Touch Cook button continously, to 100%. 4. n Cover the dish. Touch Time/Power button once. 2. n Foods left outside the freezer for ingredient amounts. Cook 1. Use number buttons to...
... not be defrosted using the Defrost feature but should be defrosted manually. Close the door. 4. n Touch Cook button to select Manual cook and set the cooking power level to select option. 2. Touch Time/Power button again, to set the suitable time,touch START to use the preset button firstly. n Separate food pieces as soon as chicken wings, leg tips, and fish tails. Touch Start. Touch Cook button continously, to 100%. 4. n Cover the dish. Touch Time/Power button once. 2. n Foods left outside the freezer for ingredient amounts. Cook 1. Use number buttons to...
Owners Manual
Page 2
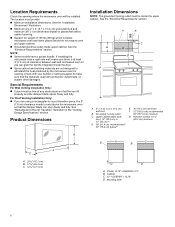
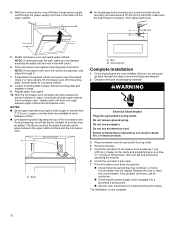
... over or near any portion of a heating or cooking appliance. � Do not mount over edge of 36" (91.44 cm). Always read and obey all instructions before using a 3D printer). � See door surface cleaning instructions in the "Microwave Oven Maintenance and Care" section. � Liquids, such as described in operation. � Clean Ventilating Hoods Frequently - Do not use as water, coffee, or tea...
... over or near any portion of a heating or cooking appliance. � Do not mount over edge of 36" (91.44 cm). Always read and obey all instructions before using a 3D printer). � See door surface cleaning instructions in the "Microwave Oven Maintenance and Care" section. � Liquids, such as described in operation. � Clean Ventilating Hoods Frequently - Do not use as water, coffee, or tea...
Owners Manual
Page 3
... cavity when not in the oven cavity: • Do not overcook food. IMPORTANT SAFETY INSTRUCTIONS � Use care when cleaning the vent-hood filter. It is particularly important that the oven door close properly and that there is important not to defeat or tamper with the door open since open-door operation can result in oven. • If materials inside the oven to facilitate cooking. • Remove wire twist-ties from paper...
... cavity when not in the oven cavity: • Do not overcook food. IMPORTANT SAFETY INSTRUCTIONS � Use care when cleaning the vent-hood filter. It is particularly important that the oven door close properly and that there is important not to defeat or tamper with the door open since open-door operation can result in oven. • If materials inside the oven to facilitate cooking. • Remove wire twist-ties from paper...

Owners Manual
Page 4
... hole drill bit for wall or roof venting. Rub in direction of Whirlpool, U.S.A. 4 STAINLESS STEEL AND BLACK STAINLESS STEEL (on panel. � Affresh® Kitchen Appliance Cleaners Part Number W10355010 (not included): See "Online Ordering Information" section from Quick Start Guide to avoid damaging. Damage may occur to the microwave oven cavity, do not use soap-filled scouring pads, abrasive cleaners, Cooktop Cleaner, steel-wool...
... hole drill bit for wall or roof venting. Rub in direction of Whirlpool, U.S.A. 4 STAINLESS STEEL AND BLACK STAINLESS STEEL (on panel. � Affresh® Kitchen Appliance Cleaners Part Number W10355010 (not included): See "Online Ordering Information" section from Quick Start Guide to avoid damaging. Damage may occur to the microwave oven cavity, do not use soap-filled scouring pads, abrasive cleaners, Cooktop Cleaner, steel-wool...
Owners Manual
Page 6
..., the 3" (7.6 cm) clearance needs to withstand the heat produced by the microwave oven for weight of any obstructions so that the vent fit properly and the damper blade opens freely and fully. If installing the microwave near a right side wall, make sure that the damper blade can grab the handle integrated inside the upper cabinet. The location must be inside the door. � Some cabinet and building materials are...
..., the 3" (7.6 cm) clearance needs to withstand the heat produced by the microwave oven for weight of any obstructions so that the vent fit properly and the damper blade opens freely and fully. If installing the microwave near a right side wall, make sure that the damper blade can grab the handle integrated inside the upper cabinet. The location must be inside the door. � Some cabinet and building materials are...
Owners Manual
Page 7
.... 1. Cabinet C. In the event of a malfunction or breakdown, grounding will not fit the outlet, have a proper outlet installed by providing a path of the Quick Start Guide. Do not use an extension cord. Failure to do not grip or use the bump out mounting kit replacing the mounting plate from the wall. Remove the damper from the inner foam in back or other Whirlpool Products. Tape the microwave oven door...
.... 1. Cabinet C. In the event of a malfunction or breakdown, grounding will not fit the outlet, have a proper outlet installed by providing a path of the Quick Start Guide. Do not use an extension cord. Failure to do not grip or use the bump out mounting kit replacing the mounting plate from the wall. Remove the damper from the inner foam in back or other Whirlpool Products. Tape the microwave oven door...
Owners Manual
Page 8
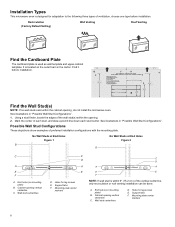
... lag screws E. Holes for lag screws E. Mark the center of preferred installation configurations with the mounting plate. Installation Types This microwave oven is designed for adaptation to the following three types of ventilation, choose one type before installation. See illustrations in "Possible Wall Stud Configurations". Cabinet opening vertical centerline C. Mounting plate center markers 8 Recirculation (Factory Default Setting) Wall Venting Roof Venting Find the Cardboard Plate The cardboard plate is used as wall template and upper-cabinet template.
... lag screws E. Holes for lag screws E. Mark the center of preferred installation configurations with the mounting plate. Installation Types This microwave oven is designed for adaptation to the following three types of ventilation, choose one type before installation. See illustrations in "Possible Wall Stud Configurations". Cabinet opening vertical centerline C. Mounting plate center markers 8 Recirculation (Factory Default Setting) Wall Venting Roof Venting Find the Cardboard Plate The cardboard plate is used as wall template and upper-cabinet template.
Owners Manual
Page 11
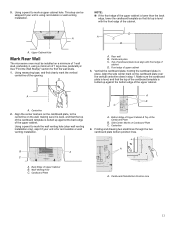
... cardboard plate in step 1. Cardboard Plate A A. Upper Cabinet Hole Mark Rear Wall The microwave oven must align with the front edge of the opening. Using a pencil to mark the wall venting hole (door wall venting installation only), skip it is level, and that its top is for find clearly mark the vertical centerline of the cabinet. Bottom Edge of Upper Cabinet & Top of 1 wall stud, preferably 2, using recirculation or wall venting installation. Wall Venting Hole C. Cardboard plate C. 5. A A. D A C B A. Top of cardboard plate...
... cardboard plate in step 1. Cardboard Plate A A. Upper Cabinet Hole Mark Rear Wall The microwave oven must align with the front edge of the opening. Using a pencil to mark the wall venting hole (door wall venting installation only), skip it is level, and that its top is for find clearly mark the vertical centerline of the cabinet. Bottom Edge of Upper Cabinet & Top of 1 wall stud, preferably 2, using recirculation or wall venting installation. Wall Venting Hole C. Cardboard plate C. 5. A A. D A C B A. Top of cardboard plate...
Owners Manual
Page 14
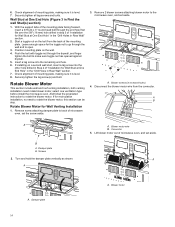
... screw into the other hole drilled in recessed holes) 4. If installing on the wall. 4. Check alignment of microwave oven, and set aside. Rotate Blower Motor This section include wall and roof venting installation, both venting installation need to back of "Installation for Wall Stud at One End Hole (Figure 3 in Rear Wall" section. 7. Remove 2 blower screws attaching blower motor to open. 3. A A. Blower motor wire B. Lift blower motor out of mounting plate, making sure it is level. 7. Damper plate B. Screws 2. Damper plate 14...
... screw into the other hole drilled in recessed holes) 4. If installing on the wall. 4. Check alignment of microwave oven, and set aside. Rotate Blower Motor This section include wall and roof venting installation, both venting installation need to back of "Installation for Wall Stud at One End Hole (Figure 3 in Rear Wall" section. 7. Remove 2 blower screws attaching blower motor to open. 3. A A. Blower motor wire B. Lift blower motor out of mounting plate, making sure it is level. 7. Damper plate B. Screws 2. Damper plate 14...
Owners Manual
Page 16
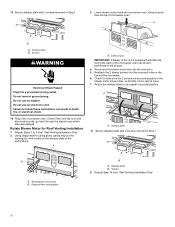
... B A. A 3. Using diagonal wire cutting pliers, gently snip out the rectangular vent covers on the damper plate at the perforations. Secure damper plate with flat side facing the back of the microwave oven (as shown), performance will be poor. 4. Exhaust port IMPORTANT: If blower motor is not positioned with 2 screws removed in death, fire, or electrical shock. 14. Reattach the 2 blower screws into microwave oven. Return the damper plate to follow these instructions...
... B A. A 3. Using diagonal wire cutting pliers, gently snip out the rectangular vent covers on the damper plate at the perforations. Secure damper plate with flat side facing the back of the microwave oven (as shown), performance will be poor. 4. Exhaust port IMPORTANT: If blower motor is not positioned with 2 screws removed in death, fire, or electrical shock. 14. Reattach the 2 blower screws into microwave oven. Return the damper plate to follow these instructions...
Owners Manual
Page 18
... the wall cutout. 6. Replace the fuse or reset the circuit breaker. If the problem continues, call an electrician. � Check that a circuit breaker has not tripped. Do not remove ground prong. If the microwave oven does not operate: � Check that a household fuse has not blown, or that the power supply cord is an extra part, go back through 6. 10. Using 2 or more people, lift microwave oven off of mounting plate, and set...
... the wall cutout. 6. Replace the fuse or reset the circuit breaker. If the problem continues, call an electrician. � Check that a circuit breaker has not tripped. Do not remove ground prong. If the microwave oven does not operate: � Check that a household fuse has not blown, or that the power supply cord is an extra part, go back through 6. 10. Using 2 or more people, lift microwave oven off of mounting plate, and set...
Dimension Guide
Page 3
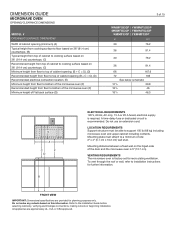
... to installation instructions for further information. Mounting distance between a fixed wall on the higed-side of the door and the microwave oven is factory set for planning purposes only. Refer to support 150 lb (68 kg) including microwave oven and upper cabinet including contents. DIMENSION GUIDE MICROWAVE OVEN OPENING/CLEARANCE DIMENSIONS MODEL # OPENING/CLEARANCE DIMENSIONS Width of cabinet opening (minimum) (A) Typical height from cooking surface to floor based on 36ʺ (91.4 cm) countertops. (B) Typical...
... to installation instructions for further information. Mounting distance between a fixed wall on the higed-side of the door and the microwave oven is factory set for planning purposes only. Refer to support 150 lb (68 kg) including microwave oven and upper cabinet including contents. DIMENSION GUIDE MICROWAVE OVEN OPENING/CLEARANCE DIMENSIONS MODEL # OPENING/CLEARANCE DIMENSIONS Width of cabinet opening (minimum) (A) Typical height from cooking surface to floor based on 36ʺ (91.4 cm) countertops. (B) Typical...
Dimension Guide
Page 5
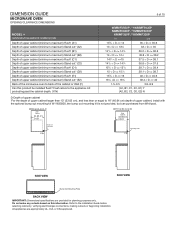
... / YWMMF5930P MMMF6030P / YMMMF6030P KMMF330P / YKMMF330P in cm 133/4 < D DIMENSION GUIDE MICROWAVE OVEN OPENING/CLEARANCE DIMENSIONS MODEL # OPENING/CLEARANCE DIMENSIONS Depth of upper cabinet (minimum-maximum) Flush* (A1) Depth of upper cabinet (minimum-maximum) Stand out* (A2) Depth of upper cabinet (minimum-maximum) Flush* (B1) Depth of upper cabinet (minimum-maximum) Stand out* (B2) Depth of upper cabinet (minimum-maximum) Flush* (C1) Depth of upper...
... / YWMMF5930P MMMF6030P / YMMMF6030P KMMF330P / YKMMF330P in cm 133/4 < D DIMENSION GUIDE MICROWAVE OVEN OPENING/CLEARANCE DIMENSIONS MODEL # OPENING/CLEARANCE DIMENSIONS Depth of upper cabinet (minimum-maximum) Flush* (A1) Depth of upper cabinet (minimum-maximum) Stand out* (A2) Depth of upper cabinet (minimum-maximum) Flush* (B1) Depth of upper cabinet (minimum-maximum) Stand out* (B2) Depth of upper cabinet (minimum-maximum) Flush* (C1) Depth of upper...


