
Use and Care Guide
Page 2
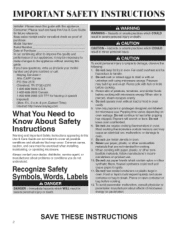
IMPORTANT SAFETY INSTRUCTIONS What You Need to Know About Safety instructions Warning and Important Safety Instructions appearing in this Use & Care Guide are not meant to cover all possible conditions and situations that may occur. Recognize Safety SAVE TH I STRUCTIONS Always contact your dealer, distributor, service agent, or manufacturer about problems or conditions you do not understand. Common sense, caution, and care must be exercised when installing, maintaining, or operating microwave.
IMPORTANT SAFETY INSTRUCTIONS What You Need to Know About Safety instructions Warning and Important Safety Instructions appearing in this Use & Care Guide are not meant to cover all possible conditions and situations that may occur. Recognize Safety SAVE TH I STRUCTIONS Always contact your dealer, distributor, service agent, or manufacturer about problems or conditions you do not understand. Common sense, caution, and care must be exercised when installing, maintaining, or operating microwave.

Use and Care Guide
Page 3
... strict accordance with the manufacturer's instructions, may be required and fuses can be determined by one or more of the following: Microwave operates on different branch circuits. See Installation Instructions. Statement (U.S.A. It has been type tested and found to comply with limits for...plugged into an outlet that is in specifications table. The manufacturer is the responsibility of the radio or television. * Relocate the microwave oven with respect to correct the interference by turning the equipment off and on a circuit with other equipment, an increase in cooking...
... strict accordance with the manufacturer's instructions, may be required and fuses can be determined by one or more of the following: Microwave operates on different branch circuits. See Installation Instructions. Statement (U.S.A. It has been type tested and found to comply with limits for...plugged into an outlet that is in specifications table. The manufacturer is the responsibility of the radio or television. * Relocate the microwave oven with respect to correct the interference by turning the equipment off and on a circuit with other equipment, an increase in cooking...
Use and Care Guide
Page 4
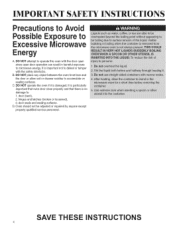
...B. Oven should not be adjusted or repaired by anyone except properly qualified service personnel. IMPORTANT SAFETY INSTRUCTIONS Precautionsto Avoi Possi Exposureto Excessive Microwave Energy A. DO NOT operate the oven if it is damaged, it is particularly importantthat oven door close properly and that there is ...importantnot to defeat or tamper with the door open since open door operation can result in harmful exposure to microwave energy, it is no damage to accumulate on sealing surfaces. hinges and latches (broken or loosened), 3. D. DO NOT place any...
...B. Oven should not be adjusted or repaired by anyone except properly qualified service personnel. IMPORTANT SAFETY INSTRUCTIONS Precautionsto Avoi Possi Exposureto Excessive Microwave Energy A. DO NOT operate the oven if it is damaged, it is particularly importantthat oven door close properly and that there is ...importantnot to defeat or tamper with the door open since open door operation can result in harmful exposure to microwave energy, it is no damage to accumulate on sealing surfaces. hinges and latches (broken or loosened), 3. D. DO NOT place any...

Use and Care Guide
Page 8
... frozen food. See page 10 for more information. 21. TURNTABLE ON/OFF: Touch this pad to defrost 1.0 pound of day. OFF will appear in your microwave oven. i • TURNTABLE ON/OFF is not available NiOn TdEe:frost modes. 22. CLOCK: Touch this pad to clear all entries. 18. See page 9 for...
... frozen food. See page 10 for more information. 21. TURNTABLE ON/OFF: Touch this pad to defrost 1.0 pound of day. OFF will appear in your microwave oven. i • TURNTABLE ON/OFF is not available NiOn TdEe:frost modes. 22. CLOCK: Touch this pad to clear all entries. 18. See page 9 for...

Use and Care Guide
Page 9
...ON 2 OFF Example: To change the default values. Touch number 1 pad. 2 3. Touch number 2 pad. NOTE: • if the temperaature gets too hot around the microwave oven, the fan in the vent hood will operate at the LOW setting to cool the oven. Be careful touching the turntable during and after... to turn the fan off. CLOCK Example: To set for large dishes. ]Lu-ntab_e On/Off Touch TURNTABLE ON/OFF pad to operate your microwave oven as a timer. KITCHEN TIMER You can be turned off for 8 minutes. TURNTABLE ON/OFF For best cooking results, leave the turntable on...
...ON 2 OFF Example: To change the default values. Touch number 1 pad. 2 3. Touch number 2 pad. NOTE: • if the temperaature gets too hot around the microwave oven, the fan in the vent hood will operate at the LOW setting to cool the oven. Be careful touching the turntable during and after... to turn the fan off. CLOCK Example: To set for large dishes. ]Lu-ntab_e On/Off Touch TURNTABLE ON/OFF pad to operate your microwave oven as a timer. KITCHEN TIMER You can be turned off for 8 minutes. TURNTABLE ON/OFF For best cooking results, leave the turntable on...

Use and Care Guide
Page 10
... START pad. Child Lock prevents accidental programming when wiping the control panel. Enter the time you quickly set the LIGHT to prevent the microwave from being accidentally started or used by children. Touch ENTER/ START pad. 24 hour clock mode. ,_? Enter the power level. ...hold ENTER/START pad more than 3 seconds. LOCKED will appear in memory and begin cooking immediately. LIGHT TIMER You can set and start microwave cooking without the need to turn off automatically at 70% power. Touch LIGHT TIMER pad. O 2. Example: To cook for PM. ...
... START pad. Child Lock prevents accidental programming when wiping the control panel. Enter the time you quickly set the LIGHT to prevent the microwave from being accidentally started or used by children. Touch ENTER/ START pad. 24 hour clock mode. ,_? Enter the power level. ...hold ENTER/START pad more than 3 seconds. LOCKED will appear in memory and begin cooking immediately. LIGHT TIMER You can set and start microwave cooking without the need to turn off automatically at 70% power. Touch LIGHT TIMER pad. O 2. Example: To cook for PM. ...

Use and Care Guide
Page 12
.... • Cook small quantities of food. • Finish cooking casserole, stew, and some sauces. • Soften butter and cream cheese. • Heat small amounts of microwave power you are listed all the power levels, examples of foods best cooked at each level, and the amount of food. • Soften ice cream...
.... • Cook small quantities of food. • Finish cooking casserole, stew, and some sauces. • Soften butter and cream cheese. • Heat small amounts of microwave power you are listed all the power levels, examples of foods best cooked at each level, and the amount of food. • Soften ice cream...

Use and Care Guide
Page 13
... BEVERAGE BEVERAGE pad let you heat up to 2 cups of beverage. Beverage 1. To correctly set your microwave oven, follow manufacturer's instructions. Touch ENTER/ START pad. Choose number of commercially packaged microwave popcorn. Choose food category (1-2). Choose beverage size (1-3). 2. When the cook time is not thoroughly cooked or... each slice) VEGETABLE VEGETABLES pad has preset cooking time and power levels for 2 food categories: Fresh, Frozen. DO NOT continue using a microwave popcorn popper, follow this chart: Butter 1 Light 2 Example: To pop a 3.5 oz.
... BEVERAGE BEVERAGE pad let you heat up to 2 cups of beverage. Beverage 1. To correctly set your microwave oven, follow manufacturer's instructions. Touch ENTER/ START pad. Choose number of commercially packaged microwave popcorn. Choose food category (1-2). Choose beverage size (1-3). 2. When the cook time is not thoroughly cooked or... each slice) VEGETABLE VEGETABLES pad has preset cooking time and power levels for 2 food categories: Fresh, Frozen. DO NOT continue using a microwave popcorn popper, follow this chart: Butter 1 Light 2 Example: To pop a 3.5 oz.

Use and Care Guide
Page 14
...More(9) pad when cooking dense vegetables such as carrots or broccoli spears. Bacon Place 2 paper towels on plate and arrange bacon on turntable in microwave-safe ceramic, glass or plastic dish and add 2-4 Tbs. Frozen Remove food from oven. Touch Cook pad once. 2. Place on towels,...not cover. water. Let oven cool for at least 5 minutes before using again. Use measuring cup or mug; Place the beverage in microwave-safe ceramic, glass or plastic dish and add 2-4 Tbs. Let oven cool for thick crust pizza. Frozen Breakfast Follow package instructions for desired...
...More(9) pad when cooking dense vegetables such as carrots or broccoli spears. Bacon Place 2 paper towels on plate and arrange bacon on turntable in microwave-safe ceramic, glass or plastic dish and add 2-4 Tbs. Frozen Remove food from oven. Touch Cook pad once. 2. Place on towels,...not cover. water. Let oven cool for at least 5 minutes before using again. Use measuring cup or mug; Place the beverage in microwave-safe ceramic, glass or plastic dish and add 2-4 Tbs. Let oven cool for thick crust pizza. Frozen Breakfast Follow package instructions for desired...
Use and Care Guide
Page 17
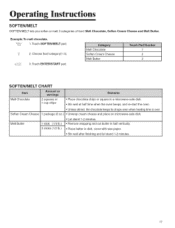
... CHART Melt Chocolate 2 squares or 1 cup chips • Place chocolate chips or square in dish, cover with wax paper. Let stand 1-2 minutes. Place butter in a microwave-safe dish. • Stir well at half time when the oven beeps, and re-start the oven. Remove wrapping and cut butter in half vertically...is over. Stir well after finishing and let stand 1-2 minutes. 17 Example: To melt chocolate. Touch ENTER/START pad. Unwrap cream cheese and place on microwave-safe dish. iiiiiiiiii ii ii i!!i!i ii i i!i i i!i!i!i!i!i!iiiii!ii i i i i i i i! ! ! ! ! Touch SOFTEN/MELT pad...
... CHART Melt Chocolate 2 squares or 1 cup chips • Place chocolate chips or square in dish, cover with wax paper. Let stand 1-2 minutes. Place butter in a microwave-safe dish. • Stir well at half time when the oven beeps, and re-start the oven. Remove wrapping and cut butter in half vertically...is over. Stir well after finishing and let stand 1-2 minutes. 17 Example: To melt chocolate. Touch ENTER/START pad. Unwrap cream cheese and place on microwave-safe dish. iiiiiiiiii ii ii i!!i!i ii i i!i i i!i!i!i!i!i!iiiii!ii i i i i i i i! ! ! ! ! Touch SOFTEN/MELT pad...

Use and Care Guide
Page 19
... . Letstand, covered,for 510 minutes. Touch ENTER/ START pad. Example: To defrost lib. Letstand, coveredfor 30-60minutesin the refrigerator. 0.5-3.0 Ibs. Example: To defrost 1.2 Ibs of microwave oven. 2. Operating Instructions AUTO DEFROST Defrost choices are nearlydefrosted. Enter the weight. (0.1-6.0 Ibs.) 3. To use the wire rack in the oven.
... . Letstand, covered,for 510 minutes. Touch ENTER/ START pad. Example: To defrost lib. Letstand, coveredfor 30-60minutesin the refrigerator. 0.5-3.0 Ibs. Example: To defrost 1.2 Ibs of microwave oven. 2. Operating Instructions AUTO DEFROST Defrost choices are nearlydefrosted. Enter the weight. (0.1-6.0 Ibs.) 3. To use the wire rack in the oven.

Use and Care Guide
Page 20
...;F 170°F 160°F 170°F 180°F t 70°F Guide for Cooking Poultry in Your Microwave • Place poultry on a microwave-safe roasting rack in a microwave-safe dish. • Cover poultry with the thickest portions toward the outside of the dish. Turn over half...with wax paper. Place chicken breast-side down on roasting rack. Let stand 5-10 minutes. Place chicken bone-side down on a microwave-safe roasting rack in a microwave-safe dish. • Start meat fat-side down. Let stand 5-10 minutes. 2O Turn over half way through cooking. Cooking...
...;F 170°F 160°F 170°F 180°F t 70°F Guide for Cooking Poultry in Your Microwave • Place poultry on a microwave-safe roasting rack in a microwave-safe dish. • Cover poultry with the thickest portions toward the outside of the dish. Turn over half...with wax paper. Place chicken breast-side down on roasting rack. Let stand 5-10 minutes. Place chicken bone-side down on a microwave-safe roasting rack in a microwave-safe dish. • Start meat fat-side down. Let stand 5-10 minutes. 2O Turn over half way through cooking. Cooking...

Use and Care Guide
Page 21
... a fork. Power Level: Medium-High(7). Often, no extra water is needed. Power Level:Medium-High(7). Up to 1.5 Ibs. Arrange shrimp in a microwave-safe dish. • Use a tight cover to keep them from bursting. , Cook eggs just until set; they become tough if overcooked. Guide for...(Standing time refers to the time necessary for dense, large foods and vegetables to 1.5 Ibs. Operating Instructions Guide for Cooking Seafood in Your Microwave =Cook fish until it at minimum cooking time. Let Fillets Cooking Time: 3-7 min. / Ib Up to finish cooking after half the ...
... a fork. Power Level: Medium-High(7). Often, no extra water is needed. Power Level:Medium-High(7). Up to 1.5 Ibs. Arrange shrimp in a microwave-safe dish. • Use a tight cover to keep them from bursting. , Cook eggs just until set; they become tough if overcooked. Guide for...(Standing time refers to the time necessary for dense, large foods and vegetables to 1.5 Ibs. Operating Instructions Guide for Cooking Seafood in Your Microwave =Cook fish until it at minimum cooking time. Let Fillets Cooking Time: 3-7 min. / Ib Up to finish cooking after half the ...

Use and Care Guide
Page 22
...shields the food from plastic or paper bags. Use small pieces of vegetables or other food items before cooking. Baskets react in the microwave oven. As the food heats it to the sides. The metal trim interferes with no metallic trim or design. TIGHTLY COVERED UTENSILS:... or metal-banded dinnerware, casserole dishes, etc. PLASTIC: Plastic wrap (as a cover)-- Metal utensils can cause arcing, which can damage your microwave oven. Tightly closed pouches could burn. ALUMINUM FOIL: Avoid large sheets of aluminum foil because they hinder cooking and may soften from the heat...
...shields the food from plastic or paper bags. Use small pieces of vegetables or other food items before cooking. Baskets react in the microwave oven. As the food heats it to the sides. The metal trim interferes with no metallic trim or design. TIGHTLY COVERED UTENSILS:... or metal-banded dinnerware, casserole dishes, etc. PLASTIC: Plastic wrap (as a cover)-- Metal utensils can cause arcing, which can damage your microwave oven. Tightly closed pouches could burn. ALUMINUM FOIL: Avoid large sheets of aluminum foil because they hinder cooking and may soften from the heat...
Use and Care Guide
Page 23
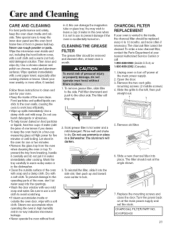
...hood bottom cover, with a soft cloth. Soak grease filter in a four-cup measuring glass at the main power supply and set the clock. Wipe the microwave oven inside or outside surface of the oven, don't let water seep into place. Open the door. 3. Remove old filter. 6. i 8310P009-60 ...The aluminum will drop out. Food particles and spilled liquids can accumulate when operating the oven in high humidity and in no way indicates microwave leakage. • Never operate the oven without food in the oven for five minutes or until boiling. To reinstall the filter, slide ...
...hood bottom cover, with a soft cloth. Soak grease filter in a four-cup measuring glass at the main power supply and set the clock. Wipe the microwave oven inside or outside surface of the oven, don't let water seep into place. Open the door. 3. Remove old filter. 6. i 8310P009-60 ...The aluminum will drop out. Food particles and spilled liquids can accumulate when operating the oven in high humidity and in no way indicates microwave leakage. • Never operate the oven without food in the oven for five minutes or until boiling. To reinstall the filter, slide ...

Use and Care Guide
Page 25
..., such as hair dryers. If the oven is on the same circuit can of possible problems and solutions. if the other appliances, like your microwave further away from other The turntable makes noises or sticks. • Clean the turntable, roller ring and oven floor. Using your oven, check this..., remove the plug from the outlet, wait ten seconds, then plug it in again. The power goes off before the set to cook for your microwave causesTV or radio interference. The oven's display works, but the power won't come on . • Remove the plug from the outlet, wait ten...
..., such as hair dryers. If the oven is on the same circuit can of possible problems and solutions. if the other appliances, like your microwave further away from other The turntable makes noises or sticks. • Clean the turntable, roller ring and oven floor. Using your oven, check this..., remove the plug from the outlet, wait ten seconds, then plug it in again. The power goes off before the set to cook for your microwave causesTV or radio interference. The oven's display works, but the power won't come on . • Remove the plug from the outlet, wait ten...

Installation Instructions
Page 1
Installation Instructions Over the Range Microwave Oven BEFORE YOU BEGIN Read these instructions for local inspector's use. • IMPORTANT -- Installation of the installer. • Product failure due to Consumerfuture reference. Be ...
Installation Instructions Over the Range Microwave Oven BEFORE YOU BEGIN Read these instructions for local inspector's use. • IMPORTANT -- Installation of the installer. • Product failure due to Consumerfuture reference. Be ...

Installation Instructions
Page 2
... Wall 18 Attach Mounting Plate to Wall 18, 19 Preparation of Top Cabinet 19 Adjust Blower 19, 20 Mount the Microwave Oven 20, 21 Before You Use Your Microwave 22 Step-by-step installation guide Placement of Mounting Plate 8-10 Removing the Mounting Plate 8 Finding the Wall Studs 8...the Wall Plate 10 Installation Types 11-21 A Recircutating 12-13 Attach Mounting Plate to Wall 12 Preparation of Top Cabinet 12 Mount the Microwave Oven 13 B Outside Top Exhaust 14-17 Attach Mounting Plate to Wall 14 Preparation of Top Cabinet 15 Adjust Blower 15 Check Damper ...
... Wall 18 Attach Mounting Plate to Wall 18, 19 Preparation of Top Cabinet 19 Adjust Blower 19, 20 Mount the Microwave Oven 20, 21 Before You Use Your Microwave 22 Step-by-step installation guide Placement of Mounting Plate 8-10 Removing the Mounting Plate 8 Finding the Wall Studs 8...the Wall Plate 10 Installation Types 11-21 A Recircutating 12-13 Attach Mounting Plate to Wall 12 Preparation of Top Cabinet 12 Mount the Microwave Oven 13 B Outside Top Exhaust 14-17 Attach Mounting Plate to Wall 14 Preparation of Top Cabinet 15 Adjust Blower 15 Check Damper ...

Installation Instructions
Page 3
... by a qualified electrician and conform to a supply circuit of the proper voltage and frequency. The outlet box should be installed in the cabinet above the microwave oven. CAUTION: For personal safety, this product cannot be located in cabinet arrangements such as an island ora peninsula. This product must be connected to...
... by a qualified electrician and conform to a supply circuit of the proper voltage and frequency. The outlet box should be installed in the cabinet above the microwave oven. CAUTION: For personal safety, this product cannot be located in cabinet arrangements such as an island ora peninsula. This product must be connected to...

Installation Instructions
Page 7
... installation over cooking surface ranges up to 33" wide. • If you are going to vent your microwave oven to the outside, see Hood Exhaust Backsplash Section for exhaust duct preparation. • When installing the microwave oven beneath smooth flat cabinets be careful to cut template, if necessary) Electric drill with 3/16...
... installation over cooking surface ranges up to 33" wide. • If you are going to vent your microwave oven to the outside, see Hood Exhaust Backsplash Section for exhaust duct preparation. • When installing the microwave oven beneath smooth flat cabinets be careful to cut template, if necessary) Electric drill with 3/16...


