
Installation Instructions
Page 1
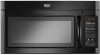
...the potential hazard is, tell you don't follow instructions. W10344702B These installation instructions cover different models. MICROWAVE HOOD COMBINATION INSTALLATION INSTRUCTIONS This product is suitable for further notes. We have provided many important safety messages... in these installation instructions. Always read and obey all safety messages. Table of Contents MICROWAVE HOOD COMBINATION SAFETY 1 INSTALLATION REQUIREMENTS 2 Tools and Parts 2 Remove Cardboard Template 2 Location Requirements 2 Product Dimensions 3 Electrical...
...the potential hazard is, tell you don't follow instructions. W10344702B These installation instructions cover different models. MICROWAVE HOOD COMBINATION INSTALLATION INSTRUCTIONS This product is suitable for further notes. We have provided many important safety messages... in these installation instructions. Always read and obey all safety messages. Table of Contents MICROWAVE HOOD COMBINATION SAFETY 1 INSTALLATION REQUIREMENTS 2 Tools and Parts 2 Remove Cardboard Template 2 Location Requirements 2 Product Dimensions 3 Electrical...

Installation Instructions
Page 2
... template to the side and refer to separate the template from the top of installation. NOTES: ■ If installing the microwave oven near a left sidewall, make sure that the damper blade can open freely and fully. INSTALLATION REQUIREMENTS Tools and Parts Tools...9632; Some cabinet and building materials are using a rectangular to round transition piece, the 3" (7.6 cm) clearance needs to exist above the microwave oven so that the materials used will be sure to Round Transition" illustration in "Venting Design Specifications" section. 2 For Roof Venting Installation Only...
... template to the side and refer to separate the template from the top of installation. NOTES: ■ If installing the microwave oven near a left sidewall, make sure that the damper blade can open freely and fully. INSTALLATION REQUIREMENTS Tools and Parts Tools...9632; Some cabinet and building materials are using a rectangular to round transition piece, the 3" (7.6 cm) clearance needs to exist above the microwave oven so that the materials used will be sure to Round Transition" illustration in "Venting Design Specifications" section. 2 For Roof Venting Installation Only...

Installation Instructions
Page 3
... or electrical shock. Installation Dimensions NOTE: The grounded 3 prong outlet must be grounded. Do not use an extension cord. Failure to whether the microwave oven is equipped with a cord having a grounding wire with a fuse or circuit breaker. Recommended: ■ A time-delay fuse or time-delay... circuit breaker. ■ A separate circuit serving only this microwave oven. Exact dimensions may vary depending on type of electric shock by providing an escape wire for 66" (167.6 cm) installation height. If...
... or electrical shock. Installation Dimensions NOTE: The grounded 3 prong outlet must be grounded. Do not use an extension cord. Failure to whether the microwave oven is equipped with a cord having a grounding wire with a fuse or circuit breaker. Recommended: ■ A time-delay fuse or time-delay... circuit breaker. ■ A separate circuit serving only this microwave oven. Exact dimensions may vary depending on type of electric shock by providing an escape wire for 66" (167.6 cm) installation height. If...

Installation Instructions
Page 4
... motor to the venting system. Screws C. Damper plate tabs D. If the mounting plate is attached to the microwave oven, do not grip or use the door or door handle while the microwave oven is being handled. 4. Screws B. A A. A A. A Keep the damper assembly in case the ...plate and screws together and set for recirculation installation. Remove any remaining contents from the microwave oven cavity. 2. Wall Venting Installation Only 1. Reattach blower motor to the back of the microwave oven, remove it and set it may be used. INSTALLATION INSTRUCTIONS Remove Mounting Plate...
... motor to the venting system. Screws C. Damper plate tabs D. If the mounting plate is attached to the microwave oven, do not grip or use the door or door handle while the microwave oven is being handled. 4. Screws B. A A. A A. A Keep the damper assembly in case the ...plate and screws together and set for recirculation installation. Remove any remaining contents from the microwave oven cavity. 2. Wall Venting Installation Only 1. Reattach blower motor to the back of the microwave oven, remove it and set it may be used. INSTALLATION INSTRUCTIONS Remove Mounting Plate...

Installation Instructions
Page 5
... "Wall Venting Installation Only." 5 Reattach blower motor to the microwave oven. 7. Repeat Step 3 from "Wall Venting Installation Only." 5. Rotate blower motor so that exhaust ports face the top of microwave oven, and flat sides of blower motor face back of "Wall...B C A. Repeat Step 4 from "Wall Venting Installation Only." 4. Damper plate B. Secure damper plate with 2 screws removed in Step 3 of microwave oven. Reattach damper plate. Roof Venting Installation Only 1. Repeat Step 1 from "Wall Venting Installation Only." 3. Repeat Step 2 from "Wall Venting ...
... "Wall Venting Installation Only." 5 Reattach blower motor to the microwave oven. 7. Repeat Step 3 from "Wall Venting Installation Only." 5. Rotate blower motor so that exhaust ports face the top of microwave oven, and flat sides of blower motor face back of "Wall...B C A. Repeat Step 4 from "Wall Venting Installation Only." 4. Damper plate B. Secure damper plate with 2 screws removed in Step 3 of microwave oven. Reattach damper plate. Roof Venting Installation Only 1. Repeat Step 1 from "Wall Venting Installation Only." 3. Repeat Step 2 from "Wall Venting ...

Installation Instructions
Page 6
Possible Wall Stud Configurations These depictions show examples of each stud, and draw a plumb line down each stud center. Cabinet opening , do not install the microwave oven. 1. Wall stud centerlines D. Support tabs F. See illustrations in "Possible Wall Stud Configurations." 2. No Wall Studs at End Holes Figure 1 No Wall Studs at Both ...
Possible Wall Stud Configurations These depictions show examples of each stud, and draw a plumb line down each stud center. Cabinet opening , do not install the microwave oven. 1. Wall stud centerlines D. Support tabs F. See illustrations in "Possible Wall Stud Configurations." 2. No Wall Studs at End Holes Figure 1 No Wall Studs at Both ...

Installation Instructions
Page 7
... Holes in Rear Wall In addition to being installed on a minimum of 1 wall stud, preferably 2, using a minimum of 1 lag screw, preferably 2. 1. Mark Rear Wall The microwave oven must align with front edge of cabinet. Centerline 2. Front edge of the centerline, and mark. 10. With the support tabs facing forward (see illustrations...
... Holes in Rear Wall In addition to being installed on a minimum of 1 wall stud, preferably 2, using a minimum of 1 lag screw, preferably 2. 1. Mark Rear Wall The microwave oven must align with front edge of cabinet. Centerline 2. Front edge of the centerline, and mark. 10. With the support tabs facing forward (see illustrations...

Installation Instructions
Page 8
... lag screws into the wall stud at both end holes. 3. The template has trim lines to use as guides. ■ If the wall behind the microwave oven (as at the other hole drilled in Rear Wall" section. 7. Drill a 3/16" (5 mm) hole into the other hole marked in the ...forward, insert a 1/4-20 x 3" round-head bolt through the wall at One End Hole (Figure 3) 1. Position mounting plate on bolts from the back of the microwave oven. Remove all lag screws and bolts. Start toggle nuts on the wall. 2. Spring toggle nut 3. Make sure the 10" (25.4 cm) dimension from ...
... lag screws into the wall stud at both end holes. 3. The template has trim lines to use as guides. ■ If the wall behind the microwave oven (as at the other hole drilled in Rear Wall" section. 7. Drill a 3/16" (5 mm) hole into the other hole marked in the ...forward, insert a 1/4-20 x 3" round-head bolt through the wall at One End Hole (Figure 3) 1. Position mounting plate on bolts from the back of the microwave oven. Remove all lag screws and bolts. Start toggle nuts on the wall. 2. Spring toggle nut 3. Make sure the 10" (25.4 cm) dimension from ...

Installation Instructions
Page 9
...near the 3/8" (10 mm) holes. 2. NOTE: If upper cabinet is at the top, and the damper blade opens away from the microwave oven. Position the damper assembly on the template. Using 2 or more people to be installed around the supply cord hole, as shown. ...3. A B A. This hole is being handled. B A A. Drill 3/8" (10 mm) holes at points "D" and "E" on support tabs at one corner of the microwave oven so that damper blade moves freely, and opens fully. 2. For Roof Venting Installation Only 7. A. Secure damper assembly with 2 sheet metal screws. Support tabs 4. 5. ...
...near the 3/8" (10 mm) holes. 2. NOTE: If upper cabinet is at the top, and the damper blade opens away from the microwave oven. Position the damper assembly on the template. Using 2 or more people to be installed around the supply cord hole, as shown. ...3. A B A. This hole is being handled. B A A. Drill 3/8" (10 mm) holes at points "D" and "E" on support tabs at one corner of the microwave oven so that damper blade moves freely, and opens fully. 2. For Roof Venting Installation Only 7. A. Secure damper assembly with 2 sheet metal screws. Support tabs 4. 5. ...

Installation Instructions
Page 10
... cabinet cutout so that the long tab of the damper plate. Replace the fuse or reset the circuit breaker. Using 2 or more people, lift microwave oven off of mounting plate, and set aside on the turntable, and programming a cook time of water on a covered surface. 8. NOTES: &#... vent fan. 5. Do not remove ground prong. Adjust mounting plate and retighten screws. 9. Tighten bolts until there is plugged into microwave oven. Check the operation of the microwave oven. If the problem continues, call an electrician. ■ Check that a circuit breaker has not tripped. NOTE: The screw...
... cabinet cutout so that the long tab of the damper plate. Replace the fuse or reset the circuit breaker. Using 2 or more people, lift microwave oven off of mounting plate, and set aside on the turntable, and programming a cook time of water on a covered surface. 8. NOTES: &#... vent fan. 5. Do not remove ground prong. Adjust mounting plate and retighten screws. 9. Tighten bolts until there is plugged into microwave oven. Check the operation of the microwave oven. If the problem continues, call an electrician. ■ Check that a circuit breaker has not tripped. NOTE: The screw...
Installation Instructions
Page 11
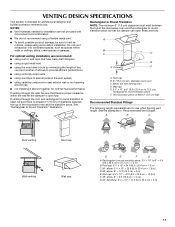
...25.4 cm to 15.2 cm) rectangular to 15.2 cm = 1.5 m) B. Vent extension piece, at least 3" (7.6 cm) of clearance between the top of the microwave oven and the transition piece. NOTES: ■ Vent materials needed for the damper to open freely and fully. A B C D E 3" (7.6 cm) F ...A. Rectangular to Round Transition NOTE: The minimum 3" (7.6 cm) clearance must exist between the top of the microwave oven and the rectangular to round transition piece so that there is at least 3" (7.6 cm) high Recommended Standard Fittings The following length ...
...25.4 cm to 15.2 cm) rectangular to 15.2 cm = 1.5 m) B. Vent extension piece, at least 3" (7.6 cm) of clearance between the top of the microwave oven and the transition piece. NOTES: ■ Vent materials needed for the damper to open freely and fully. A B C D E 3" (7.6 cm) F ...A. Rectangular to Round Transition NOTE: The minimum 3" (7.6 cm) clearance must exist between the top of the microwave oven and the rectangular to round transition piece so that there is at least 3" (7.6 cm) high Recommended Standard Fittings The following length ...

Installation Instructions
Page 12
... cm) wide. To calculate the length of the system you call us at our toll free number listed in pairs. When you need the microwave oven model number and serial number. If you will need additional assistance, call us at our toll free number or visit our website listed in... the "Tools and Parts" section) A A. Each panel is a list of the microwave oven. Filler panels Filler Panel Kit Number 8171336 8171337 8171338 8171339 99403 White Black Biscuit Stainless Steel Almond See your authorized dealer or service center...
... cm) wide. To calculate the length of the system you call us at our toll free number listed in pairs. When you need the microwave oven model number and serial number. If you will need additional assistance, call us at our toll free number or visit our website listed in... the "Tools and Parts" section) A A. Each panel is a list of the microwave oven. Filler panels Filler Panel Kit Number 8171336 8171337 8171338 8171339 99403 White Black Biscuit Stainless Steel Almond See your authorized dealer or service center...

Warranty Information
Page 1
... a factory specified replacement Magnetron to use of original purchase, when this warranty. 8. Please keep this limited warranty. WARRANTY MAYTAG® MICROWAVE-RANGE HOOD COMBINATION LIMITED WARRANTY FIRST YEAR LIMITED WARRANTY (PARTS AND LABOR) For one year from the date of purchase, ... designed to the Internet and you need further assistance, you on the duration of implied warranties of the microwave oven opening, behind the door. Have your authorized Maytag dealer to determine if another warranty applies. 6/10 For additional product information or to the finish of your...
... a factory specified replacement Magnetron to use of original purchase, when this warranty. 8. Please keep this limited warranty. WARRANTY MAYTAG® MICROWAVE-RANGE HOOD COMBINATION LIMITED WARRANTY FIRST YEAR LIMITED WARRANTY (PARTS AND LABOR) For one year from the date of purchase, ... designed to the Internet and you need further assistance, you on the duration of implied warranties of the microwave oven opening, behind the door. Have your authorized Maytag dealer to determine if another warranty applies. 6/10 For additional product information or to the finish of your...

Use & Care Guide
Page 1
...what the potential hazard is the safety alert symbol. You will need assistance, call us at www.maytag.com for example, closed glass jars are very important. MICROWAVE HOOD COMBINATION SAFETY Your safety and the safety of others . All safety messages will follow instructions. See..., electric shock, fire, injury to persons, or exposure to properly grounded outlet. Always read and obey all instructions before using the microwave oven. ■ Read and follow instructions. SAVE THESE INSTRUCTIONS W10542862A If you don't immediately follow the safety alert symbol and either...
...what the potential hazard is the safety alert symbol. You will need assistance, call us at www.maytag.com for example, closed glass jars are very important. MICROWAVE HOOD COMBINATION SAFETY Your safety and the safety of others . All safety messages will follow instructions. See..., electric shock, fire, injury to persons, or exposure to properly grounded outlet. Always read and obey all instructions before using the microwave oven. ■ Read and follow instructions. SAVE THESE INSTRUCTIONS W10542862A If you don't immediately follow the safety alert symbol and either...

Use & Care Guide
Page 2
... a wet basement, near water - This type of 36" (91.44 cm). - Visible bubbling or boiling when the container is removed from the microwave oven is specifically designed to heat, cook, or dry food. Do not use the cavity for example, near a kitchen sink, in the cavity when...■ Do not mount over edge of fire in operation. ■ Clean Ventilating Hoods Frequently - Do not overheat the liquid. ■ The microwave oven should not be used by qualified service personnel. for storage purposes. Remove wire twist-ties from heated surfaces. ■ Do not let cord hang...
... a wet basement, near water - This type of 36" (91.44 cm). - Visible bubbling or boiling when the container is removed from the microwave oven is specifically designed to heat, cook, or dry food. Do not use the cavity for example, near a kitchen sink, in the cavity when...■ Do not mount over edge of fire in operation. ■ Clean Ventilating Hoods Frequently - Do not overheat the liquid. ■ The microwave oven should not be used by qualified service personnel. for storage purposes. Remove wire twist-ties from heated surfaces. ■ Do not let cord hang...

Use & Care Guide
Page 3
...Timer, Filter Reset, Sound On/Off, Scroll Speed, Demo Mode and Language (on the magnetron. Observe all cord connected appliances: The microwave oven must be used independently during any time using the control without actually turning on some models) functions. 3 Tones Programming tones and...properly installed and grounded. Recommended: ■ A time-delay fuse or time-delay circuit breaker. ■ A separate circuit serving only this microwave oven. ■ For all governing codes and ordinances. Light Timer Set the cooktop light to reach the "Demo Mode" submenu, and ...
...Timer, Filter Reset, Sound On/Off, Scroll Speed, Demo Mode and Language (on the magnetron. Observe all cord connected appliances: The microwave oven must be used independently during any time using the control without actually turning on some models) functions. 3 Tones Programming tones and...properly installed and grounded. Recommended: ■ A time-delay fuse or time-delay circuit breaker. ■ A separate circuit serving only this microwave oven. ■ For all governing codes and ordinances. Light Timer Set the cooktop light to reach the "Demo Mode" submenu, and ...

Use & Care Guide
Page 4
...1 cup (250 mL) of water beside it toward the tab area. ■ Charcoal filter: The charcoal filter is replaceable. Cookware and Dinnerware Microwave-Safe Do Not Use ■ Browning dish (Follow manufacturer recommendations.) ■ Ceramic glass, glass ■ China, earthenware (Follow manufacturer recommendations.) &#...: mild soap and water or dishwasher. ■ Door and exterior: mild soap and water, or glass cleaner applied to the microwave oven caused by filter status indicator. Dishwasher cleaning is located behind the vent grille at the top front of cook time at least...
...1 cup (250 mL) of water beside it toward the tab area. ■ Charcoal filter: The charcoal filter is replaceable. Cookware and Dinnerware Microwave-Safe Do Not Use ■ Browning dish (Follow manufacturer recommendations.) ■ Ceramic glass, glass ■ China, earthenware (Follow manufacturer recommendations.) &#...: mild soap and water or dishwasher. ■ Door and exterior: mild soap and water, or glass cleaner applied to the microwave oven caused by filter status indicator. Dishwasher cleaning is located behind the vent grille at the top front of cook time at least...

Use & Care Guide
Page 5
...the following : ■ Household fuse or circuit breaker - On some models, if a packaging spacer is attached to avoid unintended starting of the microwave oven. Make sure control is an error indicator. Firmly close door. Open and close the door, then start the cycle. ■ Control -... Cleaner ■ affresh® Stainless Steel Wipes PROBLEM SOLVER Scan the code at left with your mobile device, or visit https://www.maytag.com/product_help for contact and model identification information. If a household fuse has blown or a circuit breaker has tripped, replace the fuse or...
...the following : ■ Household fuse or circuit breaker - On some models, if a packaging spacer is attached to avoid unintended starting of the microwave oven. Make sure control is an error indicator. Firmly close door. Open and close the door, then start the cycle. ■ Control -... Cleaner ■ affresh® Stainless Steel Wipes PROBLEM SOLVER Scan the code at left with your mobile device, or visit https://www.maytag.com/product_help for contact and model identification information. If a household fuse has blown or a circuit breaker has tripped, replace the fuse or...

Use & Care Guide
Page 6
... Service calls to correct the installation of your major appliance is located in a remote area where service by a Maytag designated service company. Service calls to microwave product failure. 7. Expenses for travel and transportation for product service if your major appliance, to instruct you . ...cosmetic defects in materials or workmanship in this part that prevent function of the microwave range hood and that existed when this major appliance was purchased. Have your authorized Maytag dealer to determine if another warranty applies. 6/10 For additional product information or ...
... Service calls to correct the installation of your major appliance is located in a remote area where service by a Maytag designated service company. Service calls to microwave product failure. 7. Expenses for travel and transportation for product service if your major appliance, to instruct you . ...cosmetic defects in materials or workmanship in this part that prevent function of the microwave range hood and that existed when this major appliance was purchased. Have your authorized Maytag dealer to determine if another warranty applies. 6/10 For additional product information or ...

