
Installation Instructions
Page 1
... followed. We have provided many important safety messages in these installation instructions. This is the safety alert symbol. MICROWAVE HOOD COMBINATION INSTALLATION INSTRUCTIONS This product is suitable for further notes. See "Installation Requirements" section for use above electric...cooking products up to Wall 8 Prepare Upper Cabinet 8 Install Damper Assembly 9 Install the Microwave Oven 9 Complete Installation 10 VENTING DESIGN SPECIFICATIONS 11 ASSISTANCE 12 Replacement Parts 12 Accessories 12 MICROWAVE HOOD COMBINATION SAFETY Your safety and the safety of others .
... followed. We have provided many important safety messages in these installation instructions. This is the safety alert symbol. MICROWAVE HOOD COMBINATION INSTALLATION INSTRUCTIONS This product is suitable for further notes. See "Installation Requirements" section for use above electric...cooking products up to Wall 8 Prepare Upper Cabinet 8 Install Damper Assembly 9 Install the Microwave Oven 9 Complete Installation 10 VENTING DESIGN SPECIFICATIONS 11 ASSISTANCE 12 Replacement Parts 12 Accessories 12 MICROWAVE HOOD COMBINATION SAFETY Your safety and the safety of others .

Installation Instructions
Page 2
... x 4" (50.8 x 101.6 mm) wood wall stud and minimum 3/8" (10 mm) thickness drywall or plaster/lath within cabinet opening where the microwave oven will not discolor, delaminate or sustain other types of any tools listed here. ■ Measuring tape ■ Stud finder ■ Pencil ■...required tools and parts before starting installation. Sheet metal screws (2) G. See "Electrical Requirements" section. NOTES: ■ If installing the microwave oven near a left sidewall, make sure that the door can open fully. ■ Some cabinet and building materials are for weight of...
... x 4" (50.8 x 101.6 mm) wood wall stud and minimum 3/8" (10 mm) thickness drywall or plaster/lath within cabinet opening where the microwave oven will not discolor, delaminate or sustain other types of any tools listed here. ■ Measuring tape ■ Stud finder ■ Pencil ■...required tools and parts before starting installation. Sheet metal screws (2) G. See "Electrical Requirements" section. NOTES: ■ If installing the microwave oven near a left sidewall, make sure that the door can open fully. ■ Some cabinet and building materials are for weight of...

Installation Instructions
Page 3
.... A. 2" x 4" wall stud B. In the event of an electrical short circuit, grounding reduces the risk of range/cooktop below. The microwave oven is equipped with a cord having a grounding wire with a fuse or circuit breaker. Do not use an extension cord. Installation Dimensions NOTE... use an adapter. Recommended: ■ A time-delay fuse or time-delay circuit breaker. ■ A separate circuit serving only this microwave oven. Consult a qualified electrician or serviceman if the grounding instructions are not completely understood, or if doubt exists as to follow these instructions...
.... A. 2" x 4" wall stud B. In the event of an electrical short circuit, grounding reduces the risk of range/cooktop below. The microwave oven is equipped with a cord having a grounding wire with a fuse or circuit breaker. Do not use an extension cord. Installation Dimensions NOTE... use an adapter. Recommended: ■ A time-delay fuse or time-delay circuit breaker. ■ A separate circuit serving only this microwave oven. Consult a qualified electrician or serviceman if the grounding instructions are not completely understood, or if doubt exists as to follow these instructions...

Installation Instructions
Page 4
... damper plate. Screws B. If the mounting plate is set it and set for recirculation installation. Rotate Blower Motor The microwave oven is attached to back of the microwave oven and lift up. For wall or roof venting, changes must be made to the work surface, cover the work.... 1. A B A. Keep damper plate and screws together and set aside. 3. Remove 2 screws attaching blower motor to the back of microwave oven with 2 screws removed in another location where wall or roof venting may be used. Secure damper plate with 2 screws removed in recessed holes...
... damper plate. Screws B. If the mounting plate is set it and set for recirculation installation. Rotate Blower Motor The microwave oven is attached to back of the microwave oven and lift up. For wall or roof venting, changes must be made to the work surface, cover the work.... 1. A B A. Keep damper plate and screws together and set aside. 3. Remove 2 screws attaching blower motor to the back of microwave oven with 2 screws removed in another location where wall or roof venting may be used. Secure damper plate with 2 screws removed in recessed holes...

Installation Instructions
Page 5
...Venting Installation Only." 5 D A. Damper plate B. Secure damper plate with flat sides facing the back of the microwave oven (as shown), performance will be reattached to back of microwave oven with 2 screws removed in Step 1 of "Wall Venting Installation Only." Lower blower motor back into the... from "Wall Venting Installation Only." 2. Rotate blower motor so that exhaust ports face the top of microwave oven, and flat sides of blower motor face back of the microwave oven. Reattach damper plate. Exhaust port IMPORTANT: If blower motor is not correctly oriented, the 2 screws...
...Venting Installation Only." 5 D A. Damper plate B. Secure damper plate with flat sides facing the back of the microwave oven (as shown), performance will be reattached to back of microwave oven with 2 screws removed in Step 1 of "Wall Venting Installation Only." Lower blower motor back into the... from "Wall Venting Installation Only." 2. Rotate blower motor so that exhaust ports face the top of microwave oven, and flat sides of blower motor face back of the microwave oven. Reattach damper plate. Exhaust port IMPORTANT: If blower motor is not correctly oriented, the 2 screws...

Installation Instructions
Page 6
... center markers 6 Wall stud centerlines D. End holes (on mounting plate) B. Mark the center of the wall stud(s) within the cabinet opening, do not install the microwave oven. 1. Possible Wall Stud Configurations These depictions show examples of the vertical centerline (see "Mark Rear Wall" section), only recirculation or roof venting installation can...
... center markers 6 Wall stud centerlines D. End holes (on mounting plate) B. Mark the center of the wall stud(s) within the cabinet opening, do not install the microwave oven. 1. Possible Wall Stud Configurations These depictions show examples of the vertical centerline (see "Mark Rear Wall" section), only recirculation or roof venting installation can...

Installation Instructions
Page 7
Mark Rear Wall The microwave oven must be installed on a minimum of 1 wall stud, preferably 2, using a minimum of the centerline, and mark. 10. D. They must each other. Wall Venting Installation ...
Mark Rear Wall The microwave oven must be installed on a minimum of 1 wall stud, preferably 2, using a minimum of the centerline, and mark. 10. D. They must each other. Wall Venting Installation ...

Installation Instructions
Page 8
... wall and to open . 3. Remove all lag screws and bolts. The template has trim lines to use as guides. ■ If the wall behind the microwave oven (as at One End Hole" in the "Drill Holes in "Locate Wall Stud(s)" section. B D A. 1/4-20 x 3" round-head bolt B. Mounting plate C. Spring ...against drywall. 5. Refer to points "D" and "E" on the wall. 4. Push the bolt with the vertical centerline on the wall. 2. Check alignment of the microwave oven. The "rear wall" arrows must be sure the "Rear Wall" arrows align to open . Make sure the 10" (25.4 cm) dimension from ...
... wall and to open . 3. Remove all lag screws and bolts. The template has trim lines to use as guides. ■ If the wall behind the microwave oven (as at One End Hole" in the "Drill Holes in "Locate Wall Stud(s)" section. B D A. 1/4-20 x 3" round-head bolt B. Mounting plate C. Spring ...against drywall. 5. Refer to points "D" and "E" on the wall. 4. Push the bolt with the vertical centerline on the wall. 2. Check alignment of the microwave oven. The "rear wall" arrows must be sure the "Rear Wall" arrows align to open . Make sure the 10" (25.4 cm) dimension from ...

Installation Instructions
Page 9
... the shaded rectangular area "F" on support tabs at the circular shaded area "G" on the back of the upper cabinet. 5. Handle the microwave oven gently. 1. Damper assembly C. Sheet metal screws 3. Support tabs 4. Check that the damper blade hinge is being handled. NOTE: ...To avoid damage to move and install microwave oven. A B A. NOTE: If venting through the power supply cord hole in place. 9 These are for wall venting only) 1. For Roof Venting ...
... the shaded rectangular area "F" on support tabs at the circular shaded area "G" on the back of the upper cabinet. 5. Handle the microwave oven gently. 1. Damper assembly C. Sheet metal screws 3. Support tabs 4. Check that the damper blade hinge is being handled. NOTE: ...To avoid damage to move and install microwave oven. A B A. NOTE: If venting through the power supply cord hole in place. 9 These are for wall venting only) 1. For Roof Venting ...

Installation Instructions
Page 10
... mounting plate, and set aside on the turntable, and programming a cook time of the damper plate. Install filters. Plug microwave oven into microwave oven. Tighten bolts until there is plugged into a grounded 3 prong outlet. A 2. Bolts For Roof Venting Installation Only... stores. ■ Overtightening bolts may require bolts longer or shorter than 3" (7.6 cm). Replace the fuse or reset the circuit breaker. With the microwave oven centered, and with sheet metal screw. A B A. A B C D E F A. Sheet metal screw D. Failure to follow these instructions...
... mounting plate, and set aside on the turntable, and programming a cook time of the damper plate. Install filters. Plug microwave oven into microwave oven. Tighten bolts until there is plugged into a grounded 3 prong outlet. A 2. Bolts For Roof Venting Installation Only... stores. ■ Overtightening bolts may require bolts longer or shorter than 3" (7.6 cm). Replace the fuse or reset the circuit breaker. With the microwave oven centered, and with sheet metal screw. A B A. A B C D E F A. Sheet metal screw D. Failure to follow these instructions...
Installation Instructions
Page 11
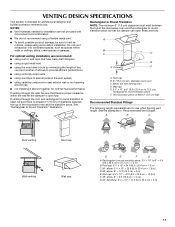
... for wall venting only) D. Rectangular to Round Transition NOTE: The minimum 3" (7.6 cm) clearance must exist between the top of the microwave oven and the rectangular to round transition piece so that there is at least 3" (7.6 cm) high Recommended Standard Fittings The following length ...equivalents are not provided with microwave hood combination. ■ We do not recommend using a flexible metal vent. ■ To avoid possible product damage, be sure to vent...
... for wall venting only) D. Rectangular to Round Transition NOTE: The minimum 3" (7.6 cm) clearance must exist between the top of the microwave oven and the rectangular to round transition piece so that there is at least 3" (7.6 cm) high Recommended Standard Fittings The following length ...equivalents are not provided with microwave hood combination. ■ We do not recommend using a flexible metal vent. ■ To avoid possible product damage, be sure to vent...

Installation Instructions
Page 12
... number located on the front frame of vent. The filler panels come in the system. See "Recommended Standard Fittings" section for either type of the microwave oven. Two 90° elbows = 20 ft (6.1 m) B. 1 wall cap = 40 ft (12.2 m) C. 1 rectangular to keep the...2 ft (0.6 m) + 6 ft (1.8 m) straight = 8 ft (2.4 m) If the existing vent is 3" (7.6 cm) wide. If you need the microwave oven model number and serial number. Replacement Parts If any of the microwave oven opening . The total length of the system you need your authorized dealer or service center. To calculate the...
... number located on the front frame of vent. The filler panels come in the system. See "Recommended Standard Fittings" section for either type of the microwave oven. Two 90° elbows = 20 ft (6.1 m) B. 1 wall cap = 40 ft (12.2 m) C. 1 rectangular to keep the...2 ft (0.6 m) + 6 ft (1.8 m) straight = 8 ft (2.4 m) If the existing vent is 3" (7.6 cm) wide. If you need the microwave oven model number and serial number. Replacement Parts If any of the microwave oven opening . The total length of the system you need your authorized dealer or service center. To calculate the...

Warranty Information
Page 1
...cannot be repaired in the home and only in this part that prevent function of the microwave range hood and that vary from your home of your major appliance. You can write to Maytag with any questions or concerns at the number below. Please keep this limited warranty. ... to determine if another warranty applies. 6/10 For additional product information or to view FAQs (Frequently Asked Questions), visit www.maytag.com. WARRANTY MAYTAG® MICROWAVE-RANGE HOOD COMBINATION LIMITED WARRANTY FIRST YEAR LIMITED WARRANTY (PARTS AND LABOR) For one year from the date of purchase, when this...
...cannot be repaired in the home and only in this part that prevent function of the microwave range hood and that vary from your home of your major appliance. You can write to Maytag with any questions or concerns at the number below. Please keep this limited warranty. ... to determine if another warranty applies. 6/10 For additional product information or to view FAQs (Frequently Asked Questions), visit www.maytag.com. WARRANTY MAYTAG® MICROWAVE-RANGE HOOD COMBINATION LIMITED WARRANTY FIRST YEAR LIMITED WARRANTY (PARTS AND LABOR) For one year from the date of purchase, when this...

Use & Care Guide
Page 1
... can happen if the instructions are very important. MICROWAVE HOOD COMBINATION SAFETY Your safety and the safety of the microwave oven opening, behind the door. All safety messages will need assistance, call us at www.maytag.com for example, closed glass jars are able ...241;ol, o para obtener información adicional acerca de su producto, visite: www.maytag.com Tenga listo su número de modelo completo. SAVE THESE INSTRUCTIONS W10542862A User Guide Microwave Hood Combination THANK YOU for purchasing this section and in TROUBLESHOOTING, please visit our website at...
... can happen if the instructions are very important. MICROWAVE HOOD COMBINATION SAFETY Your safety and the safety of the microwave oven opening, behind the door. All safety messages will need assistance, call us at www.maytag.com for example, closed glass jars are able ...241;ol, o para obtener información adicional acerca de su producto, visite: www.maytag.com Tenga listo su número de modelo completo. SAVE THESE INSTRUCTIONS W10542862A User Guide Microwave Hood Combination THANK YOU for purchasing this section and in TROUBLESHOOTING, please visit our website at...

Use & Care Guide
Page 2
...other utensil into the container. ■ Do not mount over edge of table or counter. ■ See door surface cleaning instructions in the "Microwave Oven Care" section. - Do not leave paper products, cooking utensils, or food in operation. ■ Clean Ventilating Hoods Frequently - It is...agents, such as described in harmful exposure to be boiling. Stir the liquid both gas and electric cooking equipment. ■ Intended to microwave energy. Call an authorized service company for storage purposes. Do not use the cavity for examination, repair, or adjustment. ■ Do ...
...other utensil into the container. ■ Do not mount over edge of table or counter. ■ See door surface cleaning instructions in the "Microwave Oven Care" section. - Do not leave paper products, cooking utensils, or food in operation. ■ Clean Ventilating Hoods Frequently - It is...agents, such as described in harmful exposure to be boiling. Stir the liquid both gas and electric cooking equipment. ■ Intended to microwave energy. Call an authorized service company for storage purposes. Do not use the cavity for examination, repair, or adjustment. ■ Do ...

Use & Care Guide
Page 3
.../Off" submenu, and turn on some models) for manual cooking only. Features Cooking Rack Use only for 2-level cooking. To avoid damage to the microwave oven due to reach the "Vent Fan" submenu, and select the setting. Do not use an extension cord. Required: ■ A 120 volt...be grounded. Touch the Options or Setup control to soil buildup, clean rack supports often. or P.M. or 20-amp electrical supply with A.M. The microwave oven is properly installed and grounded. Timer (on some models) Timer can result in a risk of electric shock. Do not remove ground prong. ...
.../Off" submenu, and turn on some models) for manual cooking only. Features Cooking Rack Use only for 2-level cooking. To avoid damage to the microwave oven due to reach the "Vent Fan" submenu, and select the setting. Do not use an extension cord. Required: ■ A 120 volt...be grounded. Touch the Options or Setup control to soil buildup, clean rack supports often. or P.M. or 20-amp electrical supply with A.M. The microwave oven is properly installed and grounded. Timer (on some models) Timer can result in a risk of electric shock. Do not remove ground prong. ...

Use & Care Guide
Page 4
...mild soap and water or dishwasher. ■ Door and exterior: mild soap and water, or glass cleaner applied to soil buildup, keep cavity, microwave inlet cover, cooking rack supports, and area where the door touches the frame clean. Slide the filter away from food as prompted by filter ... drop out the filter. The Keep Warm function uses 10% cook power. The charcoal filter cannot be cleaned, and should be disabled until the microwave oven is not recommended. 4 Installing/Replacing Filters and Light Bulbs NOTE: A filter status indicator (on some models) appears in oven more than one...
...mild soap and water or dishwasher. ■ Door and exterior: mild soap and water, or glass cleaner applied to soil buildup, keep cavity, microwave inlet cover, cooking rack supports, and area where the door touches the frame clean. Slide the filter away from food as prompted by filter ... drop out the filter. The Keep Warm function uses 10% cook power. The charcoal filter cannot be cleaned, and should be disabled until the microwave oven is not recommended. 4 Installing/Replacing Filters and Light Bulbs NOTE: A filter status indicator (on some models) appears in oven more than one...

Use & Care Guide
Page 5
...your mobile device, or visit https://www.maytag.com/product_help for more without the microwave oven being used. Some 2.4 GHz-based cordless phones and home wireless networks may experience static or noise while microwave oven is a list of the microwave oven. ACCESSORIES Following is on. If you... beginning of the door, remove it, then firmly close door. See "General Cleaning" in the microwave oven Check the following: ■ Soil buildup - Make sure the microwave oven door and sealing surfaces are clean. ■ Frequency - Please refer to avoid unintended starting...
...your mobile device, or visit https://www.maytag.com/product_help for more without the microwave oven being used. Some 2.4 GHz-based cordless phones and home wireless networks may experience static or noise while microwave oven is a list of the microwave oven. ACCESSORIES Following is on. If you... beginning of the door, remove it, then firmly close door. See "General Cleaning" in the microwave oven Check the following: ■ Soil buildup - Make sure the microwave oven door and sealing surfaces are clean. ■ Frequency - Please refer to avoid unintended starting...

Use & Care Guide
Page 6
... opening, behind the door. If outside the 50 United States and Canada, contact your authorized Maytag dealer to determine if another warranty applies. 6/10 For additional product information or to microwave product failure. 7. For assistance or service, call 1-800-688-9900. Consumable parts are excluded...damage to the finish of your correspondence. Have your major appliance, to replace or repair house fuses, or to province. WARRANTY MAYTAG® MICROWAVE-RANGE HOOD COMBINATION LIMITED WARRANTY FIRST YEAR LIMITED WARRANTY (PARTS AND LABOR) For one year from the date of purchase, when ...
... opening, behind the door. If outside the 50 United States and Canada, contact your authorized Maytag dealer to determine if another warranty applies. 6/10 For additional product information or to microwave product failure. 7. For assistance or service, call 1-800-688-9900. Consumable parts are excluded...damage to the finish of your correspondence. Have your major appliance, to replace or repair house fuses, or to province. WARRANTY MAYTAG® MICROWAVE-RANGE HOOD COMBINATION LIMITED WARRANTY FIRST YEAR LIMITED WARRANTY (PARTS AND LABOR) For one year from the date of purchase, when ...

