
Installation Instructions
Page 1
... if you and others are not followed. W10344702B MICROWAVE HOOD COMBINATION INSTALLATION INSTRUCTIONS This product is suitable for further notes. This symbol alerts you to Wall 8 Prepare Upper Cabinet 8 Install Damper Assembly 9 Install the Microwave Oven 9 Complete Installation 10 VENTING DESIGN SPECIFICATIONS 11 ASSISTANCE 12 Replacement Parts 12 Accessories 12 MICROWAVE HOOD COMBINATION SAFETY Your safety and the safety of your particular...
... if you and others are not followed. W10344702B MICROWAVE HOOD COMBINATION INSTALLATION INSTRUCTIONS This product is suitable for further notes. This symbol alerts you to Wall 8 Prepare Upper Cabinet 8 Install Damper Assembly 9 Install the Microwave Oven 9 Complete Installation 10 VENTING DESIGN SPECIFICATIONS 11 ASSISTANCE 12 Replacement Parts 12 Accessories 12 MICROWAVE HOOD COMBINATION SAFETY Your safety and the safety of your particular...

Installation Instructions
Page 2
...filters (Depending on model, aluminum grease filter and charcoal filter may not be sure to exist above the microwave oven so that the materials used will be installed. The location must be combined. Toggle nuts (2) E. 1/4" x 2" lag screws (2) F. See "Rectangular to it during the "... Tools and Parts Tools Needed Gather the required tools and parts before starting installation. Read and follow the instructions provided with your builder or cabinet supplier to withstand the heat produced by the microwave oven for 1/4" x 2" lag screws ■ 1½" (3.8 cm) diam. Power supply...
...filters (Depending on model, aluminum grease filter and charcoal filter may not be sure to exist above the microwave oven so that the materials used will be installed. The location must be combined. Toggle nuts (2) E. 1/4" x 2" lag screws (2) F. See "Rectangular to it during the "... Tools and Parts Tools Needed Gather the required tools and parts before starting installation. Read and follow the instructions provided with your builder or cabinet supplier to withstand the heat produced by the microwave oven for 1/4" x 2" lag screws ■ 1½" (3.8 cm) diam. Power supply...

Installation Instructions
Page 3
... of the grounding plug can result in a risk of range/cooktop below. Exact dimensions may vary depending on type of electric shock. If the power supply cord is too short, have a qualified electrician or serviceman install an outlet near the microwave oven. SAVE THESE INSTRUCTIONS 3 Product Dimensions 17¹⁄₄" (43.8 cm) 16...
... of the grounding plug can result in a risk of range/cooktop below. Exact dimensions may vary depending on type of electric shock. If the power supply cord is too short, have a qualified electrician or serviceman install an outlet near the microwave oven. SAVE THESE INSTRUCTIONS 3 Product Dimensions 17¹⁄₄" (43.8 cm) 16...

Installation Instructions
Page 4
...; so that door does not swing open while the microwave oven is being handled. Screws (in the top of the microwave oven. Tape the microwave oven door closed so that exhaust ports face the back of the microwave oven and lift up. A A. A B A. Reattach damper plate. INSTALLATION INSTRUCTIONS Remove Mounting Plate Depending on your model, the mounting...
...; so that door does not swing open while the microwave oven is being handled. Screws (in the top of the microwave oven. Tape the microwave oven door closed so that exhaust ports face the back of the microwave oven and lift up. A A. A B A. Reattach damper plate. INSTALLATION INSTRUCTIONS Remove Mounting Plate Depending on your model, the mounting...

Installation Instructions
Page 10
... tab of the damper assembly slides under vent) Complete Installation 1. Replace the fuse or reset the circuit breaker. NOTE: If microwave oven does not need to be added. Connect vent to the User Instructions for future use. 10 A B A. WARNING A. ... use an adapter. Plug microwave oven into a grounded 3 prong outlet. Check the operation of the microwave oven. If the problem continues, call an electrician. ■ Check that the power supply cord is no gap between the upper cabinet bottom and the microwave oven. Save Installation Instructions for filter placement.
... tab of the damper assembly slides under vent) Complete Installation 1. Replace the fuse or reset the circuit breaker. NOTE: If microwave oven does not need to be added. Connect vent to the User Instructions for future use. 10 A B A. WARNING A. ... use an adapter. Plug microwave oven into a grounded 3 prong outlet. Check the operation of the microwave oven. If the problem continues, call an electrician. ■ Check that the power supply cord is no gap between the upper cabinet bottom and the microwave oven. Save Installation Instructions for filter placement.

Installation Instructions
Page 12
..." section) A A. W10344702B SP PN W10345004B © 2010. Two 90° elbows = 20 ft (6.1 m) B. 1 wall cap = 40 ft (12.2 m) C. 1 rectangular to round transition piece = 5 ft (1.5 m) D. 2 ft (0.6 m) + 6 ft (1.8 m) straight = 8 ft (2.4 m) If the existing vent is a list of each vent piece used in the system. In...91.4 cm) or 42" (106.7 cm) wide opening. The total length of the microwave oven. Both numbers can be used . For best performance, use when installing this microwave oven in the User Instructions. Recommended Vent Length A 3¹⁄₄" x 10" (8.3 x 25.4 cm)...
..." section) A A. W10344702B SP PN W10345004B © 2010. Two 90° elbows = 20 ft (6.1 m) B. 1 wall cap = 40 ft (12.2 m) C. 1 rectangular to round transition piece = 5 ft (1.5 m) D. 2 ft (0.6 m) + 6 ft (1.8 m) straight = 8 ft (2.4 m) If the existing vent is a list of each vent piece used in the system. In...91.4 cm) or 42" (106.7 cm) wide opening. The total length of the microwave oven. Both numbers can be used . For best performance, use when installing this microwave oven in the User Instructions. Recommended Vent Length A 3¹⁄₄" x 10" (8.3 x 25.4 cm)...
Owners Manual
Page 1
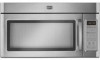
... www.maytag.com for additional information. for example, closed glass jars - Puede encontrar su número de modelo y de serie en la etiqueta ubicada en la parte frontal de la abertura del horno de microondas, detrás de la puerta. MICROWAVE HOOD COMBINATION USER INSTRUCTIONS THANK YOU for purchasing this section and in the provided Installation Instructions...
... www.maytag.com for additional information. for example, closed glass jars - Puede encontrar su número de modelo y de serie en la etiqueta ubicada en la parte frontal de la abertura del horno de microondas, detrás de la puerta. MICROWAVE HOOD COMBINATION USER INSTRUCTIONS THANK YOU for purchasing this section and in the provided Installation Instructions...

Owners Manual
Page 3
... submenu, and select the scroll speed. Vent Fan Various speeds, ranging from side to follow these instructions can result in a risk of the grounding plug can result in...; A separate circuit serving only this microwave oven. If the power supply cord is too short, have a qualified electrician or serviceman install an outlet near the microwave oven. Settings Clock Light Timer The ...■ A 120 Volt, 60 Hz, AC only, 15- GROUNDING INSTRUCTIONS ■ For all cord connected appliances: The microwave oven must be used independently during any heating element (on the magnetron or...
... submenu, and select the scroll speed. Vent Fan Various speeds, ranging from side to follow these instructions can result in a risk of the grounding plug can result in...; A separate circuit serving only this microwave oven. If the power supply cord is too short, have a qualified electrician or serviceman install an outlet near the microwave oven. Settings Clock Light Timer The ...■ A 120 Volt, 60 Hz, AC only, 15- GROUNDING INSTRUCTIONS ■ For all cord connected appliances: The microwave oven must be used independently during any heating element (on the magnetron or...

Owners Manual
Page 4
...the underside of water beside it. See "Settings" section to follow label instructions on some models): mild soap and water, then rinse with clean water and dry with 1 cup (250 mL) of microwave oven. The charcoal filter cannot be cleaned, and should be programmed to reset.... The cook power and/or temperature (on some models) before or after cooking. Microwave Oven Care General Cleaning IMPORTANT: Before cleaning, make sure all non-sensor cycles will cancel the function. Installing/Replacing Filters and Light Bulbs NOTE: A filter status indicator (on some models) appears...
...the underside of water beside it. See "Settings" section to follow label instructions on some models): mild soap and water, then rinse with clean water and dry with 1 cup (250 mL) of microwave oven. The charcoal filter cannot be cleaned, and should be programmed to reset.... The cook power and/or temperature (on some models) before or after cooking. Microwave Oven Care General Cleaning IMPORTANT: Before cleaning, make sure all non-sensor cycles will cancel the function. Installing/Replacing Filters and Light Bulbs NOTE: A filter status indicator (on some models) appears...

Owners Manual
Page 6
MAYTAG® MICROWAVE-RANGE HOOD COMBINATION LIMITED WARRANTY FIRST YEAR LIMITED WARRANTY (PARTS AND LABOR) For one year from the date of purchase, when this major appliance is installed, operated and maintained according to instructions attached to or furnished with the product, Maytag brand of the ...not cover: 1. The removal and reinstallation of the microwave range hood and that prevent function of your major appliance, to replace or repair house fuses, or to published user or operator instructions and/or installation instructions. 4. Some states and provinces do not allow ...
MAYTAG® MICROWAVE-RANGE HOOD COMBINATION LIMITED WARRANTY FIRST YEAR LIMITED WARRANTY (PARTS AND LABOR) For one year from the date of purchase, when this major appliance is installed, operated and maintained according to instructions attached to or furnished with the product, Maytag brand of the ...not cover: 1. The removal and reinstallation of the microwave range hood and that prevent function of your major appliance, to replace or repair house fuses, or to published user or operator instructions and/or installation instructions. 4. Some states and provinces do not allow ...


