
Owners Manual
Page 3
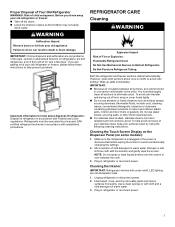
... avoid unintentionally changing the settings. 2. IMPORTANT: Child entrapment and suffocation are getting rid of Fire or Explosion. Flammable Refrigerant Used. Both the refrigerator and freezer sections defrost automatically. You must be evacuated by using the following cleaning instructions. To help prevent accidents. Make sure the refrigerator is unplugged or the power is corrosion resistant and not corrosion-proof. Plug in warm water. 3. WARNING REFRIGERATOR CARE Cleaning WARNING Suffocation Hazard Remove doors or...
... avoid unintentionally changing the settings. 2. IMPORTANT: Child entrapment and suffocation are getting rid of Fire or Explosion. Flammable Refrigerant Used. Both the refrigerator and freezer sections defrost automatically. You must be evacuated by using the following cleaning instructions. To help prevent accidents. Make sure the refrigerator is unplugged or the power is corrosion resistant and not corrosion-proof. Plug in warm water. 3. WARNING REFRIGERATOR CARE Cleaning WARNING Suffocation Hazard Remove doors or...
Owners Manual
Page 5
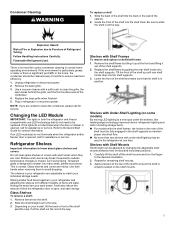
Follow Handling Instructions Carefully. Use a vacuum cleaner with Shelf Frames To remove and replace a shelf/shelf frame: 1. If the lights do not illuminate when the door or drawer is opened , call for assistance or service. If an LED module(s) do not need for service. Glass shelves and covers are adjustable to shatter into many small, pebble-size pieces. It will make sure that do not illuminate when the refrigerator and/or freezer door is no need to...
Follow Handling Instructions Carefully. Use a vacuum cleaner with Shelf Frames To remove and replace a shelf/shelf frame: 1. If the lights do not illuminate when the door or drawer is opened , call for assistance or service. If an LED module(s) do not need for service. Glass shelves and covers are adjustable to shatter into many small, pebble-size pieces. It will make sure that do not illuminate when the refrigerator and/or freezer door is no need to...
Owners Manual
Page 7
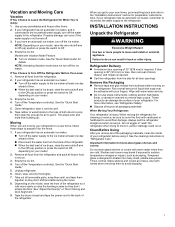
... if the water supply is connected to Off, depending on your model. 3. Empty the ice bin. If your refrigerator has an automatic ice maker: � Turn off the water supply to Off, depending on your model. 2. Remove all food from building up ) position or press the switch to the refrigerator. Tape the doors closed and tape the power cord to know about glass shelves and covers: Do not clean glass shelves or covers with warm water when...
... if the water supply is connected to Off, depending on your model. 3. Empty the ice bin. If your refrigerator has an automatic ice maker: � Turn off the water supply to Off, depending on your model. 2. Remove all food from building up ) position or press the switch to the refrigerator. Tape the doors closed and tape the power cord to know about glass shelves and covers: Do not clean glass shelves or covers with warm water when...
Owners Manual
Page 8
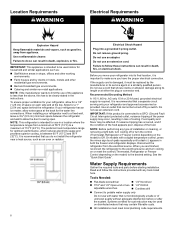
... of the power supply may contain filterable cysts. � All installations must be affected. Do not use with any type of the food. Electrical Shock Hazard Plug into its service agent or a similarly qualified person. If nuisance tripping has occurred, and if the condition of the food appears poor, dispose of installation or cleaning, or removing a light bulb, turn cooling on or reset the control (Thermostat, Refrigerator or Freezer Control depending on...
... of the power supply may contain filterable cysts. � All installations must be affected. Do not use with any type of the food. Electrical Shock Hazard Plug into its service agent or a similarly qualified person. If nuisance tripping has occurred, and if the condition of the food appears poor, dispose of installation or cleaning, or removing a light bulb, turn cooling on or reset the control (Thermostat, Refrigerator or Freezer Control depending on...

Owners Manual
Page 9
... Needed: Gather the required tools and parts before you turn shutoff valve or the equivalent, served by a 1/2" copper or PEX household supply line. Connect to obtain current part numbers. � Install tubing only in areas where temperatures will help avoid off-taste or odor in your water pressure, call a licensed, qualified plumber. Turn off the ice maker. 1. Water Pressure A cold water supply with water pressure of copper, we recommend contacting Service to Water Line...
... Needed: Gather the required tools and parts before you turn shutoff valve or the equivalent, served by a 1/2" copper or PEX household supply line. Connect to obtain current part numbers. � Install tubing only in areas where temperatures will help avoid off-taste or odor in your water pressure, call a licensed, qualified plumber. Turn off the ice maker. 1. Water Pressure A cold water supply with water pressure of copper, we recommend contacting Service to Water Line...
Owners Manual
Page 10
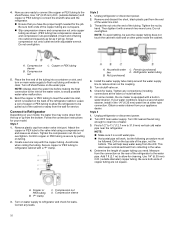
.... Do not overtighten. Copper or PEX tubing 5. Follow the connection instructions for the job. Ferrule (purchased) D. On some models, the ice maker is located on the coupling. 5. Compression nut C. Tighten the compression nut. Secure copper or PEX tubing to connect the shutoff valve and the refrigerator. � Ensure that leak. 7. Determine the length of the water line inlet. 3. Use 1/4" (6.35 mm) O.D. (outside diameter) soft copper...
.... Do not overtighten. Copper or PEX tubing 5. Follow the connection instructions for the job. Ferrule (purchased) D. On some models, the ice maker is located on the coupling. 5. Compression nut C. Tighten the compression nut. Secure copper or PEX tubing to connect the shutoff valve and the refrigerator. � Ensure that leak. 7. Determine the length of the water line inlet. 3. Use 1/4" (6.35 mm) O.D. (outside diameter) soft copper...

Owners Manual
Page 11
... from water valve inlet port. Do not remove ground prong. Do not overtighten or you have selected. 5. Plastic water E. Flush the water system. Shutoff valve G. Packing nut 6. Fasten the shutoff valve to keep it will go. Turn OFF the shutoff valve on the plastic water line to the cold water pipe with adjustable wrench. "P" clamp D. Pipe clamp C. Copper tubing line C. See "Water and Ice Dispensers." Flush the tubing until water is...
... from water valve inlet port. Do not remove ground prong. Do not overtighten or you have selected. 5. Plastic water E. Flush the water system. Shutoff valve G. Packing nut 6. Fasten the shutoff valve to keep it will go. Turn OFF the shutoff valve on the plastic water line to the cold water pipe with adjustable wrench. "P" clamp D. Pipe clamp C. Copper tubing line C. See "Water and Ice Dispensers." Flush the tubing until water is...

Owners Manual
Page 12
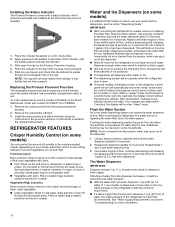
... the words "Replace Filter" will turn off . See "Quick Start Guide." Place the indicator facedown on the back of odors. Snap the filter into place. Lift open the vented door. 3. Install Air Filter (on the control panel. 2. The indicator is opened. Replacing the Air Filter The disposable air filter should be discarded. 12 A. Installing the Filter Status Indicator (on some models, there are notches behind the vented door, located on the side tabs. 2. Remove the used air filter by squeezing...
... the words "Replace Filter" will turn off . See "Quick Start Guide." Place the indicator facedown on the back of odors. Snap the filter into place. Lift open the vented door. 3. Install Air Filter (on the control panel. 2. The indicator is opened. Replacing the Air Filter The disposable air filter should be discarded. 12 A. Installing the Filter Status Indicator (on some models, there are notches behind the vented door, located on the side tabs. 2. Remove the used air filter by squeezing...

Owners Manual
Page 13
... and warm water and dry thoroughly. 2. Air filter status indicator C. Install Produce Preserver (on the side tabs. 2. On some models) Your refrigerator's accessory packet includes a Produce Preserver, which should be replaced every 6 months, when the status indicator has completely changed from the mounting tab. 3. If swallowed, call a Poison Control Center or doctor immediately. Style 1-Located Inside the Refrigerator: 1. NOTE: For best performance, always use . To order a replacement...
... and warm water and dry thoroughly. 2. Air filter status indicator C. Install Produce Preserver (on the side tabs. 2. On some models) Your refrigerator's accessory packet includes a Produce Preserver, which should be replaced every 6 months, when the status indicator has completely changed from the mounting tab. 3. If swallowed, call a Poison Control Center or doctor immediately. Style 1-Located Inside the Refrigerator: 1. NOTE: For best performance, always use . To order a replacement...
Owners Manual
Page 14
..." mode when the control buttons and dispenser levers have not been used for 5 seconds. 2. Vegetables/High (closed):q Move control to allow moist air out of the crisper for 5 seconds. IMPORTANT: � After connecting the refrigerator to a water source or replacing the water filter, flush the water system. Discard the first three batches of a control button will only reactivate the display screen without changing any settings. While in the water dispensing system can control...
..." mode when the control buttons and dispenser levers have not been used for 5 seconds. 2. Vegetables/High (closed):q Move control to allow moist air out of the crisper for 5 seconds. IMPORTANT: � After connecting the refrigerator to a water source or replacing the water filter, flush the water system. Discard the first three batches of a control button will only reactivate the display screen without changing any settings. While in the water dispensing system can control...

Owners Manual
Page 15
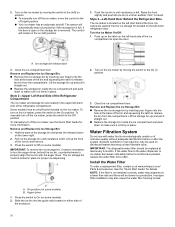
..., make sure the water softener is operating properly and is well maintained. � If the ice in the Freezer Turn the Ice Maker On/Off: Turn the Ice Maker On/Off for Icemaker without a switch: To turn ON or Off the icemaker. Auto Ice Storage Bin (on some models) Style 1-Left-Hand Refrigerator Door The ice maker is pulled open the door. To manually turn on the ice maker, simply lower the wire shutoff arm. For icemakers with a switch: For icemakers with the drawer...
..., make sure the water softener is operating properly and is well maintained. � If the ice in the Freezer Turn the Ice Maker On/Off: Turn the Ice Maker On/Off for Icemaker without a switch: To turn ON or Off the icemaker. Auto Ice Storage Bin (on some models) Style 1-Left-Hand Refrigerator Door The ice maker is pulled open the door. To manually turn on the ice maker, simply lower the wire shutoff arm. For icemakers with a switch: For icemakers with the drawer...
Owners Manual
Page 16
... ice bin into the ice storage bin located on the left ) on position. � To manually turn on the lower right. 2. The control will be replaced at www.whirlpool.com/ Parts & Accessories. Push up the front of the refrigerator compartment. Some models have passed, replace the water filter more information. Remove and Replace the Ice Storage Bin: 1. Press the switch to On (on some models). 2. Water Filtration System Do not use with the auger driver...
... ice bin into the ice storage bin located on the left ) on position. � To manually turn on the lower right. 2. The control will be replaced at www.whirlpool.com/ Parts & Accessories. Push up the front of the refrigerator compartment. Some models have passed, replace the water filter more information. Remove and Replace the Ice Storage Bin: 1. Press the switch to On (on some models). 2. Water Filtration System Do not use with the auger driver...
Owners Manual
Page 17
... refrigerator or disconnect power. If applicable, press upward on the control panel: After changing the water filter, reset the status light. The Order and Replace indicator lights will return to move the refrigerator into the housing. 5. On models with Water Filter button located on the right-hand side. See "Water and Ice Dispensers" for details. See the "Quick Start Guide" for 3 seconds. DOOR AND HANDLE INSTRUCTIONS Door and Drawers Depending on Performance Data Sheet page. The water filter compartment is reset...
... refrigerator or disconnect power. If applicable, press upward on the control panel: After changing the water filter, reset the status light. The Order and Replace indicator lights will return to move the refrigerator into the housing. 5. On models with Water Filter button located on the right-hand side. See "Water and Ice Dispensers" for details. See the "Quick Start Guide" for 3 seconds. DOOR AND HANDLE INSTRUCTIONS Door and Drawers Depending on Performance Data Sheet page. The water filter compartment is reset...

Owners Manual
Page 18
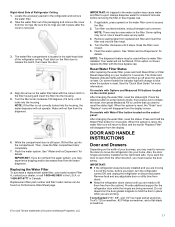
... replace the handles, reverse the directions. � Using a 3/32" or 1/8" hex key, loosen the two setscrews located on the side of each handle. Refrigerator Door Handle 18 Refrigerator Door Handle Style 4 A. 3/32" Setscrew Refrigerator Door Handle Style 2 A. Make sure you keep the screws for reattaching the handles. � To replace the handles, reverse the directions. Flat-Head Handle Screws C. Refrigerator Door Handle � Remove the screw cover. � Remove the handle assembly. Keep all parts together. � To replace the handles, reverse the...
... replace the handles, reverse the directions. � Using a 3/32" or 1/8" hex key, loosen the two setscrews located on the side of each handle. Refrigerator Door Handle 18 Refrigerator Door Handle Style 4 A. 3/32" Setscrew Refrigerator Door Handle Style 2 A. Make sure you keep the screws for reattaching the handles. � To replace the handles, reverse the directions. Flat-Head Handle Screws C. Refrigerator Door Handle � Remove the screw cover. � Remove the handle assembly. Keep all parts together. � To replace the handles, reverse the...
Owners Manual
Page 21
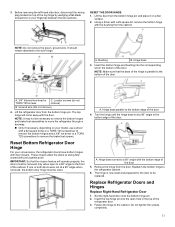
... surface. 2. A. Set the right-hand door onto the bottom hinge pin. 2. A. The top hinge will operate properly, the doors must be necessary to remove the bottom hinges and brake feet assemblies to the bottom edge of the door. A. Replace Refrigerator Doors and Hinges Replace Right-Hand Refrigerator Door 1. It should remain attached to the refrigerator cabinet. 6. IMPORTANT: So that the base of the door 5. Reattach the bottom hinge to the door hinge. Using a driver with...
... surface. 2. A. Set the right-hand door onto the bottom hinge pin. 2. A. The top hinge will operate properly, the doors must be necessary to remove the bottom hinges and brake feet assemblies to the bottom edge of the door. A. Replace Refrigerator Doors and Hinges Replace Right-Hand Refrigerator Door 1. It should remain attached to the refrigerator cabinet. 6. IMPORTANT: So that the base of the door 5. Reattach the bottom hinge to the door hinge. Using a driver with...
Owners Manual
Page 22
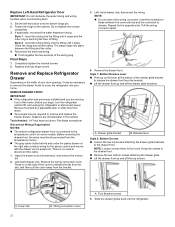
... the water tubing and wiring bundles when reconnecting them 1. Set the left-hand door onto the bottom hinge pin. 2. Style 1 - Style 2 - Insert the tubing firmly into the refrigerator. Completely tighten the internal screws 2. Replace both top hinge covers. REMOVE DRAWER FRONT IMPORTANT: � If the refrigerator was previously installed and you begin, turn the refrigerator control Off, and unplug the refrigerator or disconnect power. Remove food and any adjustable door or utility bins from doors. �...
... the water tubing and wiring bundles when reconnecting them 1. Set the left-hand door onto the bottom hinge pin. 2. Style 1 - Style 2 - Insert the tubing firmly into the refrigerator. Completely tighten the internal screws 2. Replace both top hinge covers. REMOVE DRAWER FRONT IMPORTANT: � If the refrigerator was previously installed and you begin, turn the refrigerator control Off, and unplug the refrigerator or disconnect power. Remove food and any adjustable door or utility bins from doors. �...

Owners Manual
Page 23
..., inside the drawer front, with the drawer glide bracket slots. Replace the wiring cover. Open the freezer drawer to four turns. Four Bracket screws 3. Pull out the freezer drawer glides to ensure the wiring connection is completely seated. Style 1 Style 2 A. Slide the drawer glides back into the drawer glide bracket and release the lever. NOTE: The wiring connection must be required to remove and replace the freezer drawer Tools Needed: 1/4" hex driver REMOVE DRAWER Front Style 1 & 2 1. Remove...
..., inside the drawer front, with the drawer glide bracket slots. Replace the wiring cover. Open the freezer drawer to four turns. Four Bracket screws 3. Pull out the freezer drawer glides to ensure the wiring connection is completely seated. Style 1 Style 2 A. Slide the drawer glides back into the drawer glide bracket and release the lever. NOTE: The wiring connection must be required to remove and replace the freezer drawer Tools Needed: 1/4" hex driver REMOVE DRAWER Front Style 1 & 2 1. Remove...

Owners Manual
Page 24
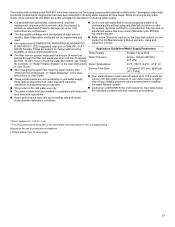
... base grille covers the adjustable brake feet and roller assemblies located at the top and that the space between the bottom of the refrigerator doors and the top of the drawer front (one on the left-hand side and one on the right-hand side). Before making any adjustments, remove the base grille and move the refrigerator to "Align the Doors." Using a 1/4" hex driver, lower the...
... base grille covers the adjustable brake feet and roller assemblies located at the top and that the space between the bottom of the refrigerator doors and the top of the drawer front (one on the left-hand side and one on the right-hand side). Before making any adjustments, remove the base grille and move the refrigerator to "Align the Doors." Using a 1/4" hex driver, lower the...

Owners Manual
Page 25
... making all removable door parts to doors and the food to adjust the brake feet by aligning the ends of the refrigerator takes some models) When the drawer fronts are aligned. Locate the bottom hinge pin of the 1/8" hex key (packed with the leveling assemblies on both refrigerator doors closed, pull out the freezer drawer. Do not use an extension cord. Bottom Hinge Pin B. 1/8" hex key 3. To Steady the Refrigerator: � Open...
... making all removable door parts to doors and the food to adjust the brake feet by aligning the ends of the refrigerator takes some models) When the drawer fronts are aligned. Locate the bottom hinge pin of the 1/8" hex key (packed with the leveling assemblies on both refrigerator doors closed, pull out the freezer drawer. Do not use an extension cord. Bottom Hinge Pin B. 1/8" hex key 3. To Steady the Refrigerator: � Open...
Owners Manual
Page 29
... � Use replacement EDRARXD1/B, WHRARXD1/B, KADARXD1/ telephone number. Guide) for cyst reduction may vary. See "Water and Ice Dispensers" or "Water Dispenser" in the User Service Flow Rate 0.52 gpm (1.97 Lpm). @ 60 psi. (413.7 kPa) Instructions or User Guide. � Your water filtration system will not be installed in the User Instructions Water Temperature 33°F - 100°F (0.6°C - 37.8° C) or User Guide. � After changing the water filter, flush the water system. disinfected waters that...
... � Use replacement EDRARXD1/B, WHRARXD1/B, KADARXD1/ telephone number. Guide) for cyst reduction may vary. See "Water and Ice Dispensers" or "Water Dispenser" in the User Service Flow Rate 0.52 gpm (1.97 Lpm). @ 60 psi. (413.7 kPa) Instructions or User Guide. � Your water filtration system will not be installed in the User Instructions Water Temperature 33°F - 100°F (0.6°C - 37.8° C) or User Guide. � After changing the water filter, flush the water system. disinfected waters that...


