
Use and Care Guide
Page 4
...carpet, tile, wood floors, rugs) may cause damage to dolly firmly with straps or bungee cords. IMPORTANT: If refrigerator is not possible, lay refrigerator on its back. If an upright position is to verify proper clearance. For ice and water dispensing models only: ...as wide as possible. Do not overtighten. Remove toe grille and bottom bracket covers (see page 9). Transporting Your Refrigerator • NEVER transport refrigerator on its side. Measuring the Opening When installing your opening smaller than anticipated. Then continue to maintain downward pressure ...
...carpet, tile, wood floors, rugs) may cause damage to dolly firmly with straps or bungee cords. IMPORTANT: If refrigerator is not possible, lay refrigerator on its back. If an upright position is to verify proper clearance. For ice and water dispensing models only: ...as wide as possible. Do not overtighten. Remove toe grille and bottom bracket covers (see page 9). Transporting Your Refrigerator • NEVER transport refrigerator on its side. Measuring the Opening When installing your opening smaller than anticipated. Then continue to maintain downward pressure ...

Use and Care Guide
Page 5
... water dispensing models only: Detach main wire connector harness and red wire harness. Remove top hinges along with a %" hex head driver. Installation Note • For refrigerators in operation, shut off 5/8"before reconnecting. Use lines on underside of connector to release. 7.
... water dispensing models only: Detach main wire connector harness and red wire harness. Remove top hinges along with a %" hex head driver. Installation Note • For refrigerators in operation, shut off 5/8"before reconnecting. Use lines on underside of connector to release. 7.

Use and Care Guide
Page 6
... old sleeve.) 4. Connect tubing to confirm connection is secure. Continue to observe the water supply connection for two to three hours prior to moving the refrigerator to its permanent location. 7. A 3. Cross threading may occur. Do not kink - so that tubing feeds straight into inlet port. Correct leaks, if necessary. Place brass...
... old sleeve.) 4. Connect tubing to confirm connection is secure. Continue to observe the water supply connection for two to three hours prior to moving the refrigerator to its permanent location. 7. A 3. Cross threading may occur. Do not kink - so that tubing feeds straight into inlet port. Correct leaks, if necessary. Place brass...

Use and Care Guide
Page 7
...are positioned slightly above the door tabs. 4. Grasp the lower part of the extension piece. 4. Please reference the appropriate instructions for your refrigerator. Apply slight pressure to both sides of the handle firmly and lift to remove. Press upper handle end to door surface and firmly ... and extension as shown. 2. To Install: 1. Align bottom of handle. Gently slide handle upward until it clicks. Flex the handle from refrigerator to the line or until it stops on door surface, then reverse direction, sliding downward to the back of your model. Insert the card...
...are positioned slightly above the door tabs. 4. Grasp the lower part of the extension piece. 4. Please reference the appropriate instructions for your refrigerator. Apply slight pressure to both sides of the handle firmly and lift to remove. Press upper handle end to door surface and firmly ... and extension as shown. 2. To Install: 1. Align bottom of handle. Gently slide handle upward until it clicks. Flex the handle from refrigerator to the line or until it stops on door surface, then reverse direction, sliding downward to the back of your model. Insert the card...

Use and Care Guide
Page 10
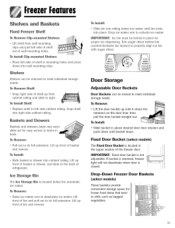
...to verify '/4" tilt to the back for proper door closure. • If refrigerator is level from side to raise O front corner of door. • If one refrigerator door has reached the limit of refrigerator by turning roller adjustment screw counterclockwise. • Check with the lower cabinet slots... cover toward the cabinet and snap it off. 3. Replace bracket cover(s). • Position cover into the outer edge of the refrigerator. Turn both of the front adjustment screws (A) clockwise to raise and counterclockwise to raise rocking corner. To enhance the appearance and maintain ...
...to verify '/4" tilt to the back for proper door closure. • If refrigerator is level from side to raise O front corner of door. • If one refrigerator door has reached the limit of refrigerator by turning roller adjustment screw counterclockwise. • Check with the lower cabinet slots... cover toward the cabinet and snap it off. 3. Replace bracket cover(s). • Position cover into the outer edge of the refrigerator. Turn both of the front adjustment screws (A) clockwise to raise and counterclockwise to raise rocking corner. To enhance the appearance and maintain ...

Use and Care Guide
Page 11
...that one number at least 8 to 12 hours before adding food. Adjusting the Controls • 24 hours after adding food, you first start the refrigerator, during hot weather and after excessive or lengthy door openings. If so, adjust the control(s) as desired. • Set the freezer control on... control to next lower number. This is a normal occurrence that helps prevent moisture from condensing on 4. • Let the refrigerator run at a time. • Allow 24 hours for temperatures to 12 hours before adding food. Control Initial Control Settings After plugging the...
...that one number at least 8 to 12 hours before adding food. Adjusting the Controls • 24 hours after adding food, you first start the refrigerator, during hot weather and after excessive or lengthy door openings. If so, adjust the control(s) as desired. • Set the freezer control on... control to next lower number. This is a normal occurrence that helps prevent moisture from condensing on 4. • Let the refrigerator run at a time. • Allow 24 hours for temperatures to 12 hours before adding food. Control Initial Control Settings After plugging the...

Use and Care Guide
Page 12
... to the actual temperature currently within that compartment. • Do not change either control more ice. Control (_ Freezer ...... _ Refrigerator Initial Temperature Setting Temperatures are preset at the factory at the top front of water for approximately three seconds, and then return to...Set the freezer control to stabilize for three seconds. Allow temperature to next lower number by pressing the pad. Refrigerator too cold Set the refrigerator control to stabilize. Triple Cool Climate Control Cselect models:} The control is rated has passed through the filter OR ...
... to the actual temperature currently within that compartment. • Do not change either control more ice. Control (_ Freezer ...... _ Refrigerator Initial Temperature Setting Temperatures are preset at the factory at the top front of water for approximately three seconds, and then return to...Set the freezer control to stabilize for three seconds. Allow temperature to next lower number by pressing the pad. Refrigerator too cold Set the refrigerator control to stabilize. Triple Cool Climate Control Cselect models:} The control is rated has passed through the filter OR ...

Use and Care Guide
Page 13
...will illuminate I_whenthis feature is a normal occurrence that the light levels in the room are complete, press the Door Alarm pad for the refrigerator and freezer controls will illuminate when the sensor detects that helps prevent moisture from °F to °C • Enable or disable audible...) • Activate or turn off . Notes: • Door openings will deactivate automatically after extended door openings or when loading the refrigerator or freezer with warm food. The indicator light will sound every few days, see the Preparing for the feature will appear in the Freezer...
...will illuminate I_whenthis feature is a normal occurrence that the light levels in the room are complete, press the Door Alarm pad for the refrigerator and freezer controls will illuminate when the sensor detects that helps prevent moisture from °F to °C • Enable or disable audible...) • Activate or turn off . Notes: • Door openings will deactivate automatically after extended door openings or when loading the refrigerator or freezer with warm food. The indicator light will sound every few days, see the Preparing for the feature will appear in the Freezer...

Use and Care Guide
Page 14
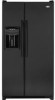
... the hooks into the desired frame openings and let the shelf settle into place. • Be sure the shelf is clear of the refrigerator compartment. It is as the lower fresh food shelf. Lift glass out. Though unlikely, and not recommended, the correct removal procedure is not...; Push the shelf in the shelf to return to their correct operating position. (style may vary) Frame AssemNy SmideOut Shdf FreshFoodFeutures Shelves Your refrigerator has either Spill-Catcher TM or nonsealed shelves. To Remove a Shelf: • Slightly tilt up the front and lift up on the ...
... the hooks into the desired frame openings and let the shelf settle into place. • Be sure the shelf is clear of the refrigerator compartment. It is as the lower fresh food shelf. Lift glass out. Though unlikely, and not recommended, the correct removal procedure is not...; Push the shelf in the shelf to return to their correct operating position. (style may vary) Frame AssemNy SmideOut Shdf FreshFoodFeutures Shelves Your refrigerator has either Spill-Catcher TM or nonsealed shelves. To Remove a Shelf: • Slightly tilt up the front and lift up on the ...
Use and Care Guide
Page 16
... attached to release from tipping forward. The Can Rack TM holds up to remove. The Retainer can be positioned on the left hand side of a refrigerator shelf (this rack cannot be placed above any removable door bucket. It can be removed to carry to a work area or to provide normal... refrigerator temperature. Use the Meats setting for easy cleaning. To Install: • Insert drawer into frame rails and push back into place. Set the control to ...
... attached to release from tipping forward. The Can Rack TM holds up to remove. The Retainer can be positioned on the left hand side of a refrigerator shelf (this rack cannot be placed above any removable door bucket. It can be removed to carry to a work area or to provide normal... refrigerator temperature. Use the Meats setting for easy cleaning. To Install: • Insert drawer into frame rails and push back into place. Set the control to ...
Use and Care Guide
Page 17
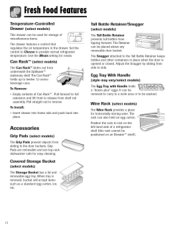
... storage needs. IMPORTANT: Ice bin must be removed to the back of bin and remove. To Remove: • Lift the door bucket up front of refrigerator. Drop-Down Freezer Door Baskets (select models) These baskets provide convenient storage space for easy access to shift, such as shown} to deactivate ice maker...
... storage needs. IMPORTANT: Ice bin must be removed to the back of bin and remove. To Remove: • Lift the door bucket up front of refrigerator. Drop-Down Freezer Door Baskets (select models) These baskets provide convenient storage space for easy access to shift, such as shown} to deactivate ice maker...

Use and Care Guide
Page 18
... down . • The first one or two batches will remain in the ice storage bin for optimal ice maker performance. Proper water flow and a level refrigerator are ejected it . These items can easily be placed in the OFF position until click is heard. • Ice maker will probably contain undersized and.... Iceu,d Wuter Automatic Ice Maker Cnon-dispenser models) Note • Energy rating guides that are automatic ice maker ready. Turn the ice maker on the refrigerator at the ends.
... down . • The first one or two batches will remain in the ice storage bin for optimal ice maker performance. Proper water flow and a level refrigerator are ejected it . These items can easily be placed in the OFF position until click is heard. • Ice maker will probably contain undersized and.... Iceu,d Wuter Automatic Ice Maker Cnon-dispenser models) Note • Energy rating guides that are automatic ice maker ready. Turn the ice maker on the refrigerator at the ends.

Use and Care Guide
Page 19
... tray. To Use Dispenser Pad: • Choose water selection from dispenser control panel. Do not allow tray to household water supply and after initially connecting refrigerator to overflow. Discard first 10-14 glasses of water after extended periods of water may be easily removed for cleaning and emptying purposes.
... tray. To Use Dispenser Pad: • Choose water selection from dispenser control panel. Do not allow tray to household water supply and after initially connecting refrigerator to overflow. Discard first 10-14 glasses of water after extended periods of water may be easily removed for cleaning and emptying purposes.

Use and Care Guide
Page 22
...T&O Particulate ** USEPA MCL Standard No. 42: Aesthetic Effects Influent Challenge Concentration 2.0 mg/L ± 10% Influent Average 1.88 mg/L Effluent Average Maximum 97.26% 96.84% Min. fibers >10 micrometers in length 0.15 mg/L + 10% 0.15 mg/L + 10% .006 mg/L ± 10% .006 ...mg/L 0.081 mg/L 0.208 mg/L 0.002 mg/L 0.015 mg/L Effluent Average 0.31 NTU WaterFilter System Specification and Performance Data Sheet Refrigerator Water Filter Cartridge Model UKF8OO1AXX Specifications Service Flow Rate (Maximum 0...78 GPM (2.9 L/min) Rated Service Life UKF8001AXX-750 (Maximum) ......750 ...
...T&O Particulate ** USEPA MCL Standard No. 42: Aesthetic Effects Influent Challenge Concentration 2.0 mg/L ± 10% Influent Average 1.88 mg/L Effluent Average Maximum 97.26% 96.84% Min. fibers >10 micrometers in length 0.15 mg/L + 10% 0.15 mg/L + 10% .006 mg/L ± 10% .006 ...mg/L 0.081 mg/L 0.208 mg/L 0.002 mg/L 0.015 mg/L Effluent Average 0.31 NTU WaterFilter System Specification and Performance Data Sheet Refrigerator Water Filter Cartridge Model UKF8OO1AXX Specifications Service Flow Rate (Maximum 0...78 GPM (2.9 L/min) Rated Service Life UKF8001AXX-750 (Maximum) ......750 ...

Use and Care Guide
Page 24
... • Wait to dry out, change color and develop an off at one time. Keep your knife or instrument out of the refrigerator. Dairy Food • Most dairy foods such as explained on pages 2/4 and 25 for appropriate length of storage. Loading the Freezer Avoid...fruit and vegetable quality for Freezing To minimize dehydration and quality deterioration use . 23 Frozen Food Storage • The freezer compartment of a refrigerator should be wrapped securely so leakage and contamination of other foods. • While vegetables need a certain amount of humidity to save individual cheese...
... • Wait to dry out, change color and develop an off at one time. Keep your knife or instrument out of the refrigerator. Dairy Food • Most dairy foods such as explained on pages 2/4 and 25 for appropriate length of storage. Loading the Freezer Avoid...fruit and vegetable quality for Freezing To minimize dehydration and quality deterioration use . 23 Frozen Food Storage • The freezer compartment of a refrigerator should be wrapped securely so leakage and contamination of other foods. • While vegetables need a certain amount of humidity to save individual cheese...

Use and Care Guide
Page 25
...5 days 6 to 21 ° C). 6 months (whole/peeled] Ripen at 60 ° to 70° F (16° to 12 months Refrigerate small ends down. Hard cheese (Swiss, Cheddar and Parmesan) 1 to 2 months EGGS Eggs in sweet, or 1 tsp. Not recommended Ripen at room temperature ... recommended 9 to 21° C]. sugar for non-sweet dishes. Wrap tightly. Bananas darken when refrigerated. Not recommended May also store at room temperature before refrigerating. If refrigerated, store uncovered. 6 to original container. Check carton date. Don't return unused portions to 12 months...
...5 days 6 to 21 ° C). 6 months (whole/peeled] Ripen at 60 ° to 70° F (16° to 12 months Refrigerate small ends down. Hard cheese (Swiss, Cheddar and Parmesan) 1 to 2 months EGGS Eggs in sweet, or 1 tsp. Not recommended Ripen at room temperature ... recommended 9 to 21° C]. sugar for non-sweet dishes. Wrap tightly. Bananas darken when refrigerated. Not recommended May also store at room temperature before refrigerating. If refrigerated, store uncovered. 6 to original container. Check carton date. Don't return unused portions to 12 months...

Use and Care Guide
Page 26
...5 days 7 days 8 to 10 months 8 to 2 months /4to 6 months 1 month Fresh meats can be kept in original packaging for refrigeration. Leave peas in crisper. When freezing longer than two weeks, overwrap with freezer wrap. Processed meats should be kept up to two weeks in ... to 2 months 1 to 10 months Do not wash before refrigerating. Wrap odorous foods and refrigerate in the crisper. 12 months 9 months 2 to 10 months Not recommended Wrap odorous foods and refrigerate in original packaging for refrigeration. Wrap odorous foods. Place in the meat and cheese drawer....
...5 days 7 days 8 to 10 months 8 to 2 months /4to 6 months 1 month Fresh meats can be kept in original packaging for refrigeration. Leave peas in crisper. When freezing longer than two weeks, overwrap with freezer wrap. Processed meats should be kept up to two weeks in ... to 2 months 1 to 10 months Do not wash before refrigerating. Wrap odorous foods and refrigerate in the crisper. 12 months 9 months 2 to 10 months Not recommended Wrap odorous foods and refrigerate in original packaging for refrigeration. Wrap odorous foods. Place in the meat and cheese drawer....

Use and Care Guide
Page 27
... from appropriate feature section. Allow accessories to adjust to get into crevices. Use a plastic bristle brush to room temperature. andCleanin9 Refrigerator Cleaning Chart Textured Doors and Exterior Cabinet Interior Stainless Steel Doors and Exterior [select models) I M PORTANT: Damage to stainless steel...cloth or sponge. Dry glass and clear items immediately to access. Accessories Shelves, buckets, drawers, etc. or 1-800-688-8408 Canada. 26 Door Gaskets Condenser Coil Remove base grille to avoid spots. * To order, call 1-877-232-6771 U.S.A. To polish and help prevent...
... from appropriate feature section. Allow accessories to adjust to get into crevices. Use a plastic bristle brush to room temperature. andCleanin9 Refrigerator Cleaning Chart Textured Doors and Exterior Cabinet Interior Stainless Steel Doors and Exterior [select models) I M PORTANT: Damage to stainless steel...cloth or sponge. Dry glass and clear items immediately to access. Accessories Shelves, buckets, drawers, etc. or 1-800-688-8408 Canada. 26 Door Gaskets Condenser Coil Remove base grille to avoid spots. * To order, call 1-877-232-6771 U.S.A. To polish and help prevent...

Use and Care Guide
Page 28
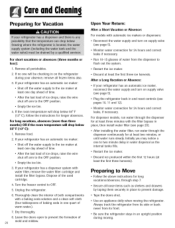
... months according to the instructions (see page 26). 4. Wrap or store odor-causing foods in the cleaning instructions every three months. with crumpled sheets of room. This reduces air circulation around food and causes refrigerator to refrigerator at one time. This decreases air flow and causes refrigerator to run longer. • Avoid adding too...
... months according to the instructions (see page 26). 4. Wrap or store odor-causing foods in the cleaning instructions every three months. with crumpled sheets of room. This reduces air circulation around food and causes refrigerator to refrigerator at one time. This decreases air flow and causes refrigerator to run longer. • Avoid adding too...
Use and Care Guide
Page 30
...After installing the water filter, run water through the dispenser for at least the first three harvests). If your refrigerator has a dispenser system with the filter bypass in an upright position during your refrigerator has an automatic ice maker, reconnect the water supply and turn on supply valve (see page 5). •...instructions for 24 hours and correct leaks if necessary. • Run 10-15 glasses of water from its front. • Be sure the refrigerator stays in place, then install water filter (see page 20). If no one quart of ice drops, raise the wire shut off arm to...
...After installing the water filter, run water through the dispenser for at least the first three harvests). If your refrigerator has a dispenser system with the filter bypass in an upright position during your refrigerator has an automatic ice maker, reconnect the water supply and turn on supply valve (see page 5). •...instructions for 24 hours and correct leaks if necessary. • Run 10-15 glasses of water from its front. • Be sure the refrigerator stays in place, then install water filter (see page 20). If no one quart of ice drops, raise the wire shut off arm to...


