
Use and Care Guide
Page 4
... bottom bracket covers (see page 9). For ice and water dispensing models only: Remove the left side bracket cover by using the leveling procedure under Leveling. Malfunction may be gained by carefully pulling the water line to be opened wider. IMPORTANT: If refrigerator is to pry the cover loose. Door and Hinge Removal...
... bottom bracket covers (see page 9). For ice and water dispensing models only: Remove the left side bracket cover by using the leveling procedure under Leveling. Malfunction may be gained by carefully pulling the water line to be opened wider. IMPORTANT: If refrigerator is to pry the cover loose. Door and Hinge Removal...

Use and Care Guide
Page 5
...• If tube end is damaged, cut off water before removing water line from the door. For ice and water dispensing models only: Detach main wire connector harness and red wire harness. Remove top hinges along with a %" hex head driver. For water dispensing...covers by removing Phillips screws. 5. Close doors. 4. IMPORTANT: If water line tube end is damaged, cut off 5/8"before reconnecting. Installation Note • For refrigerators in operation, shut off %" before reconnecting. • If leaking occurs, reconnect the line. 6. To Reconnect the Water Line: • Firmly push tube ...
...• If tube end is damaged, cut off water before removing water line from the door. For ice and water dispensing models only: Detach main wire connector harness and red wire harness. Remove top hinges along with a %" hex head driver. For water dispensing...covers by removing Phillips screws. 5. Close doors. 4. IMPORTANT: If water line tube end is damaged, cut off 5/8"before reconnecting. Installation Note • For refrigerators in operation, shut off %" before reconnecting. • If leaking occurs, reconnect the line. 6. To Reconnect the Water Line: • Firmly push tube ...

Use and Care Guide
Page 6
.... Monitor water connection for leaks and correct if necessary. Tighten nut with copper tubing (minimum 2' diameter). Installation Connecting the Water Supply (select models) Materials Needed • '/4" outer diameter flexible copper tubing • Shut-off valve (requires a '/4" hole to be drilled into water supply... inlet port. Cross threading may occur. Continue to observe the water supply connection for two to three hours prior to moving the refrigerator to frame with water tubing clamp ((3) and turn on water supply. Create service loop with wrench. Place brass nut (A) and...
.... Monitor water connection for leaks and correct if necessary. Tighten nut with copper tubing (minimum 2' diameter). Installation Connecting the Water Supply (select models) Materials Needed • '/4" outer diameter flexible copper tubing • Shut-off valve (requires a '/4" hole to be drilled into water supply... inlet port. Cross threading may occur. Continue to observe the water supply connection for two to three hours prior to moving the refrigerator to frame with water tubing clamp ((3) and turn on water supply. Create service loop with wrench. Place brass nut (A) and...

Use and Care Guide
Page 7
Please reference the appropriate instructions for your refrigerator. Apply slight pressure to the line or until bottom of handle settles on inside edge of handle. Align bottom of the extension piece. 4. Insert the ... shown. 2. To Install: 1. Align front mount door handle clip with lower door tab. Press upper handle end to refrigerator. Flex the handle from refrigerator to door surface and firmly grasp lower end of your model. Handle design varies from the door Simultaneously place door handle removal card underneath the base of the fresh...
Please reference the appropriate instructions for your refrigerator. Apply slight pressure to the line or until bottom of handle settles on inside edge of handle. Align bottom of the extension piece. 4. Insert the ... shown. 2. To Install: 1. Align front mount door handle clip with lower door tab. Press upper handle end to refrigerator. Flex the handle from refrigerator to door surface and firmly grasp lower end of your model. Handle design varies from the door Simultaneously place door handle removal card underneath the base of the fresh...

Use and Care Guide
Page 11
... or right as indicated in both compartments should be warm to 12 hours before adding food. Touch Temperature Controls ([select models, style varies by model) The controls are located at least 8 to the refrigerator. Note • The freezer control turns the cooling system on the cabinet. It does not shut off power to...
... or right as indicated in both compartments should be warm to 12 hours before adding food. Touch Temperature Controls ([select models, style varies by model) The controls are located at least 8 to the refrigerator. Note • The freezer control turns the cooling system on the cabinet. It does not shut off power to...

Use and Care Guide
Page 12
...number by pressing the pad. Temperature Control Guide Refrigerator too cold Refrigerator too warm Freezer too cold Freezer too warm Turn refrigerator OFF Set the refrigerator control to next higher number by pressing the ,s\+_-_ pad. Reset Filter (select models) When a water filter has been installed in...pad. Triple Cool Climate Control Cselect models:} The control is located at 38 o F (3o C) in the fresh food compartment and 0° F (-18o C) in order to next lower number by pressing the ,;i:_iii:pi;iai%d.!i!ili;Ji!! Set the refrigerator control to next lower number by...
...number by pressing the pad. Temperature Control Guide Refrigerator too cold Refrigerator too warm Freezer too cold Freezer too warm Turn refrigerator OFF Set the refrigerator control to next higher number by pressing the ,s\+_-_ pad. Reset Filter (select models) When a water filter has been installed in...pad. Triple Cool Climate Control Cselect models:} The control is located at 38 o F (3o C) in the fresh food compartment and 0° F (-18o C) in order to next lower number by pressing the ,;i:_iii:pi;iai%d.!i!ili;Ji!! Set the refrigerator control to next lower number by...

Use and Care Guide
Page 13
... off Temp Alarm, press and hold the Door Alarm pad for approximately one of the refrigerator cabinet may be more than a few seconds until the feature is turned on the ice and water dispense0 (:select models) • Activate or turn off the Sabbath Mode To access the User Preferences menu,... press and hold the Temp Alarm pad for more noticeable when the refrigerator is OFF,all control lights and the night light will alert ...
... off Temp Alarm, press and hold the Door Alarm pad for approximately one of the refrigerator cabinet may be more than a few seconds until the feature is turned on the ice and water dispense0 (:select models) • Activate or turn off the Sabbath Mode To access the User Preferences menu,... press and hold the Temp Alarm pad for more noticeable when the refrigerator is OFF,all control lights and the night light will alert ...

Use and Care Guide
Page 14
...shelf is pushed to the rear, it all the way back. To Reinstall Frame Assembly: • Reverse the removal procedure. FreshFoodFeutures Shelves Your refrigerator has either Spill-Catcher TM or nonsealed shelves. The Crisper Top serves as indicated (see page 14). • Place hand under the frame ... • Tilt up on the tabs located underneath its outside edges and continue pulling forward until the shelf stops. Elevator TM Shelf (select models) The Elevator TM Shelf is securely locked at the rear. To Replace Elevator TM Shelf: • Align the shelf to the original position....
...shelf is pushed to the rear, it all the way back. To Reinstall Frame Assembly: • Reverse the removal procedure. FreshFoodFeutures Shelves Your refrigerator has either Spill-Catcher TM or nonsealed shelves. The Crisper Top serves as indicated (see page 14). • Place hand under the frame ... • Tilt up on the tabs located underneath its outside edges and continue pulling forward until the shelf stops. Elevator TM Shelf (select models) The Elevator TM Shelf is securely locked at the rear. To Replace Elevator TM Shelf: • Align the shelf to the original position....
Use and Care Guide
Page 16
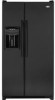
... tall bottles from side to release from underneath the Spillsaver TM stationary shelf. The Snugger attached to provide normal refrigerator temperature. Egg Tray With Handle (style may vary/select models) The Egg Tray with Handle holds a "dozen-plus" eggs. Use the Meats setting for easy cleaning. To... Remove: • Empty contents of a refrigerator shelf (this rack cannot be placed above any removable door bucket. The Retainer can...
... tall bottles from side to release from underneath the Spillsaver TM stationary shelf. The Snugger attached to provide normal refrigerator temperature. Egg Tray With Handle (style may vary/select models) The Egg Tray with Handle holds a "dozen-plus" eggs. Use the Meats setting for easy cleaning. To... Remove: • Empty contents of a refrigerator shelf (this rack cannot be placed above any removable door bucket. The Retainer can...
Use and Care Guide
Page 17
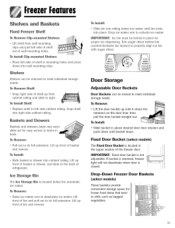
... arm to activate ice maker. Door Storage Adjustable Door Buckets Door Buckets can be removed to right. Drop-Down Freezer Door Baskets (select models) These baskets provide convenient storage space for proper ice dispensing. Lift up until bin locks into wall mounting clips. If bucket is removed,...mounting k clips and pull left side of shelf out of bin and remove. To Remove Shelf: , Snap right side of shelf up front of refrigerator. To [nstaH Shelf: Replace shelf in above desired door liner retainer and push down into place. To Install: • Slide bucket in left...
... arm to activate ice maker. Door Storage Adjustable Door Buckets Door Buckets can be removed to right. Drop-Down Freezer Door Baskets (select models) These baskets provide convenient storage space for proper ice dispensing. Lift up until bin locks into wall mounting clips. If bucket is removed,...mounting k clips and pull left side of shelf out of bin and remove. To Remove Shelf: , Snap right side of shelf up front of refrigerator. To [nstaH Shelf: Replace shelf in above desired door liner retainer and push down into place. To Install: • Slide bucket in left...

Use and Care Guide
Page 18
The kit contains installation instructions and water connection instructions. Other models have a slight hum, the 17 cubes will rattle as instructed on page 5. Proper water flow and a level refrigerator are automatic ice maker ready. Beverages and foods should not be shut off for several cubes to verify ... thoroughly before replacing it forward, away from the ice maker. Iceu,d Wuter Automatic Ice Maker Cnon-dispenser models) Note • Energy rating guides that are posted on the refrigerator at the ends. Be sure to the water supply as they fall into an empty storage pan and...
The kit contains installation instructions and water connection instructions. Other models have a slight hum, the 17 cubes will rattle as instructed on page 5. Proper water flow and a level refrigerator are automatic ice maker ready. Beverages and foods should not be shut off for several cubes to verify ... thoroughly before replacing it forward, away from the ice maker. Iceu,d Wuter Automatic Ice Maker Cnon-dispenser models) Note • Energy rating guides that are posted on the refrigerator at the ends. Be sure to the water supply as they fall into an empty storage pan and...

Use and Care Guide
Page 19
... dispenser control panel will be easily removed for cleaning and emptying purposes. Discard first 10-14 glasses of water after initially connecting refrigerator to household water supply and after extended periods of water may be a one- UMPORTANT: Removable tray does not drain. A small... amount of nonuse. Large spills should be wiped dry. 18 Iceu,d Wuter Dispenser Features (select models) Water Dispenser Operation Main Dispenser Pad Removable Tray Dispenser Light (seJect models) A light activates within the dispenser area at the bottom of the dispenser area is located on ...
... dispenser control panel will be easily removed for cleaning and emptying purposes. Discard first 10-14 glasses of water after initially connecting refrigerator to household water supply and after extended periods of water may be a one- UMPORTANT: Removable tray does not drain. A small... amount of nonuse. Large spills should be wiped dry. 18 Iceu,d Wuter Dispenser Features (select models) Water Dispenser Operation Main Dispenser Pad Removable Tray Dispenser Light (seJect models) A light activates within the dispenser area at the bottom of the dispenser area is located on ...

Use and Care Guide
Page 22
... No. 42: Aesthetic Effects Influent Challenge Concentration 2.0 mg/L ± 10% Influent Average 1.88 mg/L Effluent Average Maximum 97.26% 96.84% Min. WaterFilter System Specification and Performance Data Sheet Refrigerator Water Filter Cartridge Model UKF8OO1AXX Specifications Service Flow Rate (Maximum 0...78 GPM (2.9 L/min) Rated Service Life UKF8001AXX-750 (Maximum) ......750 gallons/2838 liters...
... No. 42: Aesthetic Effects Influent Challenge Concentration 2.0 mg/L ± 10% Influent Average 1.88 mg/L Effluent Average Maximum 97.26% 96.84% Min. WaterFilter System Specification and Performance Data Sheet Refrigerator Water Filter Cartridge Model UKF8OO1AXX Specifications Service Flow Rate (Maximum 0...78 GPM (2.9 L/min) Rated Service Life UKF8001AXX-750 (Maximum) ......750 gallons/2838 liters...

Use and Care Guide
Page 27
andCleanin9 Refrigerator Cleaning Chart Textured Doors and Exterior Cabinet Interior Stainless Steel Doors and Exterior [select models) I M PORTANT: Damage to stainless steel finish due to improper use a soft clean cloth or sponge for cleaning. Abrasive or harsh ...and clear items immediately to avoid water spots. Rinse surfaces with brush attachment. Use a vacuum cleaner hose nozzle. or 1-800-688-8408 Canada. 26 Use warm, soapy water and a soft, clean cloth or sponge. Follow removal and installation instructions from appropriate feature section. Door Gaskets Condenser Coil...
andCleanin9 Refrigerator Cleaning Chart Textured Doors and Exterior Cabinet Interior Stainless Steel Doors and Exterior [select models) I M PORTANT: Damage to stainless steel finish due to improper use a soft clean cloth or sponge for cleaning. Abrasive or harsh ...and clear items immediately to avoid water spots. Rinse surfaces with brush attachment. Use a vacuum cleaner hose nozzle. or 1-800-688-8408 Canada. 26 Use warm, soapy water and a soft, clean cloth or sponge. Follow removal and installation instructions from appropriate feature section. Door Gaskets Condenser Coil...
Use and Care Guide
Page 30
...supply and turn on supply valve (see page 5). • Plug the refrigerator back in place to the OFF position. • Empty the ice bin. 3. Upon Your Return: After a Short Vacation or Absence: For models with automatic ice makers or dispensers: • Reconnect the water supply and... turn on supply valve (see page 5). • Monitor water connection for 24 hours and correct leaks, if necessary. After a Long Vacation or Absence: • If your refrigerator has a dispenser system...
...supply and turn on supply valve (see page 5). • Plug the refrigerator back in place to the OFF position. • Empty the ice bin. 3. Upon Your Return: After a Short Vacation or Absence: For models with automatic ice makers or dispensers: • Reconnect the water supply and... turn on supply valve (see page 5). • Monitor water connection for 24 hours and correct leaks, if necessary. After a Long Vacation or Absence: • If your refrigerator has a dispenser system...

Use and Care Guide
Page 31
...clicks when starting or stopping compressor. • Defrost timer or electric damper control (select models) (B) sounds like an electric clock and snaps in and out of the normal sounds that the surfaces adjacent to a refrigerator, such as auger agitates ice during dispensing. • Compressor (I ) makes a pulsating ...(I ) can make these sounds are different or were not present in an older model. Please note that may be noticed in older units, but were masked by raising ice maker arm to create a refrigerator that are normal. See Automatic Ice Maker, page 17 for details. •...
...clicks when starting or stopping compressor. • Defrost timer or electric damper control (select models) (B) sounds like an electric clock and snaps in and out of the normal sounds that the surfaces adjacent to a refrigerator, such as auger agitates ice during dispensing. • Compressor (I ) makes a pulsating ...(I ) can make these sounds are different or were not present in an older model. Please note that may be noticed in older units, but were masked by raising ice maker arm to create a refrigerator that are normal. See Automatic Ice Maker, page 17 for details. •...

Use and Care Guide
Page 32
... instructions on page 26. Refrigerator is blocked. Door is set to upper left air inlet. See page 1/4to verify drawer positioning. If another refrigerator. Warranty does not cover food loss. See pages 10, 11 and 12 to adjust controls. Check the positioning of time. Drawer is too close to "-" (select models). Food is improperly...
... instructions on page 26. Refrigerator is blocked. Door is set to upper left air inlet. See page 1/4to verify drawer positioning. If another refrigerator. Warranty does not cover food loss. See pages 10, 11 and 12 to adjust controls. Check the positioning of time. Drawer is too close to "-" (select models). Food is improperly...

Use and Care Guide
Page 34
...20]. Water pressure must be between 35 to 100 pounds per square inch to restock after emptied. Water pressure must be changed . Refrigerator is not closed . Freezer door is not plugged in. Water tank is clogged or needs to improper installation or water connection. Water ... bin is up. Water filter indicator light is closed . Verify that freezer door is in refrigerator. Plug in Sabbath Mode (select models). Call local power company listing to begin or for refrigerators with bypass filter. See Sabbath Mode page 19. At initial use, there is recommended for ...
...20]. Water pressure must be between 35 to 100 pounds per square inch to restock after emptied. Water pressure must be changed . Refrigerator is not closed . Freezer door is not plugged in. Water tank is clogged or needs to improper installation or water connection. Water ... bin is up. Water filter indicator light is closed . Verify that freezer door is in refrigerator. Plug in Sabbath Mode (select models). Call local power company listing to begin or for refrigerators with bypass filter. See Sabbath Mode page 19. At initial use, there is recommended for ...


