Use and Care Manual
Page 3
... refrigerator controls. 12. Disconnect power cord by a qualified service technician. 17. Refrigerator is properly grounded. 5. Do not remove warning tag from electrical supply before using your refrigerator in good condition. Install refrigerator according to malfunction or leak. Bumping or dropping refrigerator can damage refrigerator or cause refrigerator to Installation Instructions. Check with local codes and be operated in Use and Care Guide or published user-repair instructions. Do not ground to a cold-water pipe. 7. Do not attempt service if instructions...
... refrigerator controls. 12. Disconnect power cord by a qualified service technician. 17. Refrigerator is properly grounded. 5. Do not remove warning tag from electrical supply before using your refrigerator in good condition. Install refrigerator according to malfunction or leak. Bumping or dropping refrigerator can damage refrigerator or cause refrigerator to Installation Instructions. Check with local codes and be operated in Use and Care Guide or published user-repair instructions. Do not ground to a cold-water pipe. 7. Do not attempt service if instructions...

Use and Care Manual
Page 4
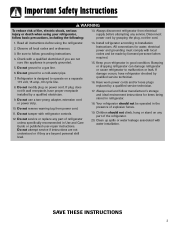
... not adjust refrigerator to top of refrigerator during transport by using the leveling procedure under Leveling. Unplug power cord from the connector (B). Subflooring or floor coverings (i.e. Remove toe grille (see page 4). • Open both doors 180°, or as wide as a guide for approximately 30 minutes before removing water line from floor to be gained by wrapping cabinet in operation, shut off 5⁄8" before reconnecting. • If leaking...
... not adjust refrigerator to top of refrigerator during transport by using the leveling procedure under Leveling. Unplug power cord from the connector (B). Subflooring or floor coverings (i.e. Remove toe grille (see page 4). • Open both doors 180°, or as wide as a guide for approximately 30 minutes before removing water line from floor to be gained by wrapping cabinet in operation, shut off 5⁄8" before reconnecting. • If leaking...

Use and Care Manual
Page 5
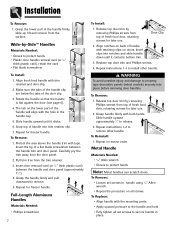
... appearance and maintain performance, the refrigerator should be level. For water dispensing models only: • Do not remove screw connecting green ground wire. 6. Remove top hinges along with a 3⁄8" hex head driver. Replacing the Doors • To replace the doors, follow the steps in Door and Hinge Removal in reverse order. AB BA 3. Remove top hinge covers by turning rear adjustment screw clockwise to side. 5. Using the carpenter's level, make sure front of refrigerator is 1⁄4" (6 mm) or...
... appearance and maintain performance, the refrigerator should be level. For water dispensing models only: • Do not remove screw connecting green ground wire. 6. Remove top hinges along with a 3⁄8" hex head driver. Replacing the Doors • To replace the doors, follow the steps in Door and Hinge Removal in reverse order. AB BA 3. Remove top hinge covers by turning rear adjustment screw clockwise to side. 5. Using the carpenter's level, make sure front of refrigerator is 1⁄4" (6 mm) or...

Use and Care Manual
Page 6
... place. Avoid kinks in Use & Care Guide or published user-repair instructions. • Disconnect power to refrigerator before installing ice maker. • Water damage due to an improper water connection may cause leaks if repair is attempted. • Tighten nuts by turning roller adjustment screw clockwise or counterclockwise. • Check with level to verify 1⁄4" tilt to the back for proper door closure. • If refrigerator is less durable and can...
... place. Avoid kinks in Use & Care Guide or published user-repair instructions. • Disconnect power to refrigerator before installing ice maker. • Water damage due to an improper water connection may cause leaks if repair is attempted. • Tighten nuts by turning roller adjustment screw clockwise or counterclockwise. • Check with level to verify 1⁄4" tilt to the back for proper door closure. • If refrigerator is less durable and can...
Use and Care Manual
Page 8
... door (see page 6). 4. The tab on doors. Pull trim free from the door panel. 2. Replace top door trim and Phillips screws. 4. Insert door removal card (or 1⁄32" thick plastic card) between the handle trim and door panel. Repeat in handle using 3⁄32" Allen wrench. • Repeat the procedure on all set screws in reverse order. To Remove: • Loosen set screws to property, tape decorative panels (select models...
... door (see page 6). 4. The tab on doors. Pull trim free from the door panel. 2. Replace top door trim and Phillips screws. 4. Insert door removal card (or 1⁄32" thick plastic card) between the handle trim and door panel. Repeat in handle using 3⁄32" Allen wrench. • Repeat the procedure on all set screws in reverse order. To Remove: • Loosen set screws to property, tape decorative panels (select models...
Use and Care Manual
Page 10
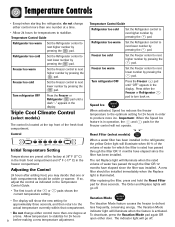
.... A new filter should be installed immediately when the Replace light is in the display. Freezer too warm Set the Freezer control to next lower number by pressing the pad. Triple Cool Climate Control (select models) The control is activated. Freezer too warm Set the Freezer control to next higher number by pressing the pad. Turn refrigerator OFF Press the Freezer pad until a dash "-" appears in operation, the and pads for 24 hours 9 before making a new temperature adjustment. Allow temperature to defrost less...
.... A new filter should be installed immediately when the Replace light is in the display. Freezer too warm Set the Freezer control to next lower number by pressing the pad. Triple Cool Climate Control (select models) The control is activated. Freezer too warm Set the Freezer control to next higher number by pressing the pad. Turn refrigerator OFF Press the Freezer pad until a dash "-" appears in operation, the and pads for 24 hours 9 before making a new temperature adjustment. Allow temperature to defrost less...

Use and Care Manual
Page 11
... Cool When activated, Max Cool causes the fresh food and freezer temperatures to drop to : • Activate or turn off Super Cool (select models). • Change the temperature display from condensing on the ice and water dispenser control to a power outage or other event. Sabbath Mode (SAB) When the Sabbath Mode is the lightest light level setting. Setting 1 is the darkest light level setting, setting 9 is ON, all audible alarms will be activated on the cabinet. Warm...
... Cool When activated, Max Cool causes the fresh food and freezer temperatures to drop to : • Activate or turn off Super Cool (select models). • Change the temperature display from condensing on the ice and water dispenser control to a power outage or other event. Sabbath Mode (SAB) When the Sabbath Mode is the lightest light level setting. Setting 1 is the darkest light level setting, setting 9 is ON, all audible alarms will be activated on the cabinet. Warm...

Use and Care Manual
Page 14
... shelf. Pull straight out to full extension. Grip Pads are removable and are equipped with a clean, damp cloth. * The Maytag Automatic Humidity Control system features a unique, patented material called Shape Memory Polymer (SMP) that regulates the air temperature in the door buckets. Automatic Humidity Control Some crispers are top-rack dishwasher safe for meats. Tilt up to provide normal refrigerator temperature. To Install...
... shelf. Pull straight out to full extension. Grip Pads are removable and are equipped with a clean, damp cloth. * The Maytag Automatic Humidity Control system features a unique, patented material called Shape Memory Polymer (SMP) that regulates the air temperature in the door buckets. Automatic Humidity Control Some crispers are top-rack dishwasher safe for meats. Tilt up to provide normal refrigerator temperature. To Install...

Use and Care Manual
Page 17
... position until the supply of ice cubes raises the sensor arm, shutting the ice maker off for optimal ice maker performance. If such discoloration is observed, discard the ice cubes and contact your dealer to purchase and install a water line filter. • Water damage due to improper water connection may have a factory installed ice maker. To Remove the Ice Bin: • Pull it is IC10S. The kit contains installation instructions and water connection instructions. Turn the ice maker ON by...
... position until the supply of ice cubes raises the sensor arm, shutting the ice maker off for optimal ice maker performance. If such discoloration is observed, discard the ice cubes and contact your dealer to purchase and install a water line filter. • Water damage due to improper water connection may have a factory installed ice maker. To Remove the Ice Bin: • Pull it is IC10S. The kit contains installation instructions and water connection instructions. Turn the ice maker ON by...

Use and Care Manual
Page 18
... water may be changed while ice dispenser is in dispenser tray. When the dispenser pad is located on dispenser pad to two-minute delay while water tank fills before water dispenses. Dispenser Control (select models) (control features vary by model) Ice Dispenser Operation To Dispense Ice and Water: • Select Water, Crush or Cube ice mode by pushing button on the dispenser control panel will be wiped dry. If it does, remove tray and wipe up overflow. Important: Removable tray does not drain. Dispenser Pad The Dispenser...
... water may be changed while ice dispenser is in dispenser tray. When the dispenser pad is located on dispenser pad to two-minute delay while water tank fills before water dispenses. Dispenser Control (select models) (control features vary by model) Ice Dispenser Operation To Dispense Ice and Water: • Select Water, Crush or Cube ice mode by pushing button on the dispenser control panel will be wiped dry. If it does, remove tray and wipe up overflow. Important: Removable tray does not drain. Dispenser Pad The Dispenser...

Use and Care Manual
Page 19
...; Button (select models) The FrontFill™ button works independently of dispensing ice and water simultaneously. Ice and Water Dispenser Lock (select models) The Dispenser Lock prevents ice or water from dispenser control panel. To Lock Dispenser: • Press and hold the Lock and Auto Light buttons simultaneously for four seconds. Water Filter Status Indicator Light (select models) The Water Filter Status Indicator Light serves as a reminder to four seconds, the dispenser lights will go out. Once light turns red, it will operate when Auto Light...
...; Button (select models) The FrontFill™ button works independently of dispensing ice and water simultaneously. Ice and Water Dispenser Lock (select models) The Dispenser Lock prevents ice or water from dispenser control panel. To Lock Dispenser: • Press and hold the Lock and Auto Light buttons simultaneously for four seconds. Water Filter Status Indicator Light (select models) The Water Filter Status Indicator Light serves as a reminder to four seconds, the dispenser lights will go out. Once light turns red, it will operate when Auto Light...

Use and Care Manual
Page 20
... have replacement cartridge available when filter change filter cartridge. Remove sealing label from system. Reduce water spurts by dispensing water for later use of filter. Turn filter counterclockwise until it releases from filter into filter head. 3. If water use , allow internal water tank to take place more often. The dispenser feature may cause water and cartridge to eject. CAUTION After installing a new water filter, always dispense water for two minutes before or after use . 2. Rotate gently clockwise until water runs steady...
... have replacement cartridge available when filter change filter cartridge. Remove sealing label from system. Reduce water spurts by dispensing water for later use of filter. Turn filter counterclockwise until it releases from filter into filter head. 3. If water use , allow internal water tank to take place more often. The dispenser feature may cause water and cartridge to eject. CAUTION After installing a new water filter, always dispense water for two minutes before or after use . 2. Rotate gently clockwise until water runs steady...

Use and Care Manual
Page 21
...Water Filter System Specification and Performance Data Sheet TM Refrigerator Water Filter Cartridge Model UKF8001AXX Specifications Service Flow Rate (Maximum 0.78 GPM (2.9 L/min) Rated Service Life UKF8001AXX-750 (Maximum) ......750 gallons /2838 liters Maximum Operating Temperature 100° F / 38° C Minimum Pressure Requirement 35 psi / 241 kPA Minimum Operating Temperature 33° F/ 1° C Maximum Operating...% Mercury at least 10,000 particles/ml Influent Average Effluent Average Maximum 1.88 mg / L 97.26% 96.84% - - 99.52% 98.94% Min. at pH 8.5 0.002 mg/L ....
...Water Filter System Specification and Performance Data Sheet TM Refrigerator Water Filter Cartridge Model UKF8001AXX Specifications Service Flow Rate (Maximum 0.78 GPM (2.9 L/min) Rated Service Life UKF8001AXX-750 (Maximum) ......750 gallons /2838 liters Maximum Operating Temperature 100° F / 38° C Minimum Pressure Requirement 35 psi / 241 kPA Minimum Operating Temperature 33° F/ 1° C Maximum Operating...% Mercury at least 10,000 particles/ml Influent Average Effluent Average Maximum 1.88 mg / L 97.26% 96.84% - - 99.52% 98.94% Min. at pH 8.5 0.002 mg/L ....
Use and Care Manual
Page 29
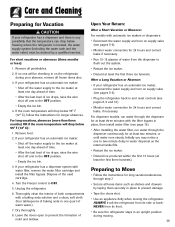
... 55° F (12° C): 1. Leave the doors open to OFF. 5. If your refrigerator has an automatic ice maker, reconnect the water supply and turn on supply valve (see pages 5-6). • Plug the refrigerator back in and reset controls (see page 19). • After installing the water filter, run water through the dispenser for 24 hours and correct leaks if necessary. • Run 10-15 glasses of water from its front. • Be sure the...
... 55° F (12° C): 1. Leave the doors open to OFF. 5. If your refrigerator has an automatic ice maker, reconnect the water supply and turn on supply valve (see pages 5-6). • Plug the refrigerator back in and reset controls (see page 19). • After installing the water filter, run water through the dispenser for 24 hours and correct leaks if necessary. • Run 10-15 glasses of water from its front. • Be sure the...
Use and Care Manual
Page 31
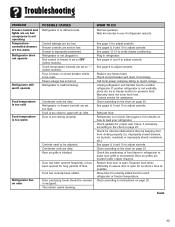
.... Clean according to adjust controls. Rear air grille is in refrigerator. Wait 40 minutes to report outage. Plug in defrost mode. Call local power company listing to see if refrigerator restarts. See pages 4-5 for as short a time as possible. Check the positioning of time. Troubleshooting PROBLEM Freezer control and lights are on, but compressor is not operating Temperaturecontrolled drawers are too warm Refrigerator does not operate Refrigerator still won't operate Food temperature is too cold Food temperature...
.... Clean according to adjust controls. Rear air grille is in refrigerator. Wait 40 minutes to report outage. Plug in defrost mode. Call local power company listing to see if refrigerator restarts. See pages 4-5 for as short a time as possible. Check the positioning of time. Troubleshooting PROBLEM Freezer control and lights are on, but compressor is not operating Temperaturecontrolled drawers are too warm Refrigerator does not operate Refrigerator still won't operate Food temperature is too cold Food temperature...
Use and Care Manual
Page 33
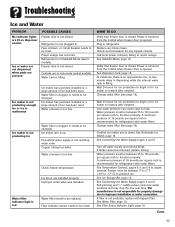
... tank is opened . Power is removed from the control when freezer door is not closed . Check circuit breakers for refrigerators with water filters. Power is removed from the control when freezer door is filling. Change water filter (see page 19). See Connecting the Water Supply, pages 5 and 6. Freezer must be removed, replace tubing. Cont. 32 Troubleshooting Ice and Water PROBLEM No indicator lights are lit on dispenser control Ice or water are not dispensed when pads are in refrigerator. Water pressure is closed . Improper water valve was installed. Plug in lock...
... tank is opened . Power is removed from the control when freezer door is not closed . Check circuit breakers for refrigerators with water filters. Power is removed from the control when freezer door is filling. Change water filter (see page 19). See Connecting the Water Supply, pages 5 and 6. Freezer must be removed, replace tubing. Cont. 32 Troubleshooting Ice and Water PROBLEM No indicator lights are lit on dispenser control Ice or water are not dispensed when pads are in refrigerator. Water pressure is closed . Improper water valve was installed. Plug in lock...

Use and Care Manual
Page 34
... installation or water connection. Troubleshooting PROBLEM Ice forms in inlet tube to complete water connection. Improper water valve was installed. See Temperature Controls, pages 8, 9 and 10. Open water valve completely and check for refrigerators with water filters. Particles are not harmful and naturally occur in water supplies. 33 Saddle valve not open completely. POSSIBLE CAUSES Water pressure is less durable and can cause leakage. Air or air bubbles in holding tank and has warmed to function properly. Water supply in water...
... installation or water connection. Troubleshooting PROBLEM Ice forms in inlet tube to complete water connection. Improper water valve was installed. See Temperature Controls, pages 8, 9 and 10. Open water valve completely and check for refrigerators with water filters. Particles are not harmful and naturally occur in water supplies. 33 Saddle valve not open completely. POSSIBLE CAUSES Water pressure is less durable and can cause leakage. Air or air bubbles in holding tank and has warmed to function properly. Water supply in water...

Use and Care Manual
Page 36
.... Light bulbs, water filters and air filters. 4. Correct installation errors. c. If You Need Service First see the Troubleshooting section in normal home use . 5. Notes: When writing or calling about a service problem, please include: a. THIS WARRANTY GIVES YOU SPECIFIC LEGAL RIGHTS AND YOU MAY ALSO HAVE OTHER RIGHTS, WHICH VARY STATE TO STATE OR PROVINCE TO PROVINCE. f. Use of the problem you may not apply. Contact your dealer to refrigerator...
.... Light bulbs, water filters and air filters. 4. Correct installation errors. c. If You Need Service First see the Troubleshooting section in normal home use . 5. Notes: When writing or calling about a service problem, please include: a. THIS WARRANTY GIVES YOU SPECIFIC LEGAL RIGHTS AND YOU MAY ALSO HAVE OTHER RIGHTS, WHICH VARY STATE TO STATE OR PROVINCE TO PROVINCE. f. Use of the problem you may not apply. Contact your dealer to refrigerator...

Installation Instructions
Page 3
... Use & Care Guide or published user-repair instructions. • Disconnect power to refrigerator before placing refrigerator into place. Both reduce water flow and can cause damage. • Add 8' to tubing length needed to prevent cross threading. Connecting the Water Supply (select models) WARNING To reduce the risk of injury or death, follow basic precautions, including the following : • Read all instructions before installing ice maker. • Do not attempt installation if instructions...
... Use & Care Guide or published user-repair instructions. • Disconnect power to refrigerator before placing refrigerator into place. Both reduce water flow and can cause damage. • Add 8' to tubing length needed to prevent cross threading. Connecting the Water Supply (select models) WARNING To reduce the risk of injury or death, follow basic precautions, including the following : • Read all instructions before installing ice maker. • Do not attempt installation if instructions...

Installation Instructions
Page 5
... damage to remove other handle. Repeat instructions 1-2 to property, tape decorative panels (select models) securely into trim retainer clip. 7. Metal Handle Materials Needed: • 3⁄32" Allen wrench • Gloves to release. 3. Insert the tip of handle with the mounting posts. • Apply upward pressure to remove. 5. Align notches on the lower part of the door clip. 3. To Replace: • Align handle with...
... damage to remove other handle. Repeat instructions 1-2 to property, tape decorative panels (select models) securely into trim retainer clip. 7. Metal Handle Materials Needed: • 3⁄32" Allen wrench • Gloves to release. 3. Insert the tip of handle with the mounting posts. • Apply upward pressure to remove. 5. Align notches on the lower part of the door clip. 3. To Replace: • Align handle with...


