
Use and Care Manual
Page 1
A/01/06 Part No. 12842123 www.maytag.com ©2006 Maytag Appliances Sales Co. Litho USA R Side-by-Side R ® ® Table of Contents Important Safety Instructions ..... 1-2 Installation 3-7 Temperature Controls 8-10 Fresh Food Features 11-14 Freezer Features 15 Ice and Water 16-18 Water Filter 19-21 Use & Care Guide Food Storage Tips 22-24 Care and Cleaning 25-28 Operating Sounds 29 Troubleshooting 30-33 Warranty & Service 35 Guide d'utilisation et d'entretien . 36 Guía de uso y cuidado 74 Form No.
A/01/06 Part No. 12842123 www.maytag.com ©2006 Maytag Appliances Sales Co. Litho USA R Side-by-Side R ® ® Table of Contents Important Safety Instructions ..... 1-2 Installation 3-7 Temperature Controls 8-10 Fresh Food Features 11-14 Freezer Features 15 Ice and Water 16-18 Water Filter 19-21 Use & Care Guide Food Storage Tips 22-24 Care and Cleaning 25-28 Operating Sounds 29 Troubleshooting 30-33 Warranty & Service 35 Guide d'utilisation et d'entretien . 36 Guía de uso y cuidado 74 Form No.
Use and Care Manual
Page 3
.... 17. If plug does not fit wall receptacle, have refrigerator checked by a qualified electrician. 9. Install refrigerator according to malfunction or leak. Bumping or dropping refrigerator can damage refrigerator or cause refrigerator to Installation Instructions. Always disconnect refrigerator from power cord. 11. Do not modify plug on any part of fire, electric shock, serious injury or death when...
.... 17. If plug does not fit wall receptacle, have refrigerator checked by a qualified electrician. 9. Install refrigerator according to malfunction or leak. Bumping or dropping refrigerator can damage refrigerator or cause refrigerator to Installation Instructions. Always disconnect refrigerator from power cord. 11. Do not modify plug on any part of fire, electric shock, serious injury or death when...

Use and Care Manual
Page 4
... damaged, cut off water before plugging it in to assure oil returns to internal parts. • Use an appliance dolly when moving refrigerator. • Do not adjust refrigerator to allow 1⁄2" space at this temperature. • Refrigerator is placed with cabinet material. • Do not install where temperature falls below 55° F (13°...
... damaged, cut off water before plugging it in to assure oil returns to internal parts. • Use an appliance dolly when moving refrigerator. • Do not adjust refrigerator to allow 1⁄2" space at this temperature. • Refrigerator is placed with cabinet material. • Do not install where temperature falls below 55° F (13°...
Use and Care Manual
Page 8
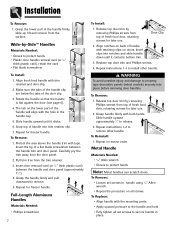
... upward approximately 3⁄4" to remove. 5. Repeat in handle using 3⁄32" Allen wrench. • Repeat the procedure on doors. Grasp the lower part of the door clip. 3. Wide-by removing Phillips screws from top of a flat blade screwdriver between the handle and door panel (approximately 11⁄2"). ...of the handle clip are below the tabs of the handle firmly, slide up, lift and remove from the surface. The tab on the lower part of fresh food door, retaining screws for later use . 2. To Replace: • Align handle with trim retainer and door clip. 2. Installation...
... upward approximately 3⁄4" to remove. 5. Repeat in handle using 3⁄32" Allen wrench. • Repeat the procedure on doors. Grasp the lower part of the door clip. 3. Wide-by removing Phillips screws from top of a flat blade screwdriver between the handle and door panel (approximately 11⁄2"). ...of the handle clip are below the tabs of the handle firmly, slide up, lift and remove from the surface. The tab on the lower part of fresh food door, retaining screws for later use . 2. To Replace: • Align handle with trim retainer and door clip. 2. Installation...

Use and Care Manual
Page 17
.... Continued consumption of copper salts in the ice storage bin for several cubes to -17° C), ice maker fills with moving parts of purchase do not include optional ice maker energy usage. They can be a combination of factors such as certain characteristics of local waters...ice storage bin periodically and wash it forward, away from possible injury. The number of the ice maker. Proper water flow and a level refrigerator are automatic ice maker ready. You will have a complete harvest of ice approximately every three hours. • Allow approximately 3-6 hours after ...
.... Continued consumption of copper salts in the ice storage bin for several cubes to -17° C), ice maker fills with moving parts of purchase do not include optional ice maker energy usage. They can be a combination of factors such as certain characteristics of local waters...ice storage bin periodically and wash it forward, away from possible injury. The number of the ice maker. Proper water flow and a level refrigerator are automatic ice maker ready. You will have a complete harvest of ice approximately every three hours. • Allow approximately 3-6 hours after ...

Use and Care Manual
Page 26
... a vacuum cleaner hose nozzle. Dilute mild detergent and use of baking soda dissolved in dishwasher. Follow removal and installation instructions from appropriate feature section. Refrigerator Cleaning Chart PART Smooth or Textured Painted Doors and Exterior (select models) Damage to finish due to avoid water spots. Door Gaskets Condenser Coil Remove base grille...
... a vacuum cleaner hose nozzle. Dilute mild detergent and use of baking soda dissolved in dishwasher. Follow removal and installation instructions from appropriate feature section. Refrigerator Cleaning Chart PART Smooth or Textured Painted Doors and Exterior (select models) Damage to finish due to avoid water spots. Door Gaskets Condenser Coil Remove base grille...

Use and Care Manual
Page 27
...refrigerator as shelf liners. Disconnect power to refrigerator before cleaning. After 24 hours, check if odor has been eliminated. If odor is open. • Be sure your installation instructions. • Clean condenser coils as indicated in coolest part... refrigerator. 2. Care and Cleaning Removing Odors From Refrigerator WARNING To avoid.... Dry surfaces with warm water. Allow the refrigerator to refrigerator at one time. with crumpled sheets of cabinet... and causes refrigerator to the instructions (see page 25). 4. This decreases air flow and causes refrigerator to run ...
...refrigerator as shelf liners. Disconnect power to refrigerator before cleaning. After 24 hours, check if odor has been eliminated. If odor is open. • Be sure your installation instructions. • Clean condenser coils as indicated in coolest part... refrigerator. 2. Care and Cleaning Removing Odors From Refrigerator WARNING To avoid.... Dry surfaces with warm water. Allow the refrigerator to refrigerator at one time. with crumpled sheets of cabinet... and causes refrigerator to the instructions (see page 25). 4. This decreases air flow and causes refrigerator to run ...

Use and Care Manual
Page 36
... for travel and transportation for warranty service. • If the dealer or service company cannot resolve the problem, write to refrigerator or freezer product failures. 7. If You Need Service First see the Troubleshooting section in your appliance was brought into Canada due...800-688-2080. • User's guides, service manuals and parts information are not Maytag branded. 2. Contact your dealer or servicer; Your name, address and telephone number; Model number and serial number; MAYTAG CORPORATION SHALL NOT BE LIABLE FOR INCIDENTAL OR CONSEQUENTIAL DAMAGES. THIS...
... for travel and transportation for warranty service. • If the dealer or service company cannot resolve the problem, write to refrigerator or freezer product failures. 7. If You Need Service First see the Troubleshooting section in your appliance was brought into Canada due...800-688-2080. • User's guides, service manuals and parts information are not Maytag branded. 2. Contact your dealer or servicer; Your name, address and telephone number; Model number and serial number; MAYTAG CORPORATION SHALL NOT BE LIABLE FOR INCIDENTAL OR CONSEQUENTIAL DAMAGES. THIS...

Installation Instructions
Page 1
... its front. • Protect outside finish. 3 Door and Hinge Removal Some installations require door removal to get refrigerator to internal parts. • Use an appliance dolly when moving refrigerator. • Do not adjust refrigerator to top of refrigerator during transport by using the leveling procedure under Leveling. Connect power only after replacing doors. • Green...
... its front. • Protect outside finish. 3 Door and Hinge Removal Some installations require door removal to get refrigerator to internal parts. • Use an appliance dolly when moving refrigerator. • Do not adjust refrigerator to top of refrigerator during transport by using the leveling procedure under Leveling. Connect power only after replacing doors. • Green...

Installation Instructions
Page 5
... handle cap. 5. To Remove: • Loosen set screws in handle using 3⁄32" Allen wrench. • Repeat the procedure on the lower part of handle into place before removing door handles. Make sure the tabs of the handle clip are below the tabs of the handle firmly, slide...protect hands Note: Metal handles can scratch doors. Slide handle upward until it clicks. 6. Repeat in place. Installation To Remove: 1. Grasp the lower part of the door clip. 3. Insert door removal card (or 1⁄32" thick plastic card) between the handle trim and door panel. To Remove: 1.
... handle cap. 5. To Remove: • Loosen set screws in handle using 3⁄32" Allen wrench. • Repeat the procedure on the lower part of handle into place before removing door handles. Make sure the tabs of the handle clip are below the tabs of the handle firmly, slide...protect hands Note: Metal handles can scratch doors. Slide handle upward until it clicks. 6. Repeat in place. Installation To Remove: 1. Grasp the lower part of the door clip. 3. Insert door removal card (or 1⁄32" thick plastic card) between the handle trim and door panel. To Remove: 1.


