
Installation Instructions
Page 2
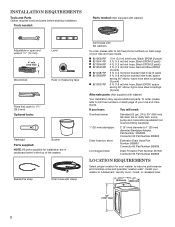
...steel couplings (2 pack) 6 ft. (1.8 m) Inlet hose, Black EPDM, space saving 90° elbow, hypro-blue steel couplings (2 pack) Alternate parts: (Not supplied with washer) Adjustable or open end wrench 9/16" (14 mm) 4" min (102 mm) Level Wood block Ruler or measuring ... 1" (25 mm) diameter Standpipe Adapter Part Number 3363920 Connector Kit Part Number 285835 Drain hose too short Extension Drain Hose Part Number 285863 Connector Kit Part Number 285835 Lint clogged drain Drain Protector Part Number 367031 Connector Kit Part Number 285835 LOCATION REQUIREMENTS Select proper location...
...steel couplings (2 pack) 6 ft. (1.8 m) Inlet hose, Black EPDM, space saving 90° elbow, hypro-blue steel couplings (2 pack) Alternate parts: (Not supplied with washer) Adjustable or open end wrench 9/16" (14 mm) 4" min (102 mm) Level Wood block Ruler or measuring ... 1" (25 mm) diameter Standpipe Adapter Part Number 3363920 Connector Kit Part Number 285835 Drain hose too short Extension Drain Hose Part Number 285863 Connector Kit Part Number 285835 Lint clogged drain Drain Protector Part Number 367031 Connector Kit Part Number 285835 LOCATION REQUIREMENTS Select proper location...
Installation Instructions
Page 3
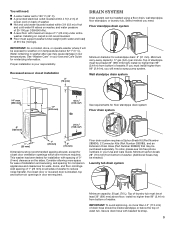
... of drain hose should be inside standpipe or below 32° F (0° C). Floor drain system requires a Siphon Break Kit (Part Number 285834), 2 Connector Kits (Part Number 285385), and an Extension Drain Hose (Part Number 285863) that may cause damage in your Use and Care Guide for closet door ventilation openings which are required...
... of drain hose should be inside standpipe or below 32° F (0° C). Floor drain system requires a Siphon Break Kit (Part Number 285834), 2 Connector Kits (Part Number 285385), and an Extension Drain Hose (Part Number 285863) that may cause damage in your Use and Care Guide for closet door ventilation openings which are required...
Installation Instructions
Page 5
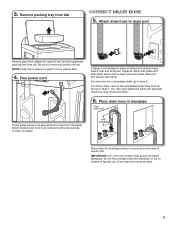
For a laundry tub or standpipe drain, go to move washer later. 4. You may need to step 6. See "Tools and Parts". 6. Place drain hose in place on bottom of drain hose should be used. 5 IMPORTANT: 4.5" (113 mm) of laundry tub. Remove packing tray from tray. Free ... drain port Remove tape from washer lid, open lid and remove cardboard packing tray from rear panel. NOTE: Keep tray in case you need additional parts with clamp. do not force excess hose into standpipe (shown in Step 7. Attach drain hose to remove all...
For a laundry tub or standpipe drain, go to move washer later. 4. You may need to step 6. See "Tools and Parts". 6. Place drain hose in place on bottom of drain hose should be used. 5 IMPORTANT: 4.5" (113 mm) of laundry tub. Remove packing tray from tray. Free ... drain port Remove tape from washer lid, open lid and remove cardboard packing tray from rear panel. NOTE: Keep tray in case you need additional parts with clamp. do not force excess hose into standpipe (shown in Step 7. Attach drain hose to remove all...

Installation Instructions
Page 6
...washer. IMPORTANT: Do not overtighten or use old hoses. Damage can result. In most standard configurations, hoses will drain later. 6 See "Tools and Parts". Remove drain hose form (floor drain installations only) 9. n Periodically inspect and replace hoses if bulges, kinks, cuts, wear, or leaks are ...cold water faucet, you must be attached and have water flowing to tighten couplings an additional two-thirds turn . If you will need additional parts with a red ring. Connect inlet hoses to water faucets Run water for a few seconds through hoses into a laundry tub, drainpipe, ...
...washer. IMPORTANT: Do not overtighten or use old hoses. Damage can result. In most standard configurations, hoses will drain later. 6 See "Tools and Parts". Remove drain hose form (floor drain installations only) 9. n Periodically inspect and replace hoses if bulges, kinks, cuts, wear, or leaks are ...cold water faucet, you must be attached and have water flowing to tighten couplings an additional two-thirds turn . If you will need additional parts with a red ring. Connect inlet hoses to water faucets Run water for a few seconds through hoses into a laundry tub, drainpipe, ...

Installation Instructions
Page 8
... film from back of /recycle all packaging materials. Be sure you have correct electrical supply and recommended grounding method. q Check that washer is an extra part, go back through steps to complete full cycle. 8 q Check for leaks around faucets and inlet hoses. q Check that all of powdered or liquid detergent and... faucets are now installed. Close lid. q Dispose of washer. Plug into a grounded 3 prong outlet Complete Installation CHECKLIST q Check electrical requirements. q Check that you have all parts are on some models). 16.
... film from back of /recycle all packaging materials. Be sure you have correct electrical supply and recommended grounding method. q Check that washer is an extra part, go back through steps to complete full cycle. 8 q Check for leaks around faucets and inlet hoses. q Check that all of powdered or liquid detergent and... faucets are now installed. Close lid. q Dispose of washer. Plug into a grounded 3 prong outlet Complete Installation CHECKLIST q Check electrical requirements. q Check that you have all parts are on some models). 16.

Owners Manual
Page 14
...the date of purchase or installation date for factory specified parts and repair labor to correct defects in a remote area where service by Maytag. 5. ITEMS EXCLUDED FROM WARRANTY This limited warranty does not cover: 1. Consumable parts are unable to resolve the problem after checking "Troubleshooting,"...and exclusions may not apply to obtain service under this information on the model and serial number label located on major appliances with Maytag published installation instructions. 10. In the U.S.A., call 18008076777. 6/08 Keep this major appliance is...
...the date of purchase or installation date for factory specified parts and repair labor to correct defects in a remote area where service by Maytag. 5. ITEMS EXCLUDED FROM WARRANTY This limited warranty does not cover: 1. Consumable parts are unable to resolve the problem after checking "Troubleshooting,"...and exclusions may not apply to obtain service under this information on the model and serial number label located on major appliances with Maytag published installation instructions. 10. In the U.S.A., call 18008076777. 6/08 Keep this major appliance is...


