
Warranty Information
Page 1
... shall be covered by a Whirlpool designated service company. This limited warranty is void if the factory applied serial number has been altered or removed from unauthorized modifications made to correct house wiring or plumbing. 2. Proof of original purchase date is reported to published user or operator instructions and/or installation instructions. 5. Repairs to parts or systems resulting from your product, to replace or repair house fuses, reset circuit breakers...
... shall be covered by a Whirlpool designated service company. This limited warranty is void if the factory applied serial number has been altered or removed from unauthorized modifications made to correct house wiring or plumbing. 2. Proof of original purchase date is reported to published user or operator instructions and/or installation instructions. 5. Repairs to parts or systems resulting from your product, to replace or repair house fuses, reset circuit breakers...

Warranty Information
Page 2
... warranty gives you specific legal rights, and you also may not apply to province. Outside the 50 United States and Canada, this book and your Whirlpool Countertop Microwave should cease to province. Additional help you obtain assistance or service if you ever need service, first see the "Troubleshooting" section of charge. Please include your door free of the Use & Care Guide. DISCLAIMER OF IMPLIED WARRANTIES IMPLIED WARRANTIES...
... warranty gives you specific legal rights, and you also may not apply to province. Outside the 50 United States and Canada, this book and your Whirlpool Countertop Microwave should cease to province. Additional help you obtain assistance or service if you ever need service, first see the "Troubleshooting" section of charge. Please include your door free of the Use & Care Guide. DISCLAIMER OF IMPLIED WARRANTIES IMPLIED WARRANTIES...

Use & Care Guide
Page 1
MICROWAVE OVEN Use & Care Guide For questions about features, operation/performance, parts, accessories or service, call: 1-800-253-1301 or visit our brand website at... www.whirlpool.com Table of Contents 2 Model UMC5165 W10497768A
MICROWAVE OVEN Use & Care Guide For questions about features, operation/performance, parts, accessories or service, call: 1-800-253-1301 or visit our brand website at... www.whirlpool.com Table of Contents 2 Model UMC5165 W10497768A

Use & Care Guide
Page 2
... 6 Turntable 6 MICROWAVE OVEN CONTROL 6 Display 7 Start/Enter 7 Add 30 Seconds 7 Off/Cancel 7 Tones 7 Clock 7 Kitchen Timer 7 Control Lock 7 MICROWAVE OVEN USE 8 Food Characteristics 8 Cooking Guidelines 8 Cookware and Dinnerware 9 Aluminum Foil and Metal 9 Microwave Cooking Power 9 Manual Cooking 10 Cooking in Stages 10 Favorite 10 Sensor Cooking 10 Quick Touch Menu (sensor and non-sensor 11 Weight Defrost / Timed Defrost 12 MICROWAVE OVEN CARE 13 General Cleaning 13 TROUBLESHOOTING 13 ASSISTANCE OR SERVICE 14 Replacement Parts 15 Built-In Kits 15 WARRANTY 15...
... 6 Turntable 6 MICROWAVE OVEN CONTROL 6 Display 7 Start/Enter 7 Add 30 Seconds 7 Off/Cancel 7 Tones 7 Clock 7 Kitchen Timer 7 Control Lock 7 MICROWAVE OVEN USE 8 Food Characteristics 8 Cooking Guidelines 8 Cookware and Dinnerware 9 Aluminum Foil and Metal 9 Microwave Cooking Power 9 Manual Cooking 10 Cooking in Stages 10 Favorite 10 Sensor Cooking 10 Quick Touch Menu (sensor and non-sensor 11 Weight Defrost / Timed Defrost 12 MICROWAVE OVEN CARE 13 General Cleaning 13 TROUBLESHOOTING 13 ASSISTANCE OR SERVICE 14 Replacement Parts 15 Built-In Kits 15 WARRANTY 15...

Use & Care Guide
Page 3
... be heated in oven. - Call an authorized service company for example, closed , turn oven off, and disconnect the power cord, or shut off power at the fuse or circuit breaker panel. - This is specifically designed to excessive microwave energy: ■ Read all safety messages. Remove wire twist-ties from heated surfaces. ■ Do not let cord hang over edge of table or counter. ■ See door surface cleaning instructions in the "Microwave Oven Care" section...
... be heated in oven. - Call an authorized service company for example, closed , turn oven off, and disconnect the power cord, or shut off power at the fuse or circuit breaker panel. - This is specifically designed to excessive microwave energy: ■ Read all safety messages. Remove wire twist-ties from heated surfaces. ■ Do not let cord hang over edge of table or counter. ■ See door surface cleaning instructions in the "Microwave Oven Care" section...

Use & Care Guide
Page 4
...), (3) Door seals and sealing surfaces. (d) The oven should not be adjusted or repaired by anyone except properly qualified service personnel. Use extreme care when inserting a spoon or other utensil into the container. ■ Do not mount over a sink. ■ Do not store anything directly on sealing surfaces. (c) Do not operate the oven if it . - THIS COULD RESULT IN VERY HOT LIQUIDS...
...), (3) Door seals and sealing surfaces. (d) The oven should not be adjusted or repaired by anyone except properly qualified service personnel. Use extreme care when inserting a spoon or other utensil into the container. ■ Do not mount over a sink. ■ Do not store anything directly on sealing surfaces. (c) Do not operate the oven if it . - THIS COULD RESULT IN VERY HOT LIQUIDS...

Use & Care Guide
Page 5
... located. SAVE THESE INSTRUCTIONS 5 Failure to hold the microwave oven and the food and utensils you place inside with a soft, damp cloth. 3. In the event of an electrical short circuit, grounding reduces the risk of electric shock by using one of the microwave oven is over 35 lbs (15.9 kg). ■ Place the microwave oven on the interior or exterior of any needed repairs. The weight of the trim kits listed...
... located. SAVE THESE INSTRUCTIONS 5 Failure to hold the microwave oven and the food and utensils you place inside with a soft, damp cloth. 3. In the event of an electrical short circuit, grounding reduces the risk of electric shock by using one of the microwave oven is over 35 lbs (15.9 kg). ■ Place the microwave oven on the interior or exterior of any needed repairs. The weight of the trim kits listed...

Use & Care Guide
Page 6
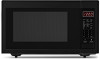
...Removable turntable support I H GF F. See "Assistance or Service" to help cook food more evenly. The appearance of the hub. Support D. To Install: 1. A B C D E MICROWAVE OVEN CONTROL Oz lbs K J A. Place the turntable on the microwave oven cavity bottom. 2. Cooking guide label D. Door lock system Turntable A B C D A. Turntable B. PARTS AND FEATURES This manual may have some or all of the parts. The model you have purchased may cover several different models. Window C. Display I . Control panel G. Glass turntable J. Model and serial number plate...
...Removable turntable support I H GF F. See "Assistance or Service" to help cook food more evenly. The appearance of the hub. Support D. To Install: 1. A B C D E MICROWAVE OVEN CONTROL Oz lbs K J A. Place the turntable on the microwave oven cavity bottom. 2. Cooking guide label D. Door lock system Turntable A B C D A. Turntable B. PARTS AND FEATURES This manual may have some or all of the parts. The model you have purchased may cover several different models. Window C. Display I . Control panel G. Glass turntable J. Model and serial number plate...

Use & Care Guide
Page 7
... and seconds, up in the display. Control Lock The Control Lock disables the control panel pads to avoid unintended use . Reset the clock if needed. Power (high) D. Pounds The icons light up to 99 minutes 99 seconds, and counts down . NOTE: To avoid unintentional operation of the microwave oven, a cooking function cannot be set ). Touch number pads to mid) E. The time can be started if the microwave oven door has been closed for 30 seconds...
... and seconds, up in the display. Control Lock The Control Lock disables the control panel pads to avoid unintended use . Reset the clock if needed. Power (high) D. Pounds The icons light up to 99 minutes 99 seconds, and counts down . NOTE: To avoid unintentional operation of the microwave oven, a cooking function cannot be set ). Touch number pads to mid) E. The time can be started if the microwave oven door has been closed for 30 seconds...

Use & Care Guide
Page 8
... operate microwave oven when it does not absorb microwaves. ■ Use oven mitts or pot holders when removing containers from bottom to center. Stir from outside to top. Arranging If heating irregularly shaped or different sized foods, arrange the thinner parts and smaller sized items toward the center. Piercing Before heating, use a fork or small knife to burst, requiring significant cleanup of the food affect cooking results. Starting...
... operate microwave oven when it does not absorb microwaves. ■ Use oven mitts or pot holders when removing containers from bottom to center. Stir from outside to top. Arranging If heating irregularly shaped or different sized foods, arrange the thinner parts and smaller sized items toward the center. Piercing Before heating, use a fork or small knife to burst, requiring significant cleanup of the food affect cooking results. Starting...

Use & Care Guide
Page 9
... may become hot from heat transferred from the microwave oven. The display will briefly show the current power level, then will flash during manual cooking, depending on the turntable. PERCENT/NAME USE 100%, High, PL10 Quick heating convenience foods and (default setting) foods with 1 cup (250 mL) of the cycle. Cooking non-stirrable casseroles, such as a general guide for microwave oven use oven mitts or pot holders when removing dishes from the food. Defrosting bread, fish...
... may become hot from heat transferred from the microwave oven. The display will briefly show the current power level, then will flash during manual cooking, depending on the turntable. PERCENT/NAME USE 100%, High, PL10 Quick heating convenience foods and (default setting) foods with 1 cup (250 mL) of the cycle. Cooking non-stirrable casseroles, such as a general guide for microwave oven use oven mitts or pot holders when removing dishes from the food. Defrosting bread, fish...

Use & Care Guide
Page 10
... a large enough vent opening to allow the steam to clear the display. Touch START/ENTER. Place food on the turntable, and close the door. 2. Favorite Use the FAVORITE control to set to cook at different cooking powers for at 100% power, begin the programmed cycle. Touch START/ENTER. Place food on the turntable, and close the door. 2. See "Microwave Cooking Power." 4. "SC" (sensor cook) will cycle first. See "Weight Defrost/Timed Defrost" to program, store and recall the top 3 most frequently used manual cook programs. Each...
... a large enough vent opening to allow the steam to clear the display. Touch START/ENTER. Place food on the turntable, and close the door. 2. Favorite Use the FAVORITE control to set to cook at different cooking powers for at 100% power, begin the programmed cycle. Touch START/ENTER. Place food on the turntable, and close the door. 2. See "Microwave Cooking Power." 4. "SC" (sensor cook) will cycle first. See "Weight Defrost/Timed Defrost" to program, store and recall the top 3 most frequently used manual cook programs. Each...

Use & Care Guide
Page 11
...-sensor) 1 to accurately determine cooking time. Let stand 5 minutes after cooking. Cover with plastic wrap, and vent*. FROZEN VEGETABLES (sensor) 1 to 4 cups (250 mL to escape. Stir and let stand 2-3 minutes after cooking. Touch OFF/CANCEL or open the door to clear the display. 11 MENU ITEM SERVING SIZE INSTRUCTIONS POPCORN (non-sensor) 3.5 oz (99 g) 3.0 oz (85 g) 1.75 oz (50 g) ■ To avoid damage to the microwave oven...
...-sensor) 1 to accurately determine cooking time. Let stand 5 minutes after cooking. Cover with plastic wrap, and vent*. FROZEN VEGETABLES (sensor) 1 to 4 cups (250 mL to escape. Stir and let stand 2-3 minutes after cooking. Touch OFF/CANCEL or open the door to clear the display. 11 MENU ITEM SERVING SIZE INSTRUCTIONS POPCORN (non-sensor) 3.5 oz (99 g) 3.0 oz (85 g) 1.75 oz (50 g) ■ To avoid damage to the microwave oven...

Use & Care Guide
Page 12
... cover. 3. When the cycle ends, "End" will sound. 5. Place food, uncovered, on the turntable and close the door. 2. Touch START/ENTER. The cycle may be interrupted briefly to shield parts of -cycle tones will appear in the display, and the end-of irregular shaped cuts should not be used , or the microwave oven can be manually set from fruit juice containers) before defrosting. FOODS INSTRUCTIONS DEF1 - Enter the weight...
... cover. 3. When the cycle ends, "End" will sound. 5. Place food, uncovered, on the turntable and close the door. 2. Touch START/ENTER. The cycle may be interrupted briefly to shield parts of -cycle tones will appear in the display, and the end-of irregular shaped cuts should not be used , or the microwave oven can be manually set from fruit juice containers) before defrosting. FOODS INSTRUCTIONS DEF1 - Enter the weight...

Use & Care Guide
Page 13
... of grain. TROUBLESHOOTING Try the solutions suggested unless otherwise noted. Nothing will soften soil. Firmly close the microwave oven door, and then touch START. See "Start" section. 13 Steam will operate ■ Has a household fuse blown, or has a circuit breaker tripped? Microwave oven will not operate ■ Is the magnetron working properly? See "Microwave Oven Control" section. ■ Is the Control Lock set correctly? MICROWAVE OVEN CAVITY To avoid damage to the inside of cold...
... of grain. TROUBLESHOOTING Try the solutions suggested unless otherwise noted. Nothing will soften soil. Firmly close the microwave oven door, and then touch START. See "Start" section. 13 Steam will operate ■ Has a household fuse blown, or has a circuit breaker tripped? Microwave oven will not operate ■ Is the magnetron working properly? See "Microwave Oven Control" section. ■ Is the Control Lock set correctly? MICROWAVE OVEN CAVITY To avoid damage to the inside of cold...

Use & Care Guide
Page 14
.... Remove and clean turntable hub, support and rollers. Remove turntable. See "Clock" section to local dealers, repair parts distributors, and service companies. Larger amounts of food need further assistance, you use ? Interference with : ■ Features and specifications on our full line of cycle. These replacement parts will not affect performance. Call the Customer eXperience Center toll free: 1-800-253-1301. Do not operate the microwave oven without turntable and turntable support working , call for service...
.... Remove and clean turntable hub, support and rollers. Remove turntable. See "Clock" section to local dealers, repair parts distributors, and service companies. Larger amounts of food need further assistance, you use ? Interference with : ■ Features and specifications on our full line of cycle. These replacement parts will not affect performance. Call the Customer eXperience Center toll free: 1-800-253-1301. Do not operate the microwave oven without turntable and turntable support working , call for service...

Use & Care Guide
Page 15
... replace light bulbs. Service calls to correct the installation of your appliance. Damage resulting from accident, alteration, misuse, abuse, fire, flood, acts of the following trim kits*. Repairs to parts or systems resulting from your microwave, to instruct you how to use or when it was purchased. The cost of purchase. 7. Replacement Parts Glass Turntable Part Number W10451786 Turntable Support and Rollers Part Number W10451792 Turntable Hub Part Number W10451789 Cleaning Supplies affresh™ Kitchen Appliance Cleaner Part Number...
... replace light bulbs. Service calls to correct the installation of your appliance. Damage resulting from accident, alteration, misuse, abuse, fire, flood, acts of the following trim kits*. Repairs to parts or systems resulting from your microwave, to instruct you how to use or when it was purchased. The cost of purchase. 7. Replacement Parts Glass Turntable Part Number W10451786 Turntable Support and Rollers Part Number W10451792 Turntable Hub Part Number W10451789 Cleaning Supplies affresh™ Kitchen Appliance Cleaner Part Number...

Use & Care Guide
Page 16
... or service if you ever need service, first see the "Troubleshooting" section of repair, you . You must provide proof of merchantability or fitness, so this information on the model and serial number label located on the duration of implied warranties of purchase or installation date for in-warranty service. Write...warranty gives you specific legal rights, and you also may be directed to forward the product to you may have other rights that vary from state to state or province to avoid damage in China Outside the 50 United States and Canada, this book and your door free...
... or service if you ever need service, first see the "Troubleshooting" section of repair, you . You must provide proof of merchantability or fitness, so this information on the model and serial number label located on the duration of implied warranties of purchase or installation date for in-warranty service. Write...warranty gives you specific legal rights, and you also may be directed to forward the product to you may have other rights that vary from state to state or province to avoid damage in China Outside the 50 United States and Canada, this book and your door free...


