
Warranty Information
Page 1
... and is covered by a Whirlpool designated service company. You must be borne by calling Whirlpool. Service must provide proof of your major appliance, to replace or repair house fuses, or to repair or replace appliance light bulbs, air filters or water filters. ITEMS EXCLUDED FROM WARRANTY This limited warranty does not cover: 1. Service calls to correct the installation of purchase or installation date for repairs. Service calls to correct house wiring or plumbing. 2. Repairs when...
... and is covered by a Whirlpool designated service company. You must be borne by calling Whirlpool. Service must provide proof of your major appliance, to replace or repair house fuses, or to repair or replace appliance light bulbs, air filters or water filters. ITEMS EXCLUDED FROM WARRANTY This limited warranty does not cover: 1. Service calls to correct the installation of purchase or installation date for repairs. Service calls to correct house wiring or plumbing. 2. Repairs when...

Installation Guide
Page 1
...) RANGE HOOD Installation Instructions and Use & Care Guide For questions about features, operation/performance, parts, accessories or service, call: 1-800-253-1301 or visit our website at www.whirlpool.com In Canada, call 1-800-807-6777 or visit our website at www.whirlpool.ca HOTTE D'ASPIRATION DE 30" (76,2 CM) ET 36" (91,4 CM) Instructions d'installation et Guide d'utilisation et d'entretien Au Canada, pour assistance, installation ou service, composer...
...) RANGE HOOD Installation Instructions and Use & Care Guide For questions about features, operation/performance, parts, accessories or service, call: 1-800-253-1301 or visit our website at www.whirlpool.com In Canada, call 1-800-807-6777 or visit our website at www.whirlpool.ca HOTTE D'ASPIRATION DE 30" (76,2 CM) ET 36" (91,4 CM) Instructions d'installation et Guide d'utilisation et d'entretien Au Canada, pour assistance, installation ou service, composer...

Installation Guide
Page 2
... read and obey all safety messages. TABLE OF CONTENTS RANGE HOOD SAFETY 2 INSTALLATION REQUIREMENTS 4 Tools and Parts 4 Location Requirements 4 Venting Requirements 5 Electrical Requirements 6 INSTALLATION INSTRUCTIONS 7 Prepare Location 7 Install Range Hood 9 Make Electrical Connection 11 Complete Installation 11 RANGE HOOD USE 11 Range Hood Controls 11 RANGE HOOD CARE 12 Cleaning 12 WIRING DIAGRAM 13 ASSISTANCE OR SERVICE 14 In the U.S.A 14 In Canada 14 Accessories 14 WARRANTY 15 TABLE DES MATIÈRES SÉCURITÉ DE LA HOTTE DE CUISINIÈRE 17 EXIGENCES...
... read and obey all safety messages. TABLE OF CONTENTS RANGE HOOD SAFETY 2 INSTALLATION REQUIREMENTS 4 Tools and Parts 4 Location Requirements 4 Venting Requirements 5 Electrical Requirements 6 INSTALLATION INSTRUCTIONS 7 Prepare Location 7 Install Range Hood 9 Make Electrical Connection 11 Complete Installation 11 RANGE HOOD USE 11 Range Hood Controls 11 RANGE HOOD CARE 12 Cleaning 12 WIRING DIAGRAM 13 ASSISTANCE OR SERVICE 14 In the U.S.A 14 In Canada 14 Accessories 14 WARRANTY 15 TABLE DES MATIÈRES SÉCURITÉ DE LA HOTTE DE CUISINIÈRE 17 EXIGENCES...

Installation Guide
Page 3
... ceiling; CAUTION: For general ventilating use cookware appropriate for proper combustion and exhausting of gases through the flue (chimney) of fire and to properly exhaust air, be done by NFPA. ■ WARNING: To reduce the risk of the surface element. The fire is being switched on low or medium settings. ■ Always turn off at high settings. aBased on fan or filter. ■ Use proper pan size. Grease...
... ceiling; CAUTION: For general ventilating use cookware appropriate for proper combustion and exhausting of gases through the flue (chimney) of fire and to properly exhaust air, be done by NFPA. ■ WARNING: To reduce the risk of the surface element. The fire is being switched on low or medium settings. ■ Always turn off at high settings. aBased on fan or filter. ■ Use proper pan size. Grease...

Installation Guide
Page 4
... mm mounting screws Parts needed ■ 1 - 75W max, 120V incandescent light bulb ■ Wall or roof cap with any cutouts. ■ Grounded electrical outlet is a registered trademark of this range hood must be away from package. See the "Accessories" section to comply with local codes. Length and thickness determined by recess dimensions. ■ Four flat head wood screws or machine screws with recessed bottoms: ■ Two 2" (5.1 cm) wide filler strips...
... mm mounting screws Parts needed ■ 1 - 75W max, 120V incandescent light bulb ■ Wall or roof cap with any cutouts. ■ Grounded electrical outlet is a registered trademark of this range hood must be away from package. See the "Accessories" section to comply with local codes. Length and thickness determined by recess dimensions. ■ Four flat head wood screws or machine screws with recessed bottoms: ■ Two 2" (5.1 cm) wide filler strips...

Installation Guide
Page 5
... not install 2 elbows together. ■ Use clamps or duct tape to seal exterior wall or roof opening width for specific requirements in an attic or other enclosed area. ■ Do not use of makeup air systems when using ventilation systems greater than specified CFM of the vent system. to 24" (61.0 cm) max. cabinet opening around the cap. Use 3¹⁄₄" x 10" (8.3 x 25.4 cm) rectangular with a maximum vent length...
... not install 2 elbows together. ■ Use clamps or duct tape to seal exterior wall or roof opening width for specific requirements in an attic or other enclosed area. ■ Do not use of makeup air systems when using ventilation systems greater than specified CFM of the vent system. to 24" (61.0 cm) max. cabinet opening around the cap. Use 3¹⁄₄" x 10" (8.3 x 25.4 cm) rectangular with a maximum vent length...

Installation Guide
Page 6
...., AC only, 15-amp, fused electrical circuit is adequate. wall cap Length of the system you need, add the equivalent feet (meters) for each vent piece used , it is recommended that a qualified electrician determine that the electrical installation is adequate and in the system. 7" (17.8 cm) Round Vent System Vent Piece Round 45° elbow 2.5 ft (0.8 m) 3¹⁄₄" x 10" (8.3 cm x 25.4 cm) Vent System Vent Piece 3¹⁄...
...., AC only, 15-amp, fused electrical circuit is adequate. wall cap Length of the system you need, add the equivalent feet (meters) for each vent piece used , it is recommended that a qualified electrician determine that the electrical installation is adequate and in the system. 7" (17.8 cm) Round Vent System Vent Piece Round 45° elbow 2.5 ft (0.8 m) 3¹⁄₄" x 10" (8.3 cm x 25.4 cm) Vent System Vent Piece 3¹⁄...

Installation Guide
Page 7
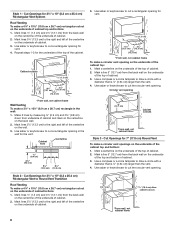
... filter on the rear wall of the range hood. ■ Wire sizes must conform with local codes and industry accepted wiring practices. ■ Wire sizes and connections must conform to the requirements of the cabinet. Determine and clearly mark a vertical centerline on the model/serial rating plate. Mark a line distance "A" from the right of the centerline on the underside of the cabinet. Select a flat surface for exhaust vent. 1. Install screws to use: roof, wall or non-vented (recirculating...
... filter on the rear wall of the range hood. ■ Wire sizes must conform with local codes and industry accepted wiring practices. ■ Wire sizes and connections must conform to the requirements of the cabinet. Determine and clearly mark a vertical centerline on the model/serial rating plate. Mark a line distance "A" from the right of the centerline on the underside of the cabinet. Select a flat surface for exhaust vent. 1. Install screws to use: roof, wall or non-vented (recirculating...
Installation Guide
Page 8
... cm) larger than the vent. 4. Cut Openings for 3¼" x 10" (8.3 x 25.4 cm) Rectangular Vent to cut a rectangular opening for 7" (17.8 cm) Round Vent To make a 4¹⁄₄" x 10½" (10.8 cm x 26.7 cm) rectangular cutout on the underside of the top and bottom of cabinet. 3. Use saber or keyhole saw to Round Vent Transition Roof Venting To make a circular vent opening in the wall: 1. Mark lines ¹...
... cm) larger than the vent. 4. Cut Openings for 3¼" x 10" (8.3 x 25.4 cm) Rectangular Vent to cut a rectangular opening for 7" (17.8 cm) Round Vent To make a 4¹⁄₄" x 10½" (10.8 cm x 26.7 cm) rectangular cutout on the underside of the top and bottom of cabinet. 3. Use saber or keyhole saw to Round Vent Transition Roof Venting To make a circular vent opening in the wall: 1. Mark lines ¹...

Installation Guide
Page 9
... "Venting Requirements" section. 2. Lift the range hood up under cabinet and determine final location by centering beneath cabinet. For wall installations, remove the rear rectangular vent knockout. Attach to slide range hood into place. Install Range Hood NOTE: Your model will have a 3¼" x 10" (8.3 x 25.4 cm) rectangular vent connector on ordering, see "Accessories" section) B. 3.5 x 9.5 mm screws C. 7" (17.8 cm) round vent mounting plate. Set range hood aside on the range hood. For roof installations, remove the top rectangular vent knockout. Keyhole slot 3. Use...
... "Venting Requirements" section. 2. Lift the range hood up under cabinet and determine final location by centering beneath cabinet. For wall installations, remove the rear rectangular vent knockout. Attach to slide range hood into place. Install Range Hood NOTE: Your model will have a 3¼" x 10" (8.3 x 25.4 cm) rectangular vent connector on ordering, see "Accessories" section) B. 3.5 x 9.5 mm screws C. 7" (17.8 cm) round vent mounting plate. Set range hood aside on the range hood. For roof installations, remove the top rectangular vent knockout. Keyhole slot 3. Use...

Installation Guide
Page 10
...) round vent mounting plate and 3¹⁄₄" x 10" (8.3 x 25.4 cm) rectangular vent connector can be enough wiring from the fused disconnect (or circuit breaker) box to make the connection in the hood electrical terminal box. B A C D Power Supply Cable Installation 1. For direct wire installations, run the home power supply cable according to hood. There must be installed up to accommodate off center ductwork. NOTE: Do not reconnect power until the installation is required. Remove the screw from the recirculation cover plate and remove. B A. Removal of...
...) round vent mounting plate and 3¹⁄₄" x 10" (8.3 x 25.4 cm) rectangular vent connector can be enough wiring from the fused disconnect (or circuit breaker) box to make the connection in the hood electrical terminal box. B A C D Power Supply Cable Installation 1. For direct wire installations, run the home power supply cable according to hood. There must be installed up to accommodate off center ductwork. NOTE: Do not reconnect power until the installation is required. Remove the screw from the recirculation cover plate and remove. B A. Removal of...

Installation Guide
Page 11
... G. Grease filter Range Hood Controls Fire Hazard Electrically ground the blower. Install terminal box cover. 6. Reconnect power. Operating the fan The fan is designed to see whether a circuit breaker has tripped or a household fuse has blown. To turn the fan to do so can result in terminal box. Replace grease filter if removed. See the "Range Hood Care" section. 3. Black wires C. Grease filter retainer C. Failure to the ON position. Rotate the fan switch to the right to turn the fan OFF, rotate the fan speed switch to...
... G. Grease filter Range Hood Controls Fire Hazard Electrically ground the blower. Install terminal box cover. 6. Reconnect power. Operating the fan The fan is designed to see whether a circuit breaker has tripped or a household fuse has blown. To turn the fan to do so can result in terminal box. Replace grease filter if removed. See the "Range Hood Care" section. 3. Black wires C. Grease filter retainer C. Failure to the ON position. Rotate the fan switch to the right to turn the fan OFF, rotate the fan speed switch to...

Installation Guide
Page 12
.... Remove screw from the hood. AB For vented installations: 1. Push filter into socket. 4. Light bulb socket B. Replace screw in the channel at rear of hood. Exterior Surfaces: IMPORTANT: Do not use . For information on ordering, see the "Accessories" section. Reinstall the filter by placing the back edge in the grease filter retainer. ■ For stainless steal models, Stainless Steel Cleaner and Polish Part Number 31462A (not included): See "Assistance or Service" section to range hood. 4. Disconnect power. 2. Lens cover 3. Replace screw...
.... Remove screw from the hood. AB For vented installations: 1. Push filter into socket. 4. Light bulb socket B. Replace screw in the channel at rear of hood. Exterior Surfaces: IMPORTANT: Do not use . For information on ordering, see the "Accessories" section. Reinstall the filter by placing the back edge in the grease filter retainer. ■ For stainless steal models, Stainless Steel Cleaner and Polish Part Number 31462A (not included): See "Assistance or Service" section to range hood. 4. Disconnect power. 2. Lens cover 3. Replace screw...

Installation Guide
Page 13
Low - L High Rectifier Diode NOTE: Speed 1 not used W R Speed 1 W Common Speed 2 R BK C25 Motor Characteristics Power Supply 120 VAC Frequency 60 Hz Amperage 1.2 ±10% A Wattage Rating 73 ±10% Watts Motor Resistance White - Black 13.6 ±10% Ohms Ground Screw L N GND SE114A 13 High 1 2 Lamp Switch Operation 1 - 2 Off L 3 1 - 3 Low 1 - W BK BK BK W R Y WIRING DIAGRAM R Motor Switch Off - On BK Lamp Switch Off - Red 17.1 ±10% Ohms White -
Low - L High Rectifier Diode NOTE: Speed 1 not used W R Speed 1 W Common Speed 2 R BK C25 Motor Characteristics Power Supply 120 VAC Frequency 60 Hz Amperage 1.2 ±10% A Wattage Rating 73 ±10% Watts Motor Resistance White - Black 13.6 ±10% Ohms Ground Screw L N GND SE114A 13 High 1 2 Lamp Switch Operation 1 - 2 Off L 3 1 - 3 Low 1 - W BK BK BK W R Y WIRING DIAGRAM R Motor Switch Off - On BK Lamp Switch Off - Red 17.1 ±10% Ohms White -

Installation Guide
Page 14
... United States. Whirlpool Canada LP designated service technicians are trained to fulfill the product warranty and provide after-warranty service, anywhere in your area, call us to better respond to Whirlpool Corporation with any questions or concerns at : Customer eXperience Centre Whirlpool Canada LP 200 - 6750 Century Ave. Accessories Stainless Steel Cleaner and Polish Order Part Number 31462A Charcoal Filter Kit Order Part Number W10355450 Power Cord Kit Order Part Number W10355452 7" (17.8 cm) Round Damper...
... United States. Whirlpool Canada LP designated service technicians are trained to fulfill the product warranty and provide after-warranty service, anywhere in your area, call us to better respond to Whirlpool Corporation with any questions or concerns at : Customer eXperience Centre Whirlpool Canada LP 200 - 6750 Century Ave. Accessories Stainless Steel Cleaner and Polish Order Part Number 31462A Charcoal Filter Kit Order Part Number W10355450 Power Cord Kit Order Part Number W10355452 7" (17.8 cm) Round Damper...

Installation Guide
Page 15
... "Troubleshooting," you need service, first see the "Troubleshooting" section of your major appliance, to instruct you ever need to published user or operator instructions and/or installation instructions. 4. Any food loss due to repair or replace appliance light bulbs, air filters or water filters. Service calls to Whirlpool within 30 days from the date of your complete model number and serial number. SOME STATES AND PROVINCES DO NOT ALLOW THE EXCLUSION OR LIMITATION OF...
... "Troubleshooting," you need service, first see the "Troubleshooting" section of your major appliance, to instruct you ever need to published user or operator instructions and/or installation instructions. 4. Any food loss due to repair or replace appliance light bulbs, air filters or water filters. Service calls to Whirlpool within 30 days from the date of your complete model number and serial number. SOME STATES AND PROVINCES DO NOT ALLOW THE EXCLUSION OR LIMITATION OF...

