

Use & Care Guide
Page 2
... very important. This symbol alerts you to reduce the chance of others . TABLE OF CONTENTS RANGE HOOD SAFETY 2 INSTALLATION REQUIREMENTS 4 Tools and Parts 4 Location Requirements 4 Venting Requirements 5 Electrical Requirements 6 INSTALLATION INSTRUCTIONS 7 Prepare Location 7 Install Range Hood 9 Make Electrical Connection 11 Complete Installation 11 RANGE HOOD USE 12 Range Hood Controls 12 RANGE HOOD CARE 12 Cleaning 12 WIRING DIAGRAM 14 ASSISTANCE OR SERVICE 15 In the U.S.A 15 In Canada 15 Accessories 15 WARRANTY 16 TABLE DES MATIÈRES SÉCURITÉ DE LA...
... very important. This symbol alerts you to reduce the chance of others . TABLE OF CONTENTS RANGE HOOD SAFETY 2 INSTALLATION REQUIREMENTS 4 Tools and Parts 4 Location Requirements 4 Venting Requirements 5 Electrical Requirements 6 INSTALLATION INSTRUCTIONS 7 Prepare Location 7 Install Range Hood 9 Make Electrical Connection 11 Complete Installation 11 RANGE HOOD USE 12 Range Hood Controls 12 RANGE HOOD CARE 12 Cleaning 12 WIRING DIAGRAM 14 ASSISTANCE OR SERVICE 15 In the U.S.A 15 In Canada 15 Accessories 15 WARRANTY 16 TABLE DES MATIÈRES SÉCURITÉ DE LA...

Use & Care Guide
Page 3
... prevent backdrafting. The fire department is needed for examination and/or repair. ■ Sufficient air is being switched on low or medium settings. ■ Always turn off at high settings. Discard fan or return to an authorized service facility for proper combustion and exhausting of gases through the flue (chimney) of the surface element. Crepes Suzette, Cherries Jubilee, Peppercorn Beef Flambé). ■ Clean ventilating fans frequently...
... prevent backdrafting. The fire department is needed for examination and/or repair. ■ Sufficient air is being switched on low or medium settings. ■ Always turn off at high settings. Discard fan or return to an authorized service facility for proper combustion and exhausting of gases through the flue (chimney) of the surface element. Crepes Suzette, Cherries Jubilee, Peppercorn Beef Flambé). ■ Clean ventilating fans frequently...

Use & Care Guide
Page 4
... and nuts (to comply with local codes. Given dimensions provide minimum clearance. See the "Accessories" section to match vent system ■ 3 - INSTALLATION REQUIREMENTS Tools and Parts Gather the required tools and parts before making any tools listed here. Tools needed ■ Wall or roof cap with any cutouts. ■ Grounded electrical outlet is the installer's responsibility to attach filler strips). Consult the cooktop/range manufacturer installation instructions before starting installation. Check that are included. ■...
... and nuts (to comply with local codes. Given dimensions provide minimum clearance. See the "Accessories" section to match vent system ■ 3 - INSTALLATION REQUIREMENTS Tools and Parts Gather the required tools and parts before making any tools listed here. Tools needed ■ Wall or roof cap with any cutouts. ■ Grounded electrical outlet is the installer's responsibility to attach filler strips). Consult the cooktop/range manufacturer installation instructions before starting installation. Check that are included. ■...

Use & Care Guide
Page 5
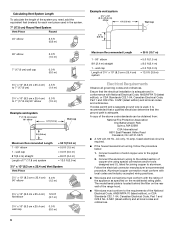
Consult your HVAC professional for specific requirements in your installation requirement. Roof Venting Wall Venting B A A B A. 18" (45.7 cm) min. If roof or wall cap has a damper, do not use damper supplied with a maximum length of range hood to provide efficient performance. Wall cap with damper (purchased separately) C. 24" (61.0 cm) min. Venting Methods Vent system can terminate either through the roof (purchased separately). Flexible vent creates both back pressure and air turbulence that greatly reduce performance. bottom...
Consult your HVAC professional for specific requirements in your installation requirement. Roof Venting Wall Venting B A A B A. 18" (45.7 cm) min. If roof or wall cap has a damper, do not use damper supplied with a maximum length of range hood to provide efficient performance. Wall cap with damper (purchased separately) C. 24" (61.0 cm) min. Venting Methods Vent system can terminate either through the roof (purchased separately). Flexible vent creates both back pressure and air turbulence that greatly reduce performance. bottom...
Use & Care Guide
Page 6
... codes and ordinances. wall cap Length of the system you need, add the equivalent feet (meters) for each vent piece used , it is recommended that a qualified electrician determine that the electrical installation is required. ■ If the house has aluminum wiring, follow the procedure below: 1. If codes permit and a separate ground wire is used in conformance with the rating of copper wire using special connectors and/or tools designed...
... codes and ordinances. wall cap Length of the system you need, add the equivalent feet (meters) for each vent piece used , it is recommended that a qualified electrician determine that the electrical installation is required. ■ If the house has aluminum wiring, follow the procedure below: 1. If codes permit and a separate ground wire is used in conformance with the rating of copper wire using special connectors and/or tools designed...

Use & Care Guide
Page 7
... the cabinet. Determine Wiring Hole Location Cut only one 1¹⁄₄" (3.2 cm) diameter wiring access hole. If cabinet has recessed bottom, add wood filler strips on your model, determine which venting method to attach filler strips in the area the vent opening for exhaust vent. 1. Depending on each side. Place covering over that is 2.2 cm) from the underside of cabinet. 3. Install screws to use: roof, wall or non-vented (recirculating...
... the cabinet. Determine Wiring Hole Location Cut only one 1¹⁄₄" (3.2 cm) diameter wiring access hole. If cabinet has recessed bottom, add wood filler strips on your model, determine which venting method to attach filler strips in the area the vent opening for exhaust vent. 1. Depending on each side. Place covering over that is 2.2 cm) from the underside of cabinet. 3. Install screws to use: roof, wall or non-vented (recirculating...

Use & Care Guide
Page 9
...) round vent mounting plate is also available as shown. For information on your installation requirements. 2. Top rectangular vent knockout C. For roof installations, remove the top rectangular vent knockout. Drill pilot hole 6. Remove metal grease filter. Leave about ¹⁄₄" (6.4 cm) space between screw heads and cabinet to range hood with the 3.5 x 5 mm screws provided and remove tape from the rear channel. NOTE: Your model will have a 3¼" x 10" (8.3 x 25.4 cm) rectangular vent damper...
...) round vent mounting plate is also available as shown. For information on your installation requirements. 2. Top rectangular vent knockout C. For roof installations, remove the top rectangular vent knockout. Drill pilot hole 6. Remove metal grease filter. Leave about ¹⁄₄" (6.4 cm) space between screw heads and cabinet to range hood with the 3.5 x 5 mm screws provided and remove tape from the rear channel. NOTE: Your model will have a 3¼" x 10" (8.3 x 25.4 cm) rectangular vent damper...
Use & Care Guide
Page 10
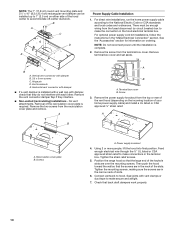
B A C D E Power Supply Cable Installation 1. For optional power supply cord kit installations, follow the instructions in the neck of the slots. Remove terminal box cover and set aside. Remove the vent connector damper flap if they do not interfere with damper ■ If a vent damper is complete. 2. Screw 3. Remove the power supply knockout from the recirculation cover plate and remove. Connect ventwork to the National Electric Code or CSA standards and local codes and ordinances. NOTE: The 7" (17.8 cm) round vent mounting plate and 3¹⁄...
B A C D E Power Supply Cable Installation 1. For optional power supply cord kit installations, follow the instructions in the neck of the slots. Remove terminal box cover and set aside. Remove the vent connector damper flap if they do not interfere with damper ■ If a vent damper is complete. 2. Screw 3. Remove the power supply knockout from the recirculation cover plate and remove. Connect ventwork to the National Electric Code or CSA standards and local codes and ordinances. NOTE: The 7" (17.8 cm) round vent mounting plate and 3¹⁄...

Use & Care Guide
Page 11
...ground screw in terminal box. Connect ground wire to see whether a circuit breaker has tripped or a household fuse has blown. Black wires C. Use UL listed wire connectors and connect white wires (A) together. Install terminal box cover. 6. Disconnect power and check wiring connections. Home power supply cable or power cord accessory kit F. Fire Hazard Electrically ground the blower. b. Check the operation of the range hood fan and light. Release the panel so the tabs lock the panel in death, fire, or electrical shock. 4. Replace all parts and panels before servicing...
...ground screw in terminal box. Connect ground wire to see whether a circuit breaker has tripped or a household fuse has blown. Black wires C. Use UL listed wire connectors and connect white wires (A) together. Install terminal box cover. 6. Disconnect power and check wiring connections. Home power supply cable or power cord accessory kit F. Fire Hazard Electrically ground the blower. b. Check the operation of the range hood fan and light. Release the panel so the tabs lock the panel in death, fire, or electrical shock. 4. Replace all parts and panels before servicing...

Use & Care Guide
Page 12
... hood controls are located on and control the blower speed and sound level for Off. Blower off . Grease filter 3. For non-vented (recirculating) installations: The charcoal filter is not washable. Replace grease filter before cooking and allow it to operate several minutes after the cooking is complete to the following instructions. Blower speed maximum button Operating the light The On/Off light button controls both lights. Operating the blower The BLOWER SPEED buttons turn the blower off and speed minimum button C. Screw B. Grease filter retainer C. Halogen lights...
... hood controls are located on and control the blower speed and sound level for Off. Blower off . Grease filter 3. For non-vented (recirculating) installations: The charcoal filter is not washable. Replace grease filter before cooking and allow it to operate several minutes after the cooking is complete to the following instructions. Blower speed maximum button Operating the light The On/Off light button controls both lights. Operating the blower The BLOWER SPEED buttons turn the blower off and speed minimum button C. Screw B. Grease filter retainer C. Halogen lights...

Use & Care Guide
Page 13
... the channel at the rear of the filter up on the long edge of the filter is to secure the filter. 4. Remove the lamp and replace it into place. 3. Pull the filter retainer toward the front of the new lamp, do not operate, make sure the lamps are inserted correctly before calling service. 1. Replacing the Halogen Lamp Turn off the range hood and allow the halogen lamp to handle lamp. Push up into...
... the channel at the rear of the filter up on the long edge of the filter is to secure the filter. 4. Remove the lamp and replace it into place. 3. Pull the filter retainer toward the front of the new lamp, do not operate, make sure the lamps are inserted correctly before calling service. 1. Replacing the Halogen Lamp Turn off the range hood and allow the halogen lamp to handle lamp. Push up into...

Use & Care Guide
Page 15
... after-warranty service, anywhere in the United States. Accessories Stainless Steel Cleaner and Polish Order Part Number 31462A Charcoal Filter Kit Order Part Number W10386873 Power Cord Kit Order Part Number W10355452 7" (17.8 cm) Round Damper Order Part Number W10355451 7" (17.8 cm) Round Vent Mounting Plate Order Part Number W10388168 15 To locate factory specified replacement parts in your nearest designated service center. In the U.S.A. For further assistance If you need further assistance, you can write to Whirlpool Canada LP with : ■ Features and specifications...
... after-warranty service, anywhere in the United States. Accessories Stainless Steel Cleaner and Polish Order Part Number 31462A Charcoal Filter Kit Order Part Number W10386873 Power Cord Kit Order Part Number W10355452 7" (17.8 cm) Round Damper Order Part Number W10355451 7" (17.8 cm) Round Vent Mounting Plate Order Part Number W10388168 15 To locate factory specified replacement parts in your nearest designated service center. In the U.S.A. For further assistance If you need further assistance, you can write to Whirlpool Canada LP with : ■ Features and specifications...

Use & Care Guide
Page 16
...-family household use of consumables or cleaning products not approved by a Whirlpool designated service company. Any food loss due to the appliance. 9. Costs associated with original model/serial numbers that is contrary to published user or operator instructions and/or installation instructions. 4. Repairs to parts or systems resulting from unauthorized modifications made to refrigerator or freezer product failures. 7. Major appliances with the removal from your...
...-family household use of consumables or cleaning products not approved by a Whirlpool designated service company. Any food loss due to the appliance. 9. Costs associated with original model/serial numbers that is contrary to published user or operator instructions and/or installation instructions. 4. Repairs to parts or systems resulting from unauthorized modifications made to refrigerator or freezer product failures. 7. Major appliances with the removal from your...

Installation Guide
Page 3
...é). ■ Clean ventilating fans frequently. Grease should not be sure to duct air outside - If the flames do not vent exhaust air into spaces within walls or ceilings, attics or into wall or ceiling; READ AND SAVE THESE INSTRUCTIONS 3 Follow the heating equipment manufacturer's guideline and safety standards such as a tag, to the service panel. ■ Installation work and electrical wiring must always be burned. ■ DO NOT USE WATER, including...
...é). ■ Clean ventilating fans frequently. Grease should not be sure to duct air outside - If the flames do not vent exhaust air into spaces within walls or ceilings, attics or into wall or ceiling; READ AND SAVE THESE INSTRUCTIONS 3 Follow the heating equipment manufacturer's guideline and safety standards such as a tag, to the service panel. ■ Installation work and electrical wiring must always be burned. ■ DO NOT USE WATER, including...

Installation Guide
Page 4
... be used. Tools needed ■ Wall or roof cap with damper to comply with installation clearances specified on the model/serial rating plate. For information on ordering, see the "Accessories" section. ■ 7" (17.8 cm) round vent mounting plate. For 3¹⁄₄" x 10" (8.3 x 25.4 cm) rectangular vented installations: ■ 3¹⁄₄" x 10" (8.3 x 25.4 cm) rectangular metal vent system For non-vented (recirculation) installations: ■ Charcoal filter kit. Location Requirements IMPORTANT: Observe all parts are included. ■ 2 - 3.5 x 5 mm screws...
... be used. Tools needed ■ Wall or roof cap with damper to comply with installation clearances specified on the model/serial rating plate. For information on ordering, see the "Accessories" section. ■ 7" (17.8 cm) round vent mounting plate. For 3¹⁄₄" x 10" (8.3 x 25.4 cm) rectangular vented installations: ■ 3¹⁄₄" x 10" (8.3 x 25.4 cm) rectangular metal vent system For non-vented (recirculation) installations: ■ Charcoal filter kit. Location Requirements IMPORTANT: Observe all parts are included. ■ 2 - 3.5 x 5 mm screws...

Installation Guide
Page 10
.... Remove the power supply knockout from the terminal box cover. Screws A. Power supply knockout 4. Feed enough electrical wire through the ½" UL listed or CSA approved strain relief to make connections in the hood electrical terminal box. Then push the hood toward the wall so that back draft dampers work properly. 10 For direct wire installations, run the home power supply cable according to hood. No vent attachments. Screw 3. NOTE: Do not reconnect power until the installation is required. A B A. Recirculation cover plate B. Using 2 or...
.... Remove the power supply knockout from the terminal box cover. Screws A. Power supply knockout 4. Feed enough electrical wire through the ½" UL listed or CSA approved strain relief to make connections in the hood electrical terminal box. Then push the hood toward the wall so that back draft dampers work properly. 10 For direct wire installations, run the home power supply cable according to hood. No vent attachments. Screw 3. NOTE: Do not reconnect power until the installation is required. A B A. Recirculation cover plate B. Using 2 or...

Installation Guide
Page 12
...steel wool, gritty washcloths or paper towels. On/Off light button B. Grease filter C. Screw B. Grease filter 3. For vented installations: Wash metal filters as needed in direction of old charcoal filter. 12 For non-vented (recirculating) installations: The charcoal filter is complete to clear all -purpose cleaner: Rinse with clean water and dry with charcoal filters. Metal or Charcoal Filter To Clean the Filter: 1. Replace grease filter before cooking and allow it to operate several minutes after the cooking is not washable. Blower speed medium button D. RANGE HOOD...
...steel wool, gritty washcloths or paper towels. On/Off light button B. Grease filter C. Screw B. Grease filter 3. For vented installations: Wash metal filters as needed in direction of old charcoal filter. 12 For non-vented (recirculating) installations: The charcoal filter is complete to clear all -purpose cleaner: Rinse with clean water and dry with charcoal filters. Metal or Charcoal Filter To Clean the Filter: 1. Replace grease filter before cooking and allow it to operate several minutes after the cooking is not washable. Blower speed medium button D. RANGE HOOD...

Installation Guide
Page 13
... up into place. 3. Remove the lamp and replace it clockwise to secure the filter. 4. Replacing the Halogen Lamp Turn off the range hood and allow the halogen lamp to handle lamp. To avoid damage or decreasing the life of the new lamp, do not operate, make sure the lamps are inserted correctly before calling service. 1. Turn it with a 120-volt, 50-watt maximum halogen lamp with bare fingers. Replace the screw into place to...
... up into place. 3. Remove the lamp and replace it clockwise to secure the filter. 4. Replacing the Halogen Lamp Turn off the range hood and allow the halogen lamp to handle lamp. To avoid damage or decreasing the life of the new lamp, do not operate, make sure the lamps are inserted correctly before calling service. 1. Turn it with a 120-volt, 50-watt maximum halogen lamp with bare fingers. Replace the screw into place to...

Installation Guide
Page 16
... Use & Care Guide. Service calls to correct the installation of your major appliance. After checking "Troubleshooting," you on the product. Dealer name Address Phone number Model number Serial number Purchase date 16 WHIRLPOOL CORPORATION MAJOR APPLIANCE WARRANTY LIMITED WARRANTY For one year from the date of purchase, when this major appliance is contrary to published user or operator instructions and/or installation instructions. 4. This limited warranty is valid only in the United...
... Use & Care Guide. Service calls to correct the installation of your major appliance. After checking "Troubleshooting," you on the product. Dealer name Address Phone number Model number Serial number Purchase date 16 WHIRLPOOL CORPORATION MAJOR APPLIANCE WARRANTY LIMITED WARRANTY For one year from the date of purchase, when this major appliance is contrary to published user or operator instructions and/or installation instructions. 4. This limited warranty is valid only in the United...

Warranty Information
Page 1
... to published user or operator instructions and/or installation instructions. 4. Major appliances with the product, Whirlpool Corporation or Whirlpool Canada LP (hereafter "Whirlpool") will need service, first see the "Troubleshooting" section of the Use & Care Guide. If outside the 50 United States and Canada, contact your major appliance for in accordance with published installation instructions. 11. Dealer name Address Phone number Model number Serial number Purchase date 16 IMPLIED WARRANTIES, INCLUDING WARRANTIES OF MERCHANTABILITY...
... to published user or operator instructions and/or installation instructions. 4. Major appliances with the product, Whirlpool Corporation or Whirlpool Canada LP (hereafter "Whirlpool") will need service, first see the "Troubleshooting" section of the Use & Care Guide. If outside the 50 United States and Canada, contact your major appliance for in accordance with published installation instructions. 11. Dealer name Address Phone number Model number Serial number Purchase date 16 IMPLIED WARRANTIES, INCLUDING WARRANTIES OF MERCHANTABILITY...


