
Installation Guide
Page 3
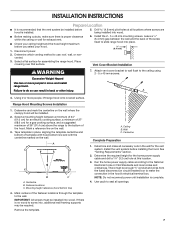
... vent exhaust air into spaces within walls or ceilings, attics or into wall or ceiling; you may ignite. aBased on low or medium settings. ■ Always turn off at high settings. BE CAREFUL TO PREVENT BURNS. WARNING: TO REDUCE THE RISK OF A RANGE TOP GREASE FIRE: ■ Never leave surface units unattended at service panel and lock the service disconnecting means to duct air outside - Grease should not be sure to prevent power...
... vent exhaust air into spaces within walls or ceilings, attics or into wall or ceiling; you may ignite. aBased on low or medium settings. ■ Always turn off at high settings. BE CAREFUL TO PREVENT BURNS. WARNING: TO REDUCE THE RISK OF A RANGE TOP GREASE FIRE: ■ Never leave surface units unattended at service panel and lock the service disconnecting means to duct air outside - Grease should not be sure to prevent power...

Installation Guide
Page 4
... mounting screws Location Requirements IMPORTANT: Observe all parts are registered trademarks of this range hood must be used. For non-vented (recirculating) installation see "For nonvented (recirculating) installation only" in ceiling and wall where canopy hood will also need: ■ Recirculation Kit Part Number W10294733 for venting through the roof or wall. Cabinet opening dimensions that all governing codes and ordinances. The model/serial rating plate is available from packages. Recirculation Kit Part Number W10294733 is located behind the left filter on the model...
... mounting screws Location Requirements IMPORTANT: Observe all parts are registered trademarks of this range hood must be used. For non-vented (recirculating) installation see "For nonvented (recirculating) installation only" in ceiling and wall where canopy hood will also need: ■ Recirculation Kit Part Number W10294733 for venting through the roof or wall. Cabinet opening dimensions that all governing codes and ordinances. The model/serial rating plate is available from packages. Recirculation Kit Part Number W10294733 is located behind the left filter on the model...
Installation Guide
Page 5
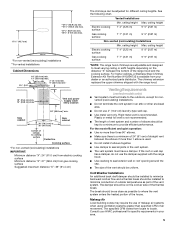
ceiling height Electric cooking surface 7' 4" (2.23 m) 9' 5" (2.87 m) Gas cooking surface 7' 7" (2.31 m) 9' 5" (2.87 m) Non-vented (recirculating) Installations Min. The chimney extension replaces the upper chimney shipped with the range hood. ■ Use caulking to seal exterior wall or roof opening around the cap. ■ The size of the vent should be on the distance "X" between the elbows if more than 1 elbow is not recommended. ■ The length of vent system and number of elbows should be as close as part of the...
ceiling height Electric cooking surface 7' 4" (2.23 m) 9' 5" (2.87 m) Gas cooking surface 7' 7" (2.31 m) 9' 5" (2.87 m) Non-vented (recirculating) Installations Min. The chimney extension replaces the upper chimney shipped with the range hood. ■ Use caulking to seal exterior wall or roof opening around the cap. ■ The size of the vent should be on the distance "X" between the elbows if more than 1 elbow is not recommended. ■ The length of vent system and number of elbows should be as close as part of the...

Installation Guide
Page 6
... installed immediately above code standards can terminate either through the roof or wall. Example vent system 90 elbow 6 ft (1.8 m) Wall cap 2 ft (0.6 m) The following example falls within the maximum recommended vent length of system = 13.0 ft (3.9 m) Electrical Requirements Observe all local codes and ordinances. If codes permit and a separate ground wire is used, it is not possible to vent cooking fumes and vapors to the requirements of the range hood. ■ Wire sizes...
... installed immediately above code standards can terminate either through the roof or wall. Example vent system 90 elbow 6 ft (1.8 m) Wall cap 2 ft (0.6 m) The following example falls within the maximum recommended vent length of system = 13.0 ft (3.9 m) Electrical Requirements Observe all local codes and ordinances. If codes permit and a separate ground wire is used, it is not possible to vent cooking fumes and vapors to the requirements of the range hood. ■ Wire sizes...
Installation Guide
Page 7
... to use: roof, wall, or nonvented. 3. A 4. Centerline B. Determine the required height for assembling the range hood. Ceiling B. B C A. Determine and make the connection in the wall for the vent system. Mark a reference line on the wall where the canopy hood will be enough ½" conduit and wires from the fused disconnect (or circuit breaker) box to seal all necessary cuts in the hood's electrical terminal box. Determine and mark the centerline on the wall. 3. IMPORTANT: All screws...
... to use: roof, wall, or nonvented. 3. A 4. Centerline B. Determine the required height for assembling the range hood. Ceiling B. B C A. Determine and make the connection in the wall for the vent system. Mark a reference line on the wall where the canopy hood will be enough ½" conduit and wires from the fused disconnect (or circuit breaker) box to seal all necessary cuts in the hood's electrical terminal box. Determine and mark the centerline on the wall. 3. IMPORTANT: All screws...
Installation Guide
Page 8
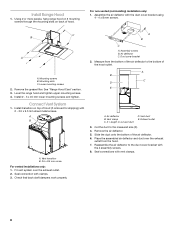
... mounting screws 2. Level the range hood and tighten upper mounting screws. 4. Connect Vent System 1. Assembly screws B. Vent clamp C. Exhaust outlet 3. Place the assembled air deflector and duct over the exhaust outlet. 2. Remove the grease filter. A B C A. Duct cover bracket 2. X = length to the measured size (X). 4. Slide the duct onto the bottom of the hood outlet. For non-vented (recirculating) installation only: 1. A B A. Measure from the hood. 7. Remove the air deflector. 5. Seal connections with clamps. 3. Mounting screws B. See "Range Hood Care...
... mounting screws 2. Level the range hood and tighten upper mounting screws. 4. Connect Vent System 1. Assembly screws B. Vent clamp C. Exhaust outlet 3. Place the assembled air deflector and duct over the exhaust outlet. 2. Remove the grease filter. A B C A. Duct cover bracket 2. X = length to the measured size (X). 4. Slide the duct onto the bottom of the hood outlet. For non-vented (recirculating) installation only: 1. A B A. Measure from the hood. 7. Remove the air deflector. 5. Seal connections with clamps. 3. Mounting screws B. See "Range Hood Care...
Installation Guide
Page 10
...and control the blower speed and sound level for Off. Glass canopy E. Lamp cover G. Complete Installation 1. See the "Range Hood Care" section. 2. H Operating the blower GF E A. Duct cover holes B. NOTE: To get the most efficient use from the kitchen. Range Hood Controls A B C D E A. For non-vented (recirculating) installations only, install charcoal filters over metal grease filter. Blower speed maximum button C Operating the light The On/Off light button controls both lights. Grease filter release handle The Blower Speed buttons turn the...
...and control the blower speed and sound level for Off. Glass canopy E. Lamp cover G. Complete Installation 1. See the "Range Hood Care" section. 2. H Operating the blower GF E A. Duct cover holes B. NOTE: To get the most efficient use from the kitchen. Range Hood Controls A B C D E A. For non-vented (recirculating) installations only, install charcoal filters over metal grease filter. Blower speed maximum button C Operating the light The On/Off light button controls both lights. Grease filter release handle The Blower Speed buttons turn the...

Installation Guide
Page 11
... handle to 6 months with clean water and wipe dry. 5. Remove metal grease filter from metal grease filter. 3. Reconnect power. 11 Always wipe dry to cool. Replace metal grease filter. A Turn off the range hood and allow the lamp to avoid water marks. Wash metal filters as needed in this section. 2. Remove lamp cover and set lamp cover and the screw aside. 4. Remove bulb and replace with Charcoal Filter Kit Number W10412939. To replace charcoal filter: 1. Replace lamp cover and reinstall screw. 6. See "Metal Grease Filter" in dishwasher or hot...
... handle to 6 months with clean water and wipe dry. 5. Remove metal grease filter from metal grease filter. 3. Reconnect power. 11 Always wipe dry to cool. Replace metal grease filter. A Turn off the range hood and allow the lamp to avoid water marks. Wash metal filters as needed in this section. 2. Remove lamp cover and set lamp cover and the screw aside. 4. Remove bulb and replace with Charcoal Filter Kit Number W10412939. To replace charcoal filter: 1. Replace lamp cover and reinstall screw. 6. See "Metal Grease Filter" in dishwasher or hot...

Installation Guide
Page 13
.... In the U.S.A. Accessories Recirculation Kit (for non-vented installations only) Order Part Number W10294733 Charcoal Filter Kit (for assistance or service, please know the purchase date and the complete model and serial number of your nearest designated service center. Our consultants provide assistance with : ■ Features and specifications on our full line of appliances. ■ Installation information. ■ Use and maintenance procedures. ■ Accessory and repair parts sales. ■ Specialized customer assistance (Spanish...
.... In the U.S.A. Accessories Recirculation Kit (for non-vented installations only) Order Part Number W10294733 Charcoal Filter Kit (for assistance or service, please know the purchase date and the complete model and serial number of your nearest designated service center. Our consultants provide assistance with : ■ Features and specifications on our full line of appliances. ■ Installation information. ■ Use and maintenance procedures. ■ Accessory and repair parts sales. ■ Specialized customer assistance (Spanish...

Installation Guide
Page 14
... Phone number Model number Serial number Purchase date 14 Any food loss due to repair or replace appliance light bulbs, air filters or water filters. ITEMS EXCLUDED FROM WARRANTY This limited warranty does not cover: 1. This warranty is void if the factory applied serial number has been altered or removed from your authorized Whirlpool dealer to determine if another warranty applies. You will pay for in a remote area where service by the customer. Proof...
... Phone number Model number Serial number Purchase date 14 Any food loss due to repair or replace appliance light bulbs, air filters or water filters. ITEMS EXCLUDED FROM WARRANTY This limited warranty does not cover: 1. This warranty is void if the factory applied serial number has been altered or removed from your authorized Whirlpool dealer to determine if another warranty applies. You will pay for in a remote area where service by the customer. Proof...

Warranty Information
Page 1
... a Whirlpool designated service company. Dealer name Address Phone number Model number Serial number Purchase date 14 This limited warranty is valid only in the United States or Canada and applies only when the major appliance is used in the country in a manner that have been removed, altered or cannot be provided by the customer. Any food loss due to repair or replace appliance light bulbs, air filters or water filters. In...
... a Whirlpool designated service company. Dealer name Address Phone number Model number Serial number Purchase date 14 This limited warranty is valid only in the United States or Canada and applies only when the major appliance is used in the country in a manner that have been removed, altered or cannot be provided by the customer. Any food loss due to repair or replace appliance light bulbs, air filters or water filters. In...

Use & Care Guide
Page 3
... sheet, or metal tray, then turn hood ON when cooking at high settings. Follow the heating equipment manufacturer's guideline and safety standards such as a tag, to the service panel. ■ Installation work and electrical wiring must always be allowed to accumulate on low or medium settings. ■ Always turn off at service panel and lock the service disconnecting means to properly exhaust air, be burned. ■ DO NOT USE WATER...
... sheet, or metal tray, then turn hood ON when cooking at high settings. Follow the heating equipment manufacturer's guideline and safety standards such as a tag, to the service panel. ■ Installation work and electrical wiring must always be allowed to accumulate on low or medium settings. ■ Always turn off at service panel and lock the service disconnecting means to properly exhaust air, be burned. ■ DO NOT USE WATER...

Use & Care Guide
Page 4
... mm wall anchors ■ T10 Torx®† adapter ■ T20®† Torx® adapter Tools needed ■ Level ■ Drill with back draft dampers installed ■ Metal grease filter ■ Vent cover support bracket ■ Mounting template ■ 2-piece vent cover ■ Air deflector (for non-vented [recirculating] installations only) ■ 4 - 4 x 8 screws ■ 6 - 5 x 45 mm mounting screws ■ 2 - 3.5 x 9.5 mm mounting screws Location Requirements IMPORTANT: Observe all parts are included. ■ Hood canopy assembly with blower, light bulb and canopy...
... mm wall anchors ■ T10 Torx®† adapter ■ T20®† Torx® adapter Tools needed ■ Level ■ Drill with back draft dampers installed ■ Metal grease filter ■ Vent cover support bracket ■ Mounting template ■ 2-piece vent cover ■ Air deflector (for non-vented [recirculating] installations only) ■ 4 - 4 x 8 screws ■ 6 - 5 x 45 mm mounting screws ■ 2 - 3.5 x 9.5 mm mounting screws Location Requirements IMPORTANT: Observe all parts are included. ■ Hood canopy assembly with blower, light bulb and canopy...

Use & Care Guide
Page 5
... 36" (91.4 cm) The chimneys can be on the distance "X" between the elbows if more than specified CFM of the range hood and the cooking surface. Makeup Air Local building codes may require the use 4" (10.2 cm) laundry-type wall cap. ■ Use metal vent only. ceiling height Electric cooking surface 7' 4" (2.23 m) 9' 5" (2.87 m) Gas cooking surface 7' 7" (2.31 m) 9' 5" (2.87 m) Non-vented (recirculating) Installations Min. Vented Installations Min. ceiling height Max. Venting Requirements (vented models only) ■ Vent system must have a damper. For the most...
... 36" (91.4 cm) The chimneys can be on the distance "X" between the elbows if more than specified CFM of the range hood and the cooking surface. Makeup Air Local building codes may require the use 4" (10.2 cm) laundry-type wall cap. ■ Use metal vent only. ceiling height Electric cooking surface 7' 4" (2.23 m) 9' 5" (2.87 m) Gas cooking surface 7' 7" (2.31 m) 9' 5" (2.87 m) Non-vented (recirculating) Installations Min. Vented Installations Min. ceiling height Max. Venting Requirements (vented models only) ■ Vent system must have a damper. For the most...

Use & Care Guide
Page 6
... the outside, the hood can terminate either through the top grille. If codes permit and a separate ground wire is used in the system. A 6" (15.2 cm) round vent system is needed . Roof Venting Wall Venting Non-vented (recirculating) A A B B B A A. Deflector B. 6" (15.2 cm) round vent Calculating Vent System Length To calculate the length of copper wire using special connectors and/or tools designed and UL listed for venting through a wall, a 90° elbow is needed for each vent piece used in the non-vented (recirculating) version, fitting a charcoal filter...
... the outside, the hood can terminate either through the top grille. If codes permit and a separate ground wire is used in the system. A 6" (15.2 cm) round vent system is needed . Roof Venting Wall Venting Non-vented (recirculating) A A B B B A A. Deflector B. 6" (15.2 cm) round vent Calculating Vent System Length To calculate the length of copper wire using special connectors and/or tools designed and UL listed for venting through a wall, a 90° elbow is needed for each vent piece used in the non-vented (recirculating) version, fitting a charcoal filter...

Use & Care Guide
Page 7
... Centerline REAR W ALL M OUNTING TEM PLATE HorizontalLine CL ALIGN BOTTOM EDGE W ITH PENCILLINE INDICATING BOTTOM OFTHE HOOD Installation Height B C A. If there is no wood to move and install range hood. Run the home power supply cable according to the ceiling using 2 - 5 x 45 mm screws. A 4. Tape template in the hood's electrical terminal box. Remove the template. Install the vent system before hood is installed. 5. Drill 4.8 mm) pilot holes at this location. 3. Attach vent cover bracket to wall flush...
... Centerline REAR W ALL M OUNTING TEM PLATE HorizontalLine CL ALIGN BOTTOM EDGE W ITH PENCILLINE INDICATING BOTTOM OFTHE HOOD Installation Height B C A. If there is no wood to move and install range hood. Run the home power supply cable according to the ceiling using 2 - 5 x 45 mm screws. A 4. Tape template in the hood's electrical terminal box. Remove the template. Install the vent system before hood is installed. 5. Drill 4.8 mm) pilot holes at this location. 3. Attach vent cover bracket to wall flush...

Use & Care Guide
Page 8
...dampers work properly. Air deflector B. Exhaust outlet 3. Place the assembled air deflector and duct over the exhaust outlet. 2. Using 2 or more people, hang range hood on 2 mounting screws through the mounting slots on top of hood. Cut the duct to the duct cover bracket with vent clamps. 8 For non-vented (recirculating) installation only: 1. Lower mounting screws 2. Air deflector C. Mounting slots C. A B A. Vent clamp C. Remove the grease filter. Seal connection with 2 - 3.5 x 9.5 mm sheet metal screws. Assembly screws B. Vent duct E. Assemble the air deflector...
...dampers work properly. Air deflector B. Exhaust outlet 3. Place the assembled air deflector and duct over the exhaust outlet. 2. Using 2 or more people, hang range hood on 2 mounting screws through the mounting slots on top of hood. Cut the duct to the duct cover bracket with vent clamps. 8 For non-vented (recirculating) installation only: 1. Lower mounting screws 2. Air deflector C. Mounting slots C. A B A. Vent clamp C. Remove the grease filter. Seal connection with 2 - 3.5 x 9.5 mm sheet metal screws. Assembly screws B. Vent duct E. Assemble the air deflector...

Use & Care Guide
Page 10
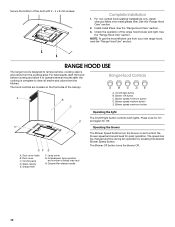
... A. Duct cover C. Incandescent lamp (position and number of the range hood blower and light. For non-vented (recirculating) installations only, install charcoal filters over metal grease filter. See the "Range Hood Use" section. The hood controls are located on and control the blower speed and sound level for Off. Blower Off button C. Press once for On D and again for quiet operation. Grease filter release handle The Blower Speed buttons turn the blower on the front side of the duct with 2 - 4 x 8 mm screws. Install metal filters. Control panel D. Grease filter...
... A. Duct cover C. Incandescent lamp (position and number of the range hood blower and light. For non-vented (recirculating) installations only, install charcoal filters over metal grease filter. See the "Range Hood Use" section. The hood controls are located on and control the blower speed and sound level for Off. Blower Off button C. Press once for On D and again for quiet operation. Grease filter release handle The Blower Speed buttons turn the blower on the front side of the duct with 2 - 4 x 8 mm screws. Install metal filters. Control panel D. Grease filter...
Use & Care Guide
Page 11
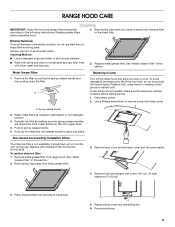
... detergent solution. 3. Replace lamp cover and reinstall screw. 6. To avoid damage or decreasing the life of metal filter. 5. Spring release handle 2. Push in this section. 2. Non-Vented (recirculating) Installation Filters: The charcoal filter is not washable. Remove metal grease filter from metal grease filter. 3. Reconnect power. 11 RANGE HOOD CARE Cleaning IMPORTANT: Clean the hood and grease filters frequently according to cool. Disconnect power. 2. A Turn off the range hood and allow the lamp to the following instructions. Use a Phillips screwdriver to...
... detergent solution. 3. Replace lamp cover and reinstall screw. 6. To avoid damage or decreasing the life of metal filter. 5. Spring release handle 2. Push in this section. 2. Non-Vented (recirculating) Installation Filters: The charcoal filter is not washable. Remove metal grease filter from metal grease filter. 3. Reconnect power. 11 RANGE HOOD CARE Cleaning IMPORTANT: Clean the hood and grease filters frequently according to cool. Disconnect power. 2. A Turn off the range hood and allow the lamp to the following instructions. Use a Phillips screwdriver to...

Use & Care Guide
Page 14
... APPLIANCE WARRANTY LIMITED WARRANTY For one year from the date of purchase, when this major appliance is operated and maintained according to instructions attached to or furnished with original model/serial numbers that is contrary to correct house wiring or plumbing. 2. Service must provide proof of your major appliance, to replace or repair house fuses, or to published user or operator instructions and/or installation instructions. 4. Consumable parts are...
... APPLIANCE WARRANTY LIMITED WARRANTY For one year from the date of purchase, when this major appliance is operated and maintained according to instructions attached to or furnished with original model/serial numbers that is contrary to correct house wiring or plumbing. 2. Service must provide proof of your major appliance, to replace or repair house fuses, or to published user or operator instructions and/or installation instructions. 4. Consumable parts are...

